6.4. Content Management
6.4.1. Support Tables
Administrators can access and see the Support Tables by clicking on Administration-Content Management-Support Tables. This menu is only for Administrator information purposes. Administrators cannot manage or edit the information; they can only view it. These tables support the ECCAIRS/SRIS and Custom Taxonomies and are handled at the ECCAIRS Central Administration level.
The system will display the Support Tables menu:
It displays a left panel with the list of all the tables, accessible by clicking on them:
· Alias
· Attributes Groups
· Conversion Factors
· Domains
· Management Units
· Measurement Unit Classes
6.4.1.1. Alias
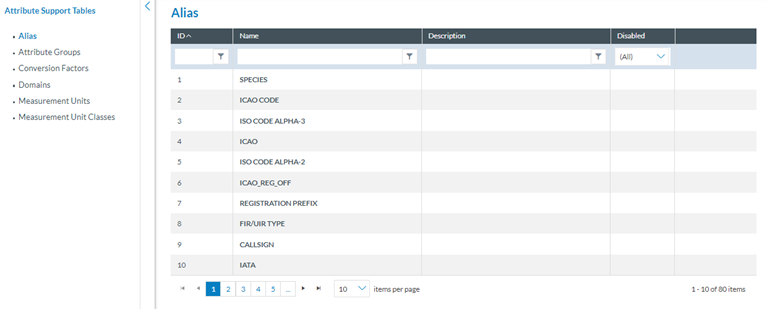
By default, the system first displays the Alias table (Image below). It shows the following columns that also work as filters:
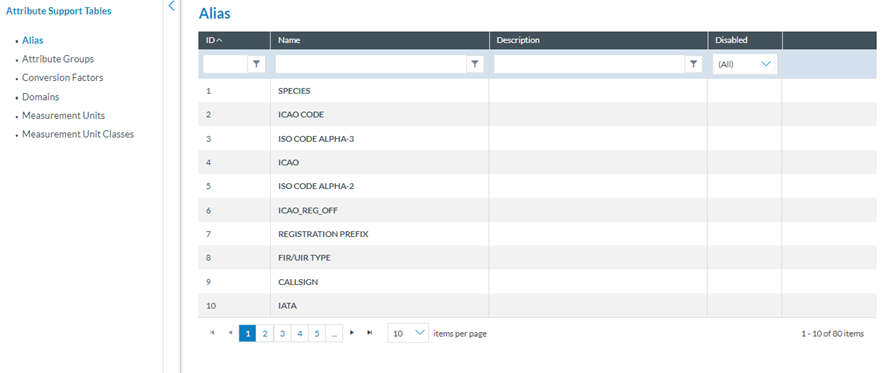
· ID: Unique and mandatory for each table
· Name: Unique and compulsory for each table
· Description: Optional
· Disabled: green tick if disabled; otherwise, enabled
6.4.1.2. Attribute groups
To access it, Administrators have to click on this table on the left pane, and the system will display it:

In this case, the table presents the following columns:
· ID: Unique and mandatory for each Attribute group
· Description: Unique and mandatory for each Attribute group
· Detail: Long explanation of the Attribute Group
· Explanation: it reproduces the description
· Languages: This will provide the translations of each Attribute not currently activated.
Above the table, the system provides a file translation button that is currently unavailable.
6.4.1.3. Conversion factors
It includes conversion factors applicable in the Taxonomy.
To access it, Administrators have to click on this table on the left pane, and the system will display it:
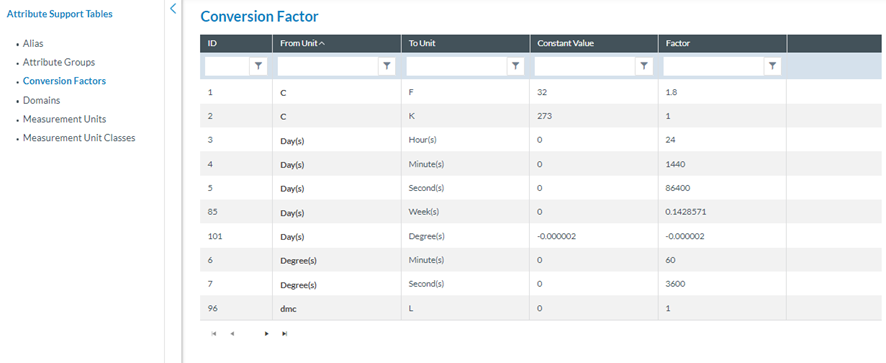
The table displays the following columns that also work as filters:
· ID: Unique and mandatory for each conversion factor
· From Unit: it refers to a measure unit from which a value comes
· To Unit: it is the measuring unit to which an original value of a different measure unit has to be converted
· Constant Value: refers to the value of the ‘To Unit’ measure unit which is considered ‘Constant’ conditions, i.e. 32 º Celsius
· Factor: It is the conversion factor that transforms from unit to unit. i.e.: 1 day =24 h or 1440 minutes; 24 times an hour is a day.
6.4.1.4. Domains
To access this tab, Administrators have to click on it on the left pane, and the system will display this table:
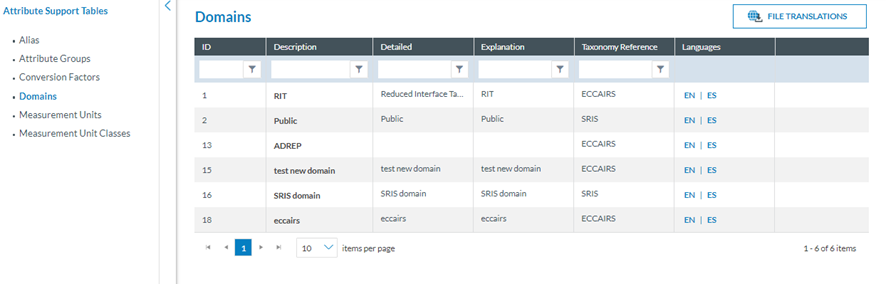
The columns that also work as filters are the following:
· ID: unique and mandatory for each domain
· Description: unique and mandatory for each domain
· Detailed: optional sort of long description
· Explanation: optional description, mostly reproducing the description
· Taxonomy reference: if it corresponds to ECCAIRS or to SRIS.
· Languages: This will provide the translations of each Attribute, but this option is currently unavailable.
Above the table, the system provides a file translation button that is currently unavailable.
6.4.1.5. Measurement Units
To access this tab, Administrators have to click on it on the left pane, and the system will display this table:
The columns (that also work as filters) are the following:
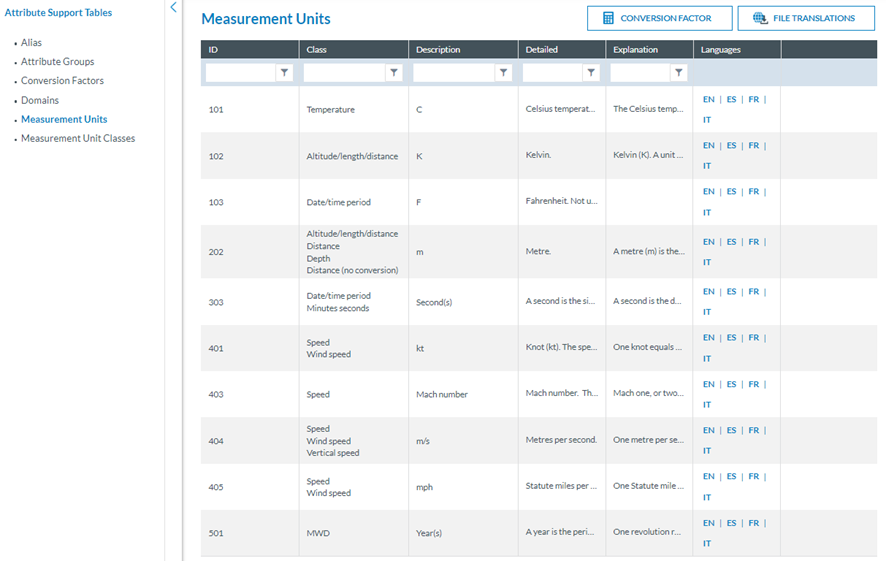
· ID: unique and mandatory for each unit
· Class: unique and mandatory for each unit
· Description: unique and mandatory for each unit
· Detailed: Optional added description
· Explanation: Optional long description
· Languages: This will provide the translations of each Attribute, but this option is currently unavailable.
Above the table, the system provides a file translation button that is currently unavailable.
Moreover, the system displays a ‘Conversion Factor’ button above the table, which accesses the previously explained ‘Conversion Factor’ table.
6.4.1.6. Measurement Unit Classes
Administrators have to click on this table on the left pane, and the system will display it:
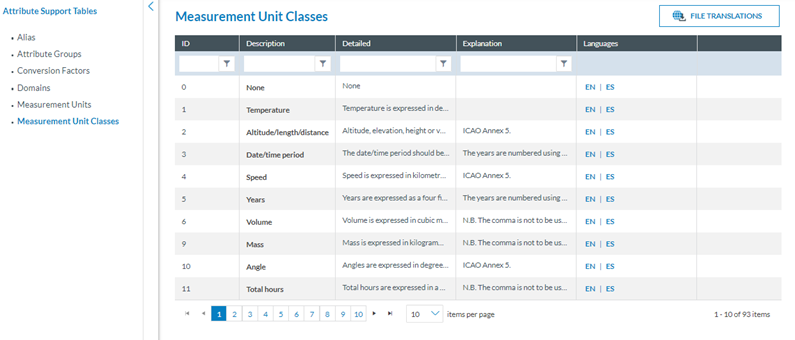
In this case, the table presents the following columns:
· ID: Unique and mandatory for each Attribute group
· Description: Unique and mandatory for each Attribute group
· Detail: Long explanation of the Attribute Group
· Explanation: it reproduces the description
· Languages: This will provide the translations of each Attribute, but this option is currently unavailable.
Above the table, the system provides a file translation button that is currently unavailable.
6.4.2. Reference Tables
The Reference Tables store Attribute values related to each other to help the users fill in the forms with adequate information. See the ‘ECCAIRS2 - Occurrence Officers’ tasks’ document for further details on its use.
Administrators can feed the values that trigger the reference tables used in the webforms and views in those centrally defined as collaborative reference tables.
Administrators have to click on ‘Administration – Content Management – Reference Tables’, and the system will display the Reference Tables menu:

The Table provides the following columns that also work as filters:
· ID: mandatory and unique for each table
· Description: unique for each table
· Detailed: optional added description
· Status: can be Draft or Release
The last section of each row is a 3-dot menu with the following options:
View Table Properties:
Administrators have to click on this option of the 3-dot menu of the specific table row of the table, and the system will display the Table Properties page:
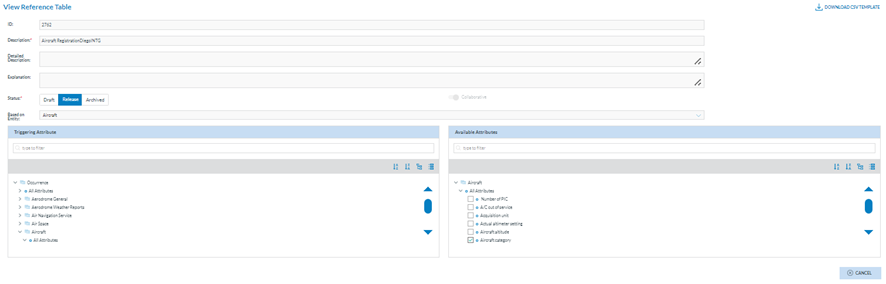
It provides the following fields:
· ID: unique and mandatory for each table
· Description: unique and mandatory for each table
· Detailed Description: optional long description
· Explanation: optional
· Status: it can be Draft, Release or Archived
· Based on Entity: it is an Entity of the Taxonomy
Below the fields, there are two panels:
· The left panel is ‘Triggering Attributes’: it provides the Taxonomy from which the triggering Attribute is selected
· The right panel is ‘Available Attributes’: it provides the selected Attributes that will provide information to be filled in the webforms.
Above the page, there is a ‘Download CSV template’ that downloads the template with the information of the panels. Administrators must download it and fill in the values indicating the start and final validity dates. It is uploaded to the system with the information filled in through the table values option.
Table values:
Administrators have to click on this option of the 3-dot menu of the specific table row of the table and the system will display the Table values page:
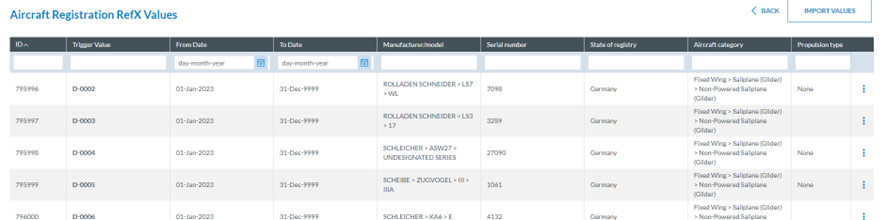
The table will display a table with the triggering values for the specific reference table. The columns are the following:
· ID: unique and automatic for each value
· Trigger Value: It is the value users have to type when filling in the webforms and views to open the reference table
· From Date: The triggering Attributes are valid. This column refers to the Start Date.
· To Date: It is the final date of the triggering Attributes
Above the table, there is an Import table button. It opens the Import table window:
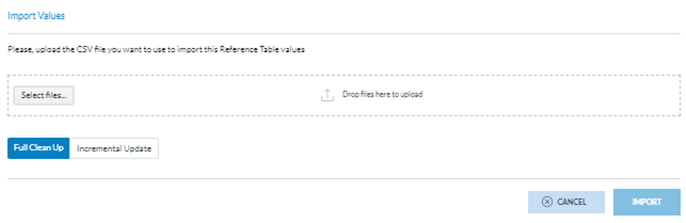
Administrators must select the CSV with the information to be imported or drag it and drop it in the file area. By default, the system selects ‘Full Clean Up’; this option deletes the previous version and uploads the new values for the reference table.
If Administrators only want to add updates on the Values, they have to click on ‘Incremental Update’. They have to click the ‘Import table’ button, and the information will be transferred to the table of values.
6.4.3. Notifications Manager
E2 can notify selected users of the creation, update, deletion, or sharing of actions over reports that meet the conditions of a query through query-based notifications.
To configure Authority notification, Administrators have to click on ‘Administration – Content Management – Notifications Manager’ and the system will display the ‘Notifications Manager’ menu:
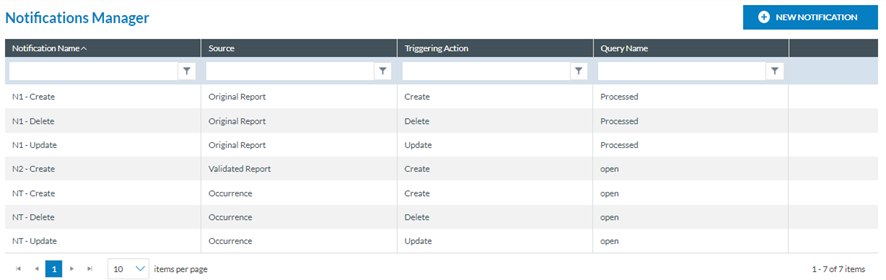
It displays the table of Notifications with the following columns that work as filters:
· Notifications Name: it is unique and mandatory for each notification
· Source: the safety event to which the query will be applied, which can be ORs, VRs, OCs or SRs (according to the Authority type) to determine if the notification will be sent
· Triggering Action: The action that will cause the execution of the query. It can be Create, Delete or Update a Safety Event.
· Query Name: it refers to the query on whose execution the notification informs
The last section of each Notification row provides an Edit and a Delete icon:

Above the table, the system displays a ‘New Notification’ button.
6.4.3.1. Create a notification
Administrators have to click the ‘New Notification’ button above the table of Notifications (See image above), and the system will display the ‘New Notification’ page:
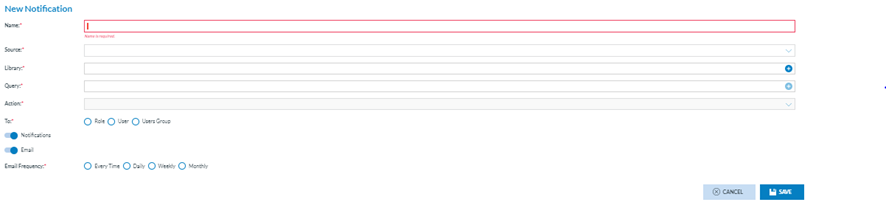
It provides the following fields:
· Name: it is mandatory and has to be unique
· Source: Mandatory drop-down menu providing the following options:
ü OR
ü VR
ü OC
ü Safety Recommendation: only for SIA’s
· Library: Mandatory field. The +ADD icon opens a Library window where the Administrator have to select a folder under the National shared library:

· Query: +ADD icon opens the selected Library window, presenting the Libraries tree view on the left. Administrators must select a folder, and the system will provide queries preceded by radio buttons to be selected in the right panel. Administrators have to choose a query and click on the ‘ADD’ button:

· Action: a mandatory drop-down menu with the options ‘Update’, ‘Create’, and ‘Delete’. Administrators can select as many of them as desired. They are the triggering actions, so the query will be triggered when the selected Action is applied to the selected Source.
· To: It is mandatory, and it indicates to whom the notification will be sent
ü If Role is selected, the system displays a Table of Available Roles:
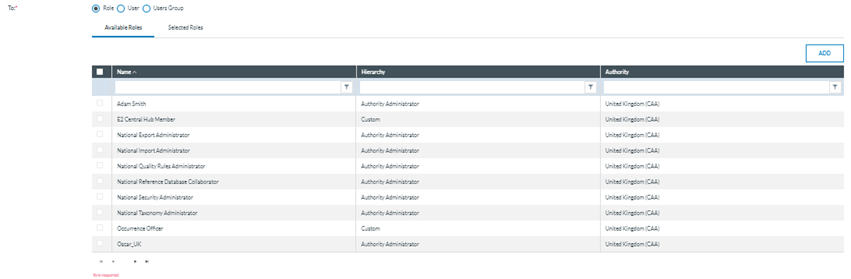
The Table of Roles provides the following columns that also work as filters:
o Name
o Hierarchy
o Authority: to which the role belongs. It will be the Administrator’s Authority.
Administrators have to select the needed roles and click on ADD, and the selected roles will be added to the ‘Selected Roles’ page. Administrators can access the Selected Roles tab by clicking on ‘Selected Roles’. This tab will display the list of selected Roles and a ‘Remove’ button to bring Roles to the ‘Available Roles’ tab.

ü If User is selected, below the system displays the table of active users, excluding organisation users:

It displays the Users created by this Administrator.
The table is divided into columns that also work as filters:
o Username: unique for each User
o First Name
o Last Name
o Roles
The table's function (to add and remove users) is similar to managing the abovementioned roles table.
ü If User Group is selected, the system displays the table of Users Groups:
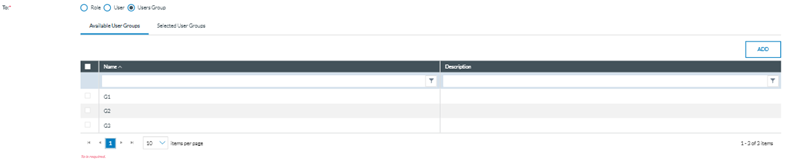
It displays the list of User Groups created by the Administrator, with the following columns also working as filters:
o Name: unique for each one
o Description: it is optional
The table's function to add and remove users is like managing the abovementioned table of roles.
· Notifications toggle: by default, it is activated. This means a notification will appear for the selected users on their landing page.
ü Email: enabled by default. A notification email will be sent to the selected Users.
ü Email Frequency: the options are the following:
o Every time: the notification email will be sent any time the selected action takes place with the results of the query execution
o Monthly: the notification email will be sent once a month
o Weekly: it will be sent once a week
o Daily: it will be sent once a day
Administrators must fill in all the mandatory information and click ‘Save’. The system will save as many notifications as Actions selected in the Actions drop-down menu in the database. Moreover, it will add those notifications to the Table of notifications. Their Names will consist of the Name introduced in the ‘New Notification’ page and each Action selected in the Actions drop-down menu:

6.4.3.2. Edit a notification
Administrators have to click on the Edit icon, and the system will display the ‘Edit Notification’ Page:
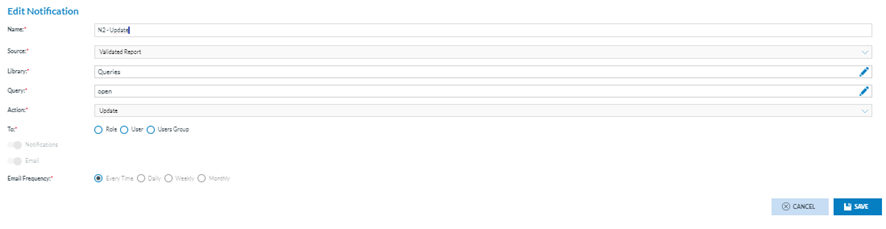
The fields are the same as those on the New Notification page explained in the previous section. The Source and the Actions are not editable. Administrators must select the ‘To’ information, update the needed fields, and click ‘Save’. The system will save the update in the database, and the table of notifications will be updated accordingly.
6.4.3.3. Delete a notification
Administrators must click the Delete icon, and the system will display a warning message to confirm the action. If Administrators confirm the action, the system will delete the notification from the database and remove the notification from the notification table.