How to create a Form
Some background
What is a form?
A form for incident reporting is a digital tool that allows reporters to report any incidents or accidents that occurred. The purpose of incident reporting is to help identify potential safety hazards and prevent future incidents.
Incident reporting forms typically ask for details about the nature of the incident, including the type of aircraft involved, the location and time of the incident, the weather conditions, and any other relevant details. They may also ask for information about the individuals involved in the incident, including their, job titles, and contact information.
What default forms do exist in E2?
ECCAIRS2 (E2) provides 6 standard reporting forms, they are always available and can be used by any Authority.
-
Technical
-
General Aviation
-
Aerodrome
-
ATM/ANS
-
Flight Operation
-
Individual
In many cases these 6 general forms are sufficient to allow reporters to adequately send in their reports. Yet as these are standard forms, they may ask for irrelevant information and so clutter the form.
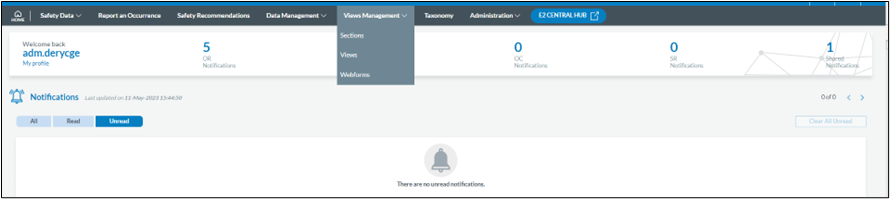
How to get to the sections, views, and forms?
Depending on the permissions the option to manage sections, views and forms becomes available on the home page.
What makes up a form?
A form is based on a view, a view is made up of sections and sections contain the attributes that a user needs to fill out.
Attributes
All ECCAIRS & Custom attributes can be included in a section.
Sections
Grouping attributes logically in ECCAIRS can help to organise and categorise information in a more structured and efficient manner. This is done in sections.
Here are some steps to follow:
1. Identify the main categories of attributes: Start by identifying the main categories of attributes that are relevant to the event being reported.
For example, categories could include Occurrence, Aircraft, Crew, Aerodrome, Weather, and Air Traffic Control...
2. Determine the subcategories: Once the main categories have been identified, break them down into more specific subcategories. Each of these subcategories can be created as separate sections.
For example, under the Aircraft category, subcategories could include Airframe, Engines, Systems, and Equipment.
3. Assign attributes to each category:
For example, under the Airframe, attributes could include Manufacturer, Model, Serial Number, and Type of Wing, Year Build.
4. Organize attributes in a logical way, such as by grouping related attributes together or by organising them in a chronological or sequential order.
For example, under the Occurrence category, you might group attributes related to the time and location of the event together, followed by attributes related to the type of operation and the severity of the event.
5. Via the preview option, review, and refine: Finally, review and refine the grouping of attributes to ensure that it makes sense and is easy to understand. Adjust as needed to ensure that the data entry is logical and intuitive for users to navigate.
Overall, grouping attributes logically in ECCAIRS can help to improve the accuracy and efficiency of incident reporting, and facilitate analysis and reporting of incident data.
Reusability
First a few words on reusability. Sections are very often used in different views, so some attention needs to be paid as of their re-usability.
The reusability of sections in forms is an important feature of E2 that can help to streamline the incident reporting process and improve data accuracy. In E2, sections are pre-defined templates that contain a set of attributes relevant to a particular type of topic within an occurrence. These sections can be reused across different incident reporting forms, eliminating the need to recreate the same sections multiple times.
The reusability of sections in forms also allows for more efficient incident reporting, as users can easily select and populate the relevant sections when creating a new incident report. This reduces the time and effort required to complete incident reports, as users do not have to manually enter the same information multiple times.
It is good practice to keep the sections small. The smaller they are the more easily they can be reused.
Organising sections
Organizing sections into libraries can help to streamline the process of creating incident reporting forms and make it easier to find and reuse sections across different forms.
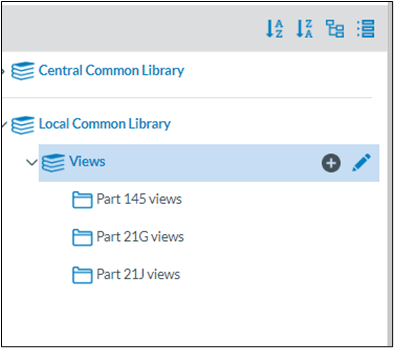
It is considered good practice before starting to create sections to think about how to organise them in section libraries, especially when working in teams. Libraries in E2 work like how the file explorer works. It is a tree like interface.
If sections are not part of a view, they can be moved to other parts within the libraries
Adding a branch or a subbranch to the library can be done by clicking on the + icon. Changing the name of the library branch is done by clicking on the pencil.
Creating a new section is done in 2 steps
Step 1: Create the section properties
Section properties are used to define the characteristics of a section, such as its type, taxonomy, name, description…
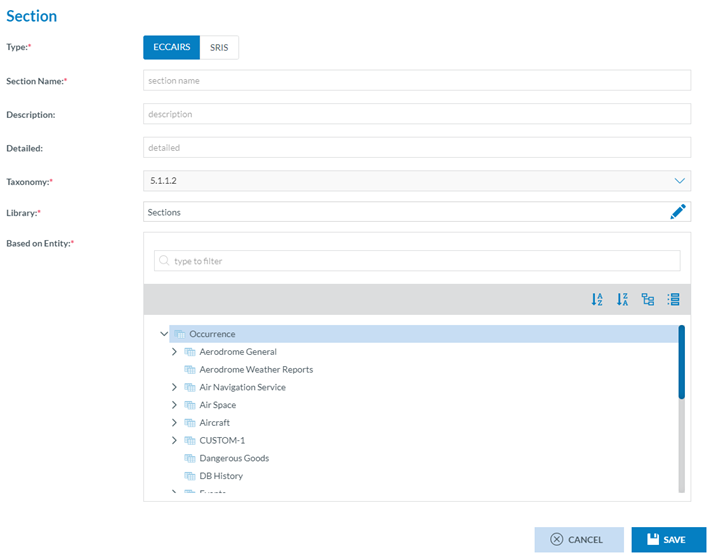
All fields marked with a little red asterisk are mandatory.
E2 caters for different types of reporting (ECCAIRS/SRIS). Each type has its own taxonomy.
The section name should accurately reflect the content of the section and make it easy to identify. Choose a clear and concise name that accurately describes the type of information that will be captured in the section.
Select the library where the section is to be saved.
The data contained in the section will be based on an entity from the taxonomy. By selecting the Entity upon the section is based will determine which attributes can be added to the section.
Example, when selecting Aerodrome general, only attributes belonging to the entity Aerodrome general will be available to be put in the section.
Step 2: Creating the section content
Find the section you want to edit and click on the three vertical little dots and select edit
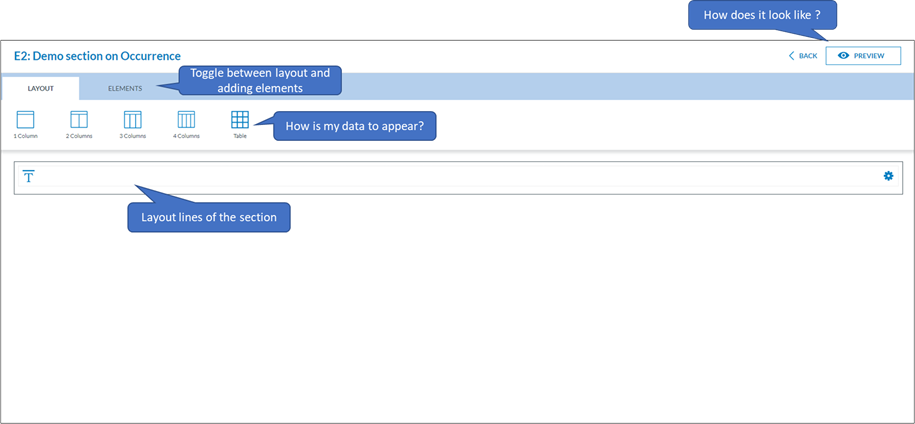
Before elements can be added as layout needs to be defined.
The section editor has 5 different types of layouts:
-
1-column, this spans the complete width of the section, it is use full if a lengthy attribute is to be filled out, such as Aircraft Make/Model
-
2-Column, this layout creates 2 columns of the same length and spreads them evenly over the length of the section
-
3-Column, this layout creates 3 columns of the same length and spreads them evenly over the length of the section
-
4-Column, this layout creates 4 columns of the same length and spreads them evenly over the length of the section
-
Table, allows you to create a table of maximum 8 columns evenly spread of the length of the section.
Adding a layout
By clicking on one of the layouts, a new layout will be added to the section.
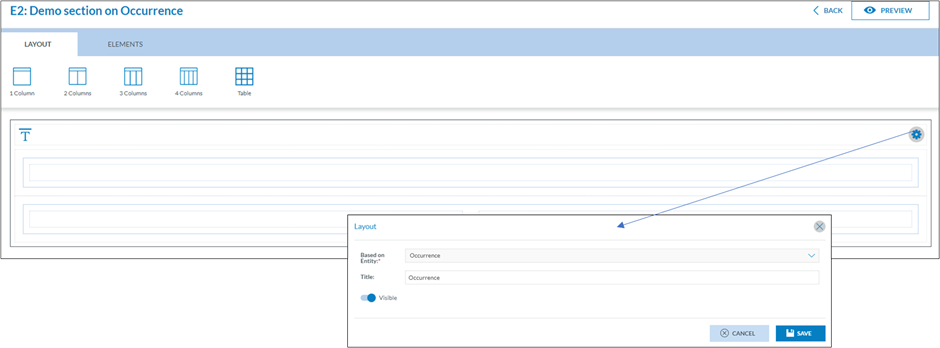
Each section has a title which can be changed or hidden by clicking on the cogwheel. By default, it will take the name of the entity upon which it was based.
The order in which layouts are added to a section is important. Once a layout has been added it can no longer be moved up or down.
Actions on a layout
There are 2 actions that can be performed on a layout.
-
Delete the layout, removes the layout including the attributes on it
-
Change the based on
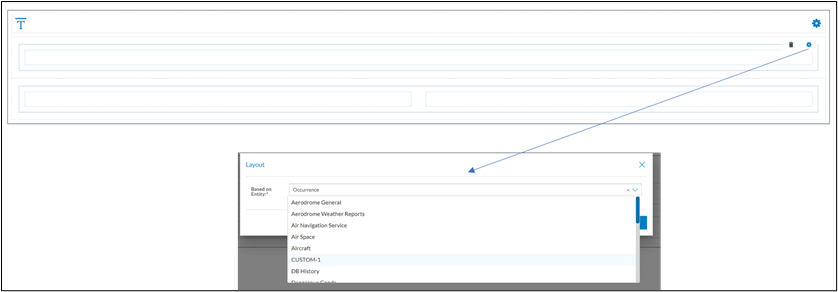
Although it indicated in the section properties that only attributes of the “Based on Entity” can be added to the section, this allows to change, just for this layout, that attributes can come from an entity 1 level below the “Based on Entity”Example if a section is based in Occurrence, a particular layout can contain data on Aircraft by changing the layout’s based on entity.
Adding elements to the layout
There are 3 types of elements you can add to the layout.
-
A free text

-
An Image


-
An attribute

Select the type of element and drag it into the layout.
Adding an Attribute
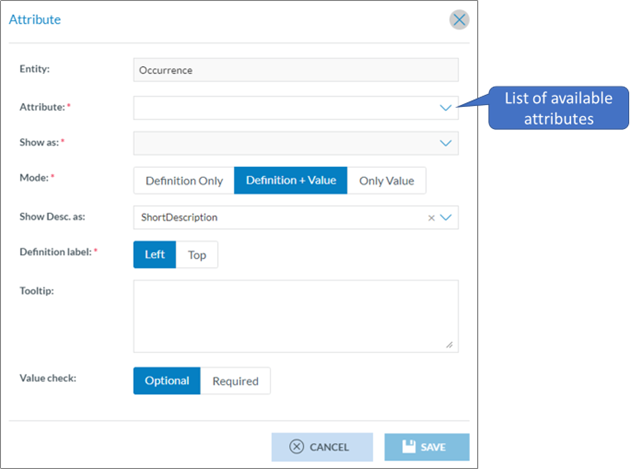
Depending on the “Based on Entity” that was selected in the section properties or in the layout properties, the attributes that are available are shown in the drop-down list.
Depending on the attribute chosen, different types of visualisations become available.
Attributes with a value list attached
-
Combo box is a simple dropdown list that shows values in a list. This is ideal for attributes that have value lists with just 1 level, for example report source.
-
Radio button allows the user to select between a limited number of options, example Weather Relevant Yes/No.
-
Selection tree, this shows the information in a hierarchical three view structure. It is ideal for selecting values from value lists with more than 1 level. Example Aircraft make/model.
Attributes without a value list attached
-
Date, opens a calendar and allows to select a date
-
File, opens the select file interface, this is used for adding attachments
-
Hyperlink, allows to enter a hyper link and when clicked, it will open the URL
-
Label, renders the data as static text
-
Latitude & Longitude, are used to enter geographical locations in Degrees/Minutes/Seconds North and South
-
One line Text, is a single line text input, for example headline
-
Multi line text, is a multi-line input, for example the narrative, reporter’s description
-
Time, opens a time interface allowing to enter the time
Mode of the attribute defines how the attribute is to be displayed
-
Definition Only, Only the label of the attribute is show, an no value
-
Definition + Value, the label is shown, and data can be entered in the field
-
Only Value, the label is not shown, yet the value can be entered
Label position, depending on the available real estate, it is possible to either have the label displayed left of the value or above the value.
Tooltips are shown by default, their text is taken from the taxonomy and can be changed.
An attribute can be set as optional or as required. Required attributes are marked with a little red asterisk next to the label. Be aware, required attributes are soft mandatory. That is, if they are not filled out, then a warning message is displayed, and the user can either continue or add the missing information. E2 will not block submitting reports with missing mandatory fields.
Example
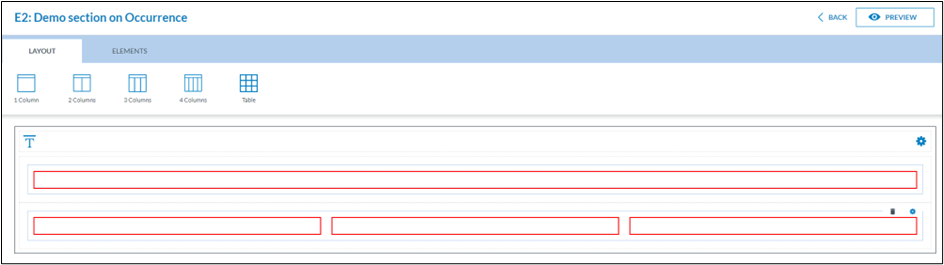
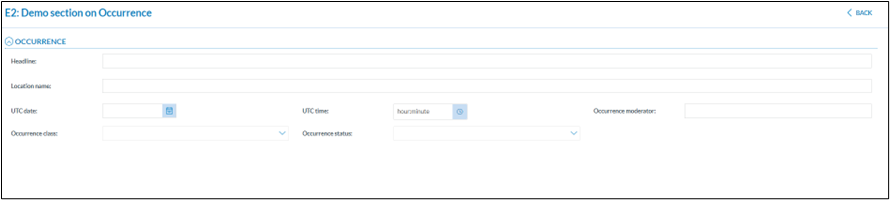
In this example the layout has 2 types of rows, a 1-column row and a 3-column row
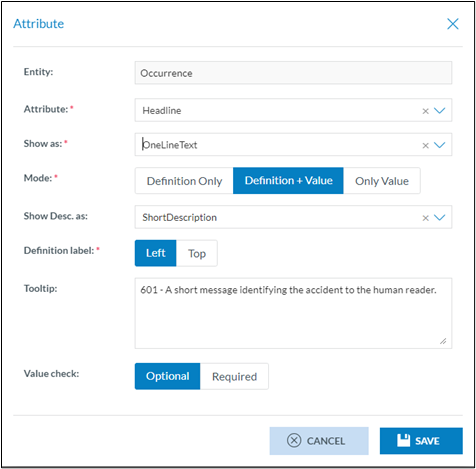
A first attribute is added, headline by dragging the attribute icon into the layout and selecting Headline when the popup-window appears.
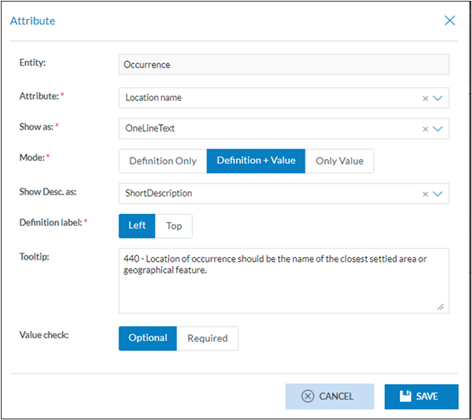
Adding a second 1-column attribute is done by dragging the Attribute icon into the layout, it will be automatically added when dropped.

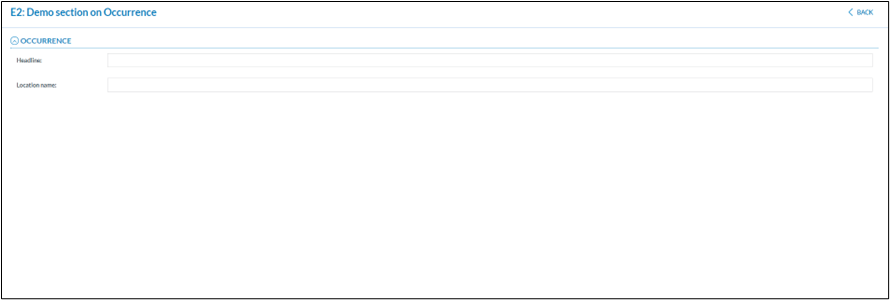
This is what the result is when previewing the section:
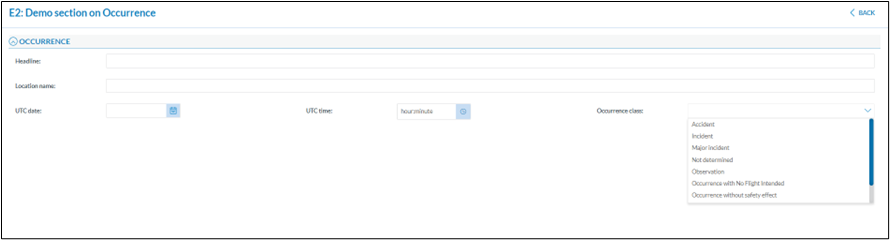
Adding attributes to the 3-column row works in a similar manner by dragging and dropping the attributes in the columns:
When working with multi-column rows, it is not necessary to fill out all the columns with attributes:
Views
In E2, views are a way to organise and display data in a particular and ordered way.
A view is a collection of sections ordered in such a way to give the user a logical manner of efficiently filling out his incident Report.
When all relevant sections have been created or are available, they can be integrated in a view. Sections can be integrated into several views.
Organising views
Organising views into libraries can help to group views together that can be assigned to users.
It is considered good practice before starting to create views to think about how to organise them in view libraries, especially when working in teams. Libraries in E2 work like how the file explorer works. It is a tree like interface.
Adding a branch or a subbranch to the library can be done by clicking on the + icon. Changing the name of the library branch is done by clicking on the pencil.
Creating a new view is done in 2 steps
Step 1: Create the view properties
View properties are used to define the characteristics of a view, such as its type, taxonomy, name, description…

The type of the view will determine which sections that can be added to the view. Only sections of the same type can be added to the view.
The taxonomy is filled automatically and will be the current E2 taxonomy.
The view name is the name of the view in the library.
The display name is the name how the view will be shown to the end user, it doesn’t need to be the same as the view name.
Description is sometime necessary to give more information on the view, example its purpose.
The library is where the view will be saved. Hence the best practice to create a good library structure.
Release number, as through time, the view may change, sections are added, removed… this allows you to keep track of the releases. There is no automatic augmentation of numbers, it is a free text and cannot be left blank.
Status, indicates if a view is
· Draft, it is being edited and cannot be used by users
· Release, a view is available to users and cannot be modified
· Archived, a view was previously available and is decommissioned
A view can may not exist as such, it needs to be linked to at least 1 role. That is users who have this role can access the view and use it.
Saving the view, will save the view properties and will not release it, it will remain in draft until it is manually released.
Step 2: Creating the view content by adding sections
Via the three little dots at then end of the row, following actions become available
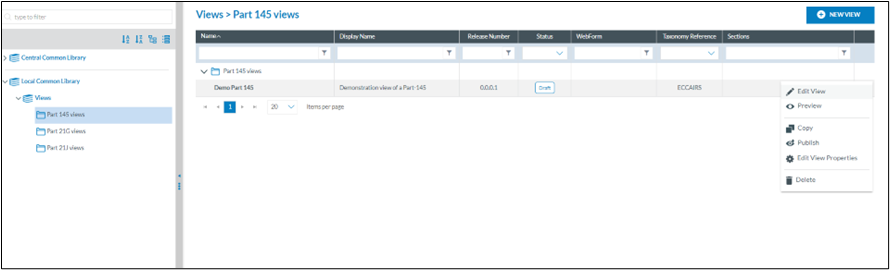
· Edit the view, open the window to add/remove sections in the view
· Preview shows how the view will look like when published
· Copy allows you to copy the view. It will create a completely new view and all sections present in the view will be copied too
· Publish will transition the view draft to released, so making it available to the users that have the role attached to the view
· Edit view properties allow to modify certain properties of the view
· Delete, deletes the view and it will no longer appear in the list. Yet all sections linked to the view will remain to exist
Edit the view
Via the three little dots in the list view, you gain access to the view editor:
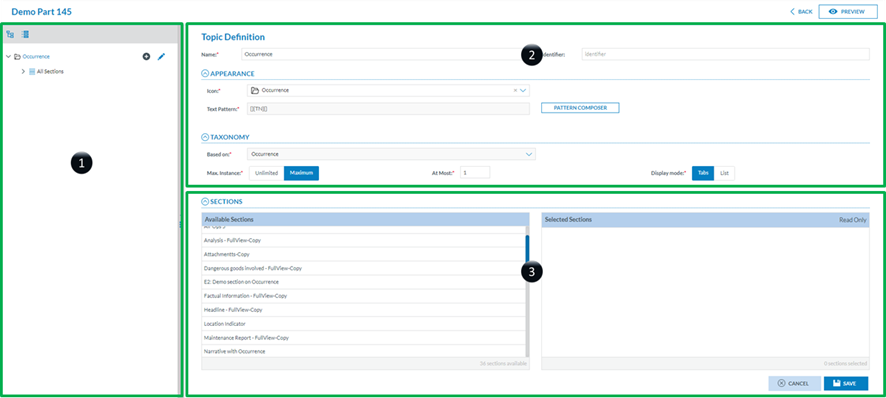
1. Is the area where new entities can be added
When creating new view, the editor starts with the occurrence level. It is always the point of entry for every view.
2. Is the area where the entity is described
· The name is the name that will be displayed in the tree view (1)
· The identifier is a free text allowing you to give the entity an identifier
· The Icon, which is mandatory, hence the asterisk, is the icon that will be placed next to the entity name in the tree view
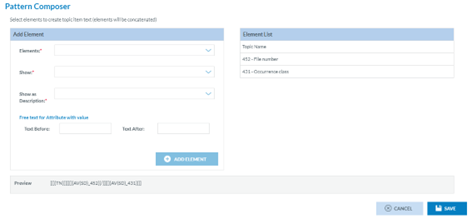
· Text pattern. By default, the name of the entity will be shown in the tree view, yet I may be that more specific data needs to be added, such as the File Number. Or in case of an Aircraft the aircraft registration

A popup window appears when clicking on the pattern composer. Here the pattern, extra information, can be created.
All attributes that belong to the entity that is being edited are available to be put in the pattern. The additional information can be shown as a definition (label) or as a value.
The information can either be shown as
· Short description
· Description
· Explanation
· Extended
· A prefix and a postfix can be provided. This is particularly interesting if more than 1 element is part of the pattern that is being composed
· Click add will add the attribute to the pattern
Although there is no limit in the number of attributes that can be part of the pattern, yet too many, or too lengthy attributes may clutter the readability:
· Views are a collection of sections and sections are based on entities. To show the available sections, “Based on” needs to be selected.
· For entities that can have multiple instances, such as aircraft, events, dangerous goods… a maximum number of occurrences can be provided, or if set to unlimited the system will put a maximum of 10.
· In the event of multiple instance entities, it is possible to either this play them in a tabular format or in a list format.
· 3. Is the area showing the available and selected sections in the view for the selected entity.
On the left all available sections are shown that can be out in a view. Adding a section to a view is done by dragging the section into the selected area.
More sections can be dragged in the selected area:

Added sections can either be used for data entry or can be set as read only. In the example above, the section on weather is read only and cannot be user for data entry by the user. The setting read only is only applicable on the view that is being edited. This means that in one view the section is read only and in another view that same section can be used for data entry.

Adding an entity to the view
Before you add an entity to a view, the view must be saved
When hovering with the mouse over the occurrence, 2 icons will appear:
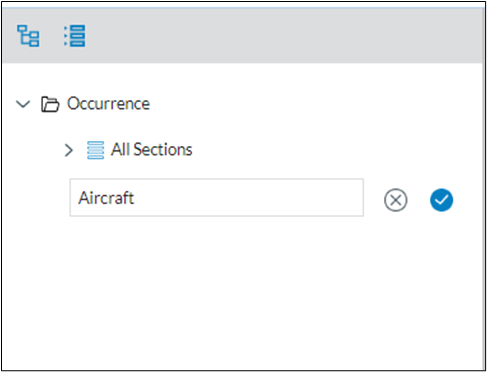
- A pencil, that allows you to modify the entity
- A + that will add an entity. By clicking this icon an empty slot will appear at the bottom of the tree.
Enter the name of entity how it is to be displayed in the tree view. This is a free text, so there is no automatic correlation between the entity name and what the entity is based on
Clicking on the tick icon will add the entity to the tree
As with the occurrence entity all relevant data is to be entered. The fields marked with a red asterisk are mandatory
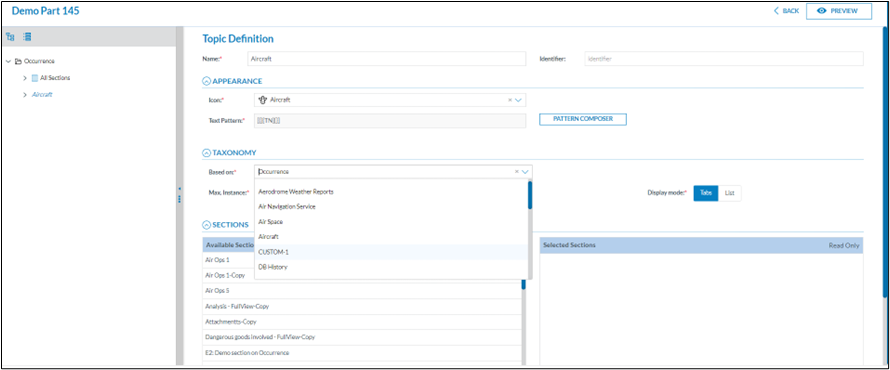
By having selected another entity, such as aircraft, that entities sections become available to be put on in the view.
In the “Based on”, is indicated upon which entity the section is based. In the example we select Aircraft from the list.
A warning message will be shown:

It is to draw you attention that other sections will become available and that the pattern composer is also going to be emptied:
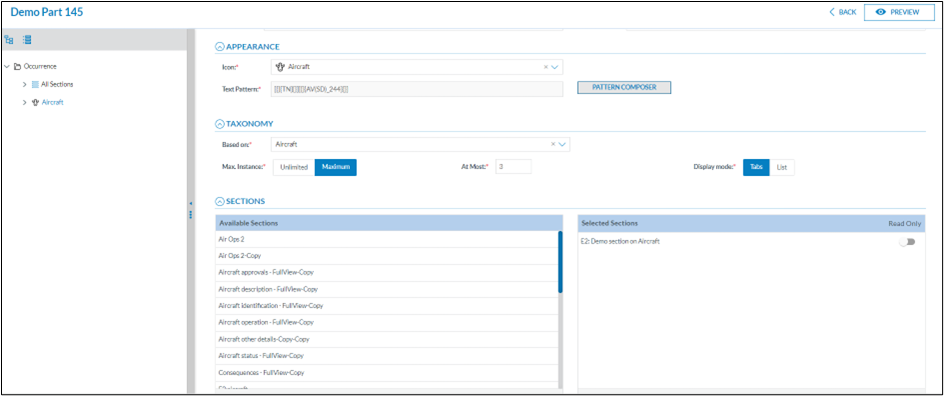
If an entity can have multiple instances in an incident report, a maximum number can be set, in this example it is set to 3 and the display is tabular.

Per entity that is added a pattern composer is available. In the next example next to the text aircraft, the Aircraft Registration number is shown.
It is important to notice that when a section is added to a view, it cannot be edited anymore unless it is removed from the view first.
As a section can be used in multiple views, then the section is to be removed from all the views before it can be edited. Hence the need for giving meaning full names to the sections
Making the view accessible to users
In the list view, the sections column, it shows which section are comprised within the view.

When via the three little dots the option “Publish view” is chosen, the view becomes available to the users who are in the role set at view level
This is how the view appears to the user
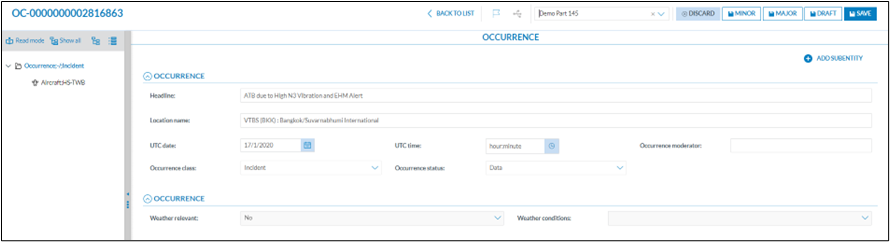
The section handling the weather was indicated as read only and is therefore greyed out
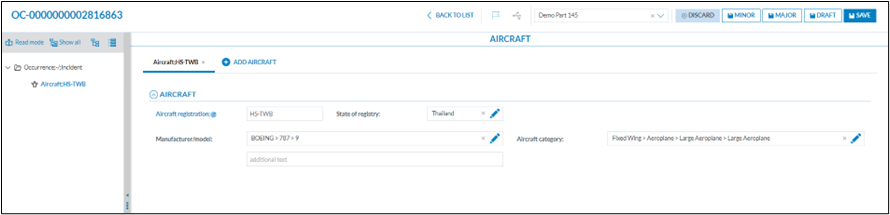
As it was set there are 3 aircraft possible an aircraft can be simply added by clicking Add Aircraft.
Turning a view into a form
Any view can be turned into a web form:
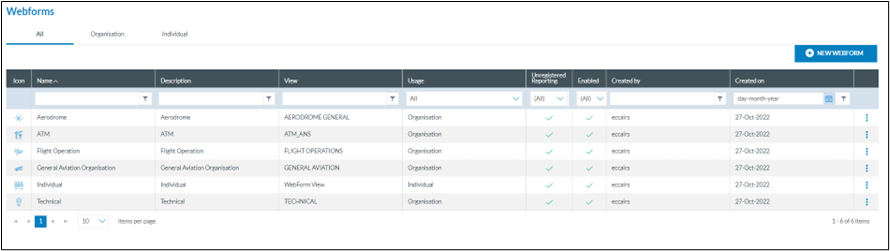
By default, ECCAIRS2 has these standard forms available
1. Technical
2. General Aviation
3. Aerodrome
4. ATM/ANS
5. Flight Operation
6. Individual
As in the list view it shows upon which views the forms are based.
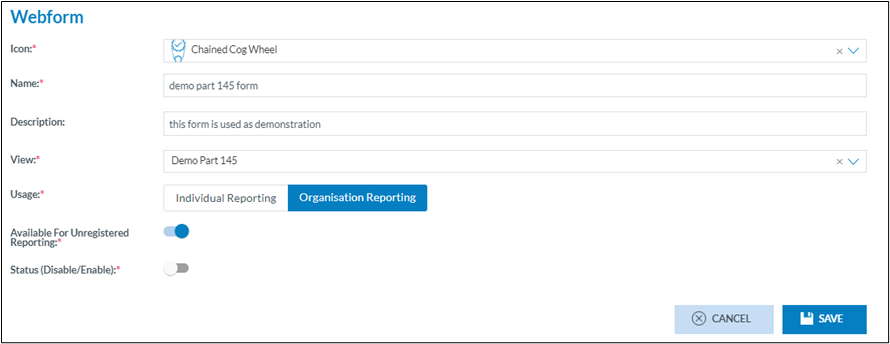
The “New Webform” button opens the configuration screen to create a new web form:
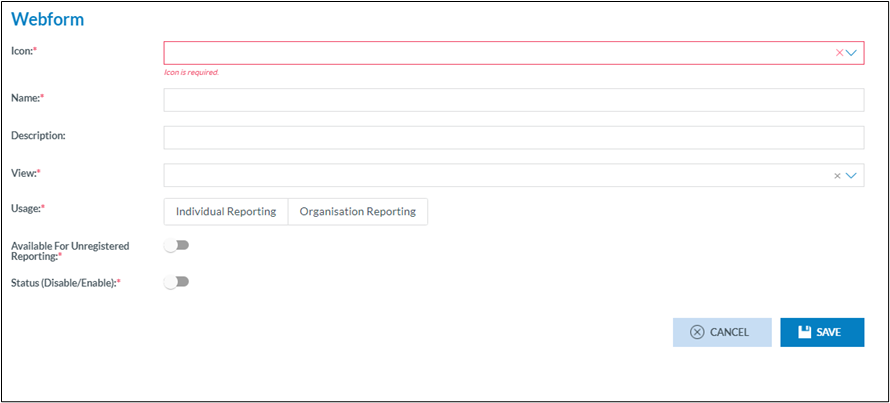
As with all interfaces, the fields marked with a red asterisk are mandatory
· Every form is to have an icon, it is a visual queue to what the form is about
· A meaning full name is necessary as this is what the end user on the aviation portal will see
· An explanation what the form tries to achieve is to be entered in the description
· In the list of views, the view upon which the form is based is to be selected
· There are 2 types of users
o An individual user, private person
o A user belonging to a registered organisation
Depending on which option is chosen, the form will become available to them
· Available for registered reporting, is to indicate if the form is also to be available to users that have not registered as private user or as a user of a registered organisation
· The status is to indicate if the form is enabled or disabled. It may well be that a form is created, yet it is opted as not to make it available to the public yet