How to Create a Form
Some background
What is a form?
A form for incident reporting is a digital tool that allows reporters to report any incidents or accidents that occurred. The purpose of incident reporting is to help identify potential safety hazards and prevent future incidents.
Incident reporting forms typically ask for details about the nature of the incident, including the type of aircraft involved, the location and time of the incident, the weather conditions, and any other relevant details. They may also ask for information about the individuals involved in the incident, including their, job titles, and contact information.
What default forms do exist in E2?
Eccairs2 (E2) provides 6 standard reporting forms, they are always available and can be used by any Authority.
-
Technical
-
General Aviation
-
Aerodrome
-
ATM/ANS
-
Flight Operation
-
Individual
In many cases these 6 general forms are sufficient to allow reporters to adequately send in their reports. Yet as these are standard forms, they may ask for irrelevant information and so clutter the form.
How to get to the sections, views, and forms?
Depending on the permissions the option to manage sections, views and forms becomes available on the home page.

What makes up a form?
A form is based on a view, a view is made up of sections and sections contain the attributes that a user needs to fill out.
Attributes
All ECCAIRS & Custom attributes can be included in a section.
Sections
Grouping attributes logically in ECCAIRS can help to organise and categorise information in a more structured and efficient manner. This is done in sections
Here are some steps to follow:
-
Identify the main categories of attributes: Start by identifying the main categories of attributes that are relevant to the event being reported.
For example, categories could include Occurrence, Aircraft, Crew, Aerodrome, Weather, and Air Traffic Control... -
Determine the subcategories: Once the main categories have been identified, break them down into more specific subcategories. Each of these subcategories can be created as separate sections
For example, under the Aircraft category, subcategories could include Airframe, Engines, Systems, and Equipment. -
Assign attributes to each category:
For example, under the Airframe, attributes could include Manufacturer, Model, Serial Number, and Type of Wing, Year Build. -
Organize attributes in a logical way, such as by grouping related attributes together or by organising them in a chronological or sequential order.
For example, under the Occurrence category, you might group attributes related to the time and location of the event together, followed by attributes related to the type of operation and the severity of the event. -
Via the preview option, review, and refine: Finally, review and refine the grouping of attributes to ensure that it makes sense and is easy to understand. Adjust as needed to ensure that the data entry is logical and intuitive for users to navigate.
Overall, grouping attributes logically in ECCAIRS can help to improve the accuracy and efficiency of incident reporting, and facilitate analysis and reporting of incident data.
Reusability
First a few words on reusability. Sections are very often used in different views, so some attention needs to be paid as of their re-usability.
The reusability of sections in forms is an important feature of E2 that can help to streamline the incident reporting process and improve data accuracy. In E2, sections are pre-defined templates that contain a set of attributes relevant to a particular type of topic within an occurrence. These sections can be reused across different incident reporting forms, eliminating the need to recreate the same sections multiple times.
The reusability of sections in forms also allows for more efficient incident reporting, as users can easily select and populate the relevant sections when creating a new incident report. This reduces the time and effort required to complete incident reports, as users do not have to manually enter the same information multiple times.
It is good practice to keep the sections small. The smaller they are the more easily they can be reused.
Organising sections
Organizing sections into libraries can help to streamline the process of creating incident reporting forms and make it easier to find and reuse sections across different forms.
It is considered good practice before starting to create sections to think about how to organise them in section libraries, especially when working in teams. Libraries in E2 work like how the file explorer works. It is a tree like interface.
If sections are not part of a view, they can be moved to other parts within the libraries
Adding a branch or a subbranch to the library can be done by clicking on the + icon. Changing the name of the library branch is done by clicking on the pencil.
Creating a new section is done in 2 steps
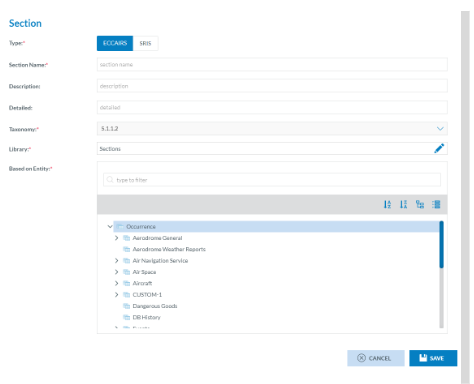
Step 1: Create the section properties
Section properties are used to define the characteristics of a section, such as its type, taxonomy, name, description…
All fields marked with a little red asterisk are mandatory.
E2 caters for different types of reporting (ECCAIRS/SRIS). Each type has its own taxonomy.
The section name should accurately reflect the content of the section and make it easy to identify. Choose a clear and concise name that accurately describes the type of information that will be captured in the section.
Select the library where the section is to be saved
The data contained in the section will be based on an entity from the taxonomy. By selecting the Entity upon the section is based will determine which attributes can be added to the section.
Example, when selecting Aerodrome general, only attributes belonging to the entity Aerodrome general will be available to be put in the section.
Step 2: Creating the section content
Find the section you want to edit and click on the three vertical little dots and select edit
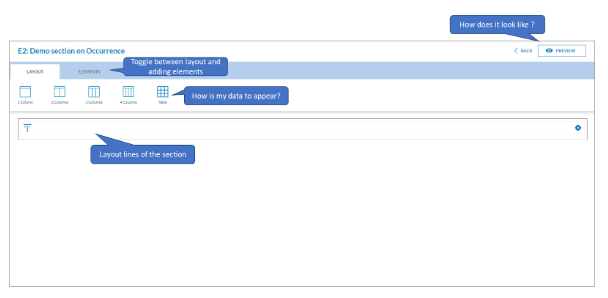
Before elements can be added as layout needs to be defined.
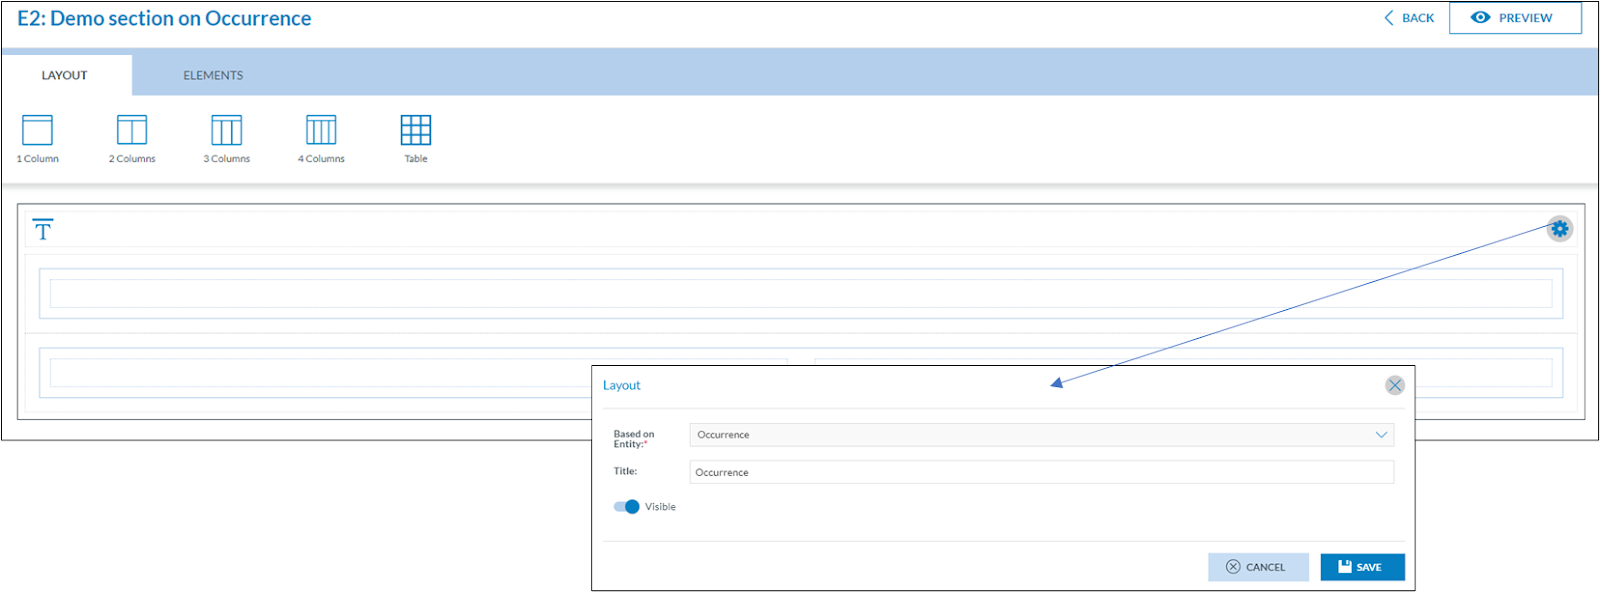
The section editor has 5 different types of layouts
-
1-column, this spans the complete width of the section, it is use full if a lengthy attribute is to be filled out, such as Aircraft Make/Model
-
2-Column, this layout creates 2 columns of the same length and spreads them evenly over the length of the section
-
3-Column, this layout creates 3 columns of the same length and spreads them evenly over the length of the section
-
4-Column, this layout creates 4 columns of the same length and spreads them evenly over the length of the section
-
Table, allows you to create a table of maximum 8 columns evenly spread of the length of the section.
Adding a layout
By clicking on one of the layouts, a new layout will be added to the section.

Each section has a title which can be changed or hidden by clicking on the cogwheel. By default, it will take the name of the entity upon which it was based.
The order in which layouts are added to a section is important. Once a layout has been added it can no longer be moved up or down.


