3.4. Features applicable to all reports
The following sections include general information applicable to OR, VR and OC levels.
3.4.1. Reports Lists
ORs, VRs, and OCs are listed in columns. Each column refers to an attribute/metadata field of the OR, VR or OC. The columns are set by default. Each row of the OR list is clickable.

The Officer can alter the position of each column by dragging and dropping them.
Next to the title of each column, there is 3 points link through which the Officer can filter the columns to be displayed:

Below each column, there is a drop-down menu through which the Officer can filter the data for the specific column:

This drop-down menu will display operators according to the attribute or field type. Additionally, for text or alphanumeric columns, the filtering can be case-sensitive  .
.
The appearing attributes and their order can also be updated through the My Account-Custom columns. See the section on Custom columns for further details.
3.4.2. Views
The view selection menu is used to see the OR or any other reports under a specific view template, showing a preselection of entities and attributes relevant to a particular perspective.
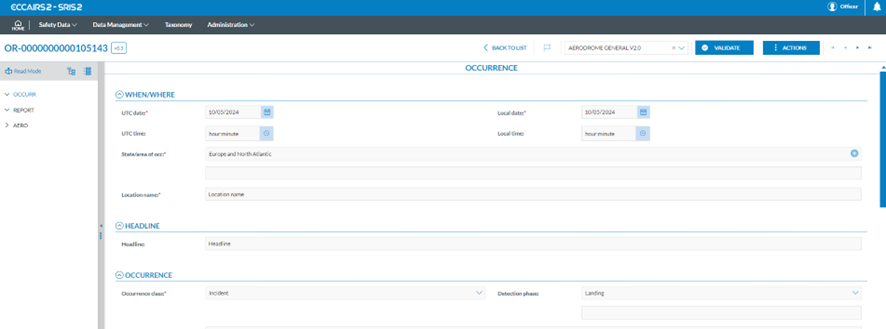
When the Officer selects a topic, the attributes under the different sections of the topic will be displayed in the right panel.

When the ‘Read Mode’ is selected, a ‘Print’ button is provided to print the report.
To recover the left pane with the topics, the Officer has to click on ‘Edit mode’ above the form.
Below the Read Mode icon of the left pane, the system displays the topics defined for the selected view. i.e.:
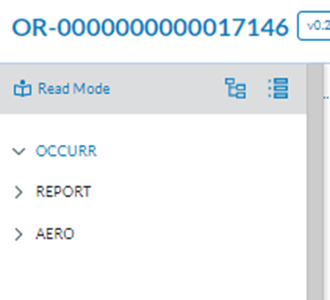
The Officer can click on a specific topic, and the system will display that topic:

3.4.3. Archive
Only available to ‘Open’ reports (E2 Status) it applies to ORs, VRs and OCs. The system displays a confirmation message when the Officer clicks on ‘Archive’ on the 3-dot menu.
If the Officer confirms the action, the report is archived and is stored as an archived report. Its status will turn from ‘Open’ to ‘Archived’.
The Officer can click on the ‘Restore’ option of the 3-dot menu of the archived report. The officer confirms the action to unarchive a report, changing the status from ‘Archived’ to ‘Open’ (E2 Status) and moving the report to the ‘In progress’ tab.
3.4.4. Saving options
The ORs are not editable for the Authority Officers. The save options are only available for VRs and OCs:
Saving options for VRs:
· Back to list button: it directly returns to the list of VRs.
· Discard button: it displays a confirmation message. If the Officer clicks on it, the system will return to the list of VRs, and the updates will be lost.
· Minor button: It saves the VR as a minor version and closes the action.
· Draft button: It will save a draft version of the VR and will close the action.
Saving options for VRs:
· Back to list button: it directly returns to the list of OCs.
· Discard button: it displays a confirmation message. If the Officer clicks on it, the system will return to the list of OCs, and the updates will be lost.
· Minor button: It saves the OC as a minor version and closes the action.
· Major button: It saves the OC as a major version and closes the action.
· Draft button: It will save a draft version of the OC and will close the action.
3.4.5. Notifications
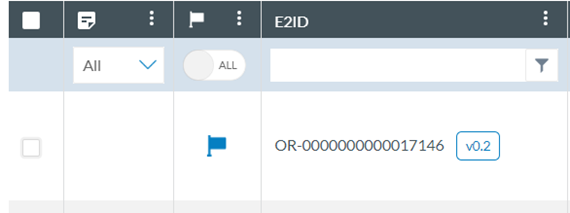
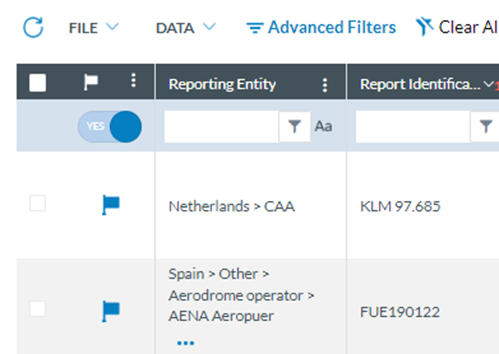
The Officer can directly flag a report in the ORs, VRs, or OCs list to be alerted of any future updates through notifications in the E2 Web Application landing page with optional email notification of any update. See details in the Object-based notifications section.
Directly by clicking the flag of the specific report of the list:
Or by checking the specific reports of the list, clicking on the File menu above the list of ORs, VRs or OCs and then clicking on ‘Notify’:
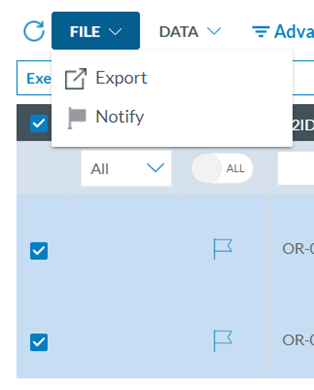
The system will display the following window:
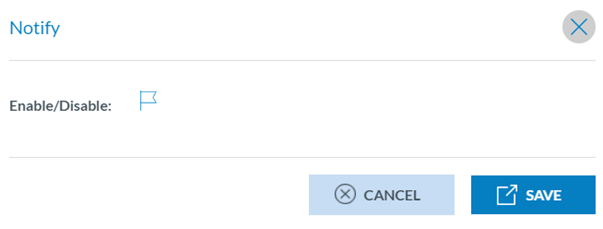
The Officer will check the flag to activate or deactivate the notifications on updates on the selected reports and will click on ‘Save’. Future updates on those reports will be sent to the specific officer if the flag was enabled. The list of flagged reports can be filtered using the filter at the top of the column.
3.4.6. Version History
This option of the 3-dot menu of each OR, VR and OC shows a modal view with all the changes the report has been through, including modification dates and users and the changes in the attributes, if edited.
The Version History can be filtered by:
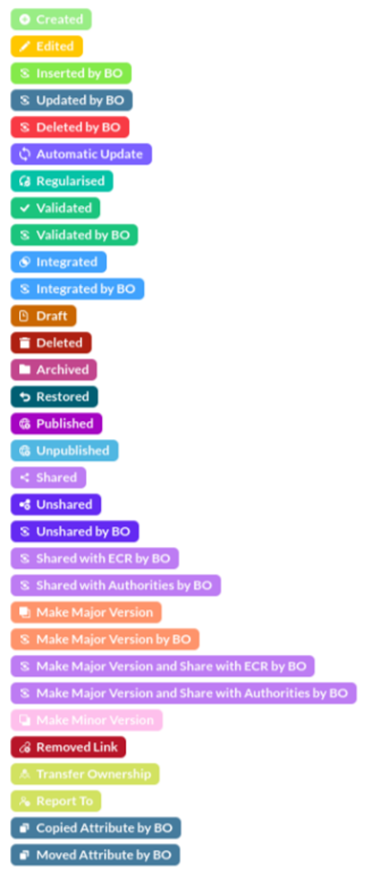
Actions: All the Actions a report can go through are registered in the Version History with a different colour:
Reports: all the reports related to the report being consulted in the Version History.
The user can select the related reports, if any, and see the changes in them in chronological order.
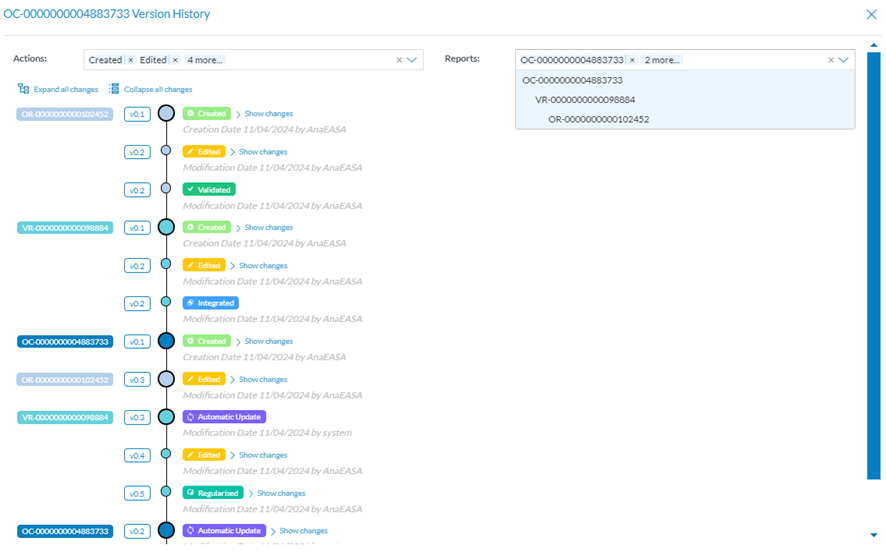
Together with each action, the Modification Date and the user account of the user who made the action are included. For some of the actions, for example, ‘Edit’, a ‘Show Changes’ section is included, which shows the attributes that were added, changed, or deleted.

3.4.7. Export
The Officer can export one or more ORs, VRs and OCs in different file formats.
· To export one report: This 3-dot menu option works for each listed report.
· Export in bulk: The export option can be performed by selecting multiple reports on the list and clicking the File drop-down menu above the list of reports.
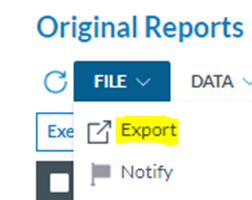
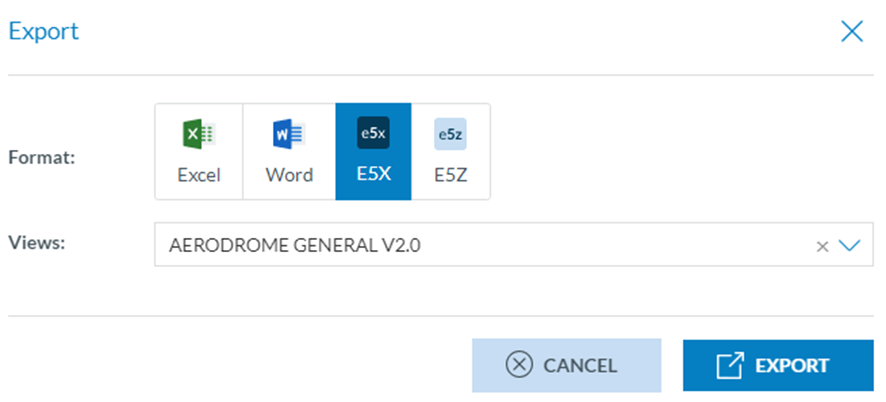
The Officer checks the specific reports to be exported at the list and clicks on ‘Export’ under the ‘File’ menu. The system will display the following pop-up window that works the same for individual exports:
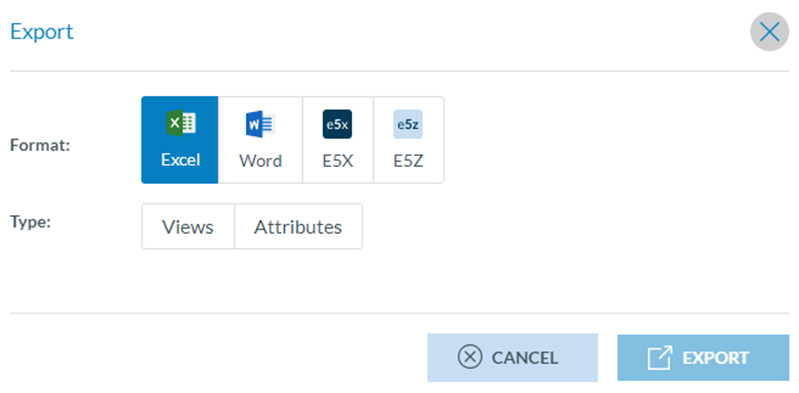 The Officer can select the format (Excel, Word, E5X, E5Z).
3.4.7.1. Excel Format
When it is selected, the system will display:
· View: A view is a template used to view the data; this export will take the same attribute selection in the same order as displayed in the view. The system displays the views menu with all the views available for the Officer and must select the specific view to export the file, i.e.:
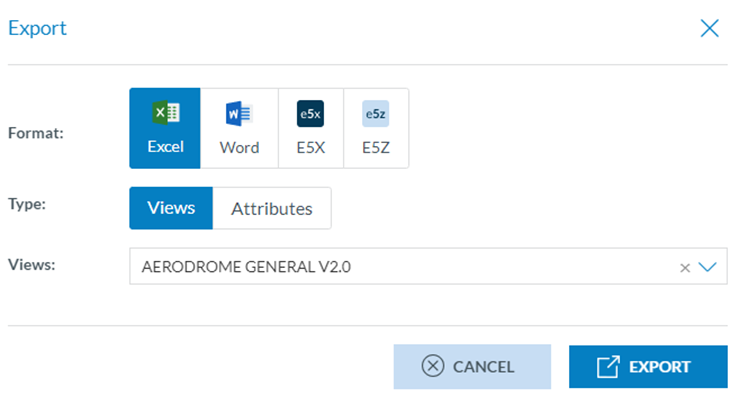
Then, click on the ‘Export’ button. The system will send an email notification to the Officer with a link to the export file.
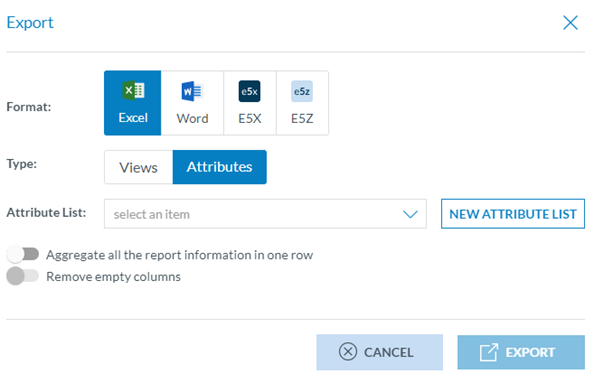
· Attributes: When the Officer selects ‘Attributes’ the system will display the Attributes List drop-down menu and the ‘New attribute list’ button:
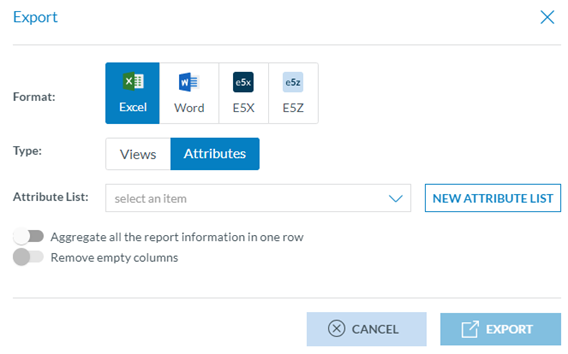
An Attribute List is an export profile available for the Officer, where they can save their export preferences. They can create one on the fly if no Attribute List item is available.
The Attribute Lists can also be created through the ‘My Account’ menu and the ‘Attribute List’ tab. See the Export by Attribute section for more details.
When the Officer clicks on ‘New attribute list’, the system will display the Attributes List pop-up window:
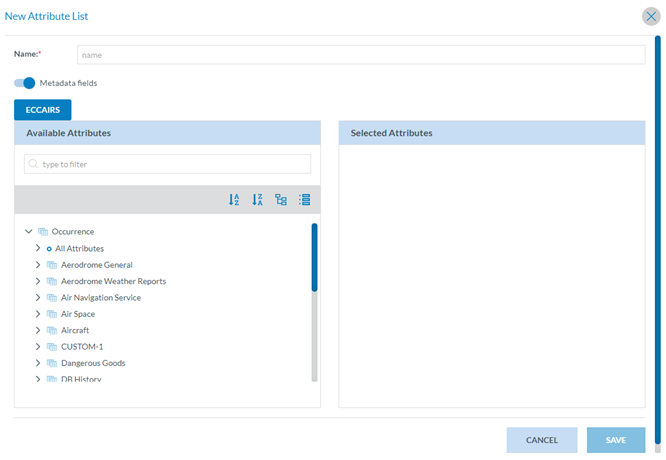
The Officer has to fill in the Name field that is unique to each Attribute List export profile. The metadata fields check is activated by default. The Officer can deactivate it so the metadata attributes of the selected reports will not be exported.
Below, the system displays the taxonomy tree, through which the officer can navigate and select the specific attributes they want to be exported.
The arrows unfold the items contained under each entity. See the Taxonomy Browser section for further detail on its navigation. The Officer can also write in the Filter field to find the specific attribute. The Officer has to check the specific one/s, and they will appear under the ‘Selected Attributes’ title, i.e.:

The Officer has to click on ‘Save’, and the system will return to the Attributes List selection window:
Here, the Officer has to select the corresponding created ‘Attribute List’ from the drop-down menu and decide if they want to ‘aggregate all the report information in one row’, and whether they want to ‘Remove empty columns’. Then, the actor clicks on ‘Export’, and the system will email the Officer’s address to send the Excel file with the OR/s.
3.4.7.2. Word format
When exporting reports to a Word format, the system picks the data in the reports. It is put into a Word Template to facilitate the generation of ready-to-distribute documents.
When it is selected, the system will display:
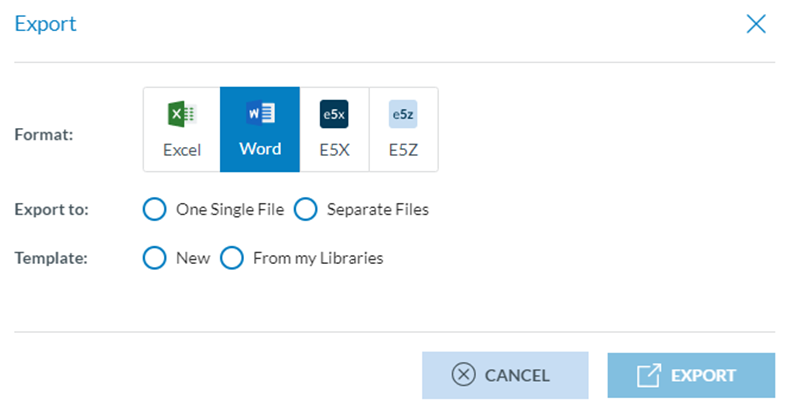
· Export to radio button:
ü This presents two options, either ‘One Single File’, if the Officer wants a compressed file containing one word document for all the reports or ‘Separate Files’, if the Officer wants a compressed file containing one document per report.
· Template radio button:
ü When the Officer selects ‘New’, the system will display a files section where the template can be uploaded through the ‘Select files’ button. The Officer can also drag the file/s and drop them in this section.
ü Officers can select ‘From my Libraries’ if a template is already available in the libraries available to the Officer.

The Officer must upload the template file and click ‘Export’. The system will email the Officer a download link when the report is ready.
From my Libraries: when the Officer clicks on this option, the system will display the Libraries pop-up window:
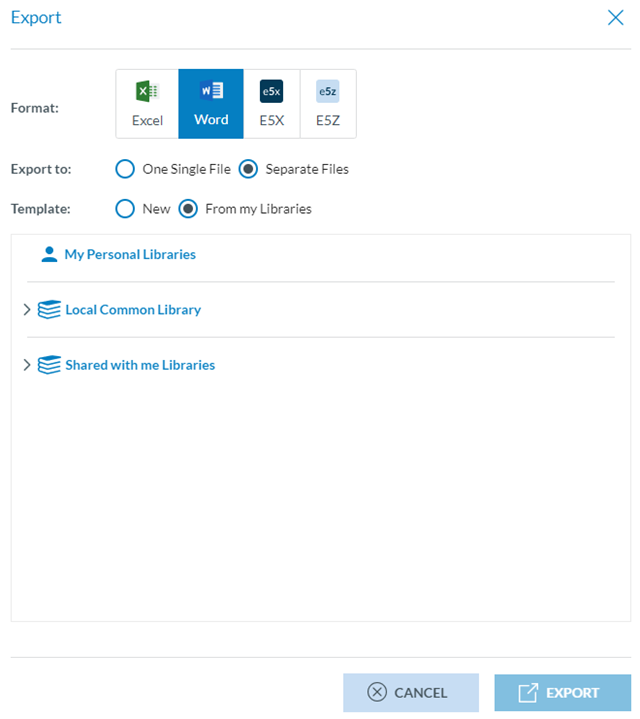
The system will display below ‘My Personal Libraries’ with the tree of Libraries available to the Officer.
The Officer will unfold the libraries through the arrows, select the specific template, and click on ‘Export’. Then, the system will email the officer’s address to send the Word file with the reports.
Nonetheless, the creation of word templates is also managed through the Data Management menu, ‘Word Templates’. See section Word Templates for further detail.
3.4.7.3. E5X and E5Z format:
When the Officer selects one of these options, the system displays the ‘Views’ drop-down menu below. The Officer can select a view on the menu and click on ‘Export’:
The system will email the Officer when the E5X file(s) will be ready to be downloaded with a download link.
3.4.8. File number
File Number is an attribute of the ECCAIRS taxonomy (452) that identifies the report (OR, VR or OC) the Officer is saving. It is unique per type of object and Authority. The pattern used to define the file number is determined at the Authority level.
3.4.9. Data menu - Refresh Queries
Next to the File menu, above the list of ORs, VRs or OCs, the system displays the Data menu:
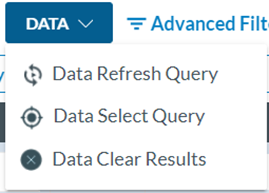
Data Refresh Query: When the Officer has selected queries through the ‘Data Select Query’, as explained above, the system will show them in the Data Refresh Query window where the Officer will select a specific query and will click on ‘Execute’:

The system will execute the query, and the system will update the list of results based on the selected query:

Data select Query: This button displays a modal window with the libraries available to the Officer to select a query:

The Officer has to navigate the available libraries, select a query, and click ‘Execute’.
The system will update the list of ORs based on the query's conditions.
The last 10 queries executed through this button will be available through the ‘Data Refresh Query’ option.
Data Clear Results: This button deletes the application of the queries in the list of results. When the Officer clicks on it, the system updates the list of ORs, removing all the filters and presenting all the results.
 Refresh icon: to refresh the page.
3.4.10. Reference table values to fill in the form
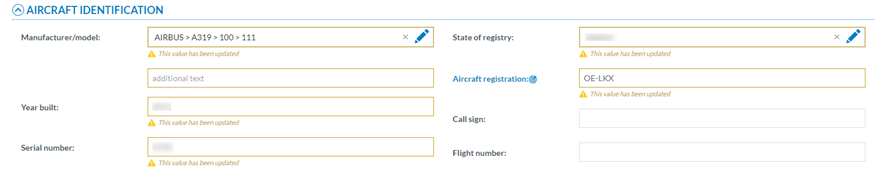
RefX, Reference Tables simplify data entry for reporters and Officers. The purpose is to centrally store look-up tables that will be used based on a trigger value to automatically retrieve the associated values. For instance, the aircraft registration reference table stores the aircraft registration number (used as a trigger). It already includes key information related to this aircraft registration number, such as make, model, aircraft category, state of registry, propulsion type, year built, etc.
The values are used to allocate data that will help reporters fill in the OR web form, and Officers fill in the VR/OC forms. There can be multiple RefX, linked to different attributes, meaning an attribute can only trigger one RefX.
All triggering attributes are identified in the view with a Triggering attribute icon  and are presented in blue:

The Officer has to type a value in the attribute field and click on the triggering attribute icon to open all the possible values registered in the Reference Database to help the Officer fill in the view.

The Officer selects a set of values from the list and clicks the 'Update' button.
The attributes in the list are automatically filled in the view with the selected values. The automatically updated attributes are highlighted in the view to help its revision, as follows:
3.4.11. European Risk Classification Scheme (ERCS)
The European Risk Classification Scheme (ERCS) is a methodology used to assess the risk posed by occurrences in civil aviation. It provides a safety risk score based on various factors. The ERCS addresses the safety risk of an occurrence and not its actual outcome. The assessment of each occurrence determines the worst likely accident outcome that might have happened and how close to that accident outcome the occurrence was.
The ERCS score is composed of two variables:
· Severity: the worst likely outcome in case the occurrence had escalated into an accident
· Probability: the likelihood of the occurrence escalating into that outcome
An out-of-the-box role, defined for officers, already exists, with the proper permissions assigned.
The Officer has to click on the ERCS button located in the view, next to the 'Risk Management' topic, i.e.:
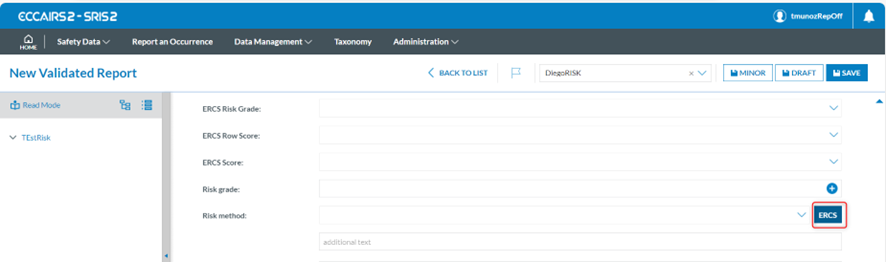
The system will display a modal window with the ERCS wizard:

It is formed by 4 simple steps:
1. Outcome / Key Risk Area Level 1: where the officer has to select the most likely type of accident (key risk area) and click on Next.

2. Severity: where the Officer has to select how many possible fatalities would have been involved in an accident in case there was one and click on ‘Next’.

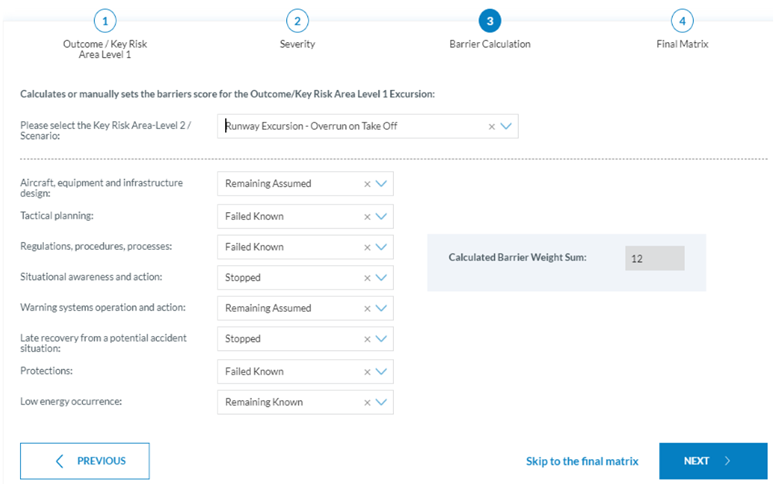
3. Barrier calculation: The officer has to select the values for the barriers list. The Barrier Weight Sum is calculated according to the Officer's selection. The Officer has to click on ‘Next’.
4. Final Matrix: The calculated risk grade is highlighted in the matrix with a tick icon and blue border. The Officer can change this value by clicking in another cell, and the system will add a field to make mandatory comments.
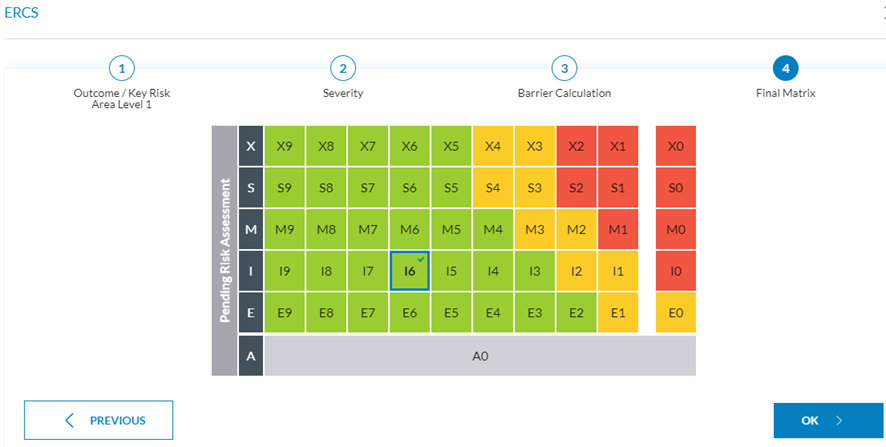
The Officer can click 'Skip to the final matrix' at any step. By doing so, the system redirects to the final step so that the Officer manually selects the risk grade. The Officer will be asked to explain that choice.
The Officer can return to any previous wizard question by clicking the ‘Previous’ button or the step number.
Once the Officer completes the process, click the OK button, and all the selections will be transferred to the edited view.