3.2. VR Management
A Validated report (VR) refers to a copy of an original report that the Authority Officer has validated. It is editable by the Officer and can enrich the report with additional information not available in the initial report. The VR is never shared outside the Authority. An Authority Officer can also create a VR from scratch through the E2 Web Application.
The Validated reports can be converted into a new occurrence or integrated into existing occurrences through an integration process.
To manage VRs, the Authority Officer accesses the E2 Web Application home page and selects the Safety Data menu on the left:

They then click ‘Validated Reports’. The system displays the list of VRs with the reports for the specific Authority to which the identified Officer belongs:

Officers can customise the VRs list as explained in the section Reports Lists.
3.2.1. Status and status filters
Above the list of VRs, on the right side, the system displays the filter tabs:

The list of results will restrict the VRs based on the selected tab.
· My Drafts: refers to VRs the Officer is editing. The list of VRs will show ‘Draft’ on the ‘E2 Status’ column and cannot be edited by another Authority Officer.
· In Progress: refers to ‘Open’ VRs. The list of VRs will show ‘Open’ on the ‘E2 Status’ column, and if an Officer is currently editing the VR, it will show a ‘padlock’ icon.
· Processed: refers to VRs integrated into an OC. The E2 Status column of the list of results displays ‘Processed’ for the VRs integrated in OCs.
· All: refers to all the VRs belonging to the Officer’s Authority regardless of status.
· Archived: VRs sent to the archive. The E2 Status column of the list of results displays ‘Archived’ for VRs.
The status of VRs can be the following:
· Draft: Draft status refers to a VR created or edited by an Officer and saved with the changes but not as a new document version. As with any other Draft in the application, the drafts can only be viewed by the user who creates it.
· Open: they are the VRs that are not integrated into an OC. The Officer can edit open VRs.
· Processed: VRs which have been integrated into an OC and cannot be edited by the Officer.
· Archived: VRs stored in the archive.
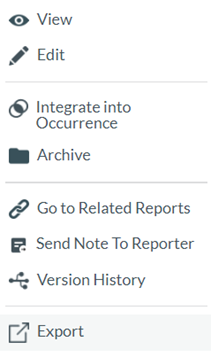
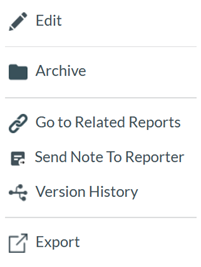
3.2.2. 3-dot menu of the list of VRs – VR features
On the extreme on the right side of each VR row of the VR table or list, there is a 3-dot menu.

If the Officer clicks on it, the system will display the following window:
For Open VRs:
For Processed VRs:

3.2.3. View
When clicking on View in the 3-dot menu (or double-clicking in the list view on any row), the system will display the content of the VR with the view the Officer has saved in ‘My account’. See Views of My Account for further details.
Otherwise, the system displays a page where the Officer has to select the specific view for the VR:


The Officer can integrate the VR into an OC by clicking on the ‘Integrate’ button, as explained in the next section, Integrate into Occurrence.
3.2.4. Integrate into occurrence
Only VRs in ‘Open’ status can be integrated into an OC. The integration is the process of converting a VR into an OC; it can be integrated as a new occurrence or into an existing one. The VR will be changed to ‘Processed’ status in the list of VRs.
A new Occurrence will be created, or an existing one will be updated. Either way, the OC will be linked to the related VR and OR.
The Officer clicks ‘Integrate into Occurrence’ on the 3-dot menu of the specific open VR in the list of VRs, and the system will display the list of ‘Validated Report into occurrence’ with all OCs available in the Authority’s database:

3.2.4.1. Integrate into a new occurrence
When the Officer has clicked on the ‘Integrate into occurrence’ of the 3-dot menu of the VR of the list, above the list of VRs and the Similar Occurrences toggle, the system displays a ‘New Occurrence’ button. The Officer can click on it, and the system will display a confirmation message. The Officer will confirm it, and the VR will be integrated into a new OC, and its status will turn to ‘Processed’ in the list of VRs.
3.2.4.2. Integration into existing occurrence
If the Officer knows the OC where to integrate the VR, a search can be done through the E2ID filter, file number or other available columns, as shown in the image above.
When potential similar OCs are unknown, or their data are unknown to the Officer, the Officer can select the ‘Similar Occurrences’ toggle. By clicking it, the system verifies if similar occurrences exist and provides the Officer with a list of these similar Occurrences.

Searching for similar occurrences is based on an attribute-weight base algorithm configured at the system level. The algorithm uses the following attributes:
|
Attribute |
Description |
|
5 |
Location indicator |
|
54 |
Call sign |
|
120 |
Flight number |
|
167 |
Last departure point |
|
215 |
Operator |
|
228 |
Planned destination |
|
244 |
Aircraft registration |
|
254 |
Aircraft serial number |
|
433 |
Local date |
|
438 |
Report identification |
|
447 |
Reporting entity |
|
477 |
UTC date |
|
881 |
Engine serial number |
|
21 |
Aircraft manufacturer model (in this attribute the validation is made with the second level value of the Value List) |
The attributes mentioned above of a VR will be checked for equality against the same attributes of all occurrences in the Authority’s database.
Some considerations:
· The algorithm is divided into 4 blocks, and each block is given a certain weight
· Block 1 and block 4 are mutually exclusive; therefore, the total is a maximum 100%
· As the similarity algorithm scans the full database, only the OCs with Attributes 433 (local date) and/or 477 (UTC date) filled out are checked for performance reasons.
All 4 blocks are executed, giving the found occurrence a similarity score. The occurrences with a score > 50% will be shown in a sorted list.
· Block 1 (50%): The Aircraft flight details. If one of the following conditions is met, the weight will be 50%.
ü (UTC date or Local date) and Aircraft Registration.
ü (UTC date or Local date) and Aircraft serial number.
ü (UTC date or Local date) and Engine serial number.
ü (UTC date or Local date) and Call sign.
ü (UTC date or Local date) and Flight number.
ü (UTC date or Local date) and Report Identification.
· Block 2 (25%): The geographical details. If one of the following conditions is met, the weight will be 25%.
ü (UTC date or Local date) and Last departure point and Planned destination.
ü (UTC date or Local date) and Location indicator.
ü (UTC date or Local date) and Operator.
ü (Report identification or Reporting entity).
· Block 3 (25%): The Aircraft's physical details. If one of the following conditions is met, the weight will be 25%.
ü Aircraft master model and Aircraft Registration.
ü Aircraft master model and Aircraft serial number.
ü Aircraft master mode and Call sign.
ü Aircraft master mode and Flight number.
ü Aircraft registration and Call sign.
ü Aircraft registration and Flight number.
· Block 4 (25%): The same as block 1, except a variance for the UTC/Local dates of +/- 1 days is considered. If one of the following conditions is met, the weight will be 25%.
ü (UTC date +/- 1 day or Local date +/- 1 day) and Aircraft registration
ü (UTC date +/- 1 day or Local date +/- 1 day) and Aircraft serial number
ü (UTC date +/- 1 day or Local date +/- 1 day) and Engine serial number
ü (UTC date +/- 1 day or Local date +/- 1 day) and Call sign
ü (UTC date +/- 1 day or Local date +/- 1 day) and Flight number
ü (UTC date +/- 1 day or Local date +/- 1 day) and Report identification
On the right of the list, there are three icons per row:
 Integrate icon: It will be activated when the report is not blocked (OC has a Draft version or a batch operation is being executed over the OC). The Officer clicks on it, and the system will display a confirmation message. The Officer confirms the action, and the system will display the integration page (explained later in Section 2.2.6.1)
 Discard icon: This icon discards the OC, so the VR cannot be integrated into that OC. If clicked, the Integrate icon is disabled, but the OC remains on the list.
 Restore icon: This icon is only active for the OCs that have been discarded. It reactivates the Integrate icon for that OC.
2.2.4.3. Integration screen
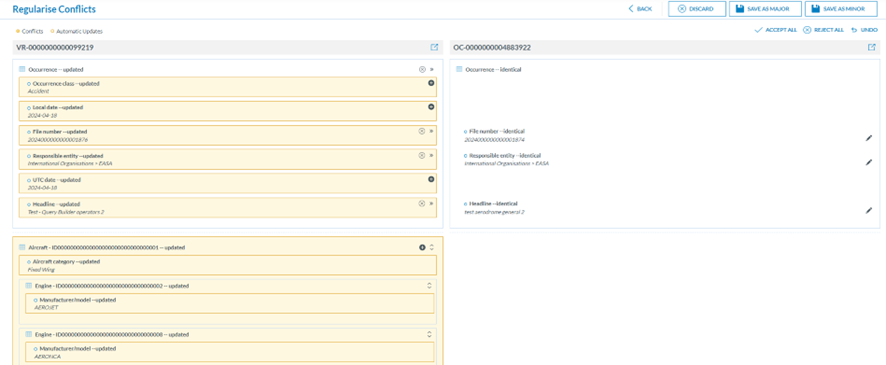
When the VR is integrated into an existing OC, the same screen as in the Conflict Resolution is displayed to the Officer. This screen allows the Officer to validate the information from the VR and the OC.
The identifying process of the entities is explained in Section 2.2.15, Automatic Updates and Conflicting Reports.
We have to explain what an Attribute Owner is. When more than one VR integrates an OC, each VR can update each attribute. However, as a principal, a Reporter cannot contradict what the Officer or other Reporter had said. So, when integrating the VR into the OC, the Officer can select the attributes of that VR that will be the owners of those same OC attributes. This is done by replacing the OC attribute with the VR one. Note that even if the information of the attribute is the same, the attribute is marked as “conflicting”. The reason for this is that it might be the case the Officer wants to make that VR owner of that Attribute, an in order to do so the information must be displayed even if it is the same in the VR as in the OC.
Being the owner of an attribute means that any update on that OR will automatically be updated at the OC level. If any other VR tries to change the attribute, the system will create a Conflict. The owner of the attribute is the last one selected on the integration screen.
When the Officer integrates the VR into an OC, the system displays all the information on the two documents. The officer can then select which attributes/instances they want to copy into the OC and make them owners of those attributes/instances.
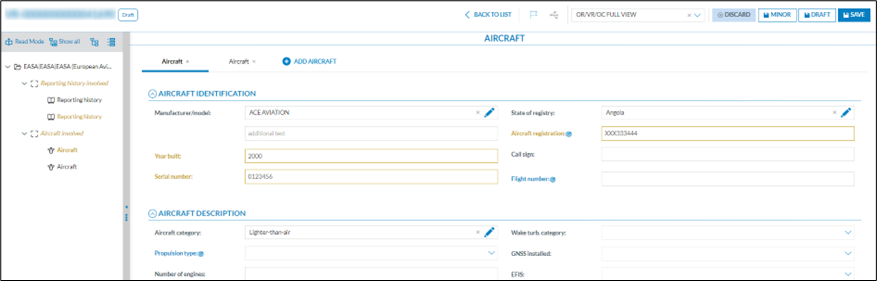
3.2.5. Edit
This option is only available for ‘Open’ and not blocked VRs. When the Officer clicks on the ‘Edit’ option of the 3-dot menu of the specific VR of the list of VRs, the system will display the content of the VR with the view the Officer has saved in ‘My account’. See Views
of My Account for further details.
Otherwise, the system displays a page where the Officer has to select the specific view to edit the VR:

The Officer selects the view in the drop-down menu, and the system displays the specific VR in Draft:

Through the left panel, the Officer can access the different topics of the view.
The Officer can discard the changes made to the VR, save them as a Draft or Minor version, return them to the VRs list, or save the changes on the current page. See Saving Options for further details.
3.2.6. Archive
This option is to archive VRs. See details in the Features applicable to all reports - Archive section.
3.2.7. Regularise conflicts
The regularisation of conflicts is explained in detail in the section Automatic updates and Only Conflicting Reports.
3.2.8. Go to related reports
This option is only available for those VRs that:
· are in Open status and come from an OR; and/or
· are in Processed status. That is, they have been integrated into an OC.
A modal view shows the reports on which VR is related.

· The user can navigate to the reports by clicking on the ‘Go to the report’ icon.
· Additionally, by clicking on the corresponding ‘remove the link’ icons, they can remove the:
ü OR-VR link
o By doing so, the status of the OR is changed from Processed to Open.
o Note that while it removes the link between the OR in the VR, the link between VR and OC is maintained if it exists.
ü VR-OC link
o By doing so, the status of the VR is changed from Processed to Open.
o Note that while it removes the link between the VR in the OC, the link between OR and VR is maintained.
3.2.9. Send note to reporter
The VRs that have come from an OR, provide this option under the 3-dot menu. It allows the Authority Officer to contact the Reporter within the system if additional information or clarification is required.
The Officer has to click on this option of the 3-dot menu for the specific VR and the system will display a modal window:
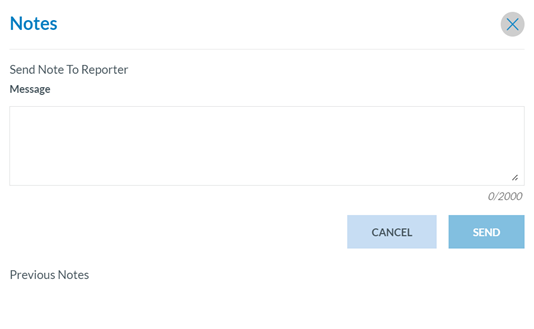
The note will be sent by email to the registered reporter.
Additionally, a Note icon  will appear by the OR in the list on the landing page of the registered reporter. As a result, the Reporter can send an updated report with the additional information or changes sent by the Officer.
3.2.10. Creation of a Validated Record from scratch
The Officer can create a new VR from scratch without having to validate an OR.
As the VR is saved, the system validates if it already exists in the Authority by checking the following attributes of the ECCAIRS Central Taxonomy:
· Report Identification (438)
· Reporting Entity (447)
· UTC Date (477)
If there is a match, the system informs the user that the VR already exists.
The Officer has to access the VR management option under the Safety Data drop-down menu, and the system will display the VRs list. Above the list of VRs and the filters, there is the ‘New Validated Report’ button:

The Officer clicks on it, and the system displays the New VR page, based on the default view the Officer has previously set through ‘My account’. See Views of My Account for further details.
If no view has been previously set, the system will display the Views drop-down menu:

The Officer selects a View on this menu for the system to display:

The Officer can move between topics through the navigation tree on the left page.
The Officer can discard the VR, save it as a Draft or Minor version, return to the VRs list or save the changes on the current page. See Saving Options for further details.
3.2.11. Export
This option exports the specific VRs of the list to different file formats. See details in the Export section.
3.2.12. Other VR features
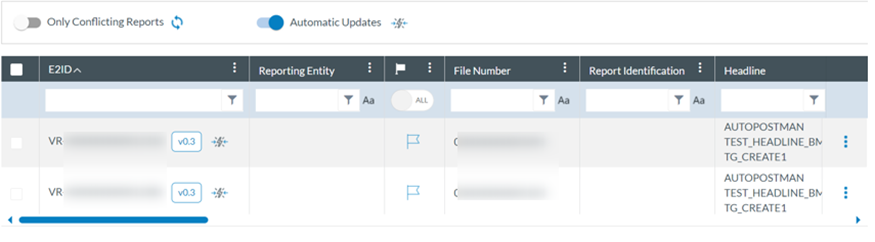
The Officer clicks on the Advanced Filters menu, and the system displays below the ‘Only conflicting Reports’ and the ‘Automatic Updates’ toggles:

3.2.13. Automatic updates
Once the OR is validated, the reporter can update the information on the report. If the OR is saved as a minor version and has related reports (VR or VR and OC), the application tries to copy the new information into the related reports of the OR. This process is called Automatic Update.
If there is new information updated, the application shows it in the view screen of the VR/OC with the fields updated highlighted as in the screenshot
Automatic updates are carried out on the related reports (VR and OC). Documents that have been automatically updated are marked with an icon in the list and have an Advanced Filter to display only those documents.
3.2.14. Conflicting Reports
Before getting to what a Conflict is, we first must explain how the system identifies the Entities and Instances. When a report is created, its entities and instances are assigned an ID. That ID is unique and is used to identify the Entity or Instance. If the Report is created Online, through a PDF or the API, the application creates the ID, but if the Report is submitted through an E5X file, it could be that it has an ID included in the E5X file (from now on referred to as E5X ID or External ID) or not provided. If the E5X ID is provided, the system will use that to identify the Entity/Instance.
If there is no ID in the E5X, the system then will try to identify the Entities or Instances through the Key Attributes. Key Attributes (referred to from now on as KA) are unique attributes settled by EASA at the central level to identify instances. There can only be one Key Attribute per instance, and currently, the following ones are available:
· Aircraft: Aircraft Registration Number
· Aerodrome: Location Indicator
· Airspace: FIR/UIR Name
· Narrative: Narrative Language
· Events: Event Type
· Reporting History: Report Identification
If those attributes are present in each instance, the system identifies them and tries to match them with the existing ones in the Documents. If there is a match, the instance is updated. If there is no KA match, a new instance is created.
A Conflict is created every time the Reporter makes an OR update. The system will automatically make the Automatic Update on the related reports. If, by doing so, the updated attributes try to modify information the Officer has updated or the system does not know with which instance (no E5X ID or KA) it is related, it will create a Conflict.
Conflicts can exist between the OR and VR, and between the VR and OC. The Officer must first resolve the conflict between the OR and VR before solving any conflict between the VR and OC.
With that information explained, when a Conflict is created, no other update is carried on until the Conflict is solved. The VR is blocked until the Officer solves the conflicts. The Officer must go to the Regularise Conflicts option in the three dots menu to do so. The VR with an existing Conflict is marked with the icon . It is also an advanced filter, so only the conflicting VR are displayed.
When the Officer enters this screen, a VR Draft is automatically created, blocking VR for the rest of the Authority Users. For all the Conflicts, the header is the same with the following buttons and actions:

· Back: returns to the table with all the VR. Before returning to the VR table, a modal requesting the Officer to discard unsaved changes is displayed.
· Discard: it deletes the Draft, and all the work done is lost. There is a modal requesting confirmation for this action. The conflict is not solved, and VR is still blocked.
· Save as Minor: Save the VR information displayed on the screen as a minor version. The Conflicts not approved will be automatically discarded, and the automatic updates will be accepted.
· Accept All: accepts all the conflicts and copies all the information from the OR to the VR. The system will show a modal advising that the instances replaced in the VR will lose all the information contained as it is fully replaced by the Instance's OR. The Officer must confirm this action for each instance that has a conflict.
· Reject All: Reject all the conflicts simultaneously, including the Automatic Updates.
· Undo: returns the VR to the starting point when the Officer opens the Conflict Resolution Screen.
Talking about the OR-VR information, the Officer can see on the left side the OR information and on the left side the VR information. It is important to remark that only the information that has been modified (either by an Automatic Update or is in Conflict) is displayed on this screen.
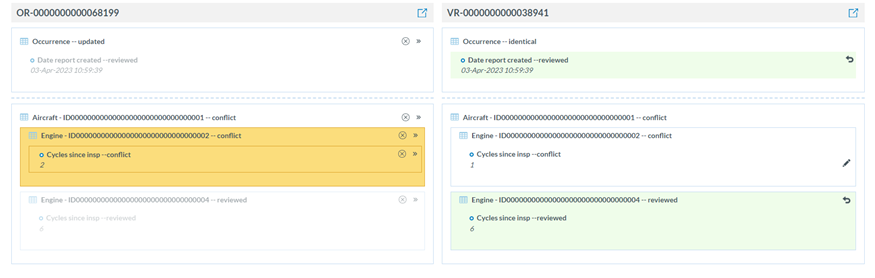
On the VR side, the Automatic Updates are marked in light green. The Officer can undo them by clicking the arrow icon (/) at attribute or instance levels.
The Conflicts pending to be solved are on the OR side, in dark yellow. The Officer can add the attribute or instance by clicking the double arrow icon ( ) or reject the Conflict by clicking the X icon (
 ).
).
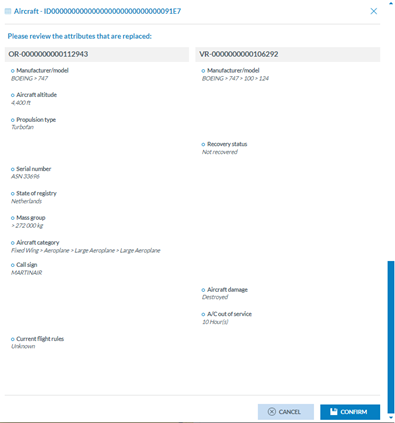
If the attribute is moved to the VR, the information is updated at the VR level with the latest Reporter’s update. If the instance is moved, all the Instance’s VR information is replaced by what the Instance’s OR has, even the information not shown on this screen. If this is the case, a new screen is presented to the Officer to confirm this action.
When the Officer has finished reviewing the conflicts, they have three options on the top right side of the screen:
· Back: returns to the VR listed screen. It does not save the changes made but keeps a Draft of the VR. Conflicts are still pending to be resolved.
· Discard: this option closes the Conflict Resolution screen without any change saved and deletes the draft. Conflicts are still pending to be resolved.
· Save as Minor: the Conflict Resolution screen is closed and all the changes (if any) madre by the Officer are saved in the VR as a new minor version. Conflicts are solved.
Note that the ‘Regularise conflicts’ option will only appear in the 3-dot button of the VR when the Open VR is not blocked.