3.3. Batch operations
With Batch Operations (BO), only available for National Aviation Authorities at present, the Administrator performs actions over the safety data automatically, in bulk, without needing to change each individual report. These are some examples of these actions:
· Update, insert, delete Attribute
· Process Original reports, Validated reports, Occurrences in various forms and states
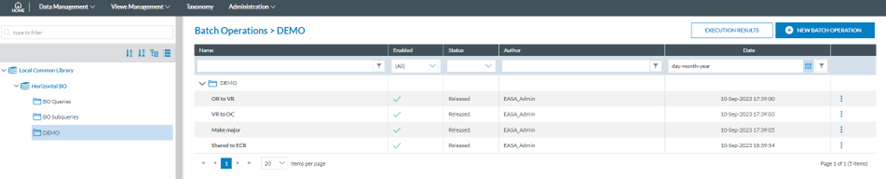
The Administrator manages the BOs through the BO menu of the Data management section:
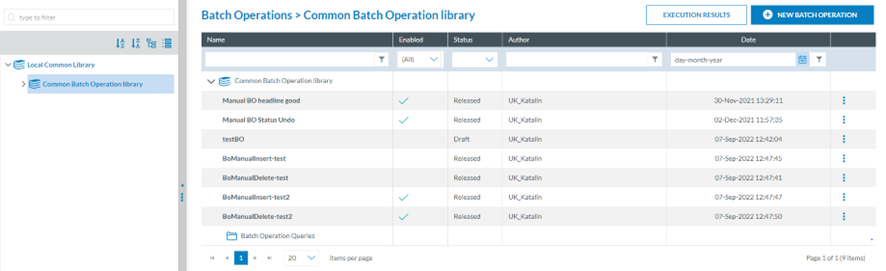
Next to the Libraries tree, the system displays the table of BOs of the Common Batch Operation library. It can include subcategories divided into columns, which also work as filters:
· Name: unique for each BO.
· Enabled: a green tick shows if it is enabled.
· Status: drafted, released or archived. The status cannot be released as long as it has not been published.
· Date: of the creation of the BO.
Review the documentation on 'How to use MABOs' for more updated information on multiple action batch operations.
3.3.1. BO Management
3.3.1.1 Create a batch operation
Once the Administrator is in the BO menu, they must click on the ‘New Batch Operation’ button above the table of BOs.
The system displays the ‘New BO’ window:
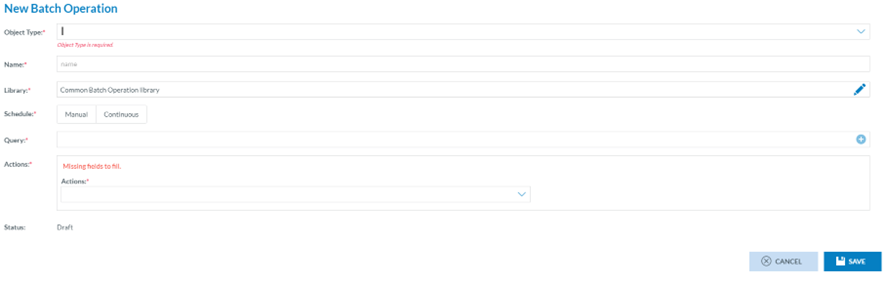
The Administrator has to fill in the following fields:
· Object type that can be OR, VR or OC
· Name: that has to be unique
· Library: it can be the Common Batch Operation library or its categories/subcategories.
· Schedule: The Administrator has to select Manual or Continuous
ü Manual: The action defined in the batch operation will be applied to the documents that meet the conditions expressed in the query of that manual batch operation when the BO is executed.
When selected, the system will display the ‘Undo toggle’ deactivated. The Administrator can leave it like that or activate it so that the system will display the ‘Minutes’ field. The Administrator has to fill it in.
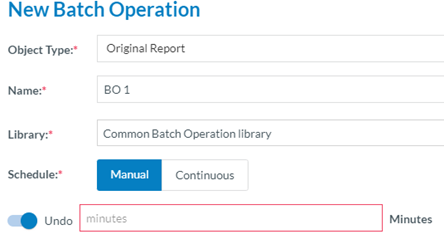
The ‘Minutes’ field sets the time the Administrator has to undo the execution of the BO’s grace period during which the action executed by the batch operation can be undone.
Manual batch operations can be based on queries with ‘Ask me later’ rules. When the ‘Undo’ is set and the BO saved, the ‘Undo toggle’ is disabled from the 3-dot menu.
ü Continuous: These are executed automatically every time a document is saved and meet the conditions expressed in the query of the continuous batch operation. One or more continuous batch operations can be triggered when the document being saved meets the conditions of each of the queries of these batch operations. In that case, they are executed in alphabetic order. In continuous batch operations, it is not possible to define a grace period during which the action can be undone and cannot be based on queries with the ‘Ask me later’ rule.
· Query: The Administrator must select among the queries in the selected library.
· Actions: Generally, batch operations actions are only applied over unlocked documents in Status=Open.
The possible actions that a batch operation can execute depend on the object type (report):
|
Document Type |
Possible Actions |
Preconditions to execute BO |
|
|
Document status |
Document version |
||
|
OR |
Process original report to validated |
OPEN |
Minor |
|
VR |
Integrate into occurrence |
OPEN |
Minor |
|
Insert, Update, Delete, Copy, Move, Merge Attributes |
OPEN |
Minor |
|
|
OC |
Share document to ECR |
OPEN |
Minor, Major |
|
Make a major version |
OPEN |
Minor |
|
|
Make a major version & Share it with ECR |
OPEN |
Minor |
|
|
Share the document with Authorities |
OPEN |
Minor, Major |
|
|
Make a major version & Share with Authorities |
OPEN |
Minor |
|
|
Unshare occurrence |
OPEN |
Minor, Major |
|
|
Insert, Update, Delete, Copy, Move, Merge Attributes |
OPEN |
Minor, Major |
|
Also, on the BO creation page, the Actions selection provides the following options:
For ORs: The Administrator will select the ‘Process as a validated report’ in the Actions menu:

For VRs:
· Concerning reports: Integrate into OC.
The Administrator selects it, and the system will display the similarity check toggle:

If the system does not find OCs similar to the VRs resulting from executing the BO query, the system will integrate those VRs into new OCs.
If the system finds similar OCs, then the system will not apply the action when the BO is executed. VRs will not be integrated into OCs.
· Concerning Attributes: The Administrator has to select between Insert, Update, Delete, Copy or Move Attributes.
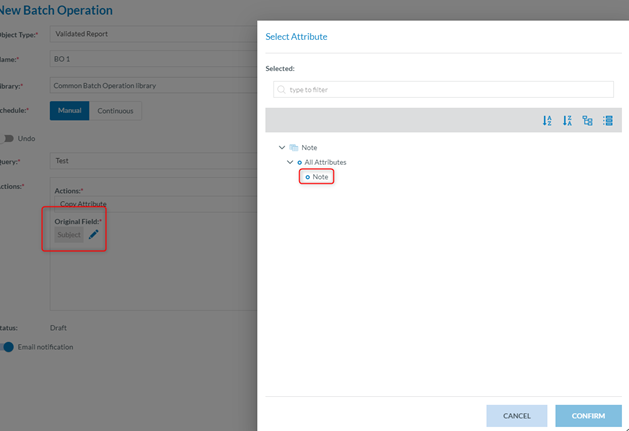
ü Insert Attribute: The Administrator selects this option, and the system will display an ‘ADD’ button to select an Attribute:

The Administrator clicks on the ADD button, and the system will display the Taxonomy browser with all the Attributes available for the Administrator:
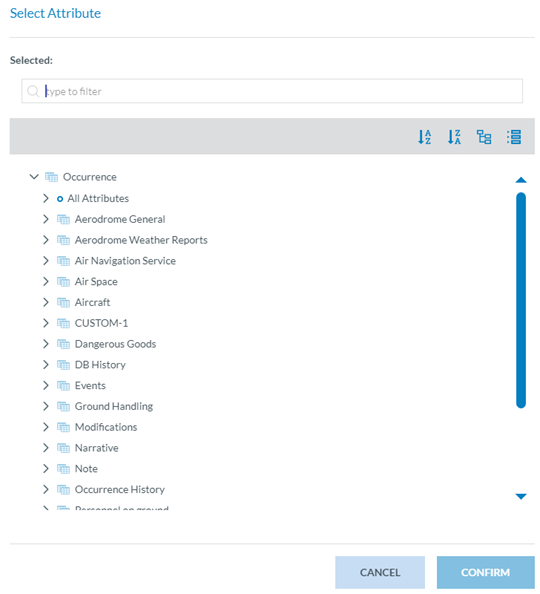
The Administrator must select the Attribute and click the ‘Confirm’ button.
When it is selected, the system will display it below the action field and will present, next to it, a field or fields to complete. In the example, a Code and Additional Text Attribute with a ‘Select Attribute value’ ADD button. This field is mandatory unless the ‘Ask me later’ check box is ticked.

The Administrator must click the ‘ADD’ button or check the ‘Ask later’ check box.

The Administrator has to select only an Attribute and click the Confirm button. The system will add the selected value to the Action section of the BO:

Below it, there will be an optional ‘additional text’ field. The ‘Selected Value’ field or fields displayed by the system match the previously selected Attribute and vary depending on that previously selected Attribute.
When executing the BO, the selected Attribute and its value will be inserted into the chosen VRs.
If Administrators check the ‘Ask later’ option instead of filling in the value when executing the BO, the system will prompt the user for the needed information.
Once the Attribute has been selected, the system allows the Administrator to add a condition through the ‘Action condition’ toggle that will display the Selected Attribute field:

The Administrator will have to select an Attribute through the ADD button. The list of Attributes will come from the same Entity as the previously selected Attribute to be inserted. The Select Layout and Select Operator menus are filled as in the section Query conditions - Attributes and metadata.
ü Update Attribute: It is to update an Attribute value of the VR. The Administrator selects the ‘Update Attribute’ on the Actions menu, and the system will display the ‘Select Attribute’ ADD button. The function is similar to the ‘Insert Attribute, ' with the only difference being in the result; when executing the BO, the system will update the value of the selected Attribute.
ü Delete Attribute: This action deletes an Attribute of the VR. The Administrator selects this option in the Actions menu, and the system will display the ‘Select Attribute’ ADD button. The system adds the selected Attribute. When executing this BO, the system will delete the selected Attribute from the VRs that meet the requirements of the BO.
ü Copy Attribute: The Administrator clicks on ‘Copy Attribute’ on the Actions menu of the BO window, and the system displays the mandatory Original field and Target field sections:

The Administrator has to click on the ADD ‘Select Attribute’ button of the Original field, and the system will display the Taxonomy browser where to select the Attribute to be copied.
Once selected, the Administrator has to click on ‘Select Attribute’ in the Target field section, and it will display a list of Attributes of the same Entity as one of the Original field Attributes.
The Administrator will select the specific Attribute and click on the ‘Confirm’ button that is enabled when the Attribute is selected.
The system will display the ‘Mismatch information’ section, warning on the different sizes of the selected Attributes of the original and target fields, which can impact the success of the execution of the BO:
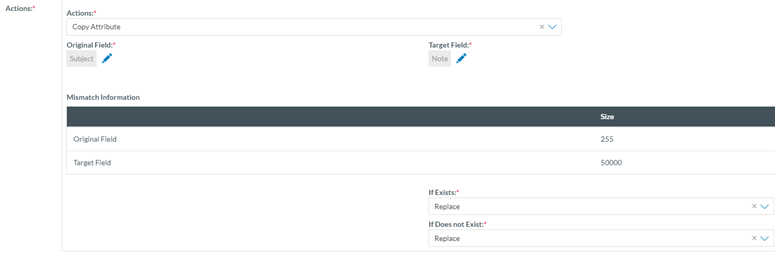
Below it, the system displays the following mandatory menus:
If it exists, the selectable values are:
o Replace: This means that if the original field Attribute exists in the VRs and meets the requirements of the BO, the system will replace it with the target field.
o Skip: This means that if the original field Attribute exists in the VRs that meet the requirements of the BO, the system will not apply the selected action to those BOs.
o Do not replace it with NULL: If the original field Attribute in the VRs meets the requirements of the BO, the system will not replace the Attribute's value with null.
If it does not exist, the selectable values for this option are:
o Replace: This means that if the original field Attribute does not exist in the VRs meeting the requirements of the BO, the system will replace it with the target field.
o Skip: This means that if the Original field Attribute does not exist in the VRs meeting the requirements of the BO, the system will not apply the selected action to those BOs.
o Do not replace it with NULL: If the Original field Attribute does not exist in the VRs meeting the requirements of the BO, the system will not replace the Attribute's value with null.
ü Move Attributes: this option moves the selected Attribute value to another Attribute of the same Entity. Thus, the Administrator has to select ‘Move Attribute’ on the Actions menu of the BO window, and the system will enable the ADD Select Attribute button. This works in the same way as the Copy Attribute option with the difference that it always replaces the Target field Attribute with the Original field Attribute, so there are options for when it exists and when it does not:
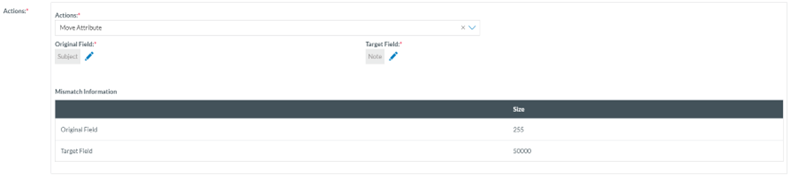
So, when the BO is executed, the original field is replaced with the target field.
ü Merge Attributes: this option allows to merge two attributes into one. The restriction that applies is that both attributes must be the same datatype. Depending on the datatype selected the options are as detailed in the following table:
|
Datatype |
Options to merge |
Target Field |
Notes |
|
Latitude and Longitude |
N/A |
N/A |
Excluded from this action. Not possible to merge them. |
|
Text |
Text + Text attributes Separator field is not mandatory and will have maximum 5 characters |
Second attribute selected to merge. Any other text attribute. |
If length of the merge exceeds the characters allowed in Target field, the string will be cut from the end until reduce it enough |
|
Number and Decimal |
Add (+), subtract (-), multiply (*), divide (/) Can be between two fields or a constant field |
Cannot be neither of the two fields used in the BO Action |
System will ignore a division by 0. Constant field can be any number (negative inclusive) |
|
Date (between two dates) |
Subtract operator only. Date 1 - Date 2 |
Any Numerical or String type |
Result can be negative |
|
Date (between one date and a constant) |
Add or subtract operators available.
|
Can be a custom attribute |
Constant field can be any number (negative inclusive) |
|
DateTime (between two dates) |
Subtract operator only. Date 1 - Date 2 |
Cannot be neither of the two fields used in the BO Action String type attributes only |
Result can be negative |
|
DateTime (between one date and a constant) |
Add or subtract operators available |
Must be a DateTime or String attribute Can be a custom attribute |
Ignore the seconds. No round ups (11:00:59 is 11:00) Constant field can be any number (negative inclusive) |
|
Time |
Add or subtract operators available |
Cannot be neither of the two fields used in the BO Action String type attributes only |
|
· Email notification toggle: if activated, it sends an email with the result of the execution of the BO.
For OCs:
· Concerning Reports:
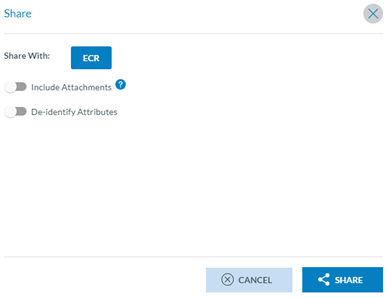
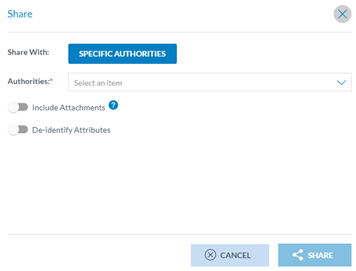
The Administrator has to decide if including the attachments through the ‘Include Attachments’ toggle is deactivated by default.
The Deidentify Attributes toggle opens a window to select the specific Attributes to be de-identified when the report is shared. The Administrator updates the Sharing settings and clicks on ‘Share’. When the Administrator executes the BO, the system will share the executed query's results with the ECR once all the mandatory fields are filled out. This action only works with OCs in the major version.
o Make a major version: This action will make the OCs meet the results of the BO query and turn it into a major version. This option only works on Open and not blocked OCs.
o Make a major version and Share it with ECR: it is the mix of the two previous options; it makes a major version and shares it with ECR. Therefore, it applies to open (not blocked) OCs. Once selected in the menu, the system displays the Share to ECR window as in the Share to ECR option explained before.
It works similarly to Share to ECR, but the Administrator has to select the specific Authorities by clicking on the Authorities drop-down menu:
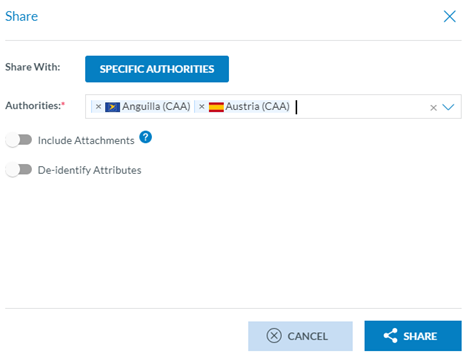
If appropriate, the Administrator must update the Attachments, de-identify Attributes, and click the ‘Share’ button. The selected Authorities will be set in the Actions field. When the Administrator executes this BO, the system will make major the OCs meeting the requirements of the query of the BO and will share them as long as they can be subject to turning into major (open and not blocked).
The status of the BO is ‘Draft’ as long as it is not saved.
Once the Administrator has filled all the mandatory fields, you must now click on the ‘Save’ button:

The system will save the new BO in the database and the table of BOs:

3.3.1.1.1.22. Edit a batch operation
The Administrator has to double-click on the Name of the BO in the list of BOs or click on the ‘Edit BO’ option of the 3-dot menu of the list of BOs:

The system displays the Edit BO window:
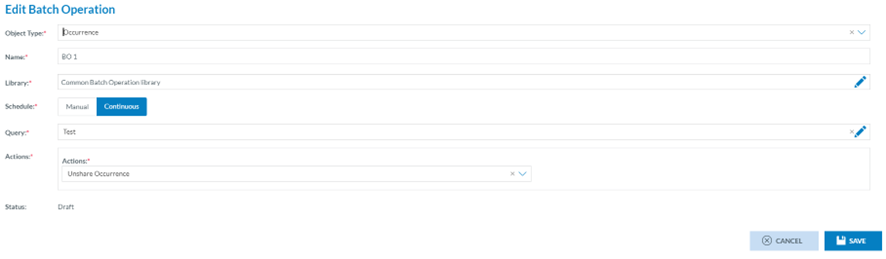
The Administrator has to update the necessary fields, leaving all the mandatory fields with content, and click the ‘Save’ button. The system will save the updates in the database, and the BO will be updated accordingly.
3.3.1.1.1.33. Copy a batch operation
The Administrator has to click on the ‘Copy BO’ option of the 3-dot menu of the BO at the table of BOs, and the system will display the Copy BO window:
It is similar to the Edit BO page, but the Name field is empty; all the fields are completed except the Name. The Administrator has to fill in the Name field and can update any of the other fields. Then, the Administrator has to click on ‘Save’.
The BO will be saved in the database with the new name and the other updates, if any. The system will return to the table of BOs, which will be updated accordingly.
The BO will be saved in the Draft version. Draft BOs can be edited, published, copied and deleted.
3.3.1.1.1.44. PPublishublish a batch operation
Only draft BOs can be published. The Administrator has to click on ‘Publish BO’ at the 3-dot menu of the specific draft BO of the list, and the system will turn the status of the BO to ‘Released’, and the BO will be published.
The list of BOs will be updated by marking the ‘Enabled’ section of the corresponding BO with a green tick.
Once a BO is published, it can be disabled through the ‘Disable’ option of its 3-dot menu at the list of BO.
3.3.1.1.1.55. Disable a batch operation
Only published BOs can be disabled. The ‘Disable’ option will be available for this BO in the 3-dot menu of the list of BOs. The Administrator has to click on it, and the BO will be disabled.
The list of BOs will be updated, with the green tick removed from the ‘Enabled’ section of the corresponding BO.
Once the BO is disabled, if it is manual, it cannot be executed; if continuous, it stops being executed. It will only be re-executed if it has the enabled status.
3.3.1.1.1.66. Enable a batch operation
Only disabled BOs can be enabled. The ‘Enable’ option will be available for these BOs in the 3-dot menu of the list of BOs.
The list of BOs will be updated by marking the ‘Enabled’ section of the corresponding BO with a green tick.
The Administrator has to click on it, and the BO will be enabled. Once the BO is enabled, if manual, it can be executed again; if continuous, it will be continuously executed.
3.3.1.1.1.77. Archive a batch operation
Only BOs that are not draft status can be archived. The Administrator has to click on the ‘Archive’ option of the 3-dot menu of the BO at the list of BOs, and the system will archive the BO. The status will turn to ‘Archived’ in the list of BOs.
The archived BOs can be viewed, copied, and deleted but are neither edited nor published.
3.3.1.1.1.88. Manual execution
The execute option is available in the 3-dot menu of the BOs of the list only for manual and published BOs. The Administrator has to click on the option, and the system will execute the BO.
If the query of the BO has an ‘Ask later’ field, the system will display a window to fill in the field of the query:
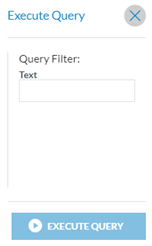
The ‘Execute query’ button will be enabled once the empty field is filled.
The system will display a message indicating if the execution was a success. If no records or only a few records meet the BO's requirements, the user will be prompted to proceed.
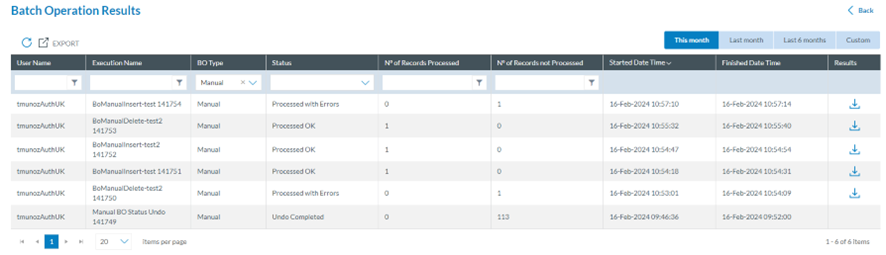
If the execution was a success or if the Administrator confirmed the execution after a message, then the Administrator has to click on the View results option of the 3-dot menu of that BO at the list of results, and the system will display the BO results page:

It shows the table of results of the execution in the current month. There are tabs to access the last month, last 6 months or Custom (where the Administrator can set the period).
The table provides the following information per column that can be used as filters:
· User Name: the author of the execution
· Execution Name: the system generates a unique name for each execution result, joining the Name of the BO and a correlative number
· BO Type: if manual or continuous
· Status:
ü Processed OK
ü Processed with errors: the results file will depict the errors
ü In Progress: the execution has not finished yet
ü Cancelled: BO was cancelled
ü Undo completed: the BO was completely undone
ü In the grace period (for manual BOs with the Undo toggle activated), the BO can be undone.
ü Created: the BO was just requested to be executed
ü Undo in progress: the Undo process is taking place. Once it is completed, the BO is undone.
· Number of records processed: number of records processed through the BO.
· Number of records not processed: The number of records did not meet the BO's requirements, so the query's action was not applied to them.
· Started date time: of the execution.
· Finished date time: of the execution.
· Results: it provides a download icon to download an xls file with the results of the execution:

Or:

The results file explains the number of records processed and not processed and the reasons for this. It indicates the affected reports.
The results of the specific manual BO will also be available through the Execution results page of the BO menu. See further details in the Execution results page section.
3.3.1.1.1.99. Continuous execution
The continuous BO are executed all the time; they are not applied over stored reports meeting the requirements of the BO, but over the updates of reports or new reports when saved.
The results of these BOs can be accessed through the view results option of the specific BO of the 3-dot menu of the list of BOs or the Execution results page in the following section.
3.3.1.1.1.1010. Execution results page
The Administrator button clicks on it, and the system displays the Execution results page:
The table includes all the executions performed by the Administrator. The function is the same as that described form. See it for further details.