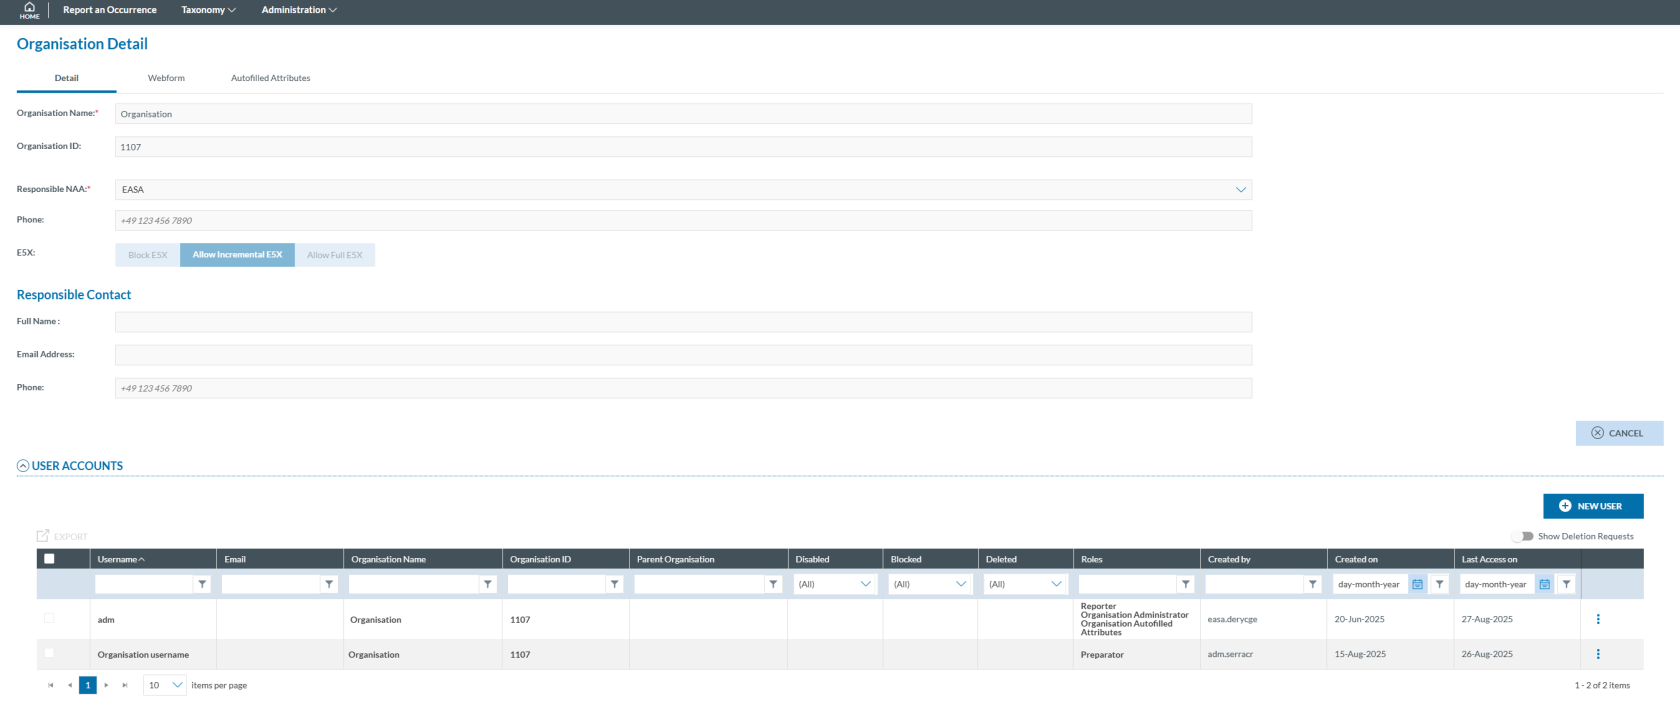
# Detail
The Details tab provides the following information, which is read-only:
[](https://help.ci-aviationreporting.eu/uploads/images/gallery/2025-10/La4image.png)
- Organisation Name: mandatory and unique
- Organisation ID: automatically generated and unique
- Responsible NAA: mandatory
- Phone: numeric field and not editable
- E5X: this information is not editable by the Organisation Administrator, but three options are showed:
- Block E5X: with this option selected the Organisation Users cannot submit OR through an E5X file. They can validate the files but are not allowed by the Authority to do so.
- Allow Incremental E5X: this option indicates the User that each update of the OR through an E5X file is added to the latest version, merging the new information with the old one.
- Allow Full E5X: last option indicates that each update of the OR made by an E5X file completely overwrites the information in the latest OR version submitted.
**To modify this setting the Organisation Administrator must contact its Authority to request the change.**
Responsible contact Information is displayed:
- Full Name: First and last name of the responsible contact
- Email Address: Email of the responsible contact
- Phone: Phone number of the responsible contact (numeric field)
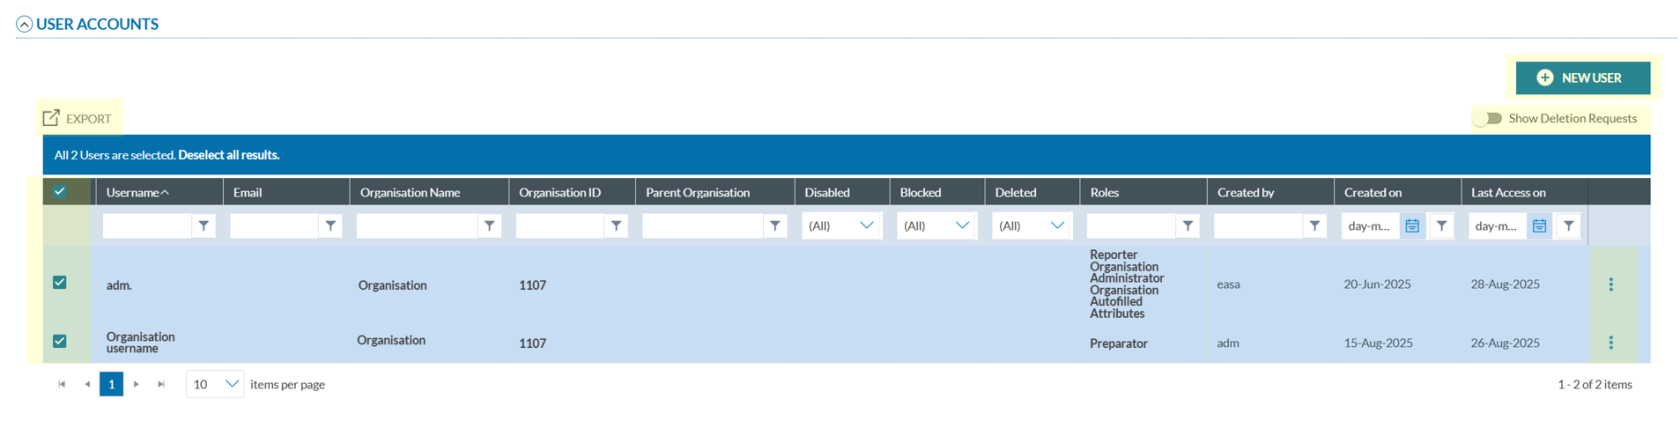
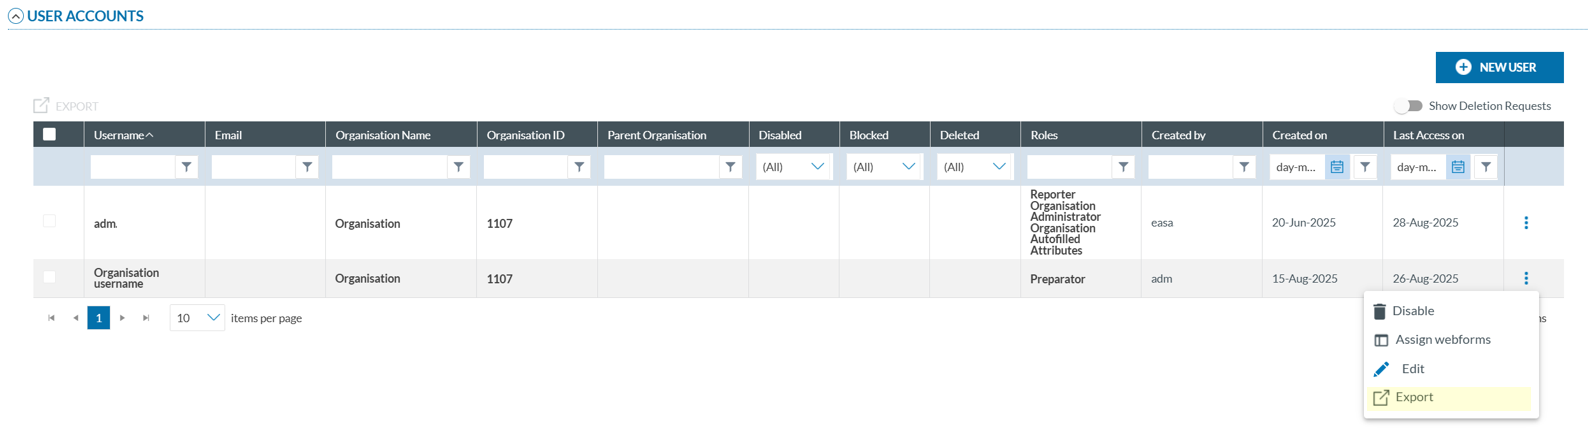
Below there is the table of User Accounts. It displays the following columns that also work as filters:
- Username: mandatory and unique for each account;
- Email: email address of each account; it can be the same for different accounts;
- Organisation Name: Organisation to which the user belongs
- Organisation ID: ID of that Organisation
- Parent Organisation: to which the Organisations’ user belongs, if any
- Disabled: if disabled, the system displays a ‘green tick’
- Blocked: if blocked, the system displays a ‘green tick’
- Deleted: if deleted, the system displays a ‘green tick’
- Roles: the assignation of roles for that user, if any
- Created by: author of the user account
- Created on: date of the creation
- Last access on: date of last access
[](https://help.ci-aviationreporting.eu/uploads/images/gallery/2025-10/hHUimage.png)
All user accounts rows are preceded by a check box to select them.
Above that check box, the system displays an ‘EXPORT’ link that is enabled when any row is selected.
Above the table of accounts, on the right side the system displays a ‘NEW USER’ button and below it a ‘Show deletion requests’ toggle.
On the last section of each row, there is a 3-dot menu providing different options depending on the status of each account, if they are disabled or block.
### Edit a User account
To edit a user account:
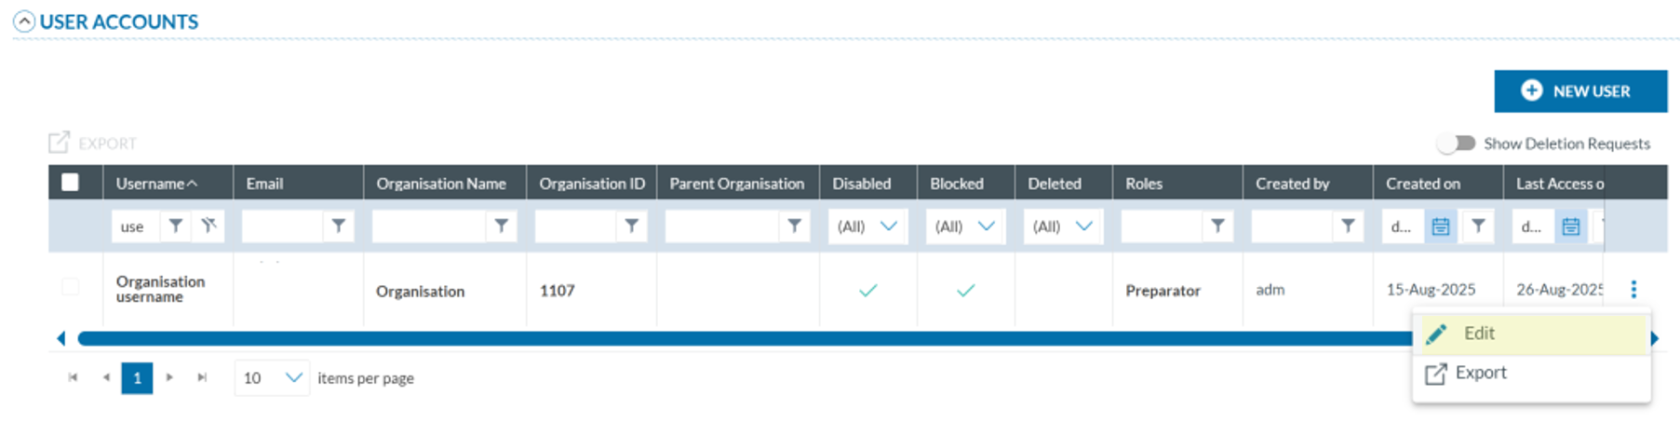
1. Click on the 'Edit' option of the 3-dot menu of the specific account:
[](https://help.ci-aviationreporting.eu/uploads/images/gallery/2025-10/n7cimage.png)
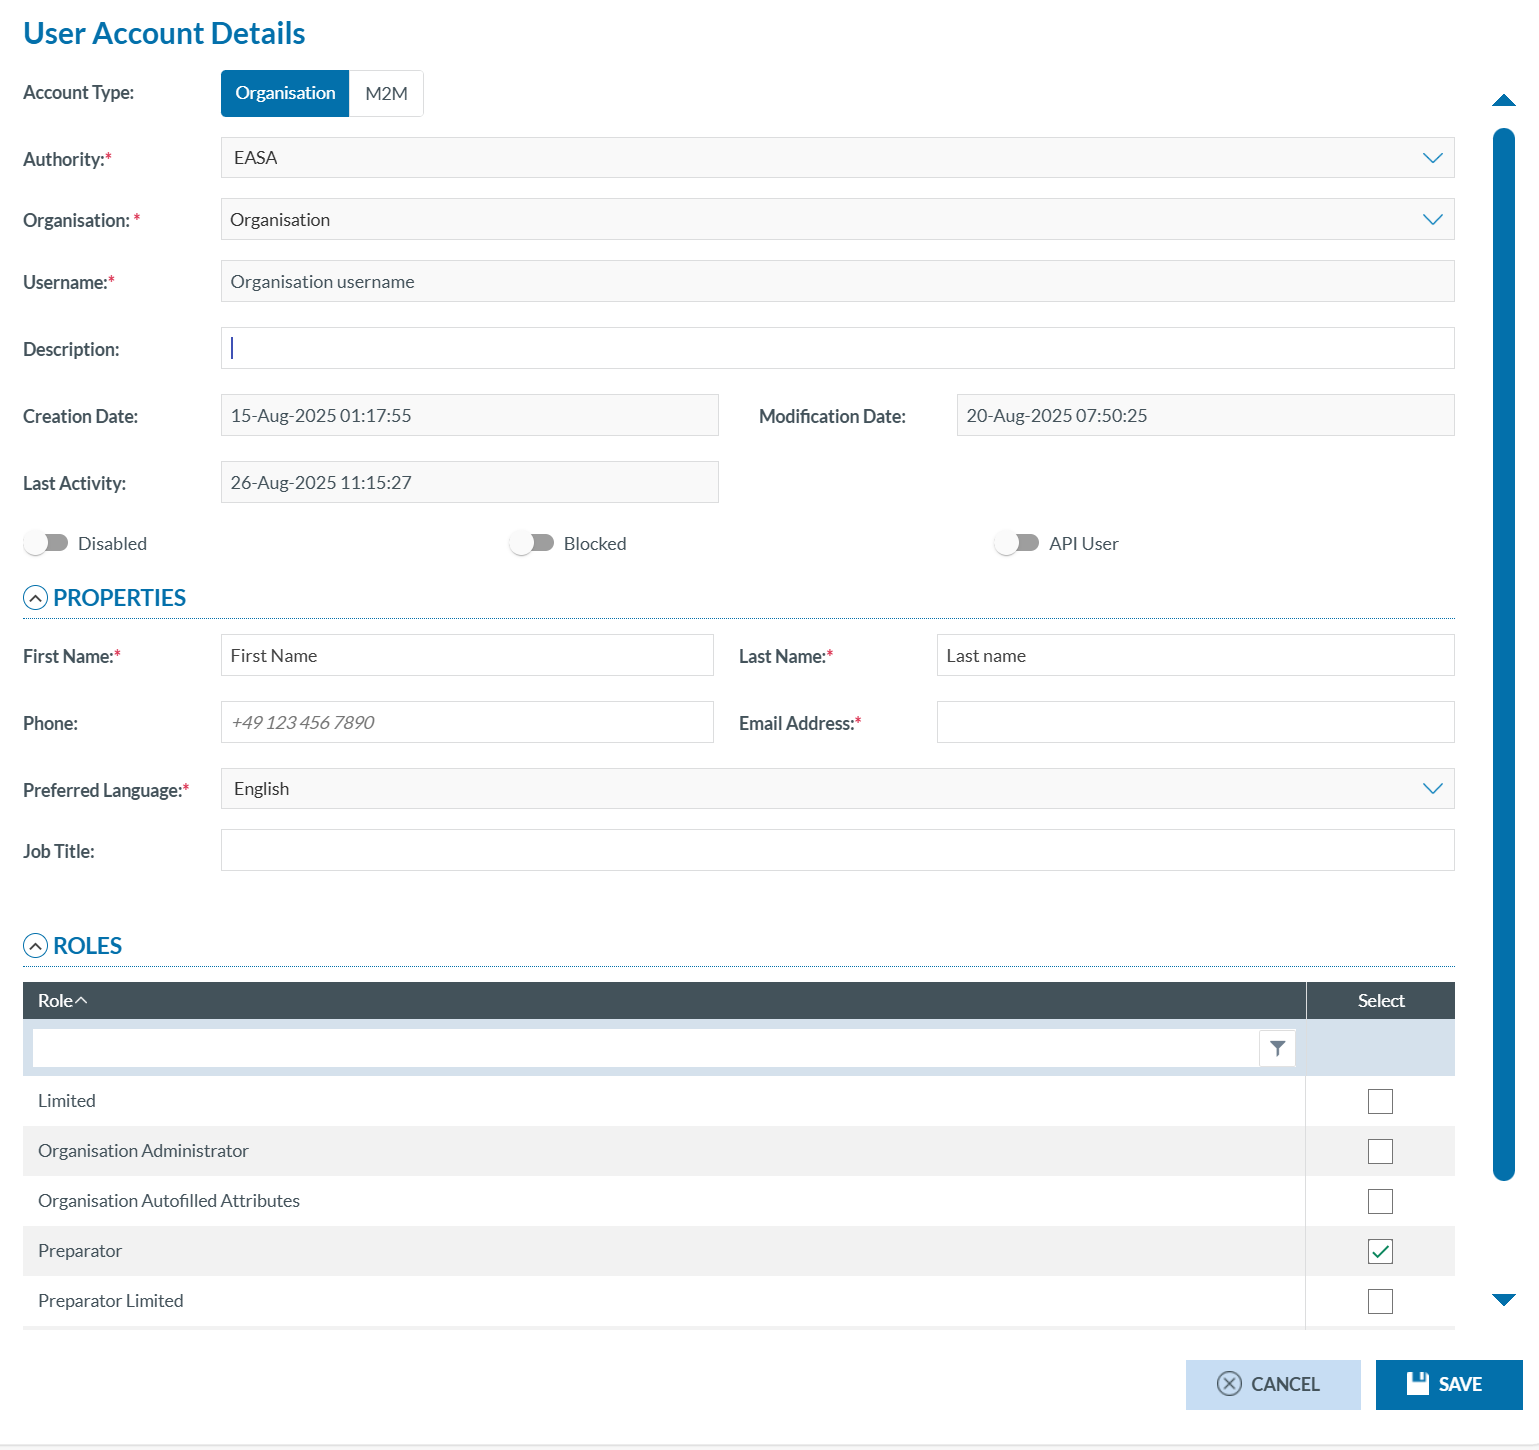
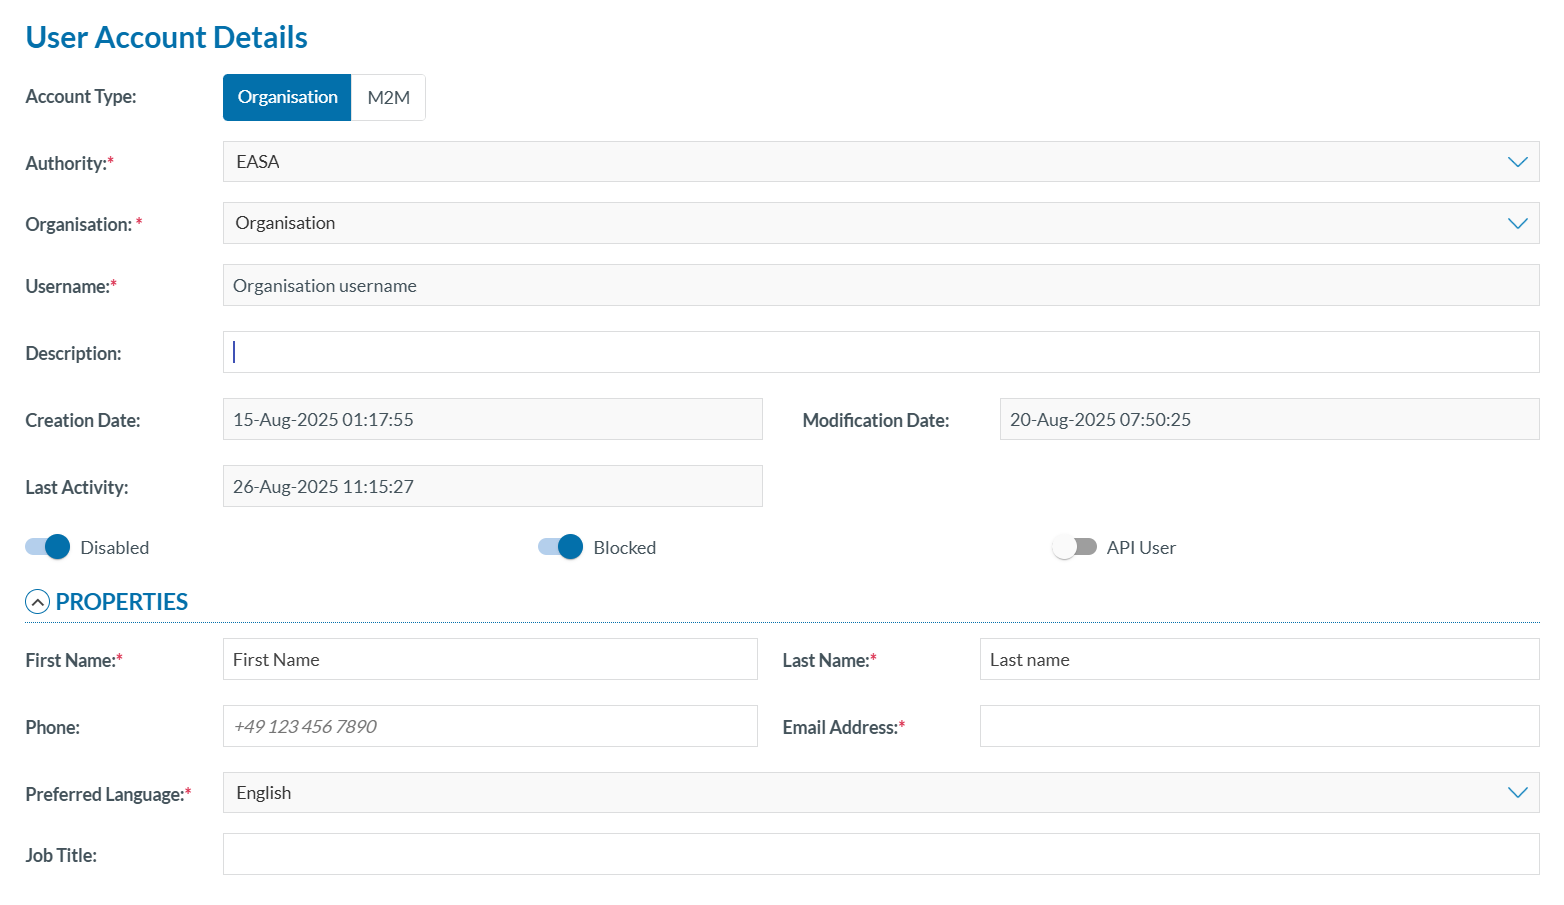
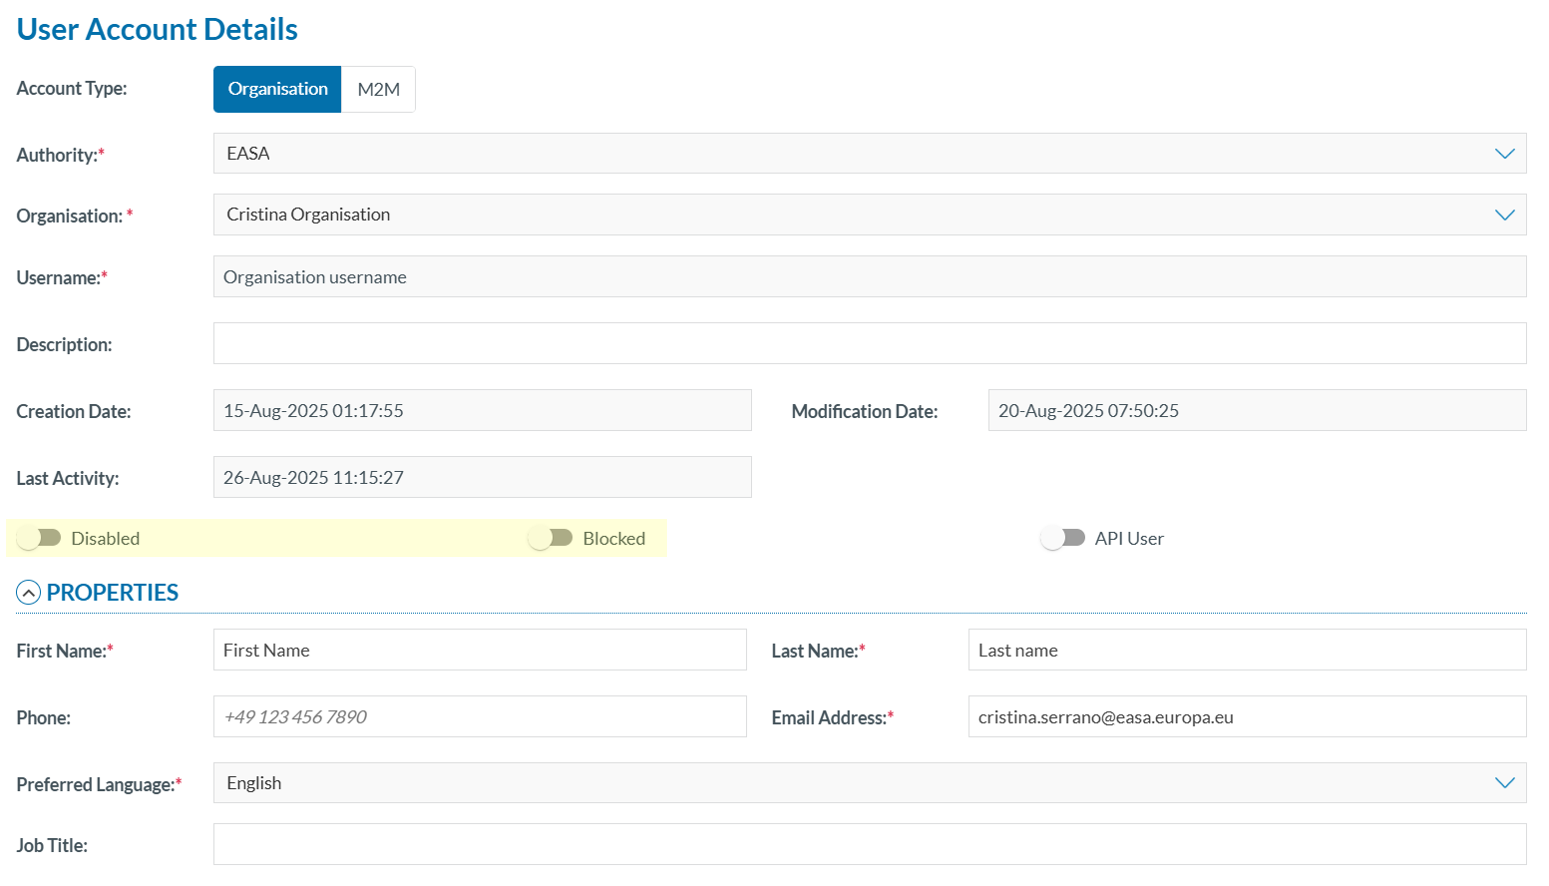
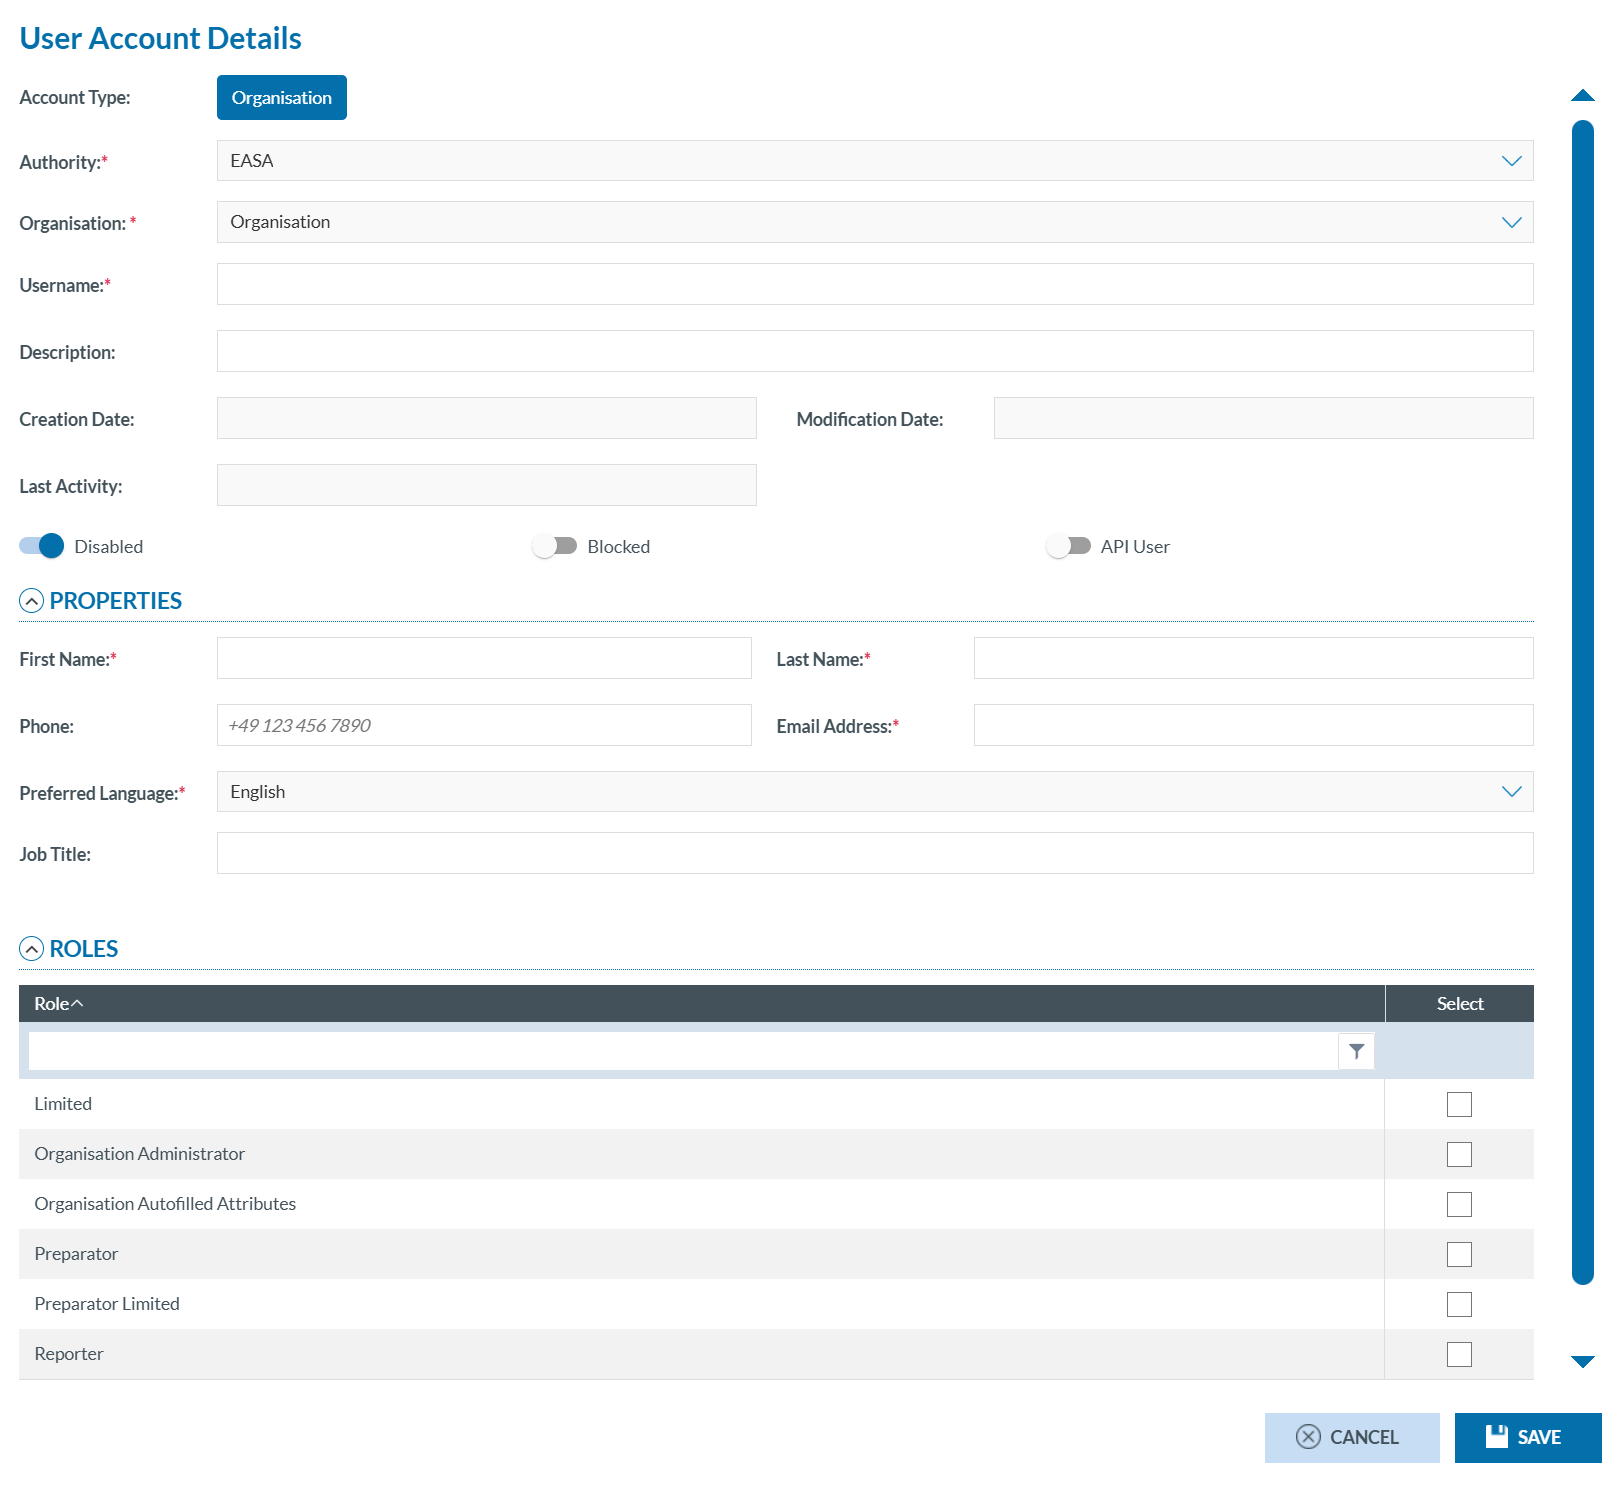
The system will display the 'User Account Details' page:
[](https://help.ci-aviationreporting.eu/uploads/images/gallery/2025-10/w7Uimage.png)
It provides the following fields:
- Account Type: Always Organisation and not editable;
- Authority: Not editable;
- Organisation: Not editable;
- Username: Not editable;
- Description: Optional free text field;
- Creation Date: Automatically generated, not editable;
- Modification Date: Automatically generated, not editable;
- Last Activity: Automatically generated, not editable;
- Disabled toggle: If activated, the account is disabled;
- Blocked toggle: If activated, the account is blocked;
- API User toggle: If activated, the account can access the platform programmatically via its API. This allows organizations to integrate E2 with their own internal systems for reporting, retrieving, and managing aviation safety occurrences.
The Properties information provides the following information:
- First Name: mandatory, free text;
- Last Name: mandatory, free text;
- Phone: Optional, numeric field;
- Email address: mandatory, email format is required;
- Preferred language: English is set and it is not editable;
- Job Title: Optional, free text field;
The Roles section displays a table containing a unique 'Roles' column, which also functions as a filter. Each row includes a 'Select' checkbox column, allowing the administrator to choose the role.
The following predefined roles are available:
- M2M;
- Organisation Administrator;
- Organisation Autoffilled Attributes;
- Reporter;
- Preparator;
- Preparator Limited.
**Note that the Reporter, Preparator and Preparator Limited are excluding each other. A user can only have one of those three roles at the same time.**
2. Make any necessary changes to the fields that are open for editing.
3. Ensure mandatory fields are completed.
4. Review and Update Roles (if needed).
5. Click ‘Save’. The Table of User Accounts will be updated accordingly.
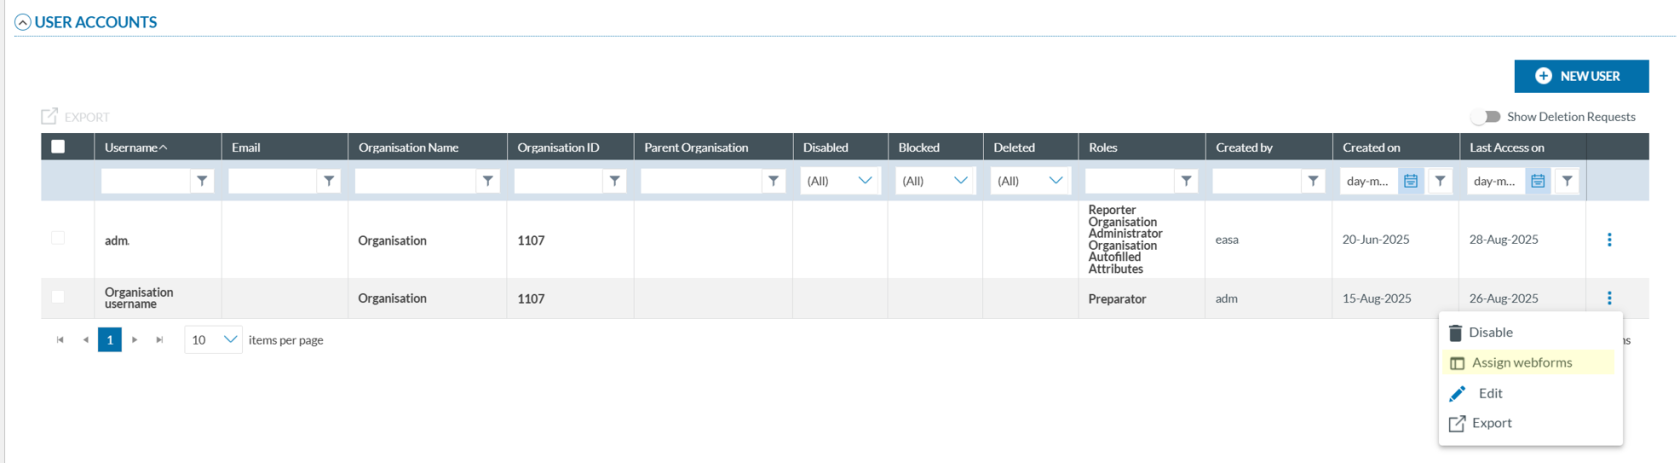
### Assign webforms to users
To assign webforms to a user account, follow these steps:
1. In the 'USER ACCOUNTS' table, click the three-dot menu next to the desired account and **select 'Assign Webform'**.
[](https://help.ci-aviationreporting.eu/uploads/images/gallery/2025-10/2QJimage.png)
The system will open the Assign Webforms window. The window is divided into two panels:
[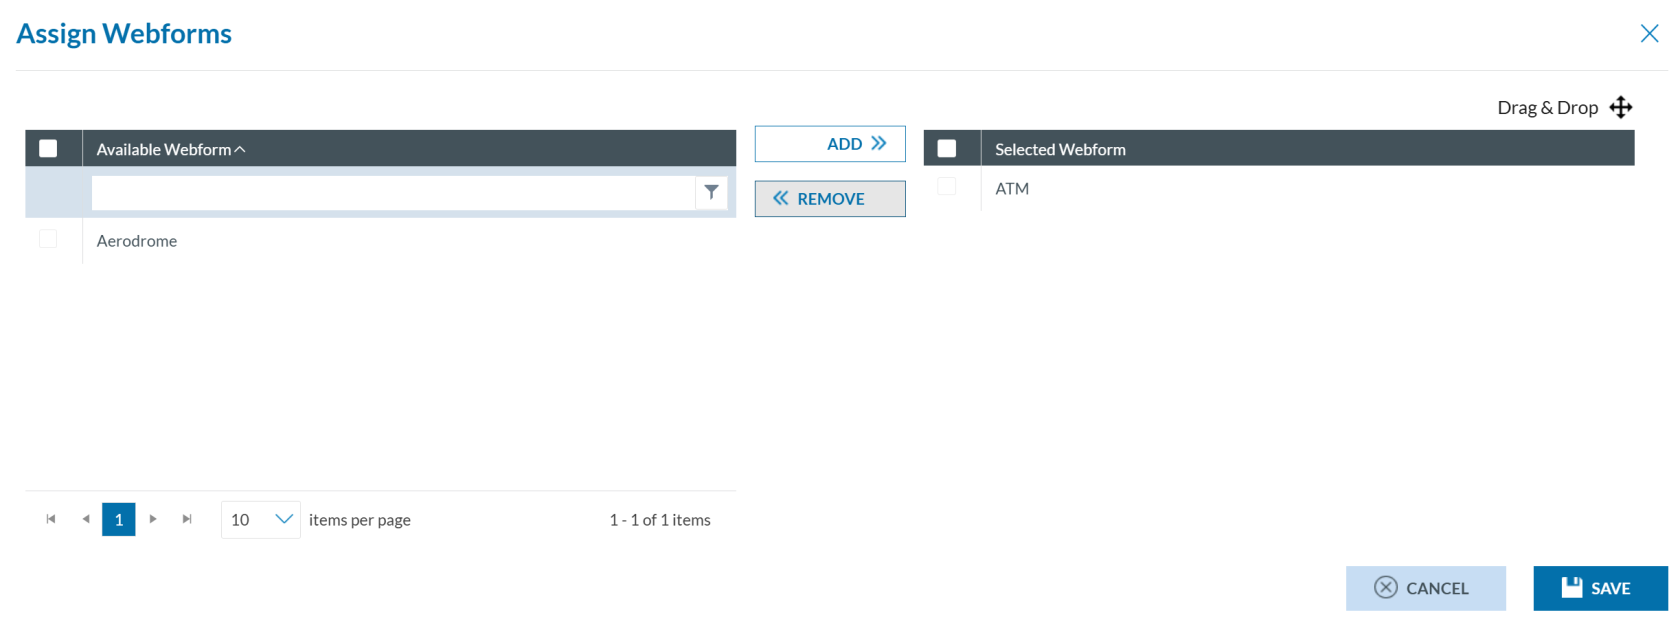](https://help.ci-aviationreporting.eu/uploads/images/gallery/2025-10/Y00image.png)
- Available Webforms (left Panel): It displays webforms defined by the Organisation’s Authority. Ten records are shown per page and can be filtered. Each webform has a checkbox for selection, including a master checkbox to select all.
- Selected Webforms (right Panel): It shows webforms already assigned. Checkboxes allow individual or bulk selection. Items can be reordered via drag-and-drop.
2. You can:
- select webforms from the left panel using the checkboxes, then click 'Add' (located between the panels) to assign webforms.
- select webforms from the right panel using the checkboxes, then click 'Remove' (located between the panels) to unassign webforms.
3. Click 'SAVE' to confirm (the system will store the selected webforms for the specific user account) or click 'CANCEL' to discard changes.
### Disable and enable a user account
#### Disable a user account
To disable a user account:
[](https://help.ci-aviationreporting.eu/uploads/images/gallery/2025-10/saAimage.png)
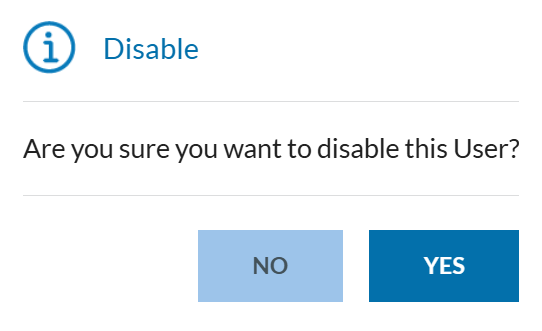
1. Click ‘Disable’ from the 3-dot menu of the desired user in the 'USER ACCOUNTS' table. A confirmation message will appear.
[](https://help.ci-aviationreporting.eu/uploads/images/gallery/2025-10/EsAimage.png)
2. Click 'YES' to confirm the action (or 'NO' to cancel). The system disables the account.
When an account is disabled, it is also automatically blocked. Both 'Disabled' and 'Blocked' columns will show a green tick.
[](https://help.ci-aviationreporting.eu/uploads/images/gallery/2025-10/Fxximage.png)
##### Enable a user account
To enable and unblock a user account:
1. Click **‘Edit’** from the 3-dot menu:
[](https://help.ci-aviationreporting.eu/uploads/images/gallery/2025-10/Vgtimage.png)
The system will open the 'User Account Details' window:
[](https://help.ci-aviationreporting.eu/uploads/images/gallery/2025-10/tAsimage.png)
2. Slide the ‘Disable’ and ‘Blocked’ toggles to the left to deactivate them:
[](https://help.ci-aviationreporting.eu/uploads/images/gallery/2025-10/WYSimage.png)
3. Click ‘SAVE’ to enable the user accounts.
### Export user accounts
To export user account data to Excel files, either individually or multiple a once. Follow the steps below for each method:
#### Individual Export
To export a single user account:
1. Click ‘Export’ from the 3-dot menu of the desired user in the 'USER ACCOUNTS' table.
[](https://help.ci-aviationreporting.eu/uploads/images/gallery/2025-10/CTfimage.png)
The system will automatically generate and download an Excel (.xlsx) file with the data of the selected account.
#### Multiple Export
To export multiple user accounts at once:
1. Select the checkboxes next to the accounts you wish to export from the '**User Accounts'** table:
[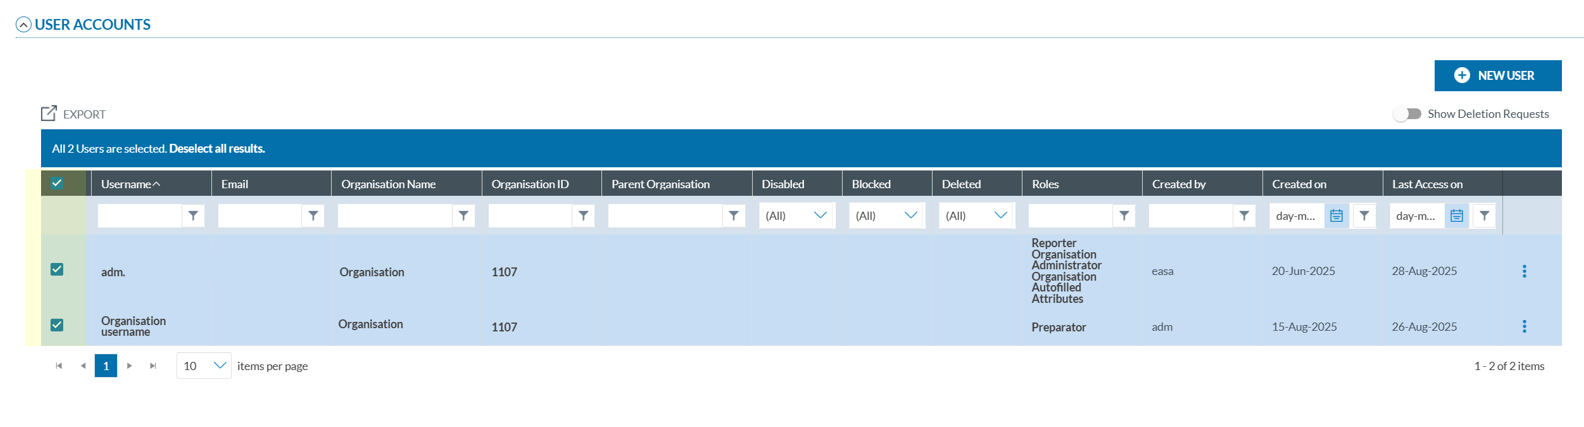](https://help.ci-aviationreporting.eu/uploads/images/gallery/2025-10/7OAimage.png)
2. Click 'Export' button located above the table:
[](https://help.ci-aviationreporting.eu/uploads/images/gallery/2025-10/KqUimage.png)
3. A confirmation message will appear indicating that the export is being processed:
[](https://help.ci-aviationreporting.eu/uploads/images/gallery/2025-10/kz4image.png)
Once complete, a ZIP file containing the exported Excel files will be sent to the organization’s registered email address.
### Create a user
To create a new user:
1. Click the ‘NEW USER’ button located above the 'User Accounts' table:
[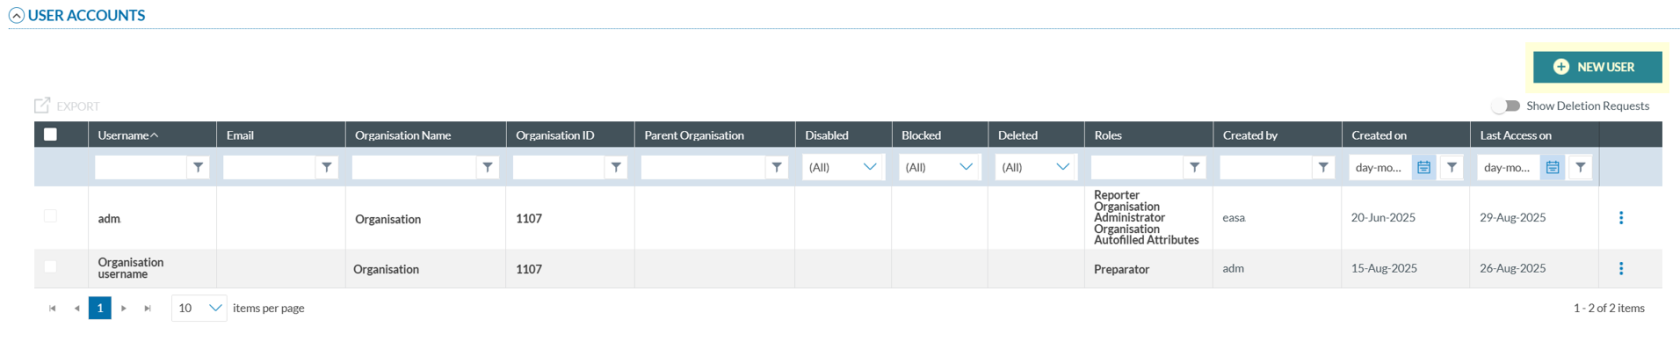](https://help.ci-aviationreporting.eu/uploads/images/gallery/2025-10/Gyzimage.png)
The system will open a page similar the 'User Account Details' page:
[](https://help.ci-aviationreporting.eu/uploads/images/gallery/2025-10/4Egimage.png)
2. Fill in all required fields (refer to the Edit a user account section for more information).
3. Click ‘SAVE’ to finish.
**Until the user logs in for the first time, the account will appear as 'Disabled'.**