Reporting Portal
This document outlines how to report aviation safety occurrences, applicable to both individuals and organizations.
- Version History
- Terms and abbreviations
- Table of Contents
- Introduction
- Accessing the Reporting Portal
- Report without registration
- Report with registration
- Introduction
- Registration as an individual
- Registration of an organisation
- Sign in
- Report as an Individual
- Report as an Organisation
- Reset Password
- Home
- Taxonomy Browser
- Organisation Management
- My account
Version History
| Version | Date | Description | E2 release |
|
0.1
0.2 0.3 0.3 |
30/09/24
30/09/24 26/06/24 30/09/24 |
ECCAIRS2 - How to report an occurrence by a Preparator or Preparator Limited.pdf ECCAIRS2 - How to report an occurrence without registration.pdf ECCAIRS2 - How to report an occurrence by a registered reporter.pdf ECCAIRS2 - Organisation Administrator tasks.pdf |
v.2.40
v.240 v2.36 v.2.40 |
| 0.4 | 20/11/25 | Migration and consolidation of training documentation from multiple PDF sources into the BookStack platform, with structural updates and content harmonization. | v2.51 |
Terms and abbreviations
| Term/Abbreviation | Description |
| API | Application Programming Interface |
| CSV | Comma-separated values |
| ECCAIRS | European Co-ordination Centre for Aircraft Incident Reporting Systems |
| E2 | ECCAIRS 2 |
| OR | Original Report |
| Portable Document Format | |
| M2M | Machine-to-Machine, automated exchange of data between systems without human intervention |
| XLS | Excel Spreadsheet |
| XML | Extensible Markup Language |
| XSD | XML Schema Definition |
For each entity or attribute in the taxonomy, you can find its definition with detailed information, an explanation, and possible values in the Taxonomy Browser.
Table of Contents
Table of Contents
Revision History
Terms and abbreviations
Introduction
Accessing the Reporting Portal
Report without registration
· Report online
· Report offline
o Report offline
o Validate your PDF
Report with registration
· Introduction
· Registration as an Individual
· Registration of an Organisation
· Sign in
· Report as an individual
o Report online
o Report offline
§ Report offline
§ Validate your PDF
· Report as an organisation
o Preparator or Preparator limited
§ Preparator
§ Preparator limited
§ Create an OR by a Preparator or Preparator limited
§ Submission of the OR by a Reporter
o Reporter
§ Report online
§ Report offline
§ Report offline
§ Validate your PD
§ E5X
§ Validate an E5X file
§ Report using an E5X file
- Reset password
Home
· View Details
· Edit
· Delete
· Download a PDF
· Export and Export List View
Taxonomy Browser
· Taxonomy
· Search
· Taxonomy structure
o Entities
o Attributes
o Value Lists
o Values
o Filter the information
· List of taxonomies
Organisation Management
· Detail
o Edit a user account
o Assign webforms to users
o Disable and enable a user account
o Export user accounts
o Create a user
· Webform
· Autofilled Attributes
My account
Introduction
In the aviation sector, the systematic reporting and analysis of safety-related occurrences is essential to maintaining and improving operational safety. ECCAIRS 2 (European Coordination Centre for Accident and Incident Reporting Systems) is the official platform used across the European Union to collect, manage, and share data on aviation occurrences. It supports a proactive approach to safety by enabling organizations and authorities to learn from past events and prevent future incidents.
Importance of Reporting
Occurrence reporting plays a critical role in aviation safety management. It allows stakeholders to:
-
Detect emerging risks and safety trends before they lead to accidents.
-
Share lessons learned across the aviation community.
-
Foster a safety culture where transparency and continuous improvement are prioritized.
-
Comply with legal obligations and contribute to the European-wide safety database.
Regulatory Framework
The reporting of aviation occurrences is governed by Regulation (EU) No 376/2014. This regulation establishes common rules for the reporting, analysis, and follow-up of civil aviation occurrences. It promotes a “Just Culture,” ensuring that individuals can report safety issues without fear of punishment, provided there is no gross negligence or willful misconduct.
The ECCAIRS 2 Platform
ECCAIRS 2 is developed and maintained by the European Union Aviation Safety Agency (EASA). It provides a standardized and user-friendly interface for reporting occurrences, ensuring consistency and interoperability across Member States and organizations. The system supports various types of reports, including mandatory and voluntary submissions, and integrates with national databases and safety management systems.
Data Destination and Use
Once submitted, the data is transmitted to the European Central Repository (ECR), a centralized database managed by EASA. This repository serves as a key resource for safety analysis, enabling the identification of systemic issues and supporting the development of preventive measures at both national and European levels. The information is used by aviation authorities, operators, manufacturers, and researchers to enhance safety across the industry.
Reporting Process Overview
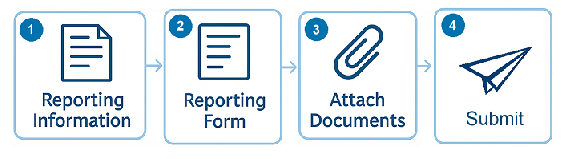
The reporting process in ECCAIRS 2 begins by accessing the official Reporting Portal. The initial reporting information is completed to help determine the appropriate authority to which the report should be submitted. This is followed by filling out the structured reporting form, which uses standardized fields and taxonomies to ensure consistency and clarity. Supporting documents—such as photos, flight data, or internal reports—can be attached to provide additional context. After reviewing all entered information, the report is submitted through the portal, where it is securely transmitted to the European Central Repository for further analysis and integration into the broader aviation safety system.
Accessing the Reporting Portal
Follow these steps to access the Reporting Portal to Report an Occurrence:
- Go to E2 Central Hub homepage.
- Click on the 'Report an Occurrence' banner.

You will be redirected to the Reporting Portal homepage.

You can report an occurrence by either:
- signing in with a registered user account — click 'SIGN IN TO ECCAIRS', or
- proceeding without an account — click 'CLICK HERE TO BEGIN'.
If you do not yet have an account, please choose one of the two options highlighted in blue at the bottom:
- Register your organisation
- Register as an individual user
These options will guide you through the appropriate registration process before submitting your report.
When submitting a report on behalf of your organisation, please first check whether the organisation is already registered in the system. If so, the report must be submitted using the organisation’s official account, rather than an individual or unregistered profile.
If you prefer to report anonymously for any reason, you may do so without using the organisation’s account. Otherwise, the standard and recommended method is to submit via your organisation’s registered profile
Report without registration
To report without registration:
- Visit the E2 Reporting Portal at https://e2.aviationreporting.eu/.
- Click 'CLICK HERE TO BEGIN'.
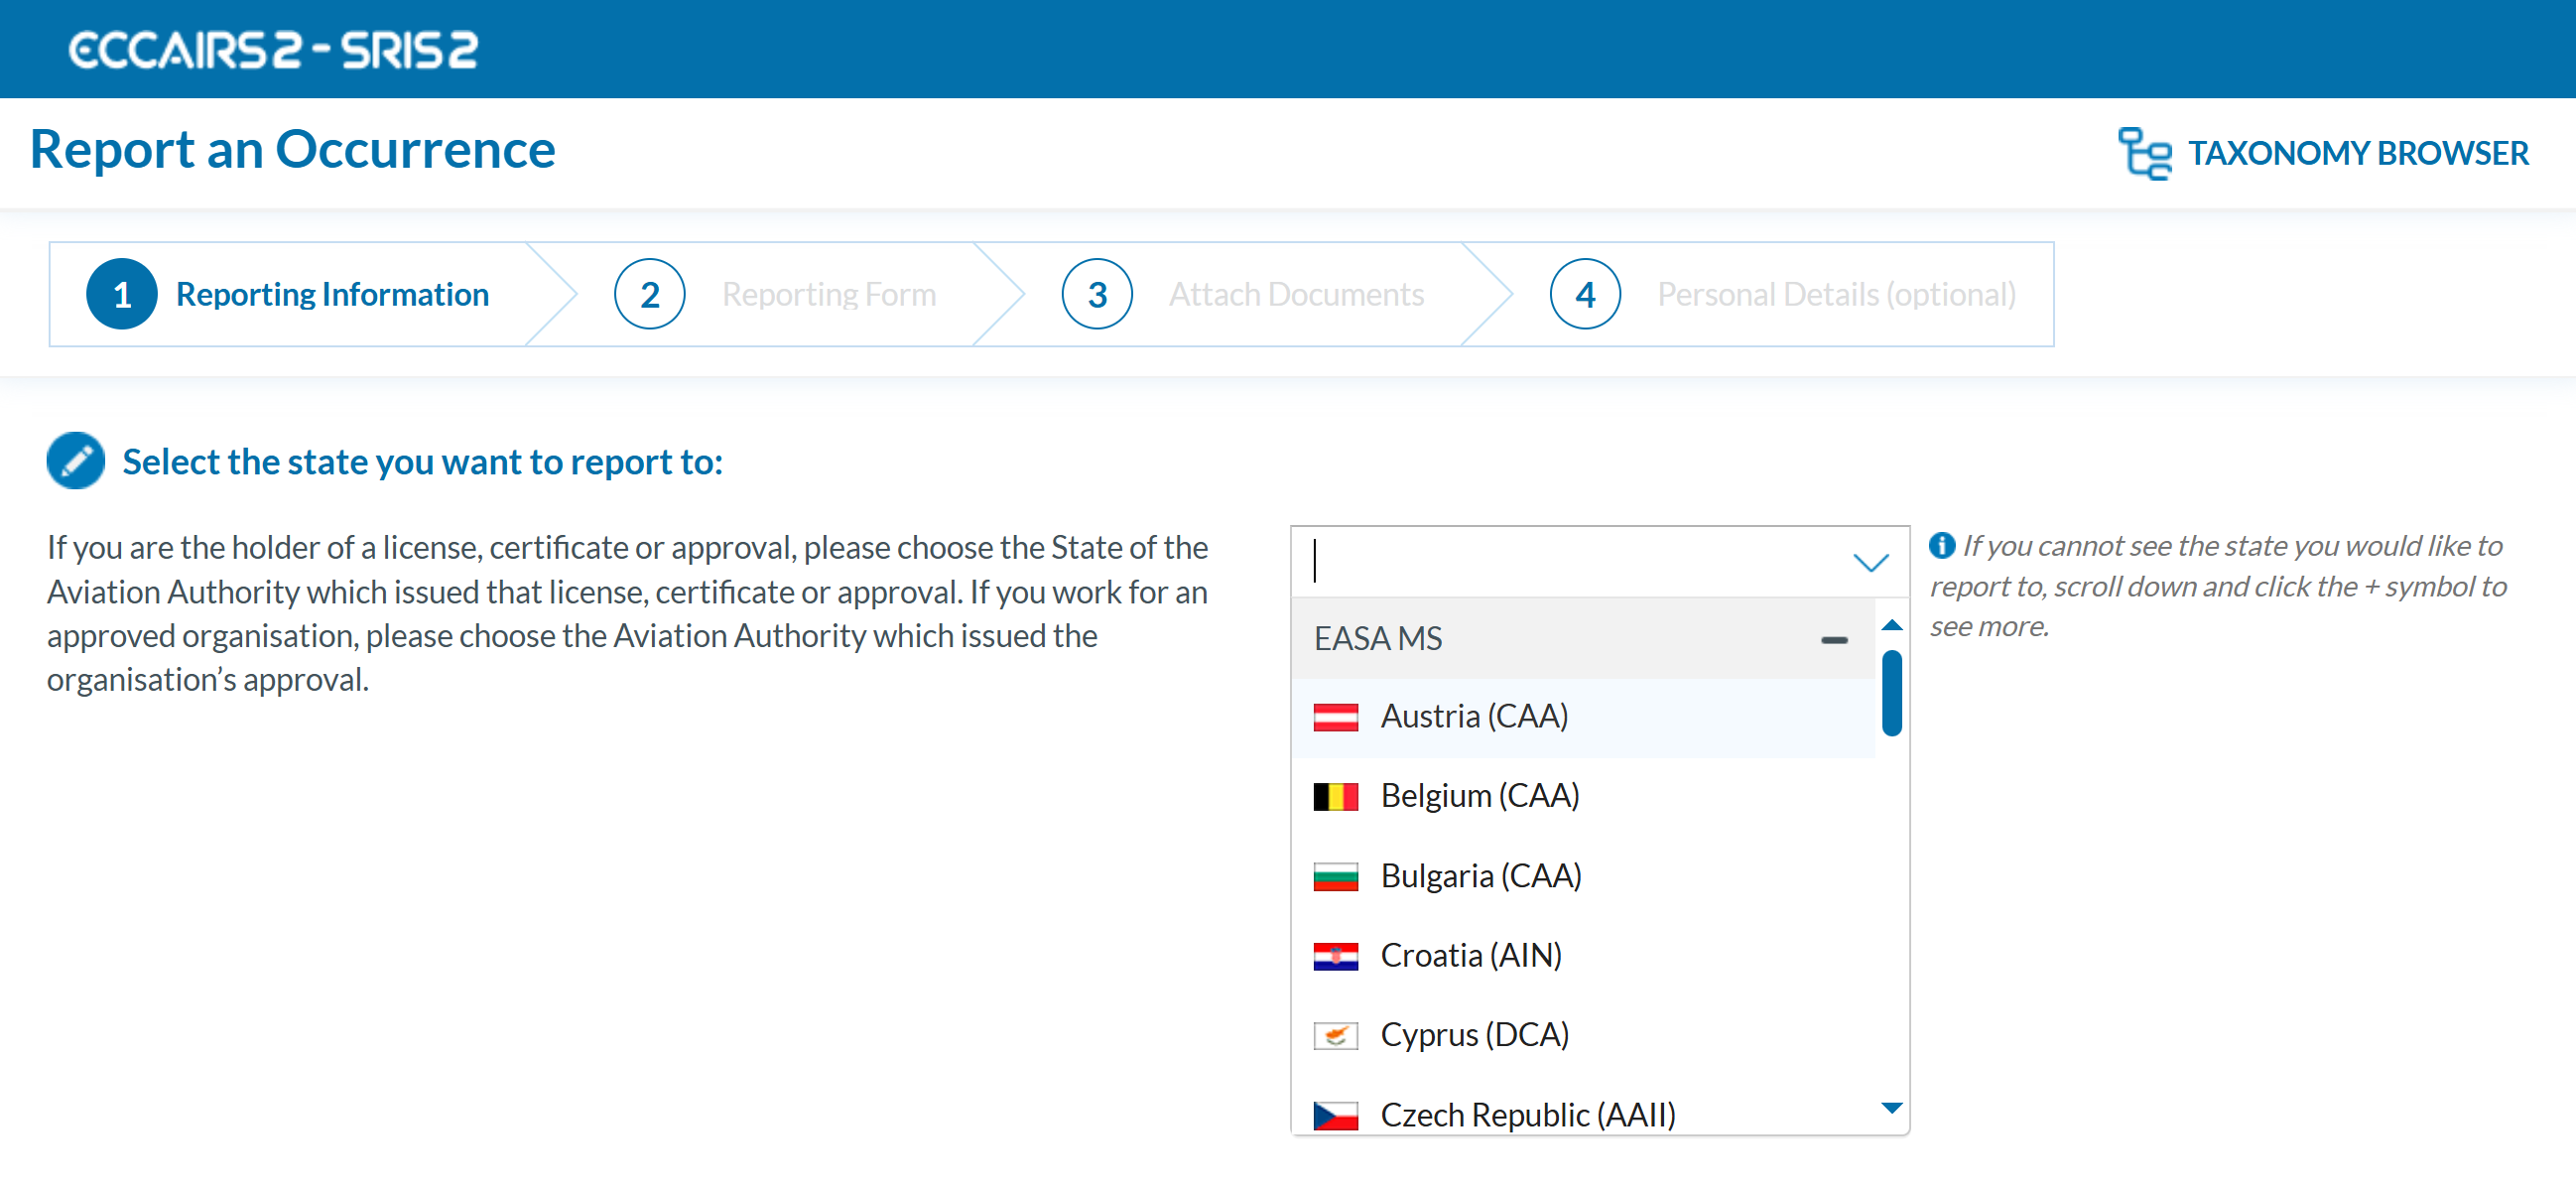
- Indicate the competent Authority to which you are reporting to:
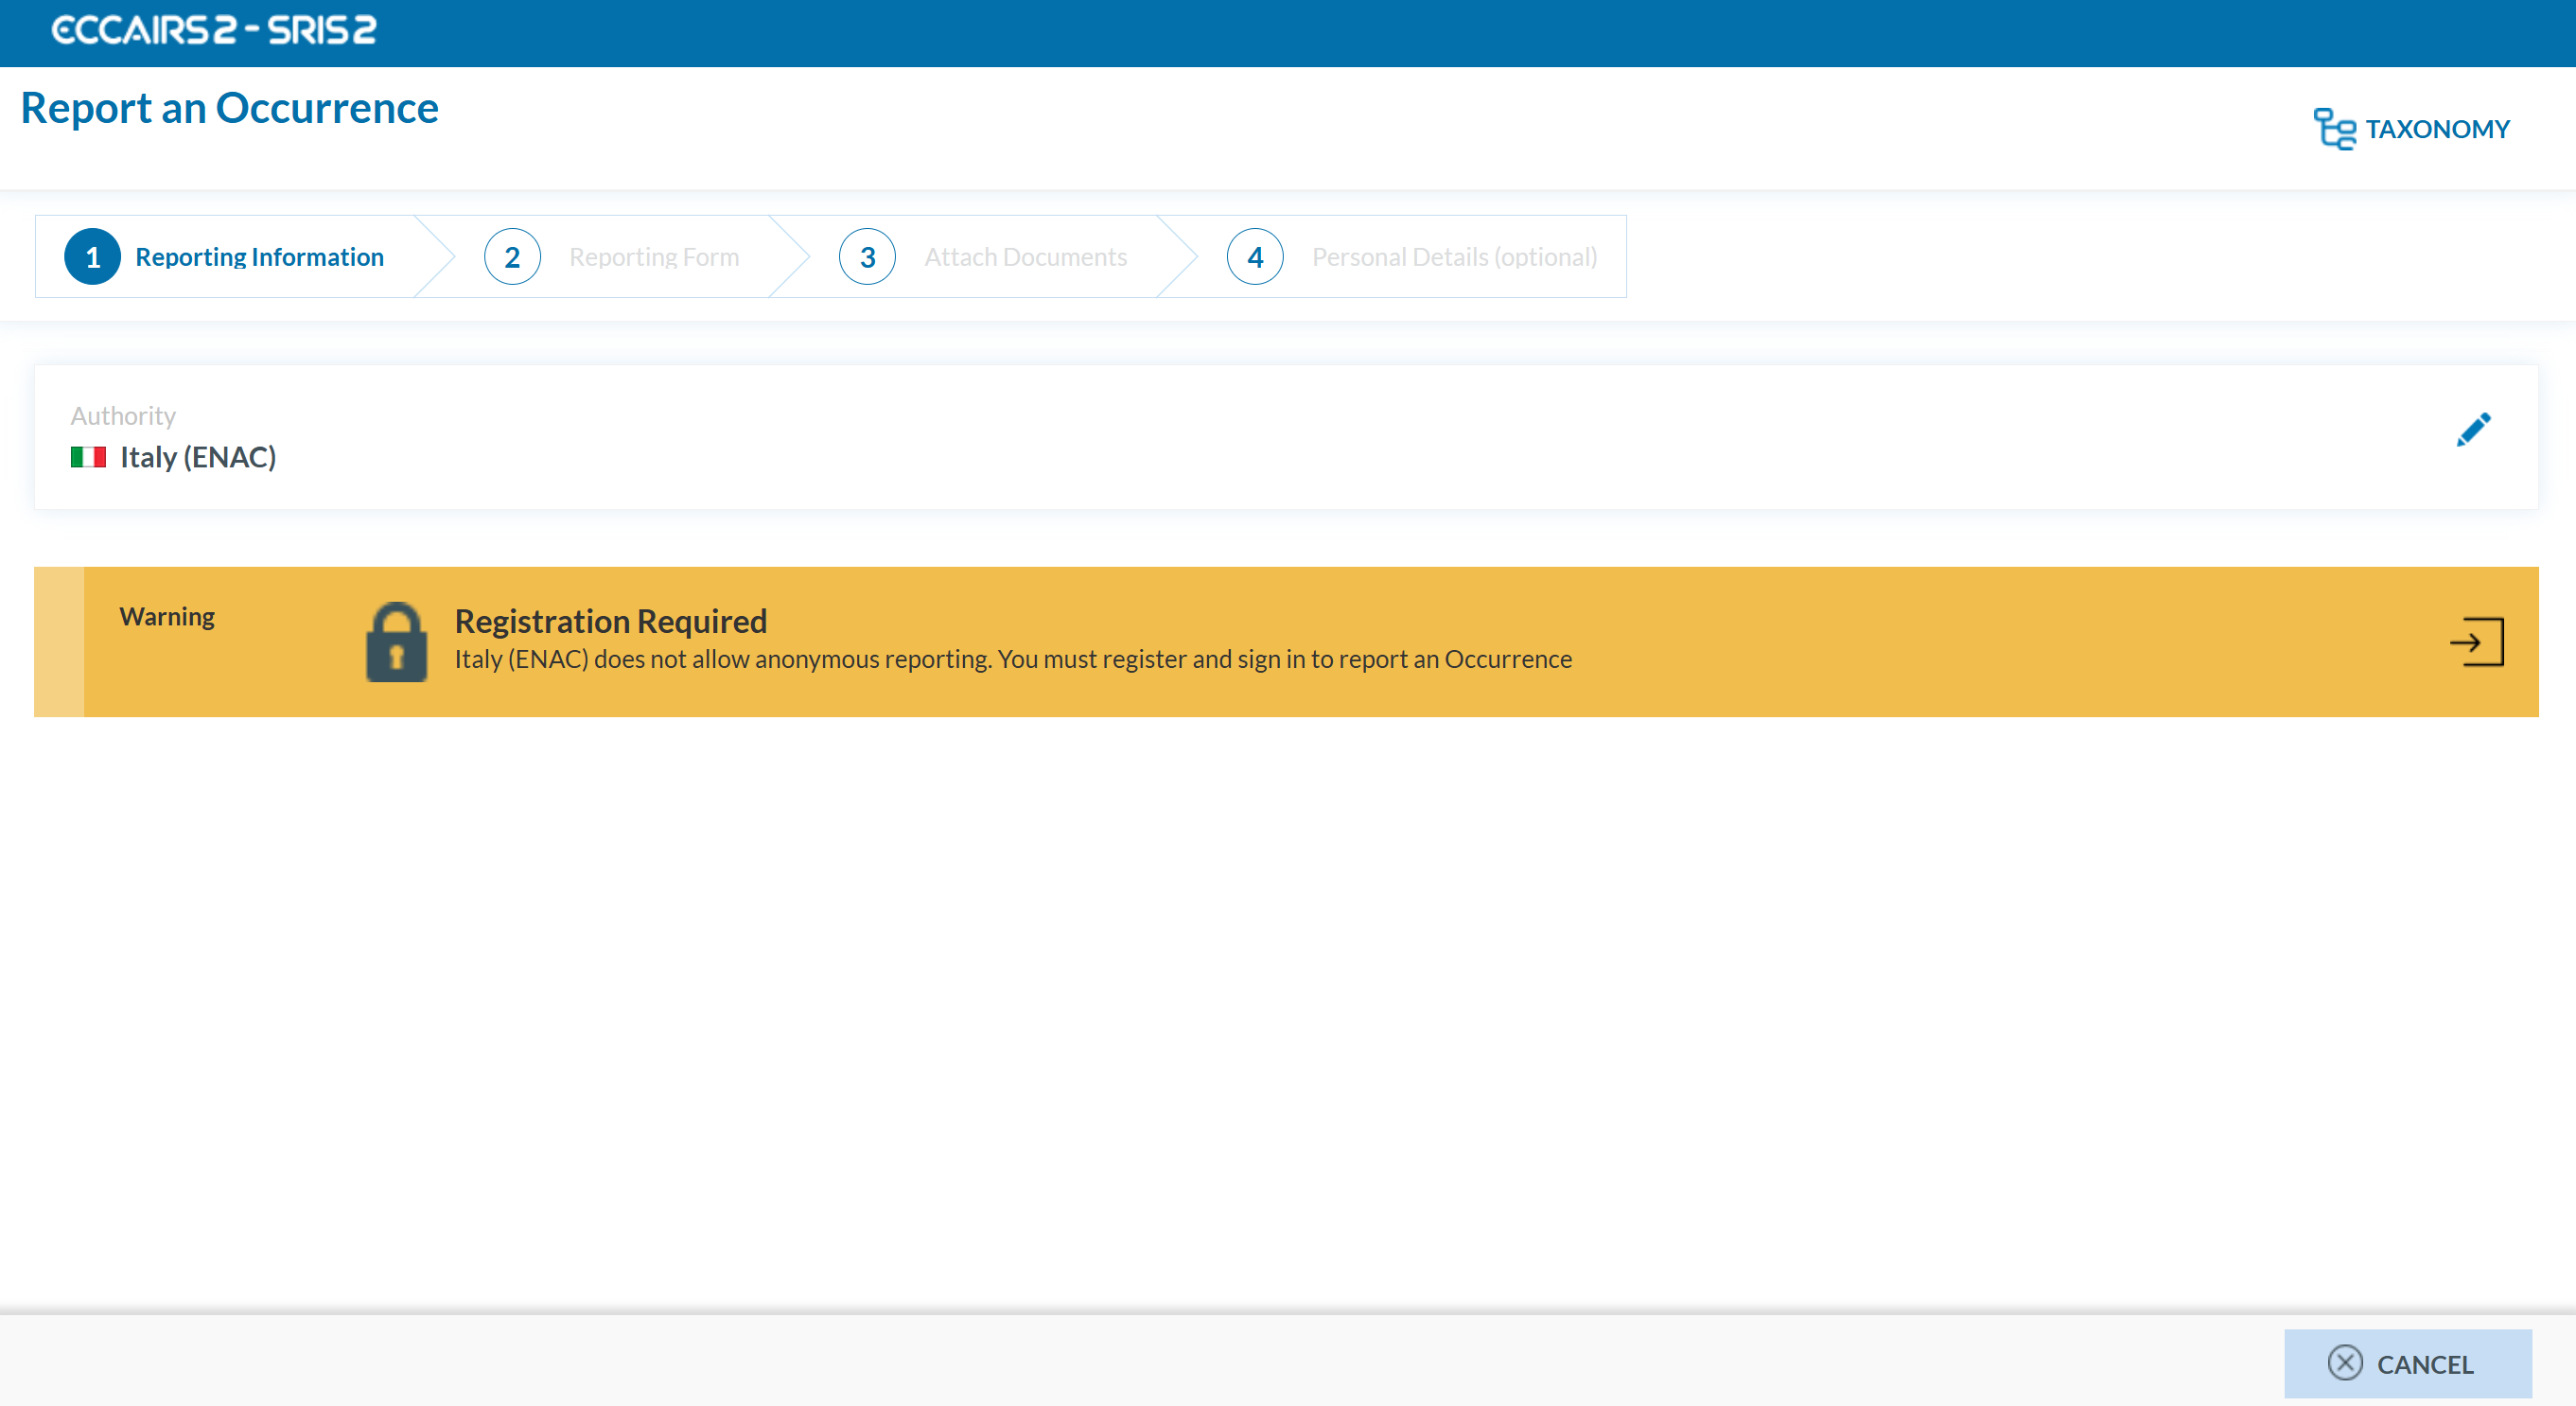
Note that some National Authorities require the reporters to be registered to report an occurrence.
-
Once the competent Authority is selected, you will get the following:
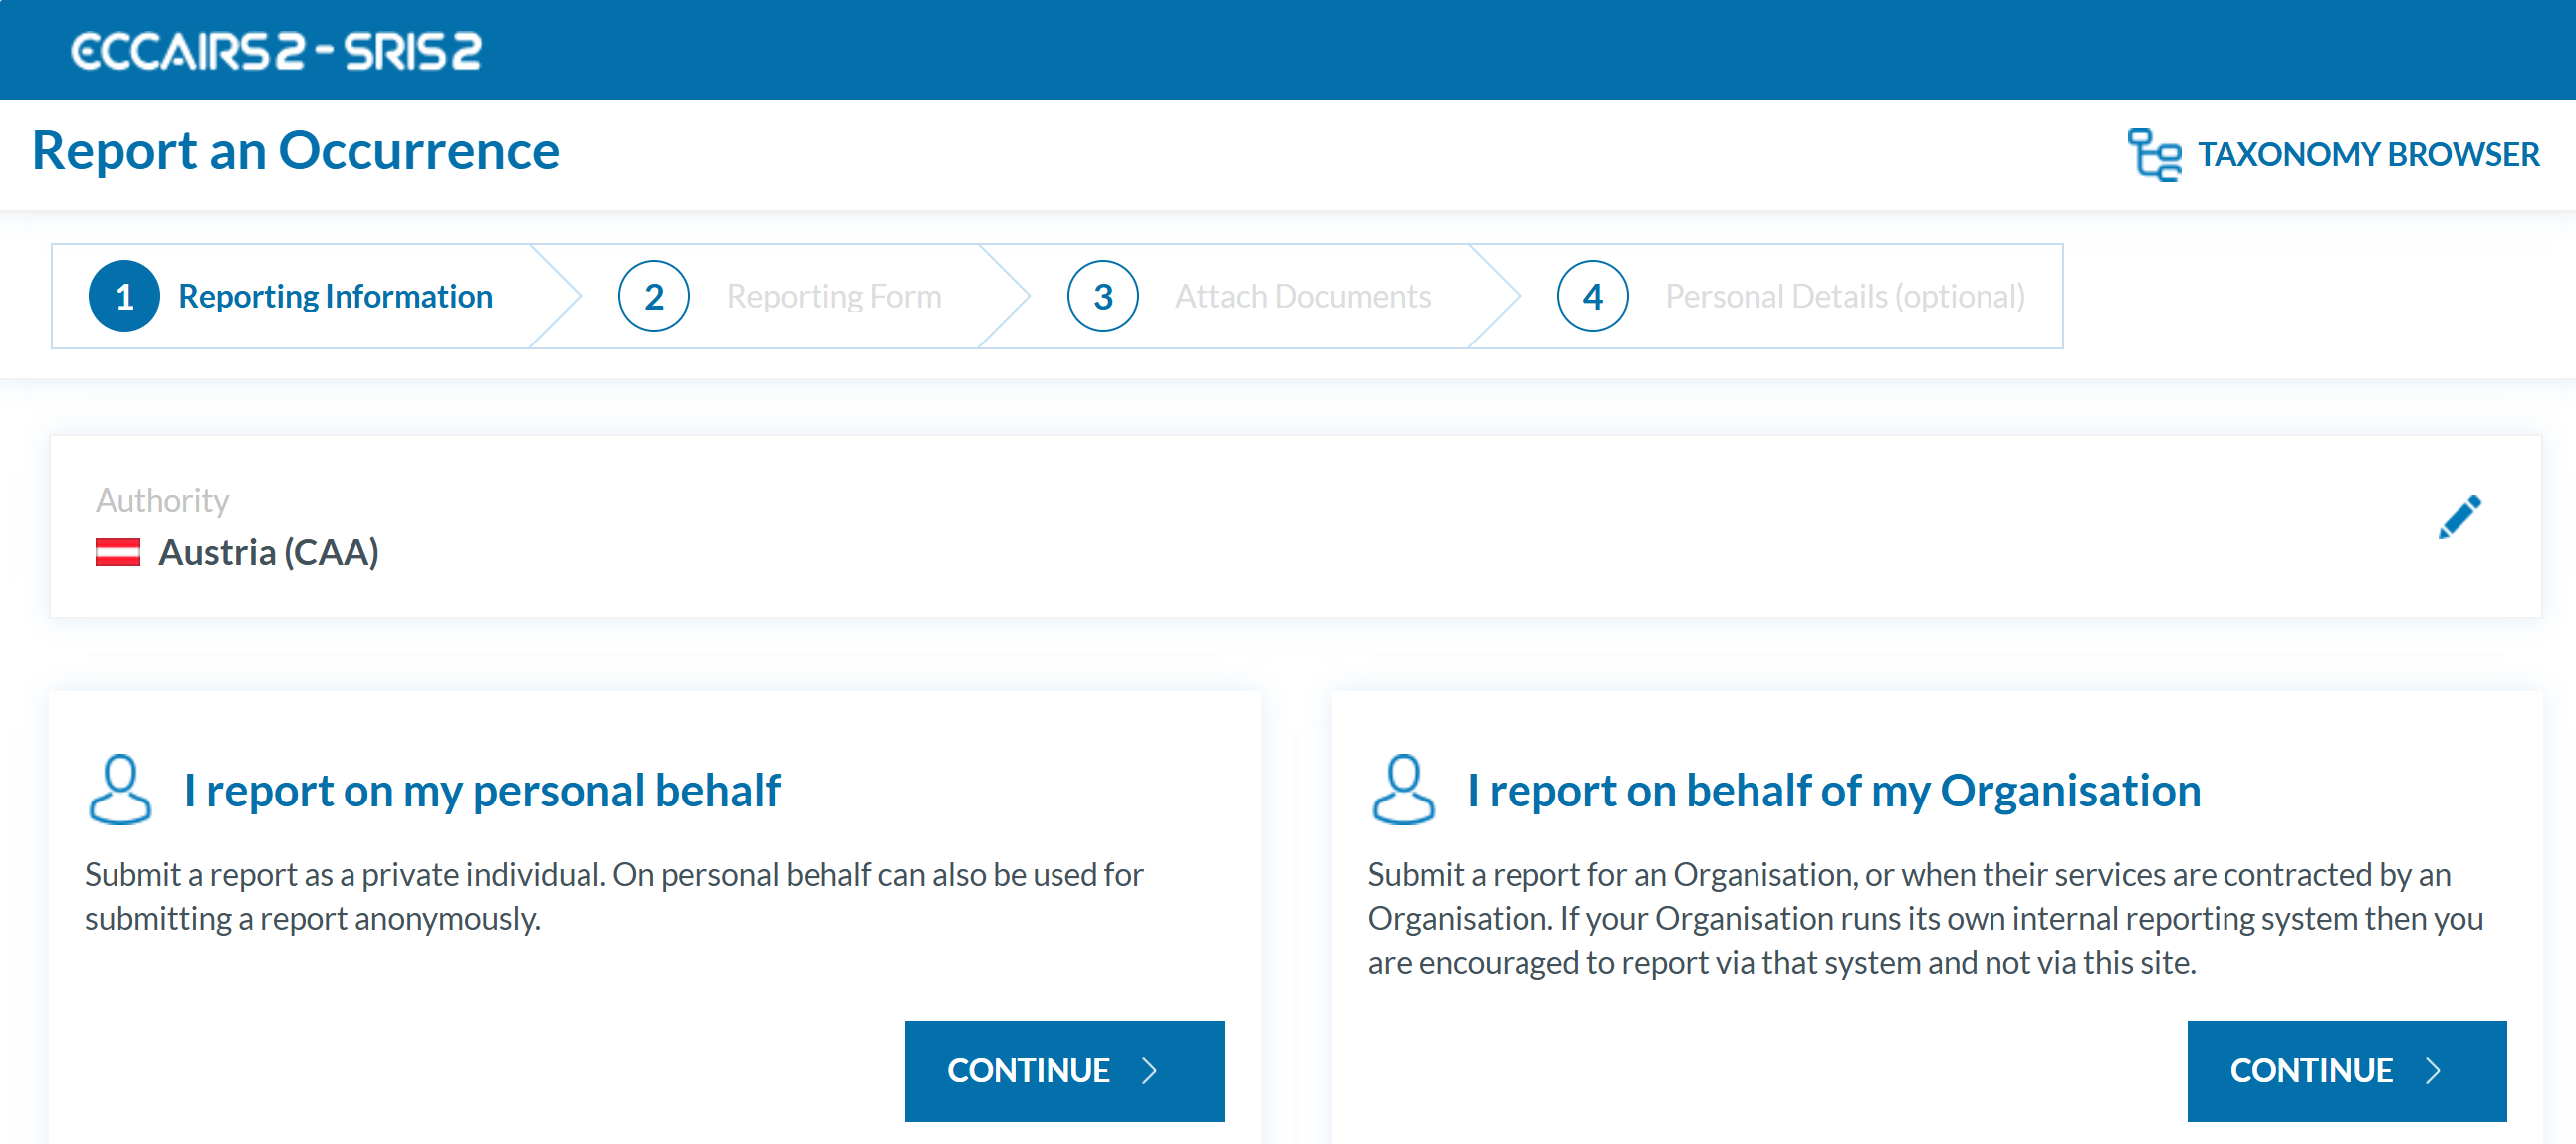
- The system offers two different ways to submit reports:
a. To report on your own behalf, click 'CONTINUE' beneath the 'I report on my behalf' section.
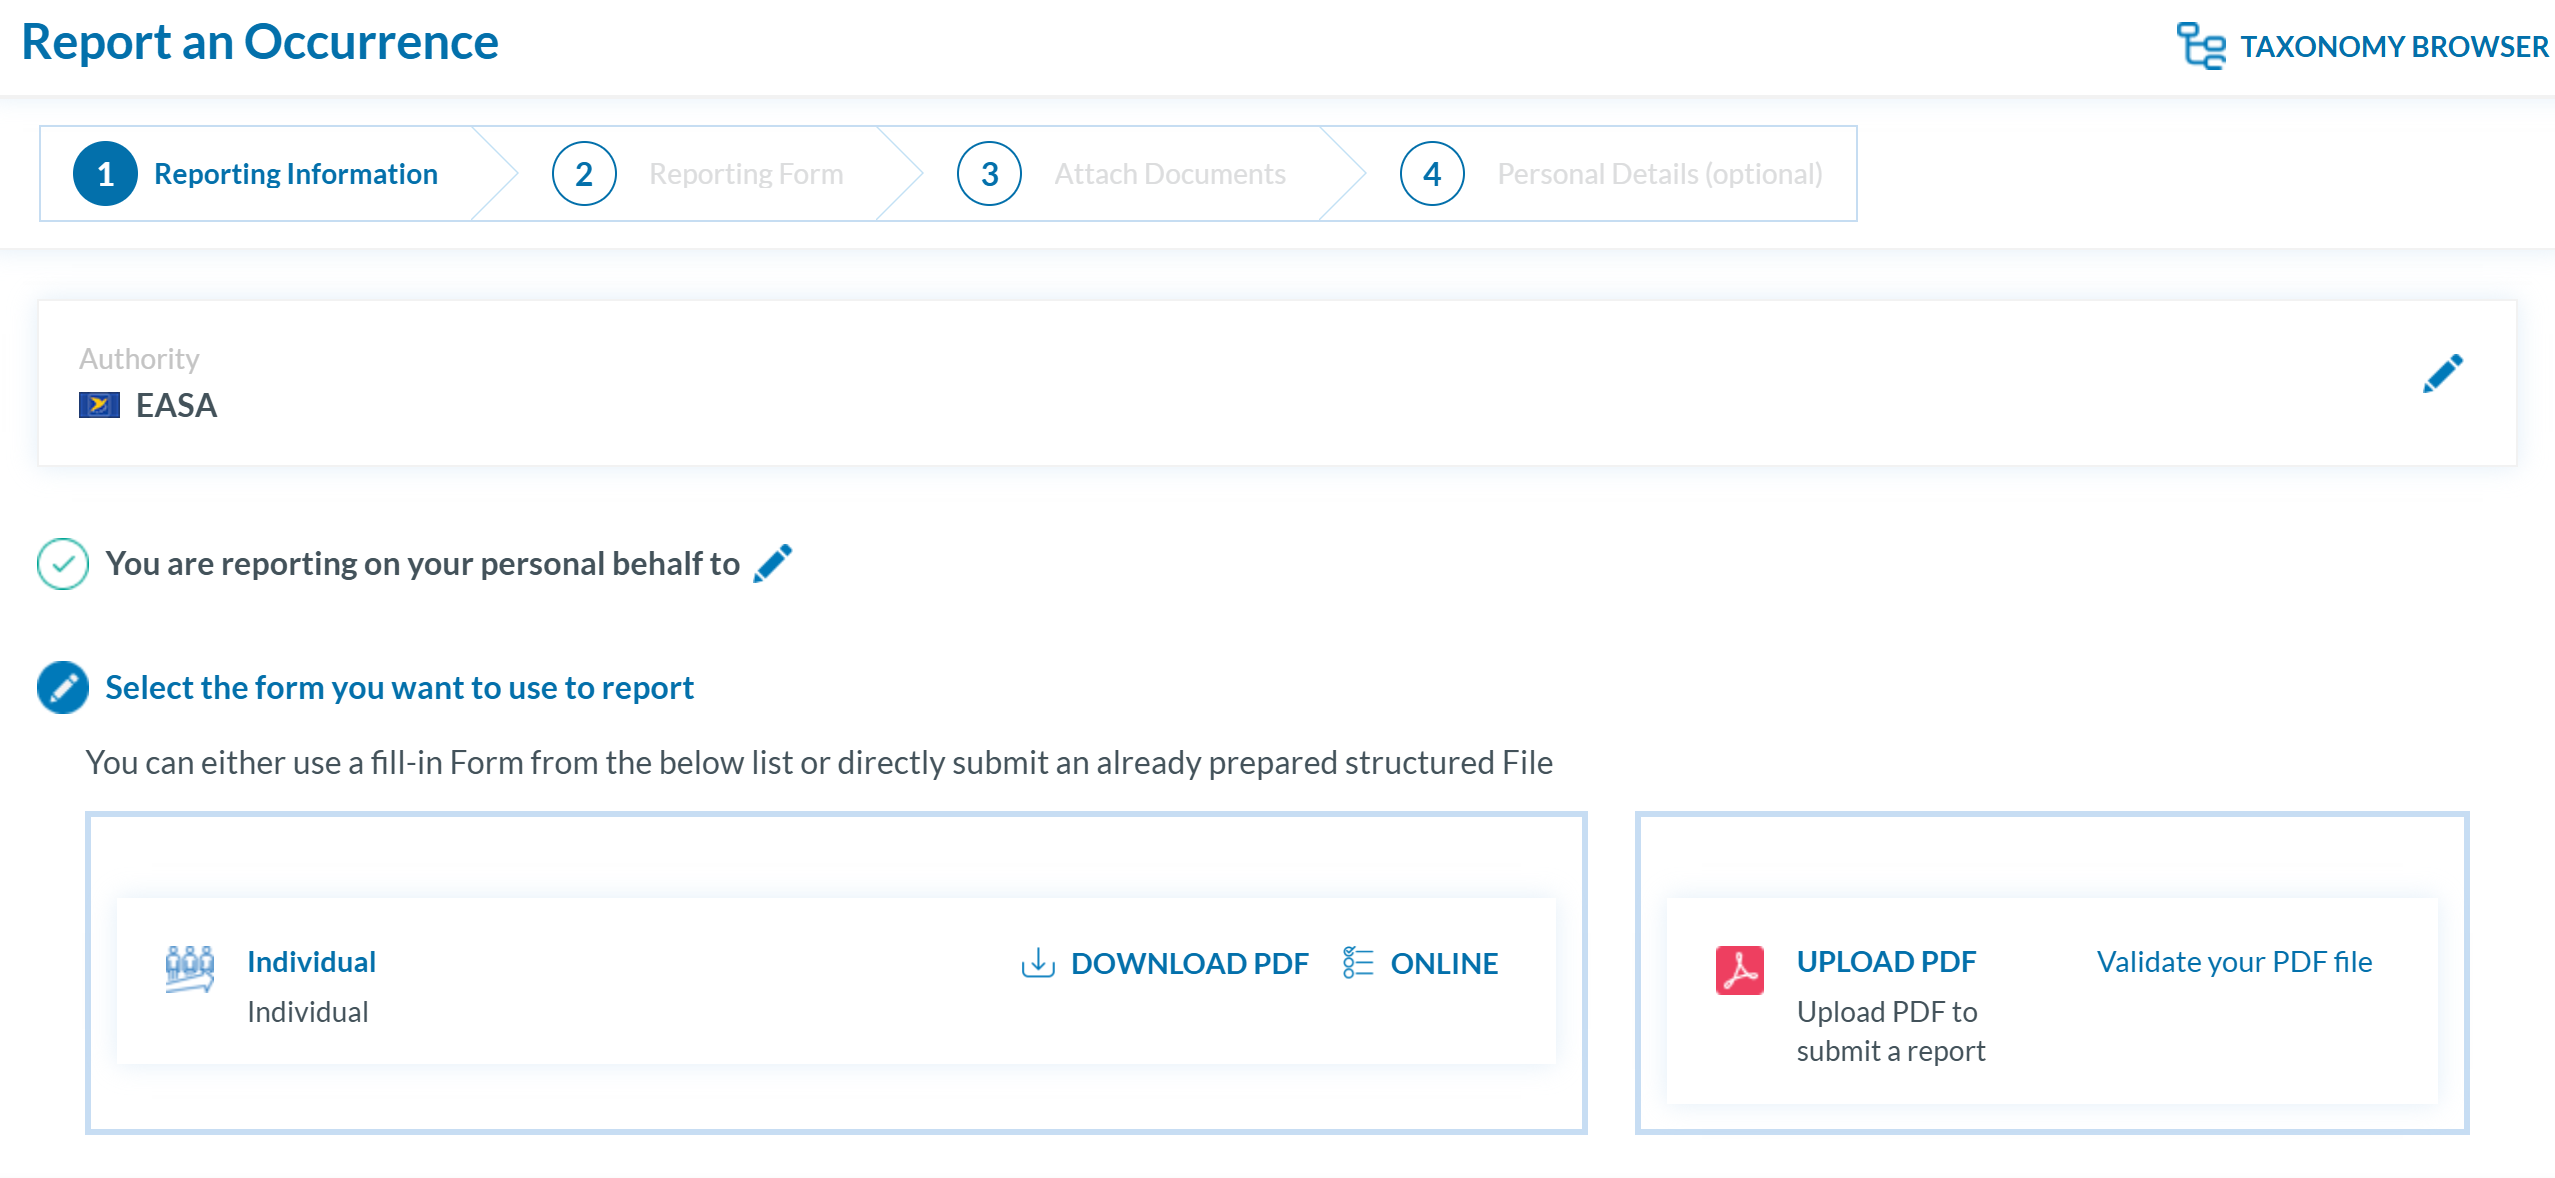
There are two different ways to report on your own behalf: online and offline.
b. To report on behalf of your organisation, click 'CONTINUE' beneath the 'I report on behalf of my Organisation' section.
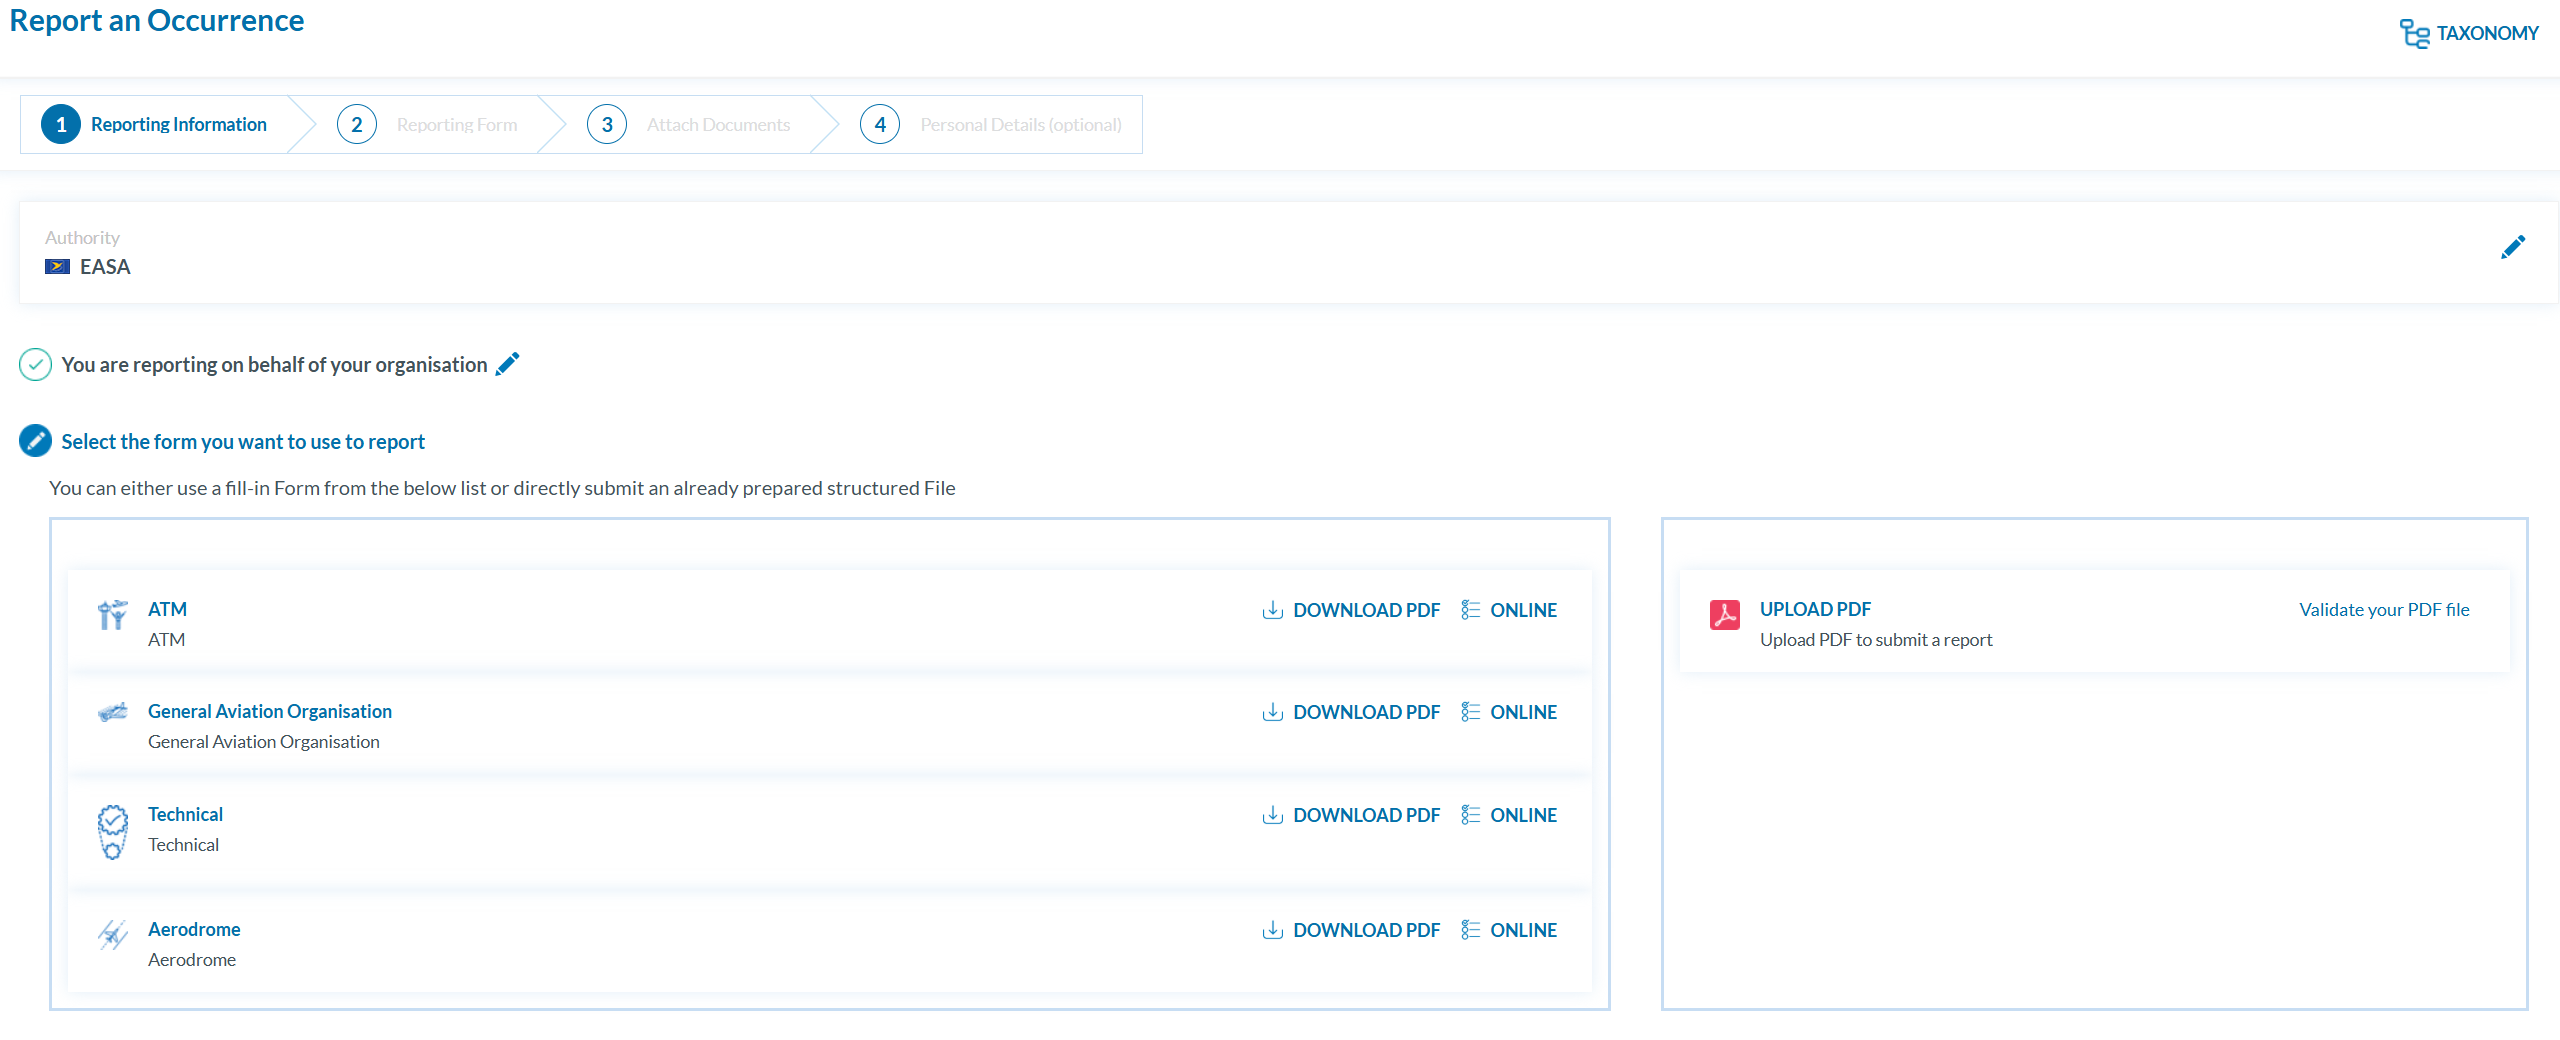
There are two different ways to report on behalf of your organisation: online and offline.
Report online
To report online without registration:
-
Click the ‘ONLINE’ button next to one of the available webforms.
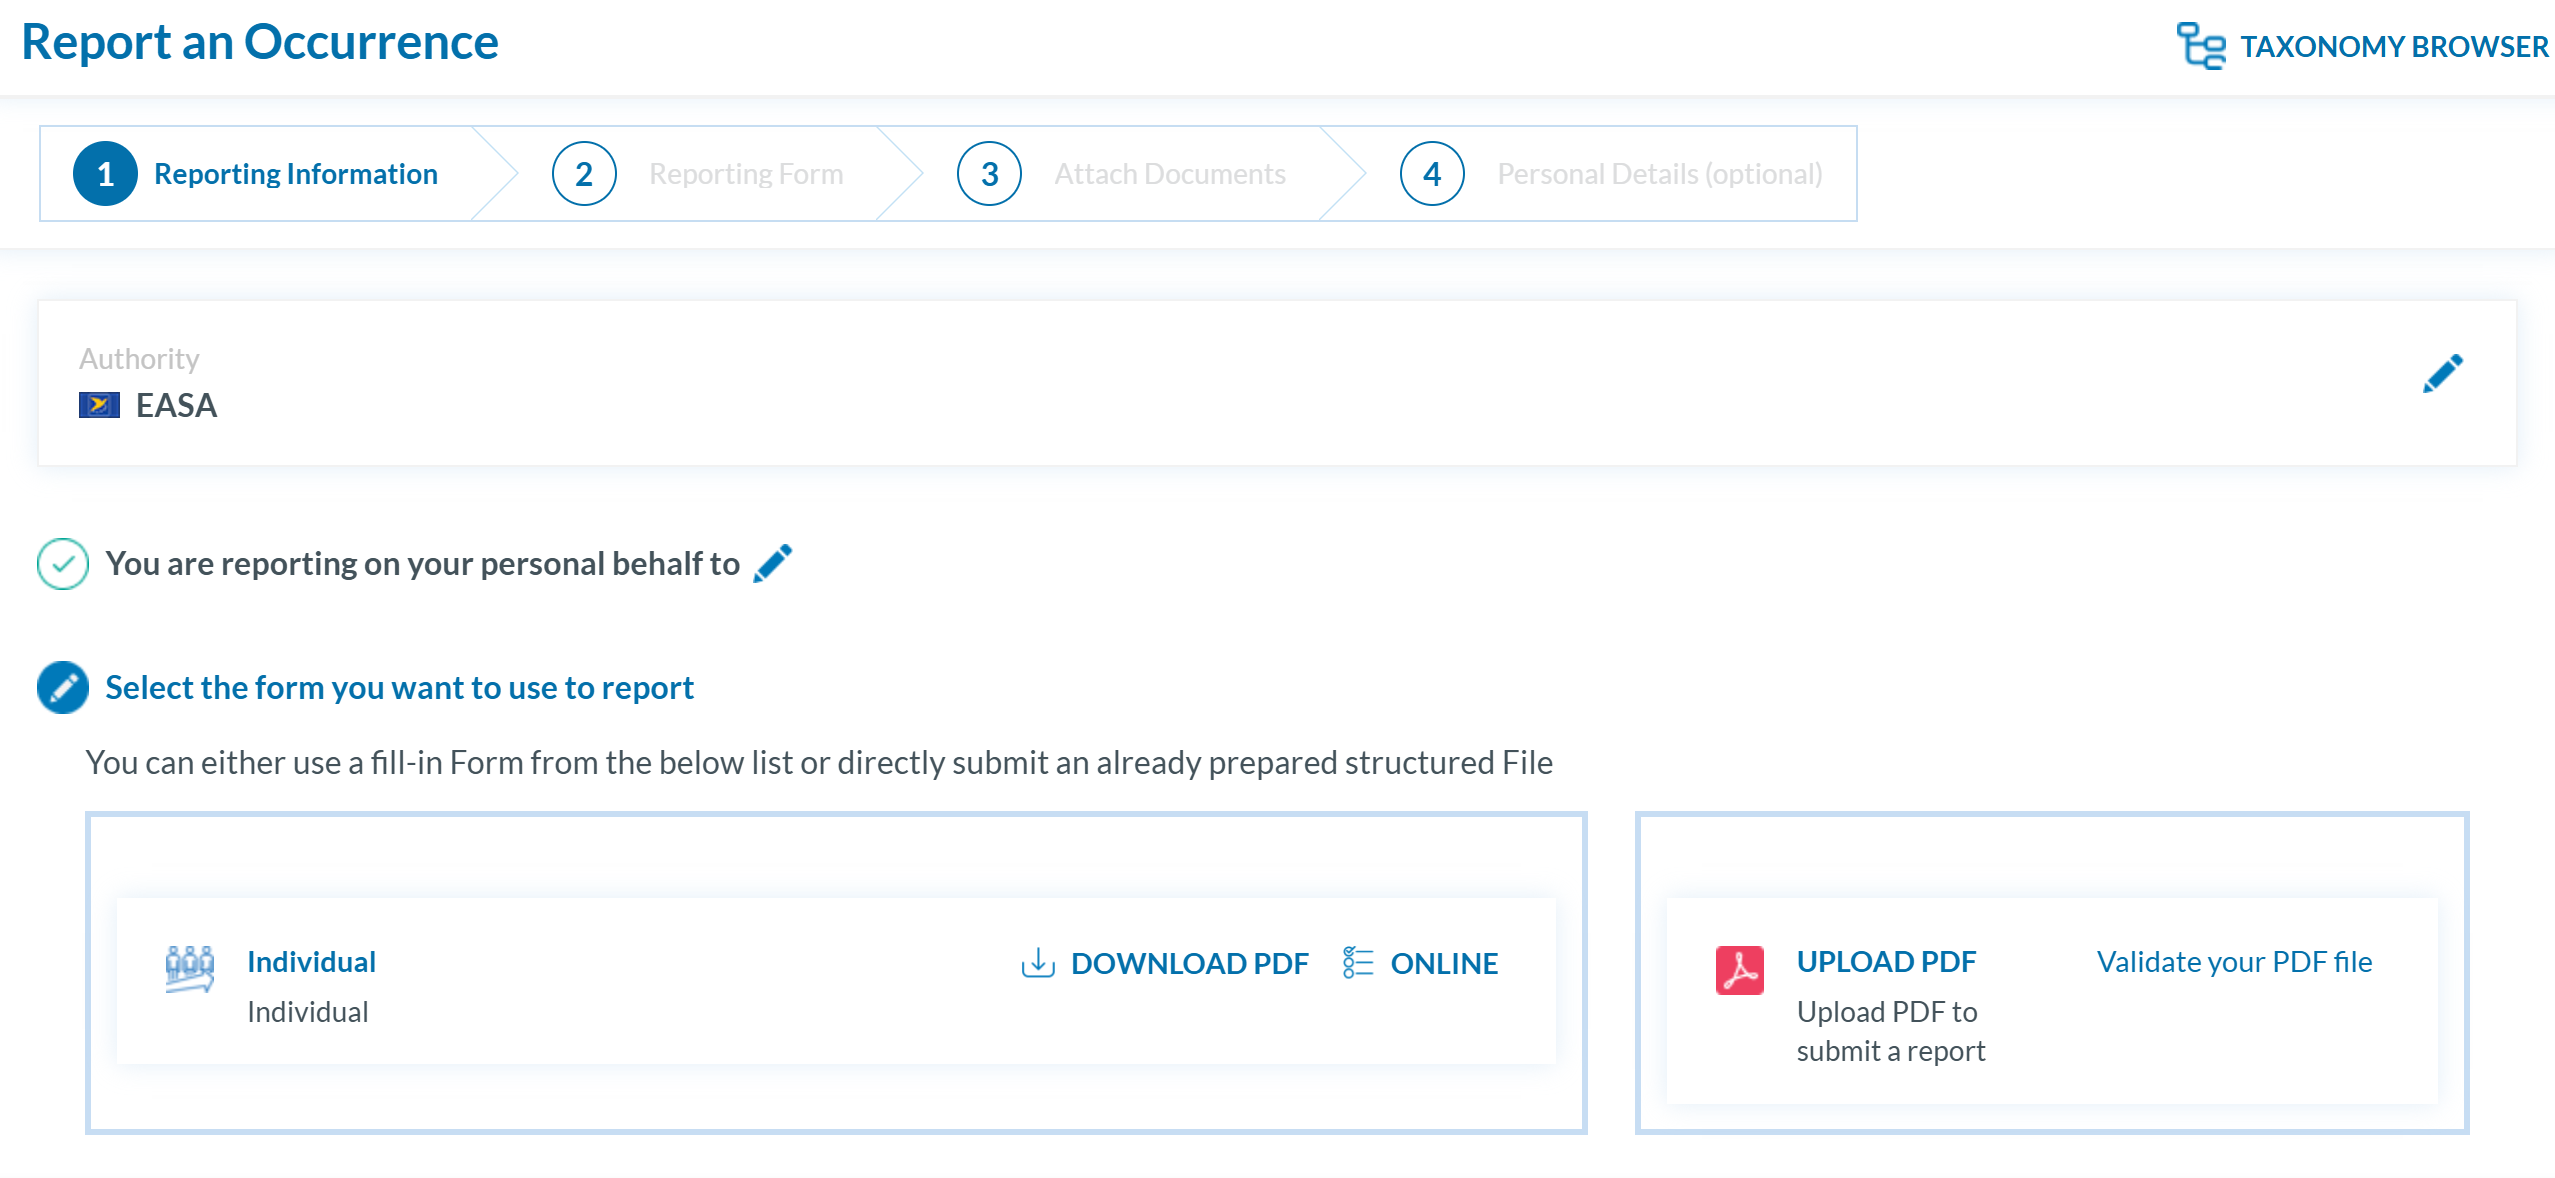
-
Fill out the form. Mandatory fields are highlighted —please provide the required information where available —.
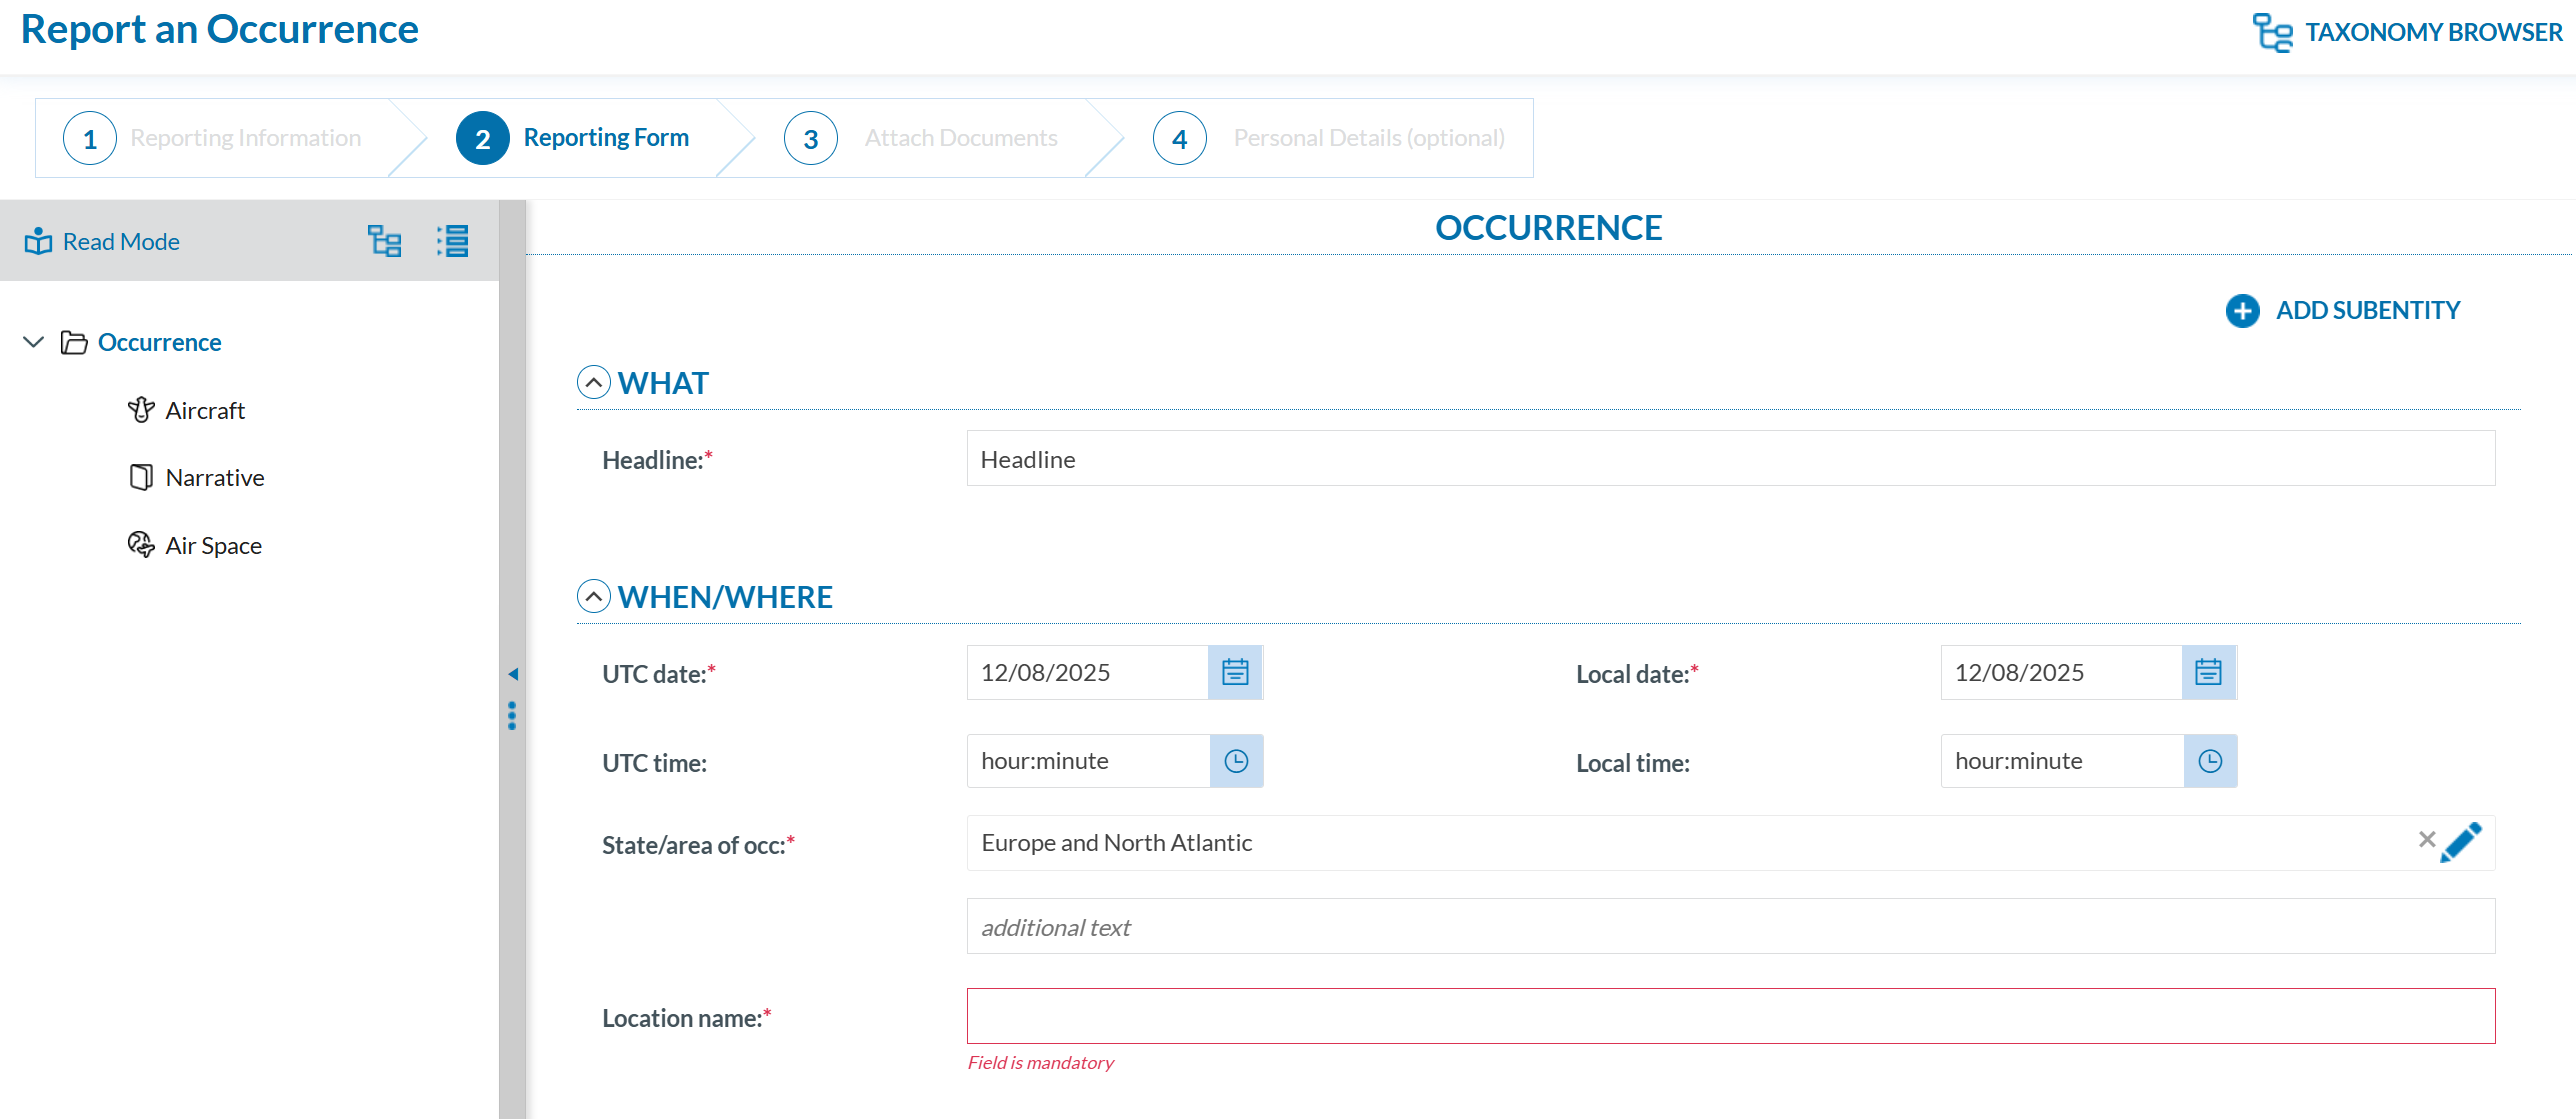
How to fill out the Reporting Form
-
Moving between topics: You can move between topics—Occurrence, Aircraft, Narrative, and Airspace—using the navigation tree on the left pane.
-
Adding entries:
-
To add a new aircraft:
-
Click on 'Aircraft' (left pane).
-
Select 'ADD AIRCRAFT' (top-left corner of the right-hand pane).
-
-
To add a new 'Air space':
-
Click on 'Air space' (left pane).
-
Click 'ADD AIR SPACE' (top-left corner of the right-hand pane).
-
-
To add elements under 'Occurrence':
-
Click on 'Occurrence' (left pane).
-
Select "ADD SUBENTITY" (top-right corner of the right-hand pane).
-
-
-
Once you've completed the report, click 'CONTINUE' to proceed.
-
If applicable, attach any relevant documents by clicking 'Select files...' or by drag and drop.

The system accepts files up to 4,000 MB in total. Supported formats include:
- Documents: .pdf, .doc/.docx, .ppt/.pptx, .xls/.xlsx/.xlsm, .xml, .rtf**, .odt**
- Images: .jpg/.jpeg, .png, .gif, .jtif**, .heic
- Media: .mp3, .mp4, .mov
- Others: .e5x, .e5z, .msg, .eml**, .zip**
❌ Files with .dll, .exe, .sys, or unknown extensions are not allowed.
You can add a description or remove the attached file by clicking on ‘x’ on the right.

Then click ‘CONTINUE’ to proceed.
- If needed, you can return to the previous step using the 'PREVIOUS STEP' button.
- You may click 'SUBMIT' to send your report, or 'CONTINUE' to optionally add your personal details.
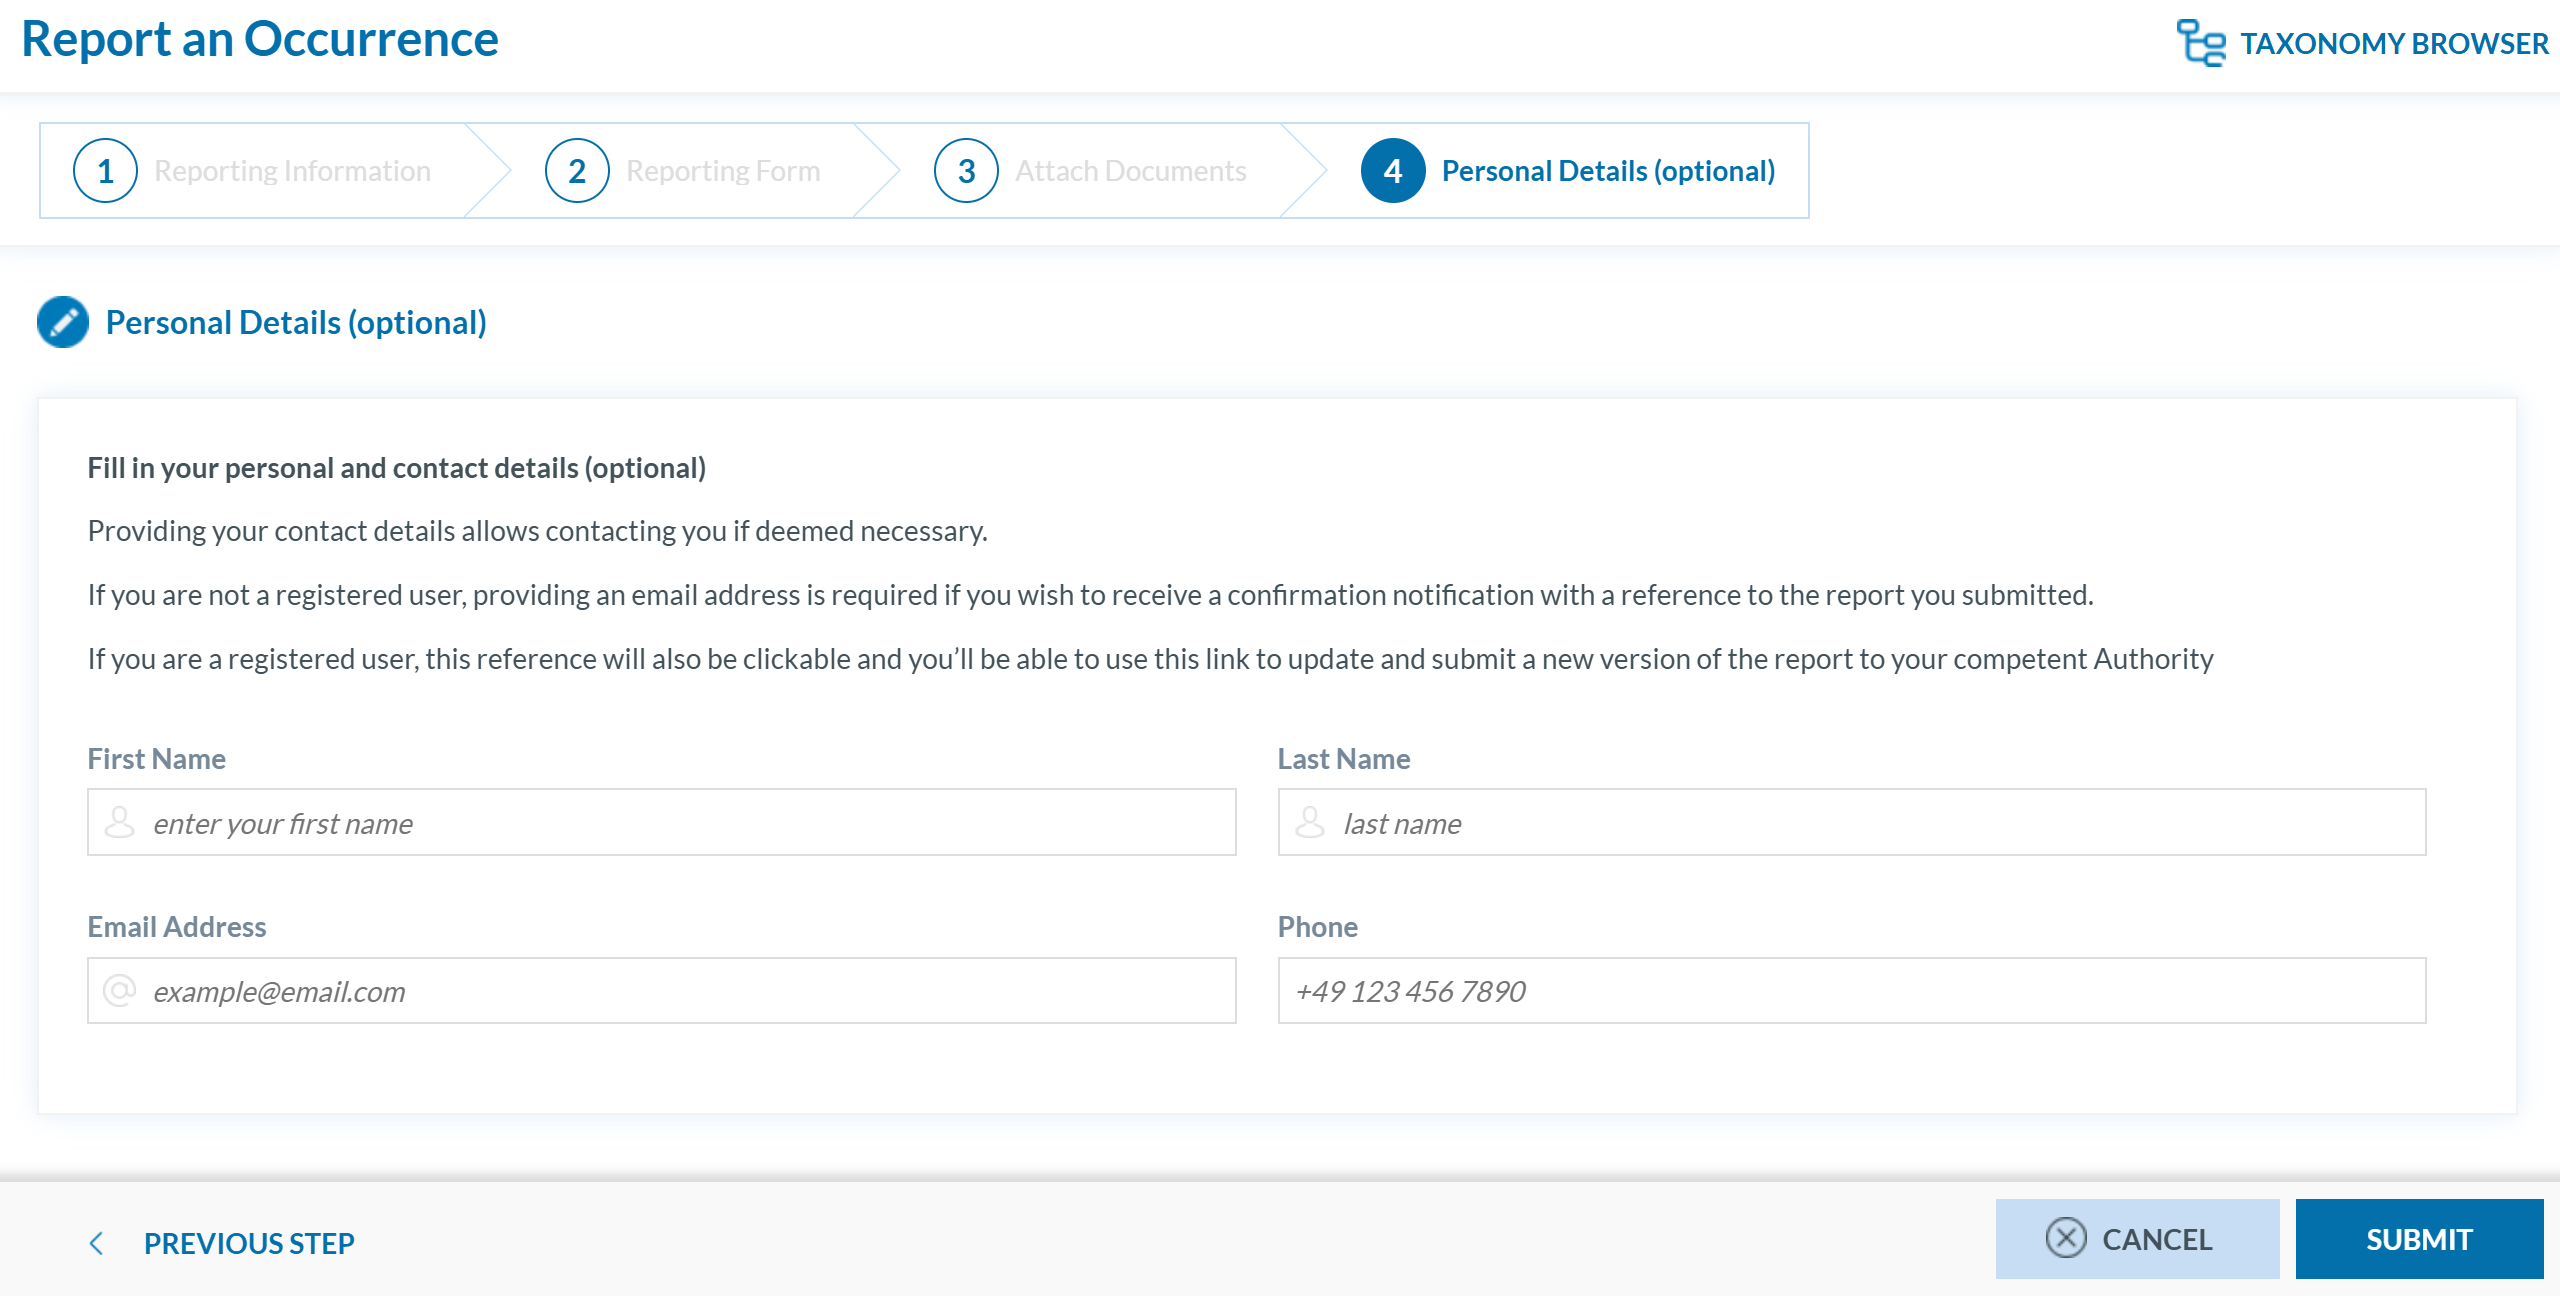
- You will get a confirmation saying that "You have successfully submitted your report(s).'
If any mandatory fields are left incomplete, a warning message will appear indicating which fields are missing. If you do not have the required information at the moment, you may still proceed by clicking ‘SUBMIT’.
Report offline
This section outlines how to report offline wihout registraion and how to validate a PDF to submit a report.
Report offline
To report offline without registration:
-
Click ‘DOWNLOAD PDF’ to obtain the reporting form in PDF format.
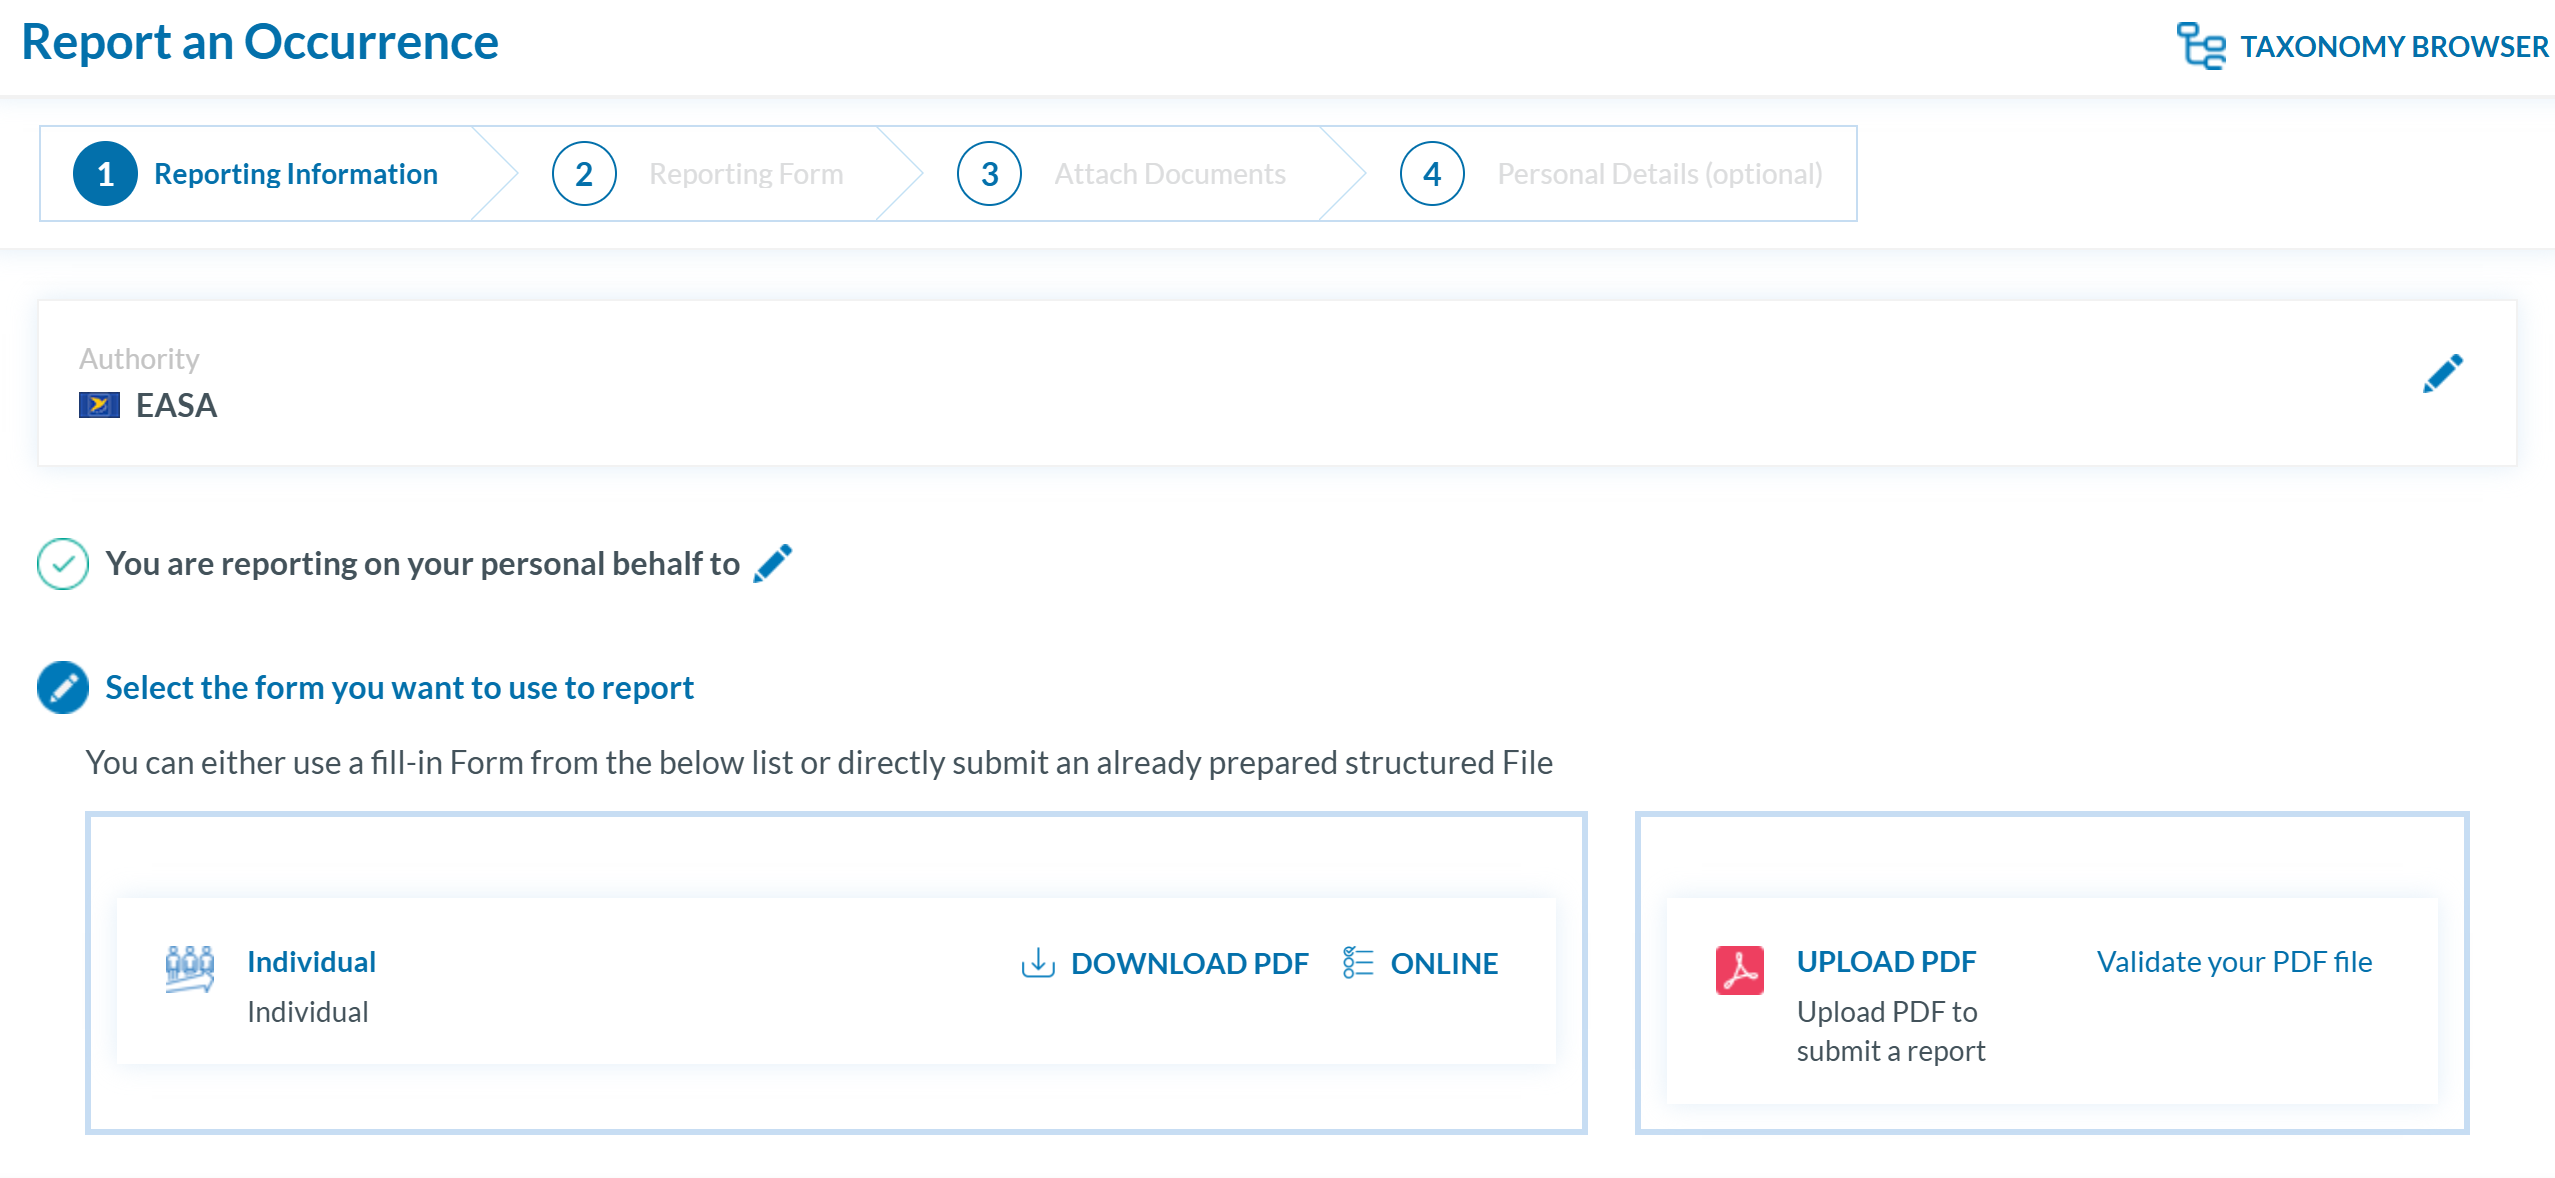
-
Use the free Acrobat Reader (Adobe's website) to fill the form. Other PDF applications may not work or corrupt the PDF form.
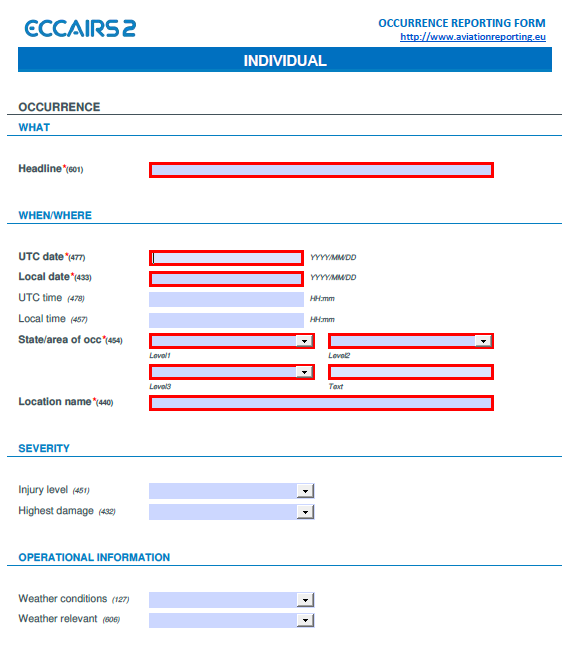
- Save the file to your device.
- Click ‘UPLOAD PDF’.
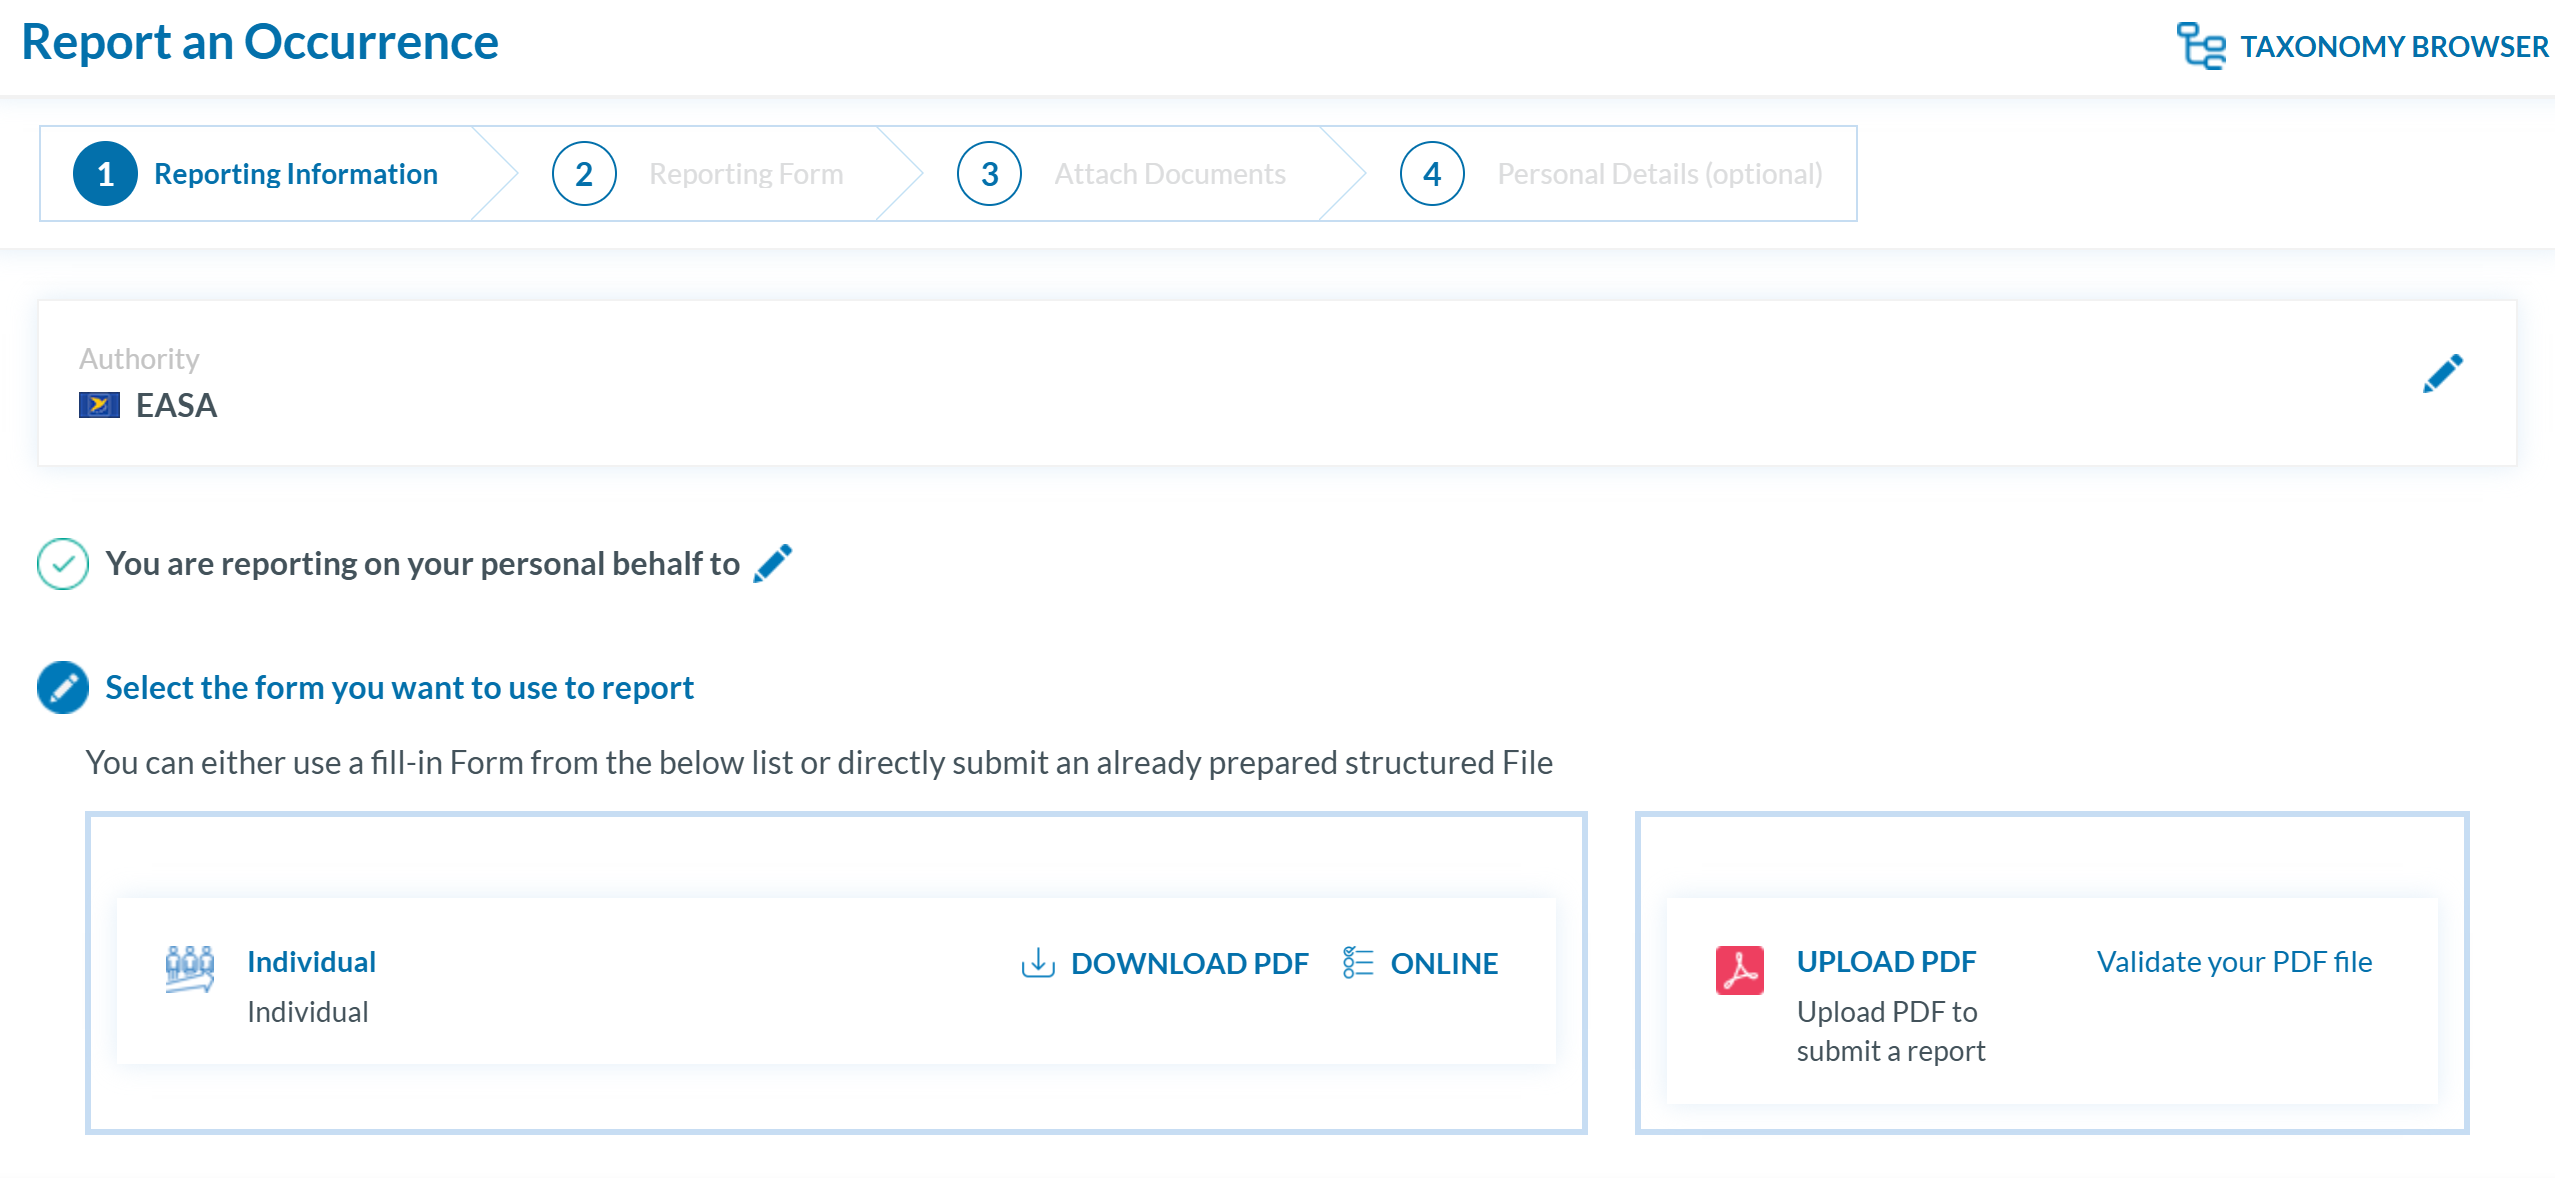
-
Attach the saved report by clicking the ‘Select files...’ button or by using drag and drop.
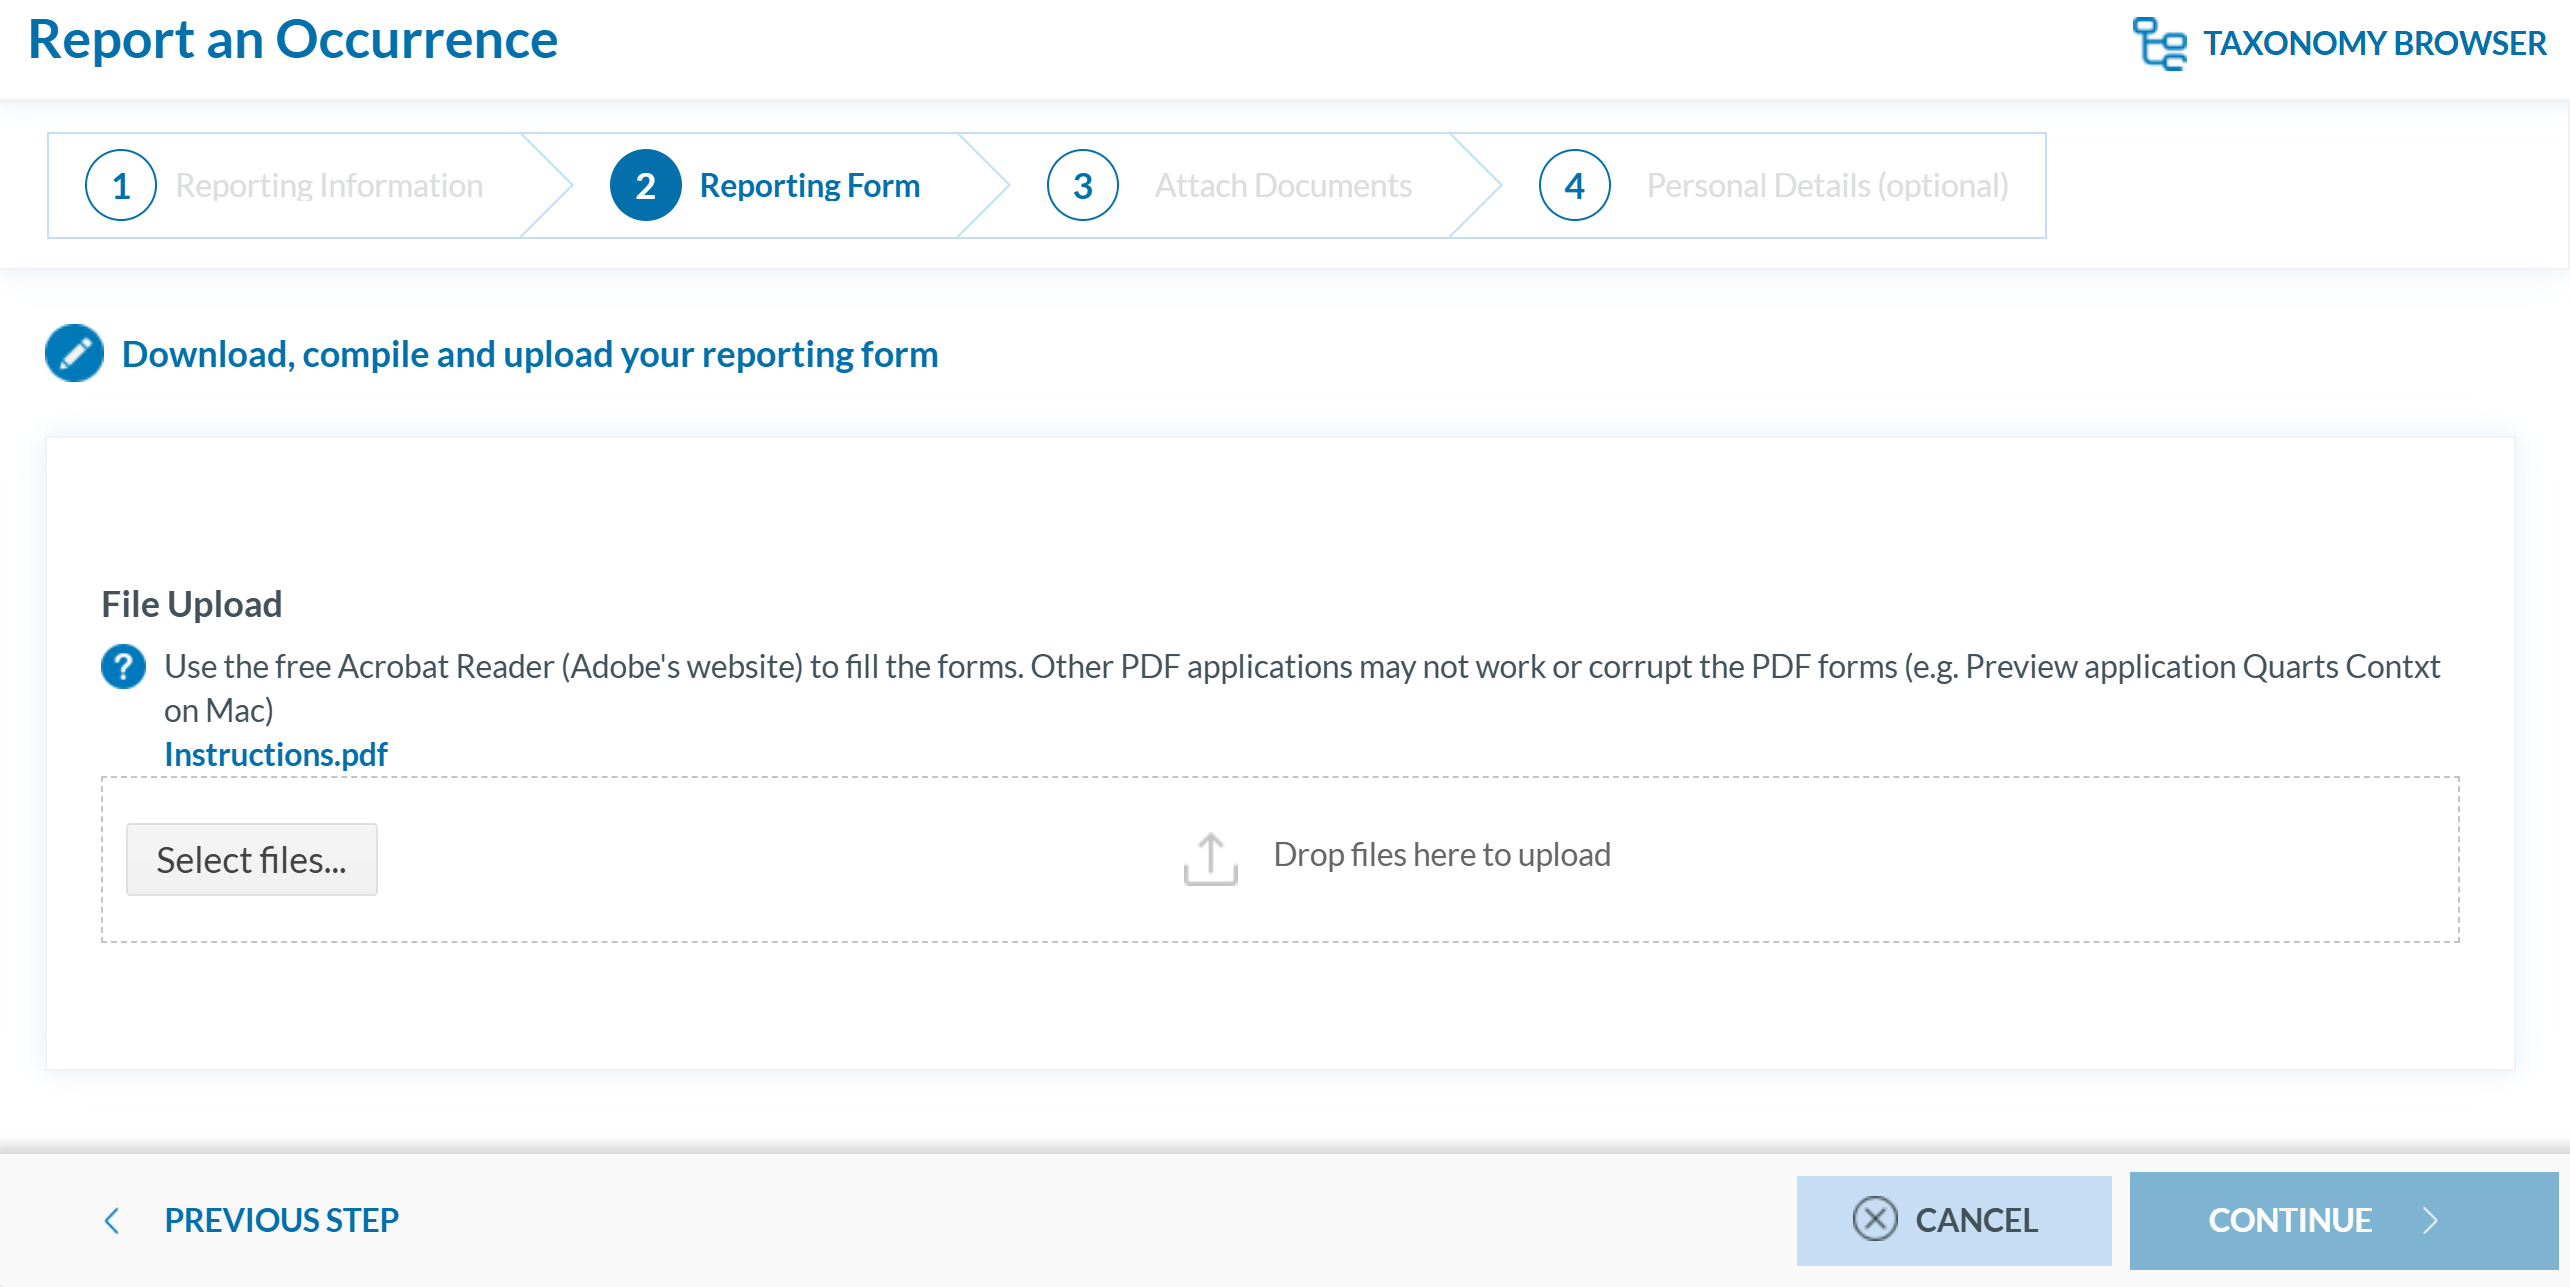
- When the process is finish you will see a message stating "Your file(s) have been successfully uploaded."
-
If applicable, attach any relevant documents by clicking 'Select files...' or by drag and drop.
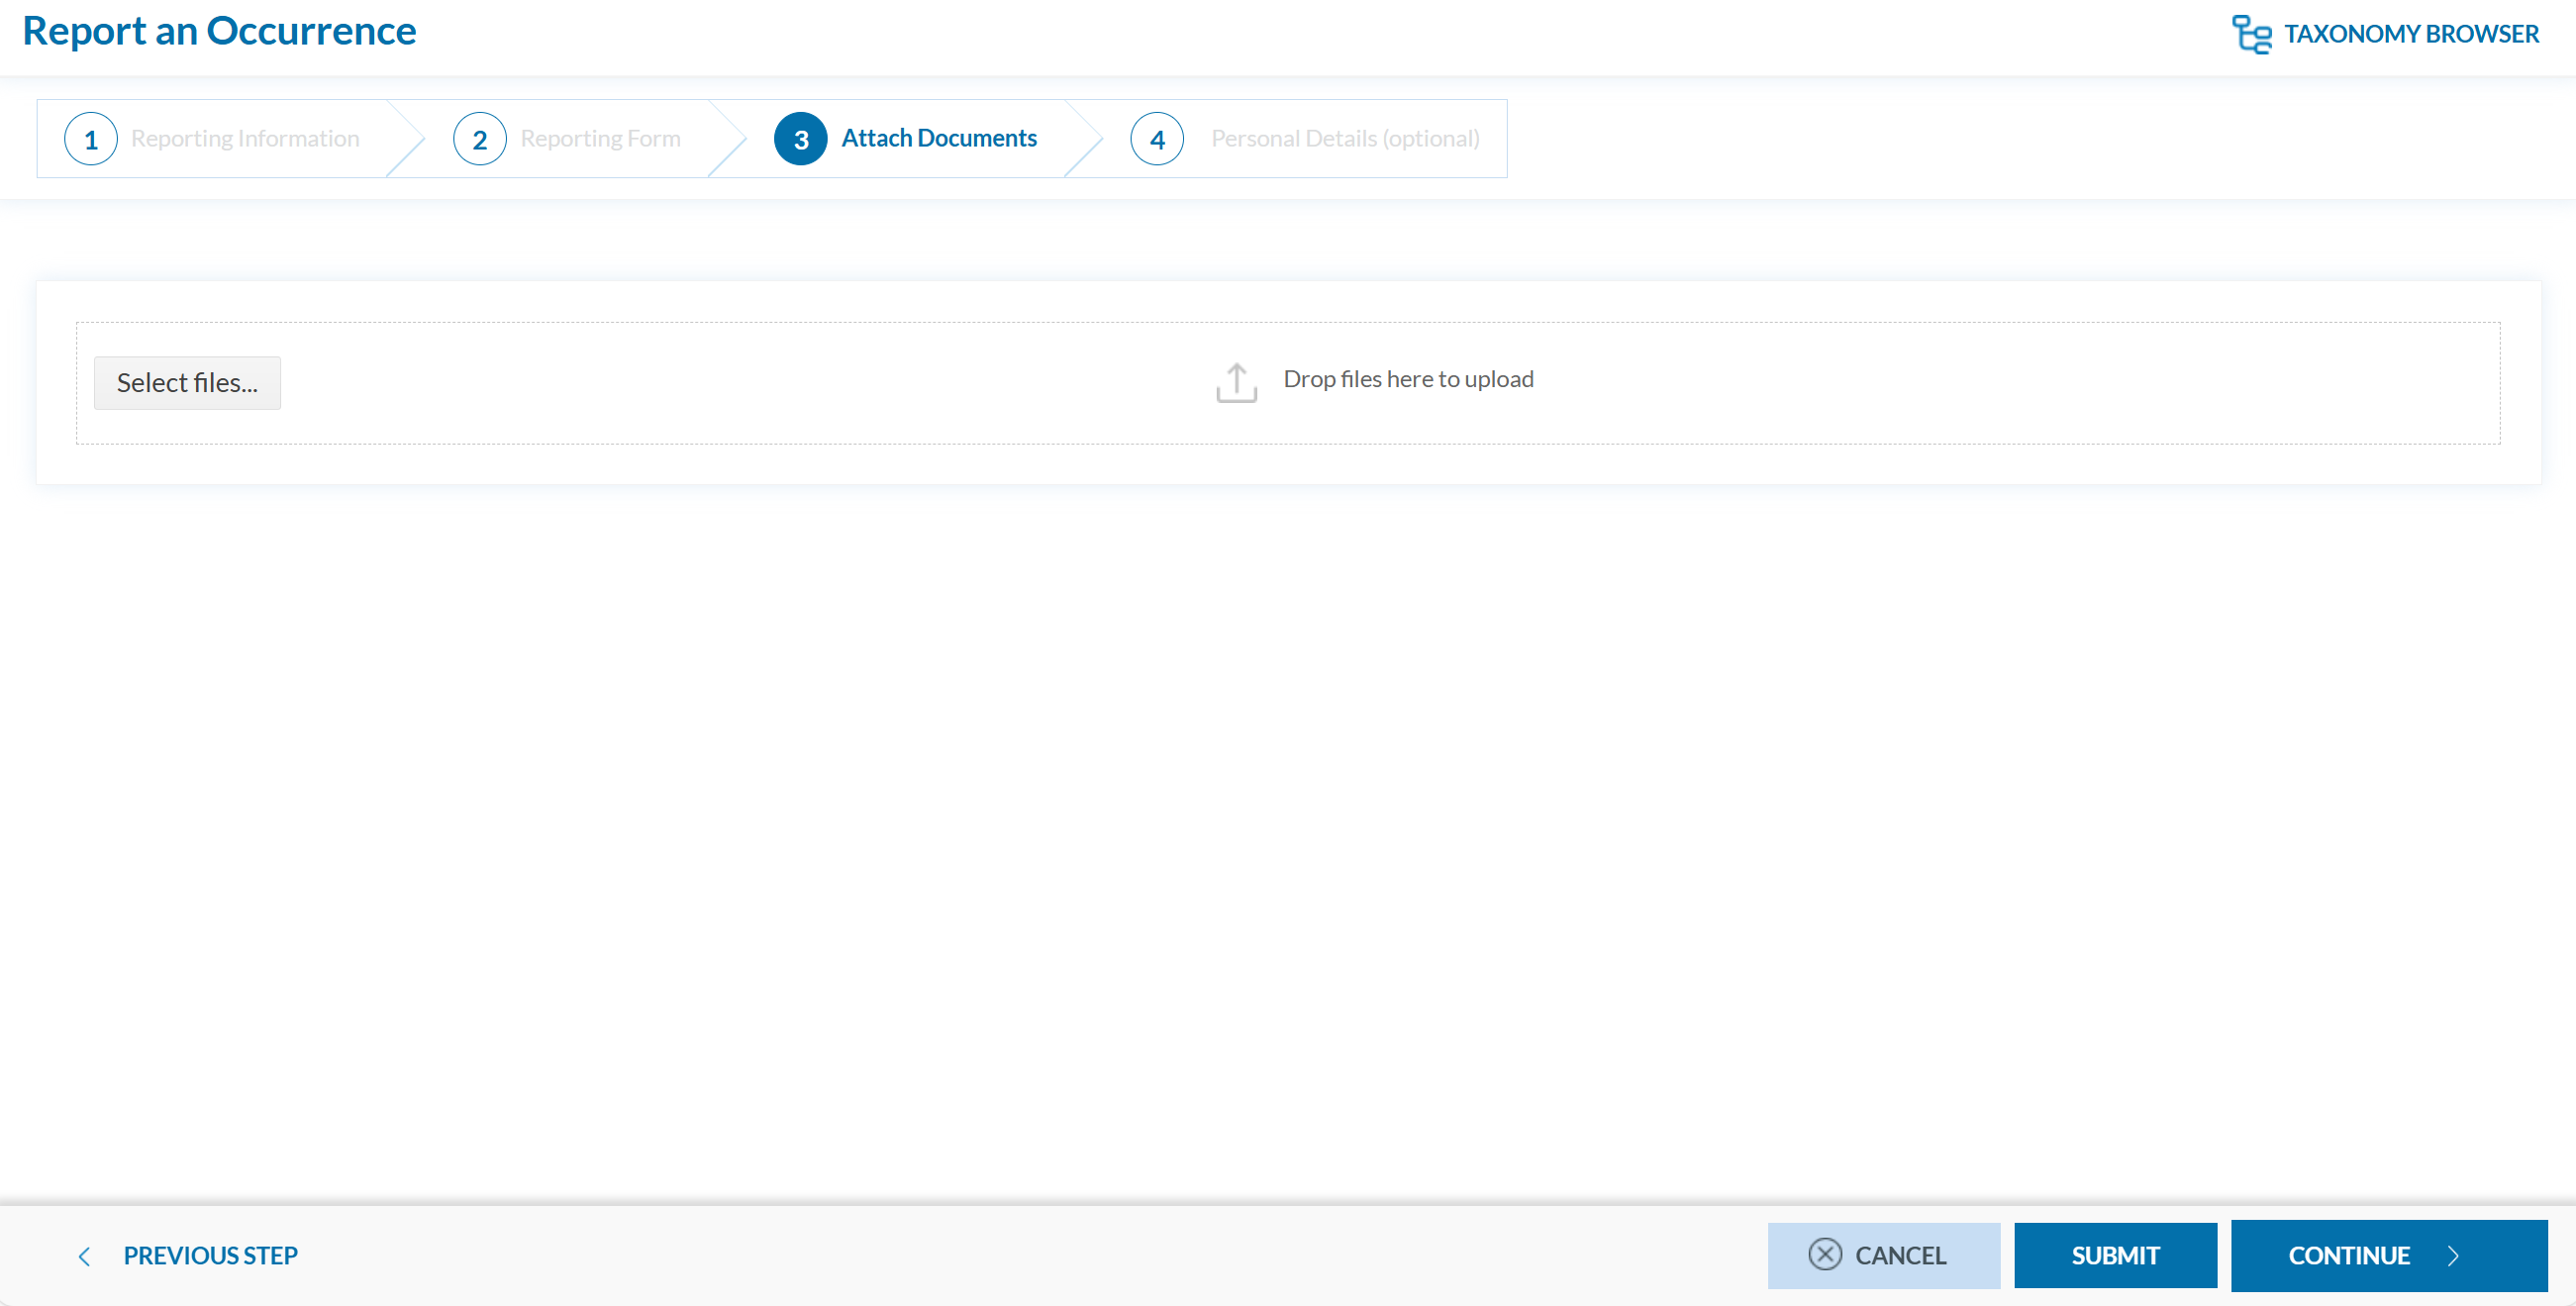
The system accepts files up to 4,000 MB in total. Supported formats include:
- Documents: .pdf, .doc/.docx, .ppt/.pptx, .xls/.xlsx/.xlsm, .xml, .rtf**, .odt**
- Images: .jpg/.jpeg, .png, .gif, .jtif**, .heic
- Media: .mp3, .mp4, .mov
- Others: .e5x, .e5z, .msg, .eml**, .zip**
❌ Files with .dll, .exe, .sys, or unknown extensions are not allowed.
You can add a description or remove the attached file by clicking on ‘x’ on the right.

Then click ‘CONTINUE’ to proceed.
-
If needed, you can return to the previous step using the 'PREVIOUS STEP' button. In the 'Report Form' section, you can replace the uploaded report by clicking the pencil icon to the right of the document name. In the 'Attach Documents' section, you can upload additional files or remove them by clicking the 'X' icon.
-
You may click 'SUBMIT' to send your report, or 'CONTINUE' to optionally add your personal details.
- You will get a confirmation saying that "You have successfully submitted your report(s).'
If any mandatory fields are left incomplete, a warning message will appear indicating which fields are missing. If you do not have the required information at the moment, you may still proceed by clicking 'SUBMIT'.
Validate your PDF
To validate your PDF:
- Sign in to access the 'Report an Occurrence' page.
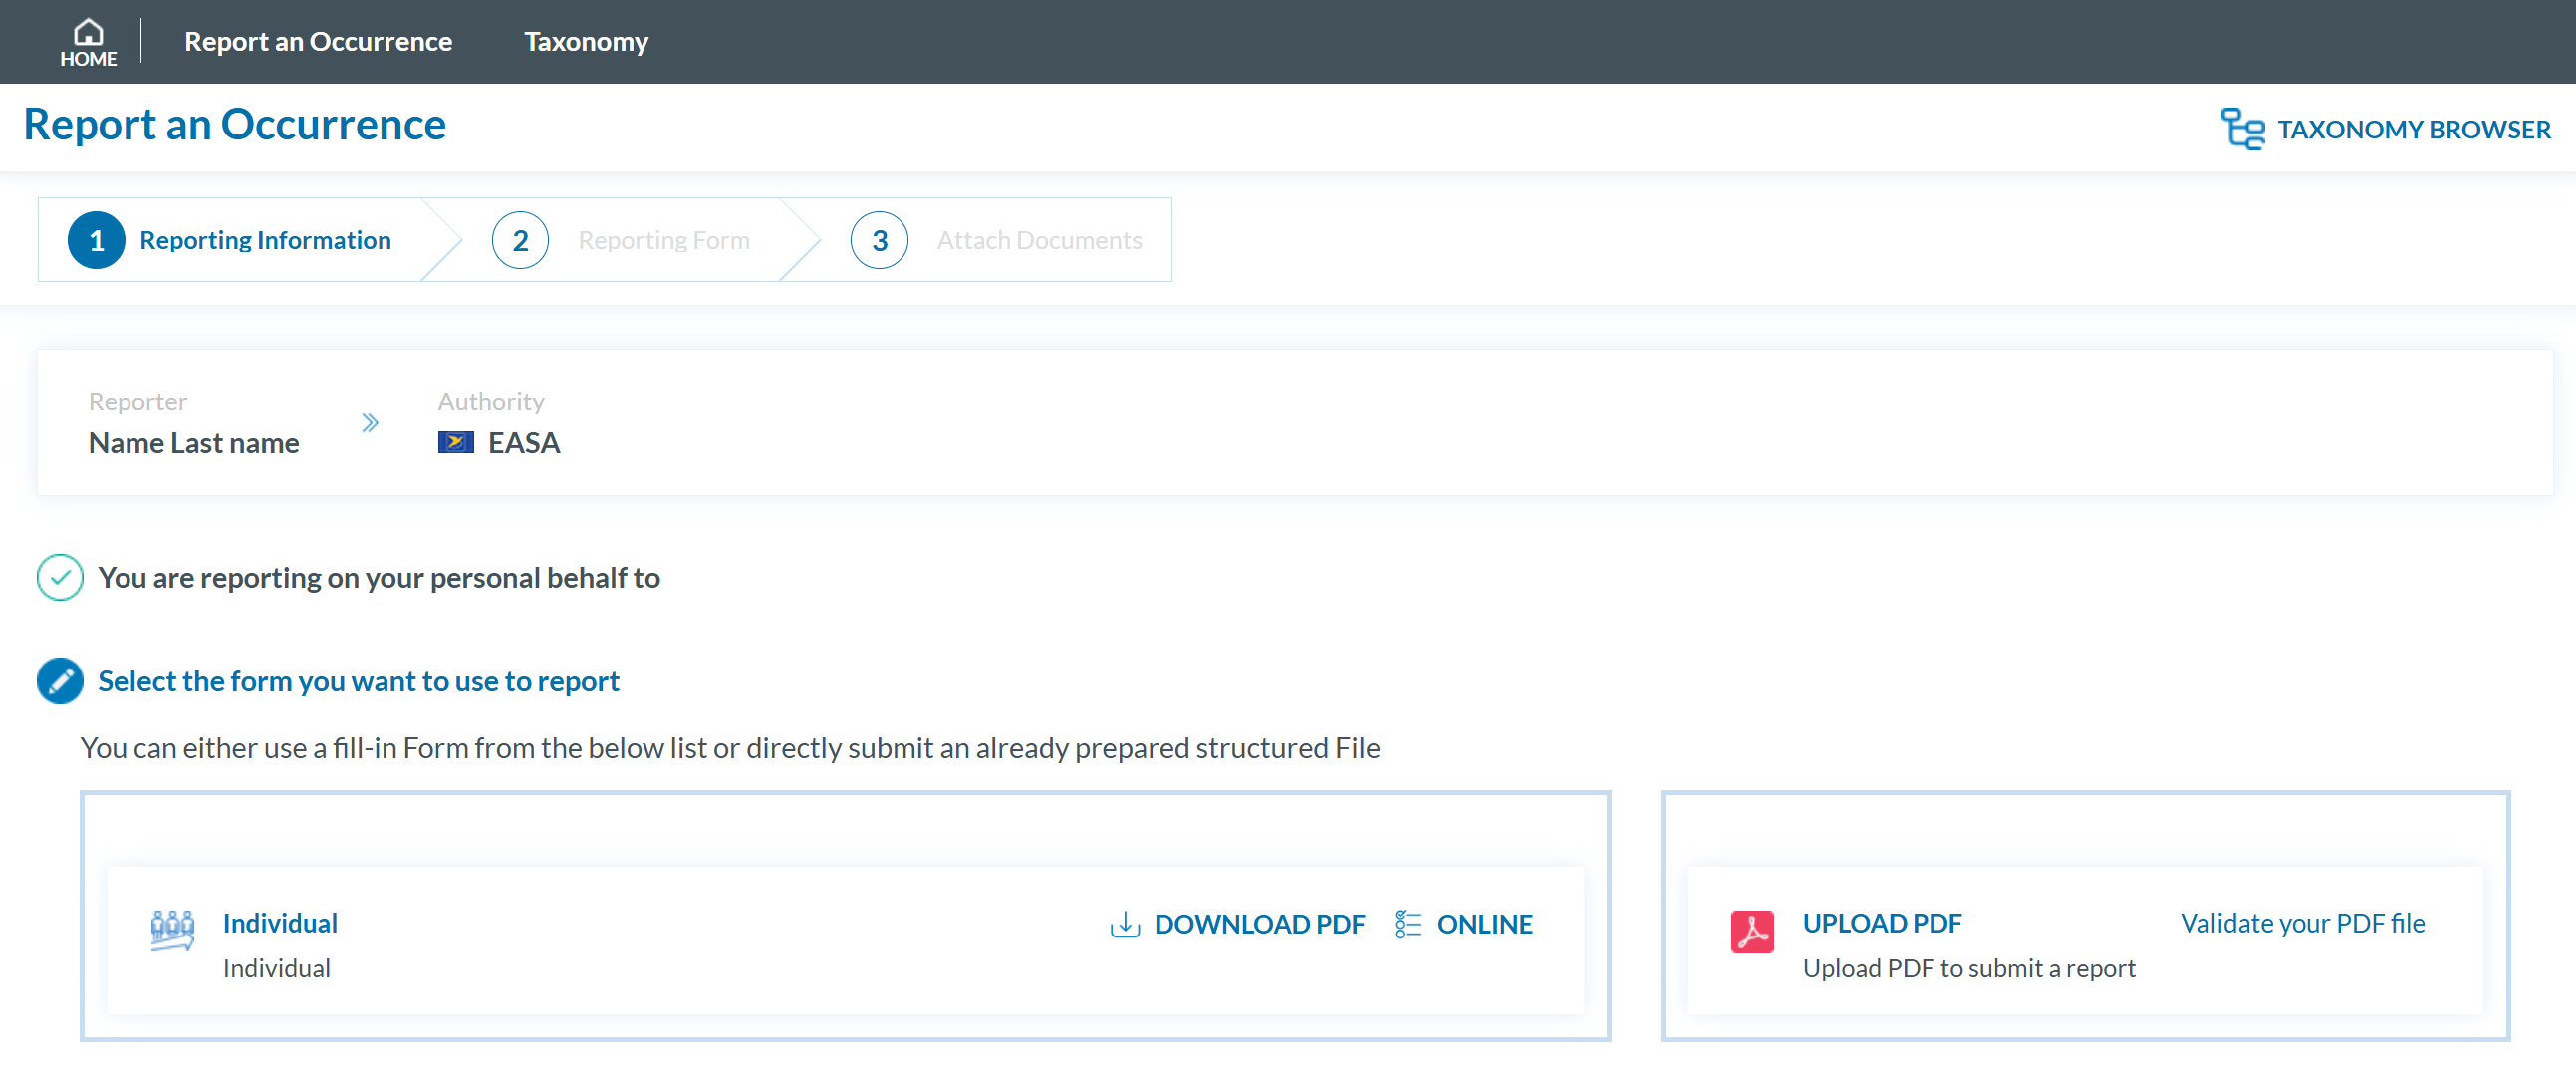
- Click 'Validate your PDF File'. The system will open the validation page:
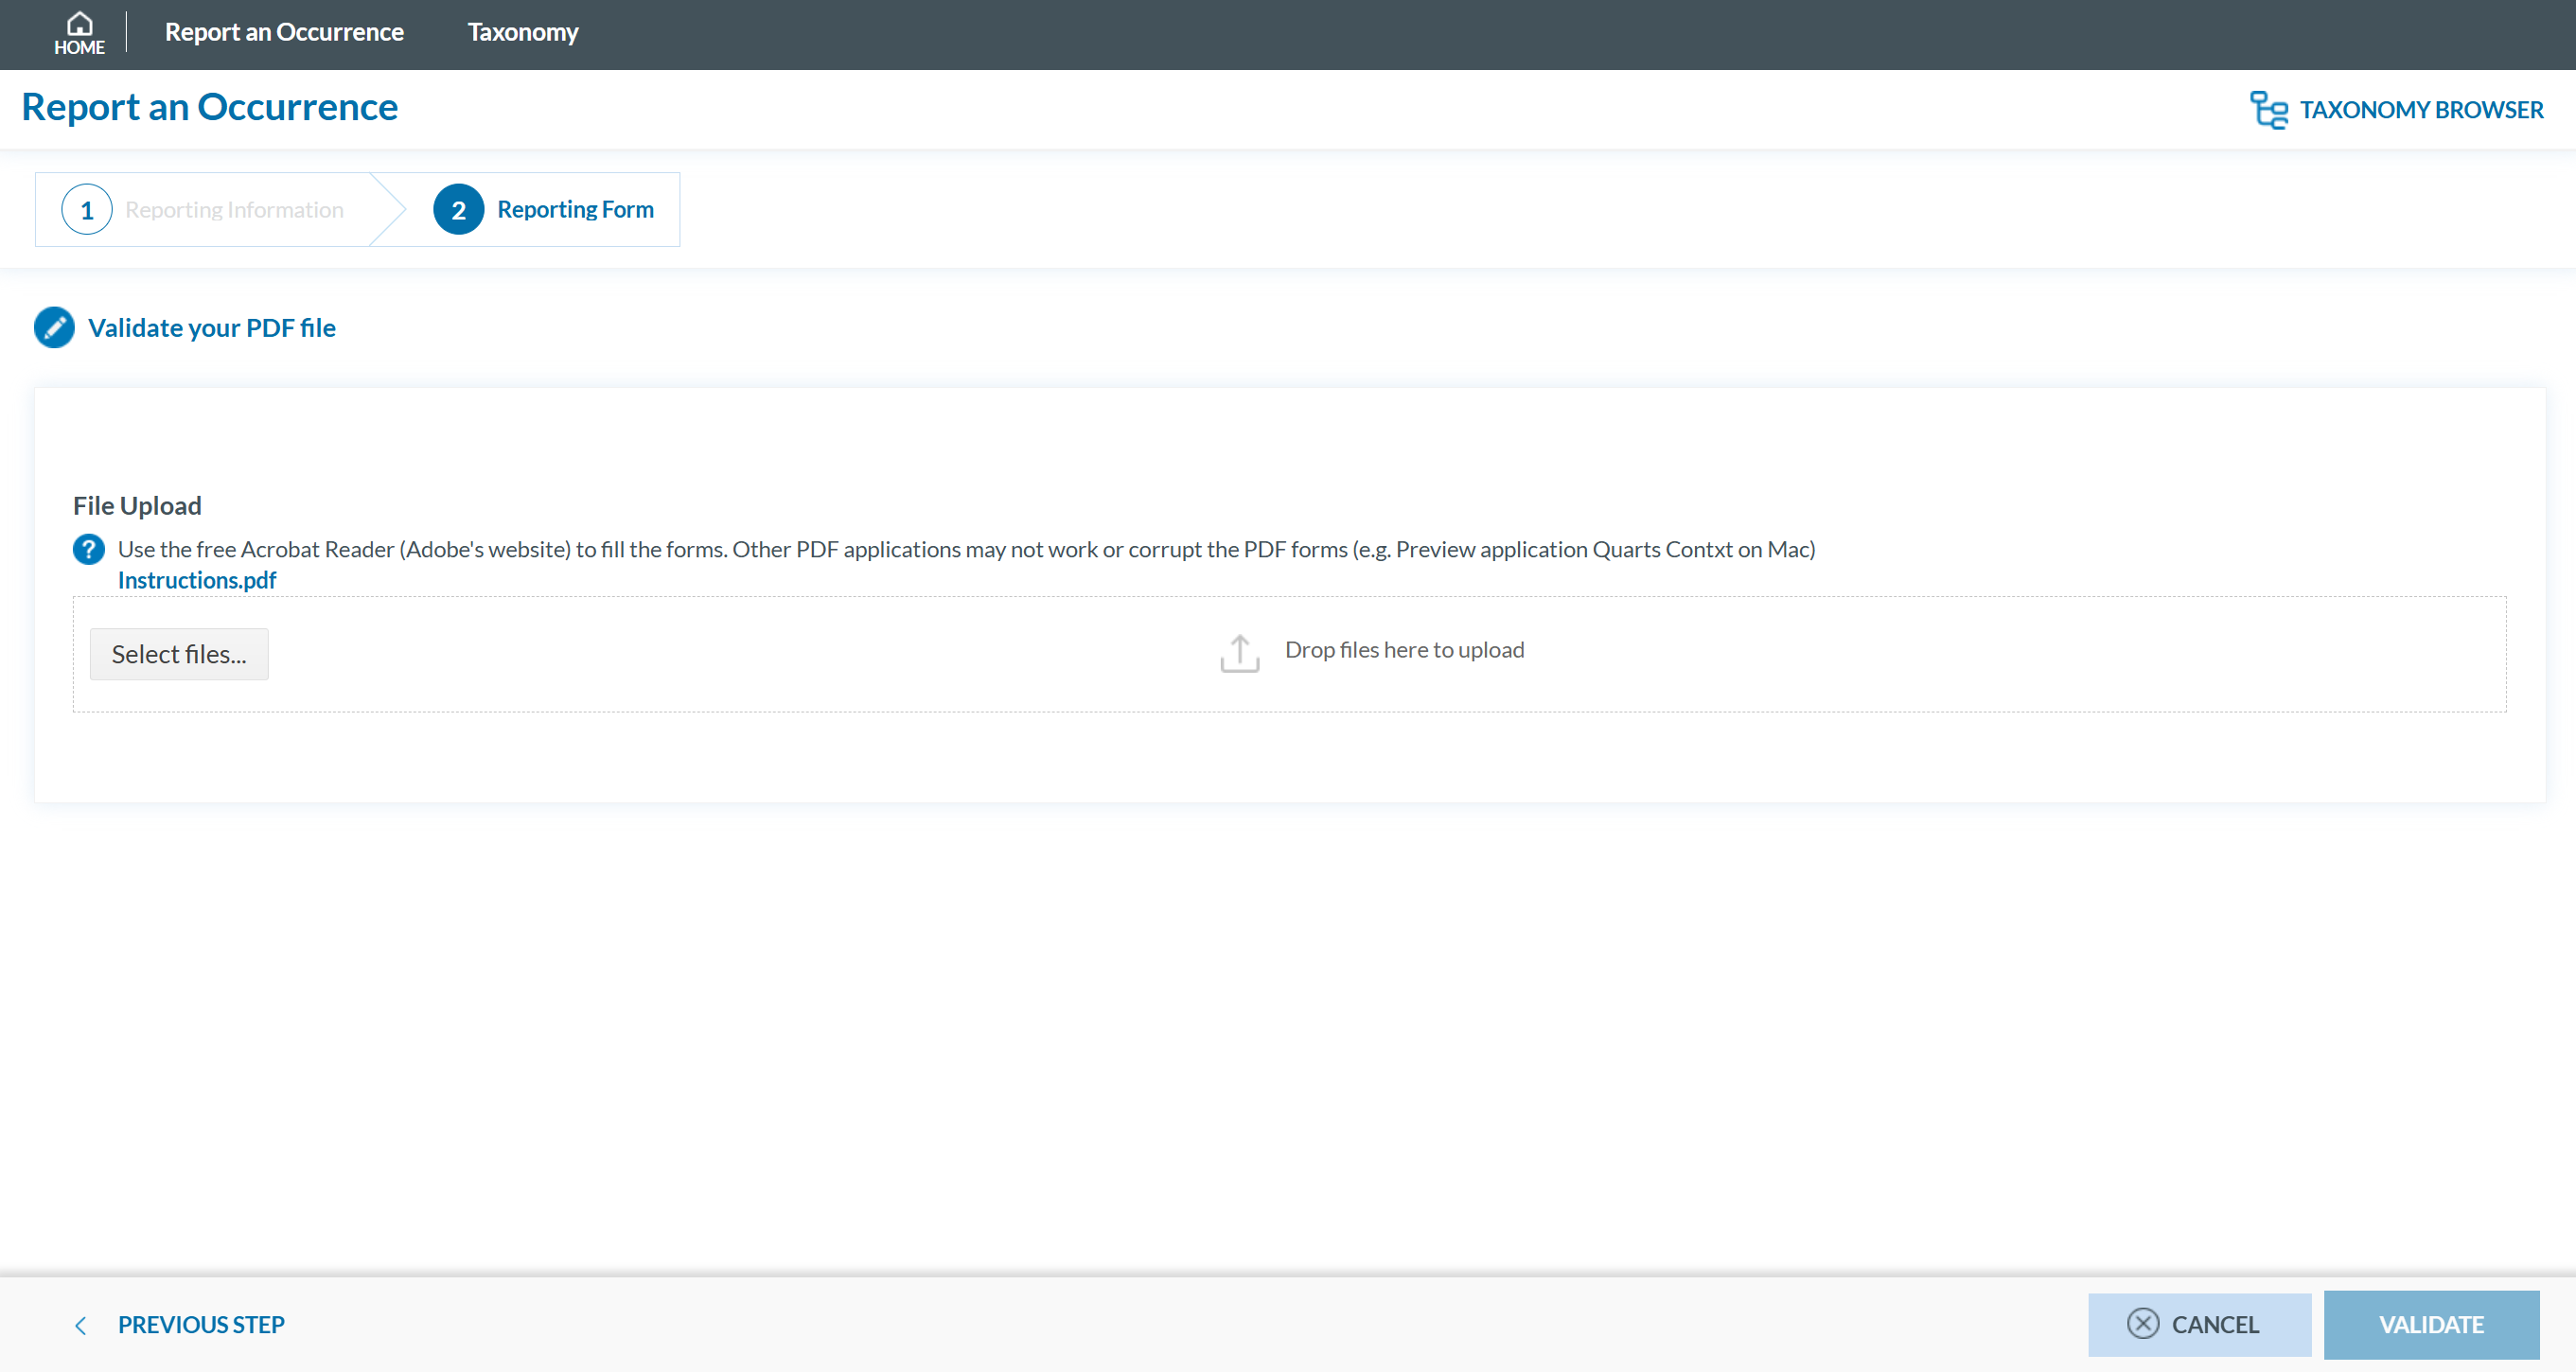
- Attach the PDF report to validate by clicking the ‘Select files...’ button or by using drag and drop. When the process is finish you will see a message stating 'Your file(s) have been successfully uploaded.'
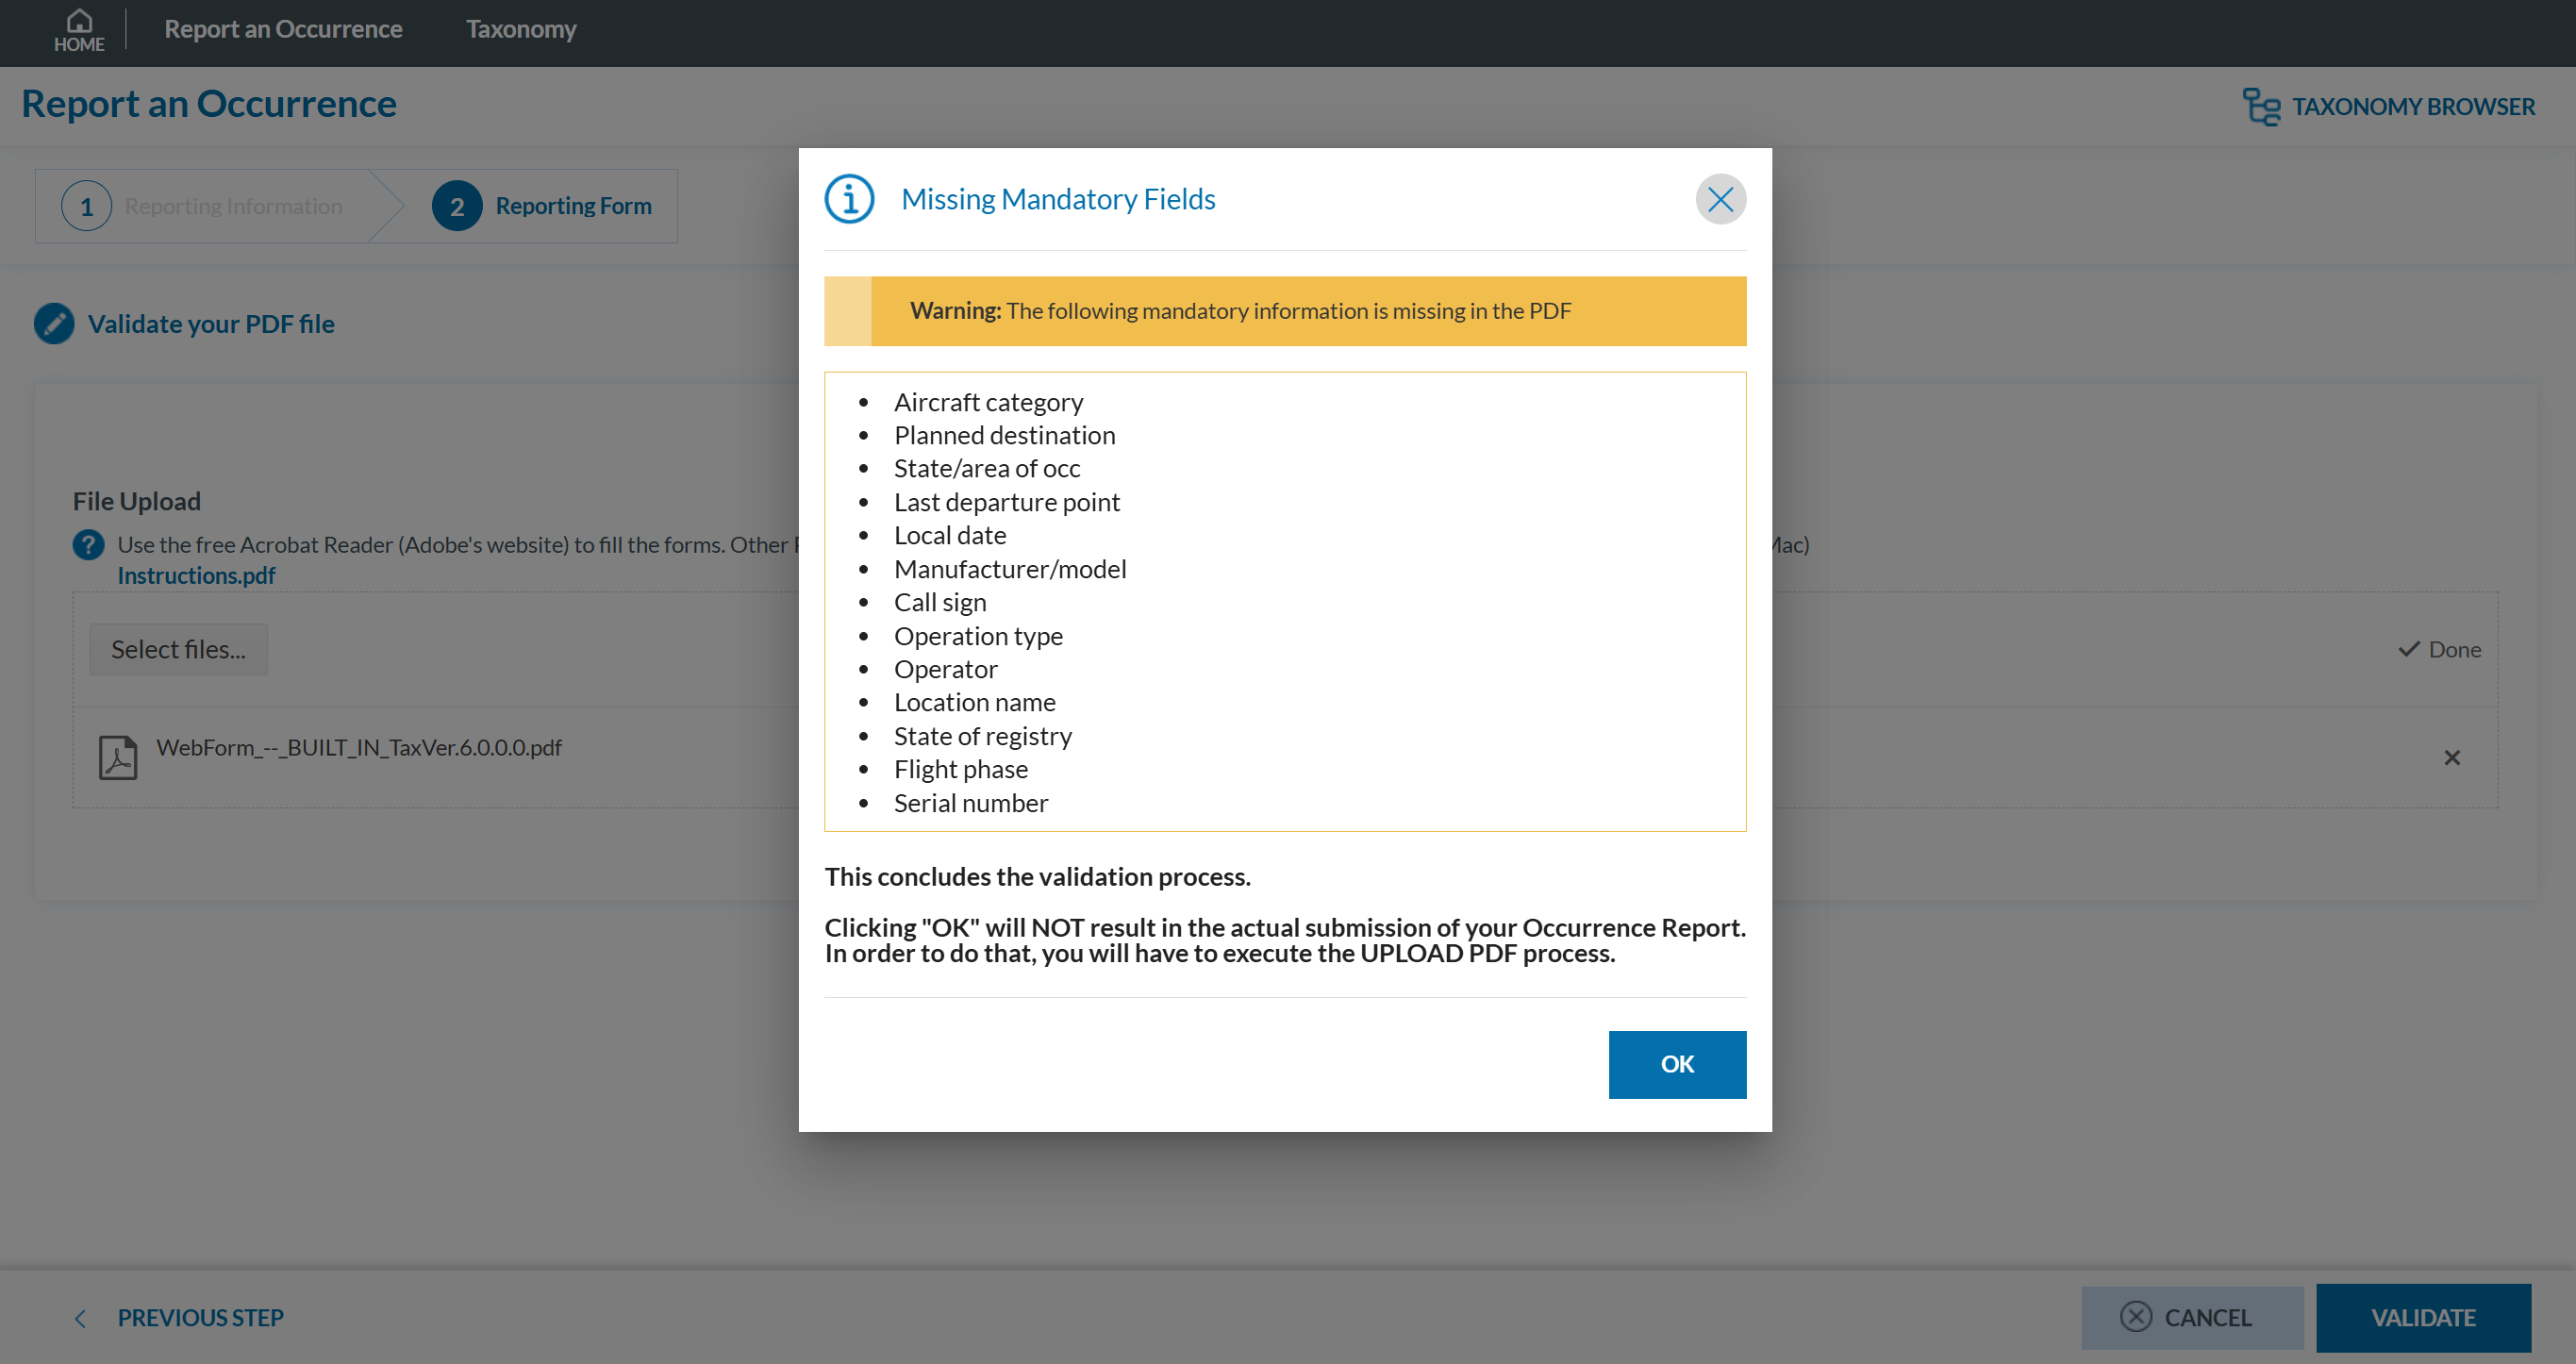
- Click 'VALIDATE'. The system will either display a message stating 'Your PDF has been successfully validated' or highlight the mandatory fields that are missing in the PDF:
Report with registration
Introduction
To report with registration, you first need to be registered and signed in.
You can report as an individual or as an organisation.
Please follow the links below for more information.
Registration as an individual
To begin your registration as an individual, please follow these steps:
- Visit the E2 Reporting Portal at https://e2.aviationreporting.eu/.
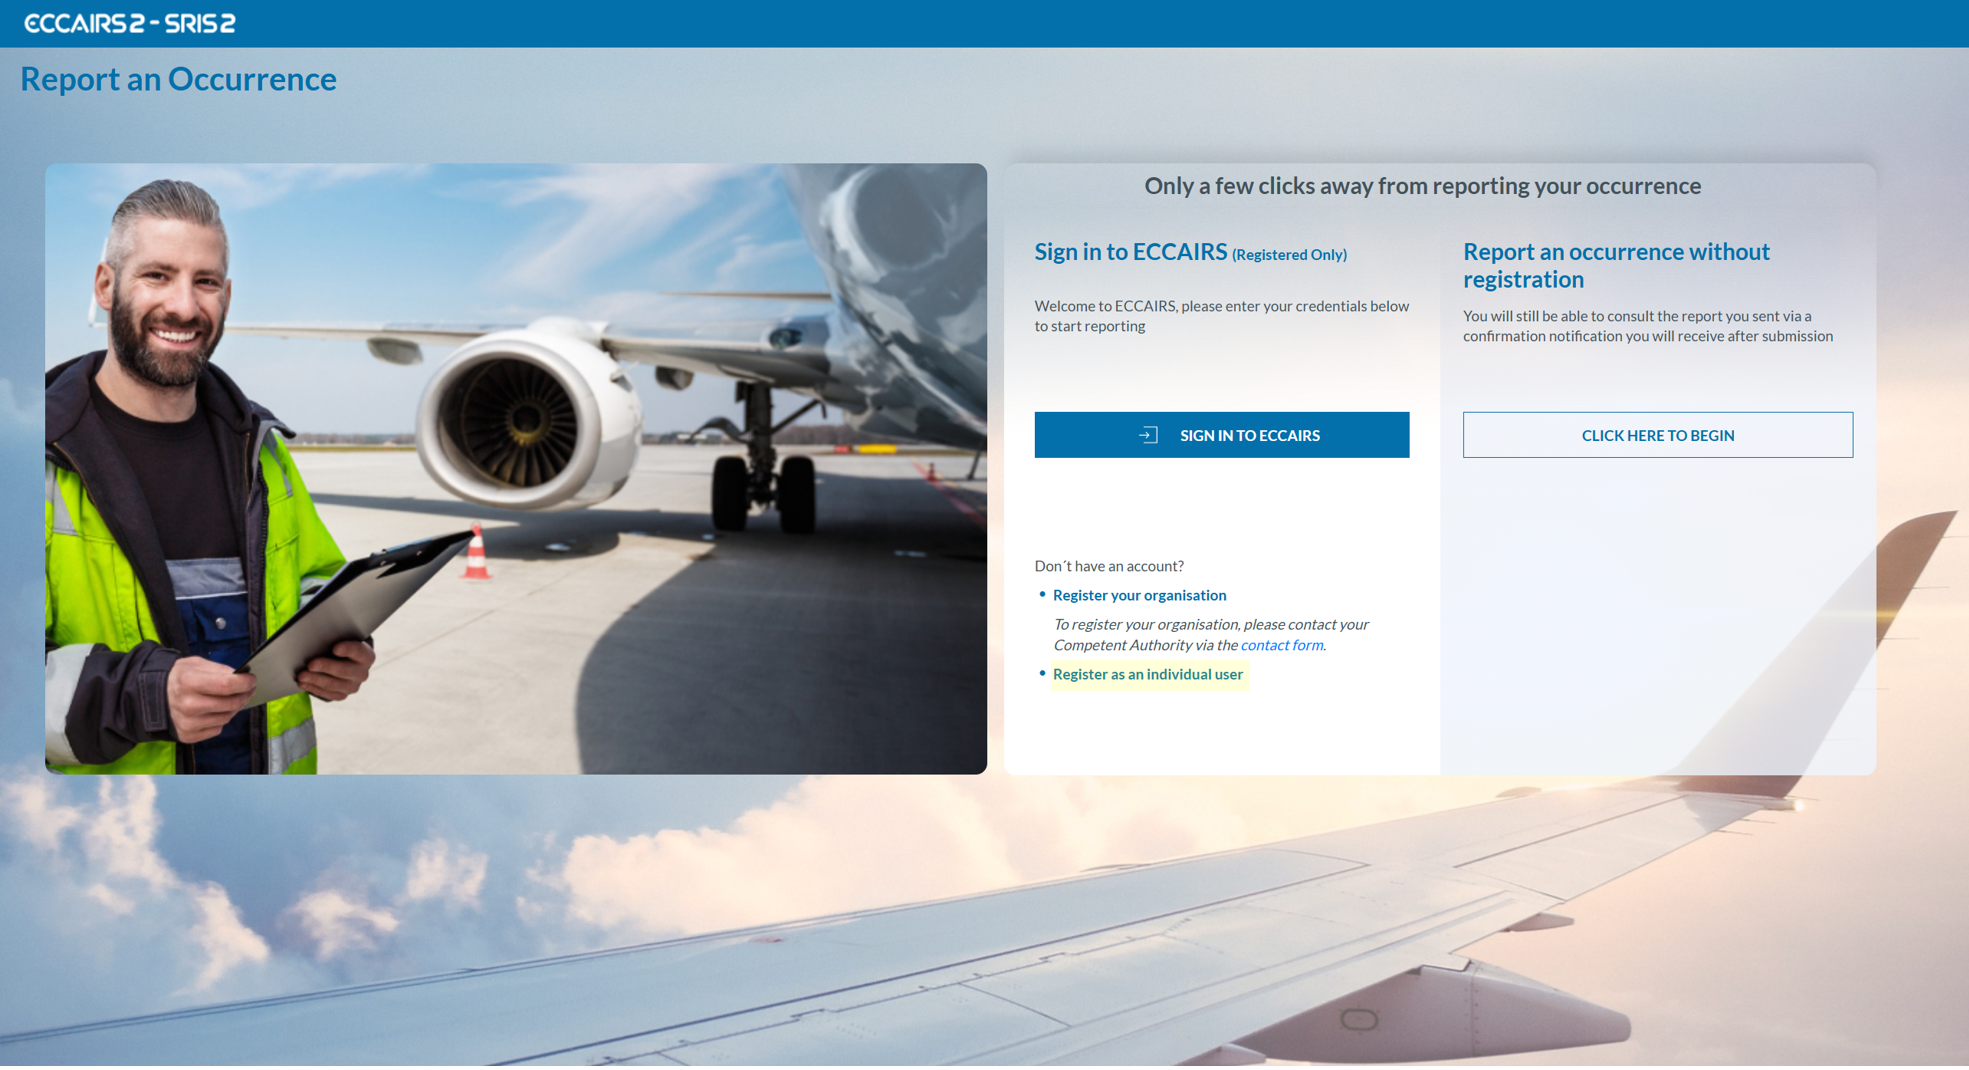
- On the center-bottom section, click on ‘Register as an individual user’ to proceed with creating your personal account.
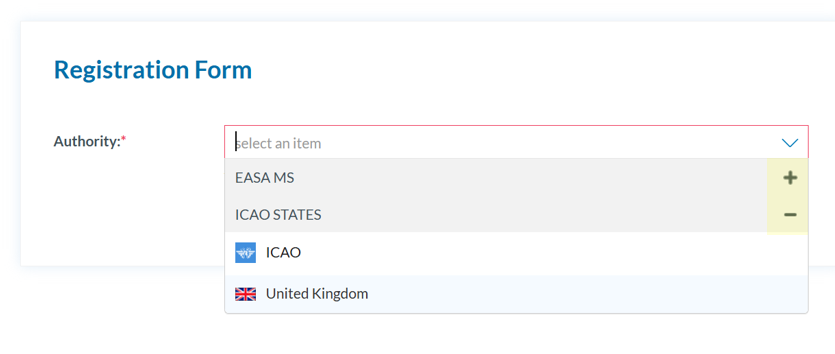
- You will need to select the appropriate authority that will receive the submitted reports.

- The system will display a registration form as follows:
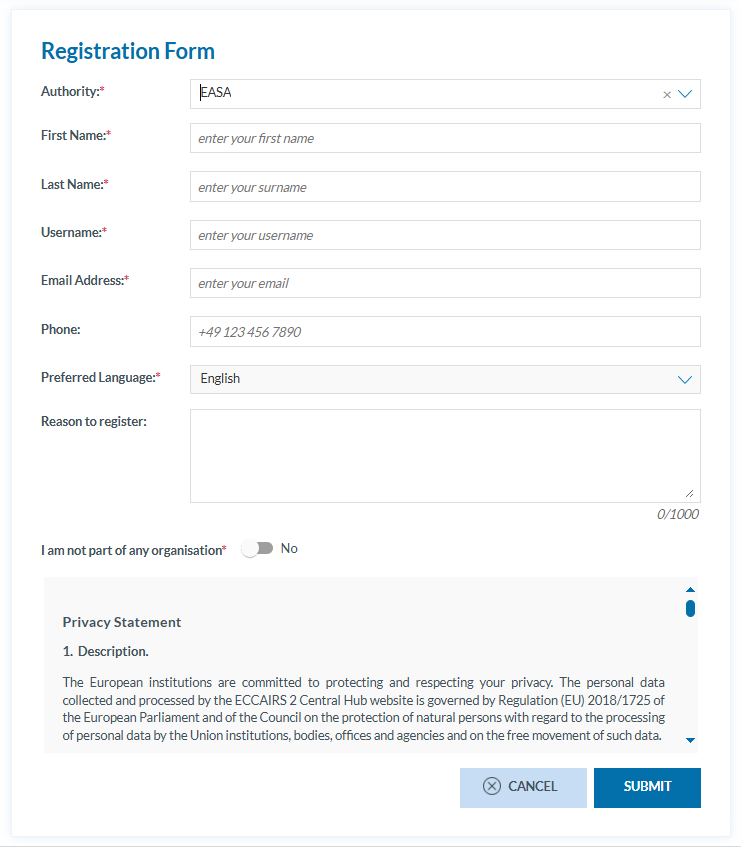
You must fill in all the mandatory fields—this includes all fields except 'Phone' and 'Reason to register', which are optional.
Usernames must be unique. If your chosen name is already taken, you'll be asked to select a different one.
To confirm that you are not part of any organization, set the toggle switch to 'No'.
Once you have completed the form and clicked the 'SUBMIT' button, the system will display the following message:
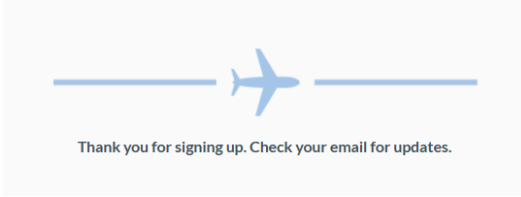
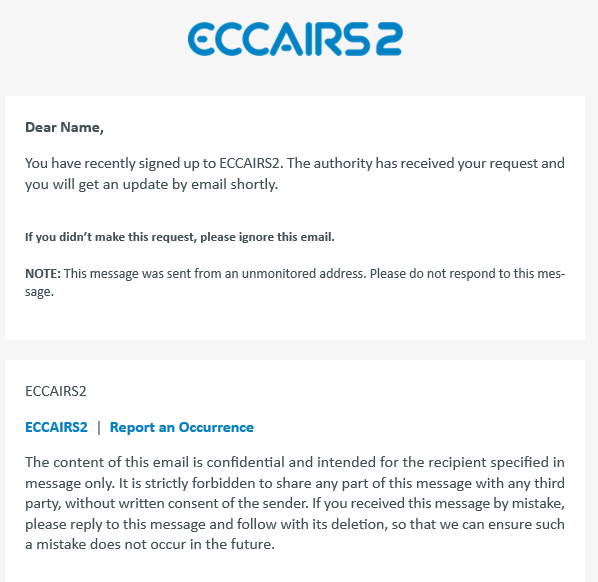
- Check your email. The system will then automatically send you an email confirming that your request has been successfully received:
a. If your registration is denied, you will receive an email notification similar to the one shown below.
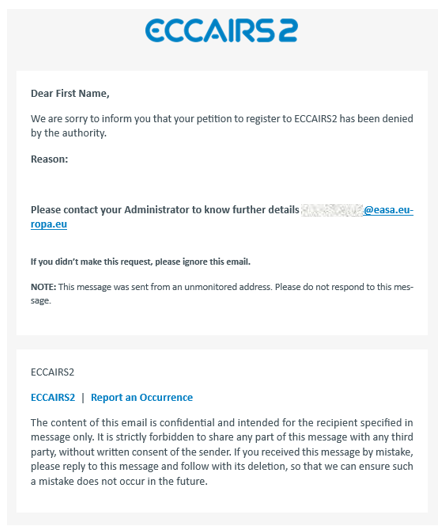
You can find the contact details of the Authority to know further details.
b. If the registration is approved, you will receive an email as follows:

- Once you have received the activation email, by clicking on 'ACTIVATE YOUR ACCOUNT' you will be securely redirected to the portal where you can set your password.
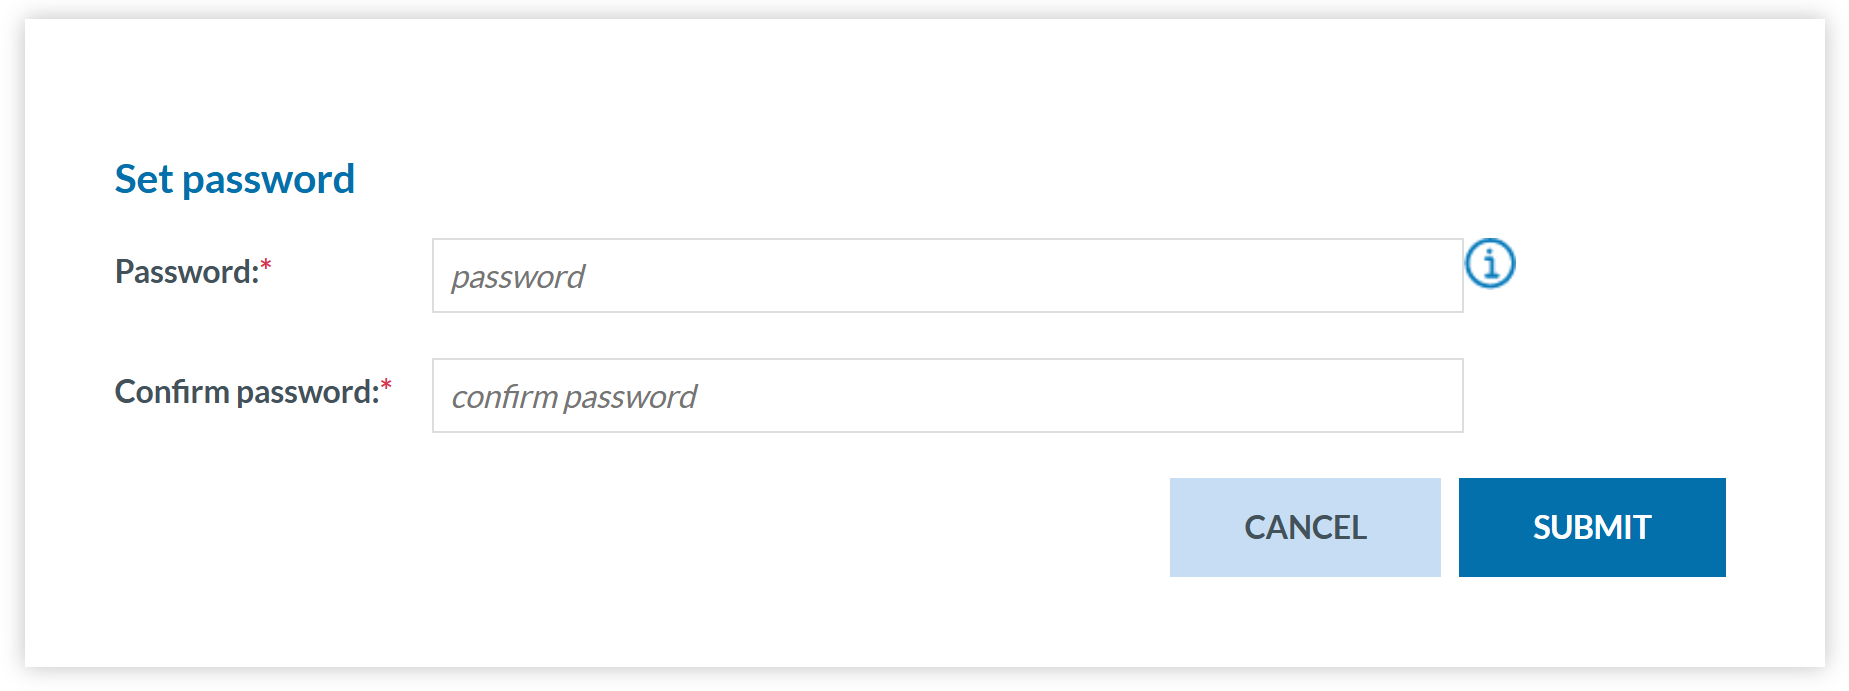
- Click 'SUBMIT' and you will receive a confirmation email shortly.
Note that the grants and generated web forms will be related to the competent Authority the Reporter has selected.
Registration of an organisation
To begin registering your organisation, please follow these steps:
- Visit the E2 Reporting Portal at https://e2.aviationreporting.eu/.
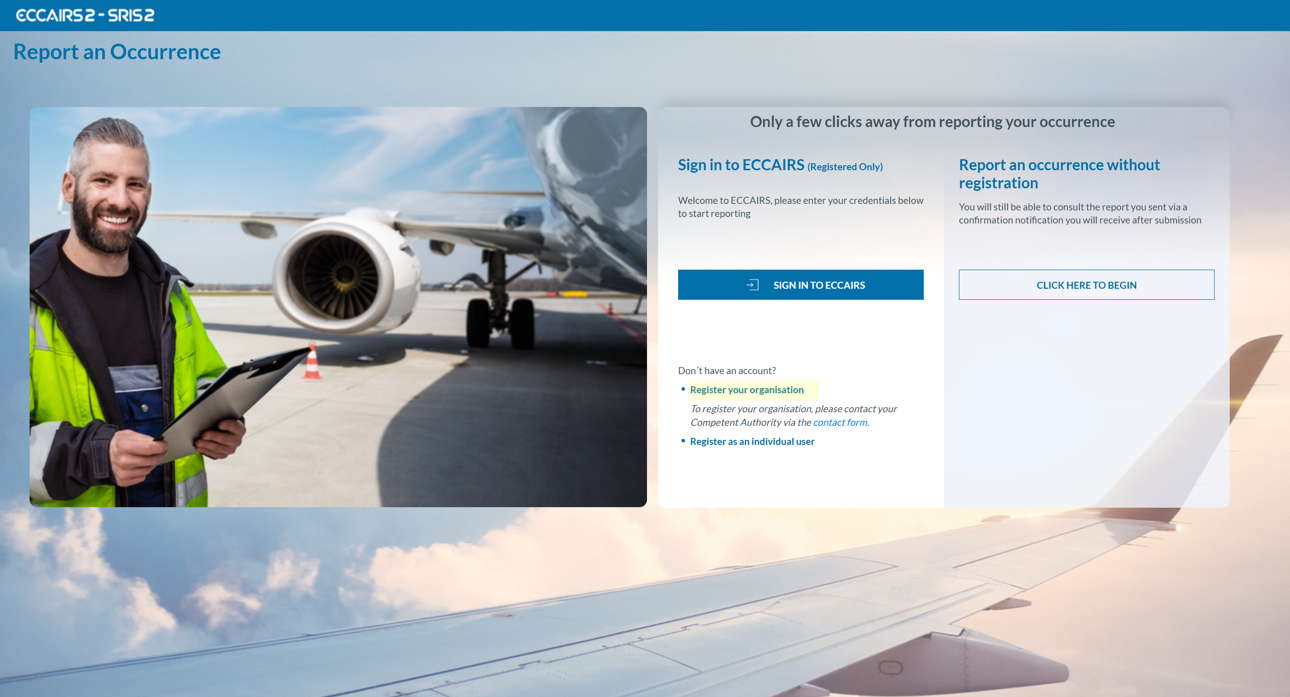
- On the center-bottom section, click on 'Register your Organisation' (If you click the 'contact form' link, you will access the same page). The system will display a Registration Request form to fill out as follows:

All fields are mandatory, except for ‘Phone,’ which is optional.
- Please click 'SUBMIT', and you will receive an email containing instructions to complete the registration process.
Sign in
Important notes
Correct Access URL
If you have created a shortcut to the URL https://api.aviationreporting.eu/idp/login, please be aware that this address points to the dedicated login server only. When accessed directly, the system does not know where to redirect the user after authentication, resulting in a failed or incomplete login process.
To ensure proper access and functionality, always use the official entry point:
Valid URL: https://e2.aviationreporting.eu
This address initiates the login flow correctly and allows the system to return you to the appropriate reporting environment after authentication.
Automatic Time Zone Configuration
For the time being it’s essential that your device’s time zone is set to automatic. If your local time doesn’t match the server time, the system may interpret your authentication token as expired—even if it was just generated.
How to ensure your time zone is set automatically:
- On Windows: Go to Settings → Time & Language → Date & Time Enable:
- “Set time automatically”
- “Set time zone automatically”
- On macOS: Go to System Preferences → Date & Time Check the box: “Set time zone automatically using current location”
- On mobile devices (Android/iOS): Make sure “Automatic date & time” is enabled in your system settings.
This configuration ensures your access token remains valid and prevents login issues related to time synchronization.
Sign in
To sign in, please follow these steps:
-
Visit the E2 Reporting Portal at https://e2.aviationreporting.eu/.
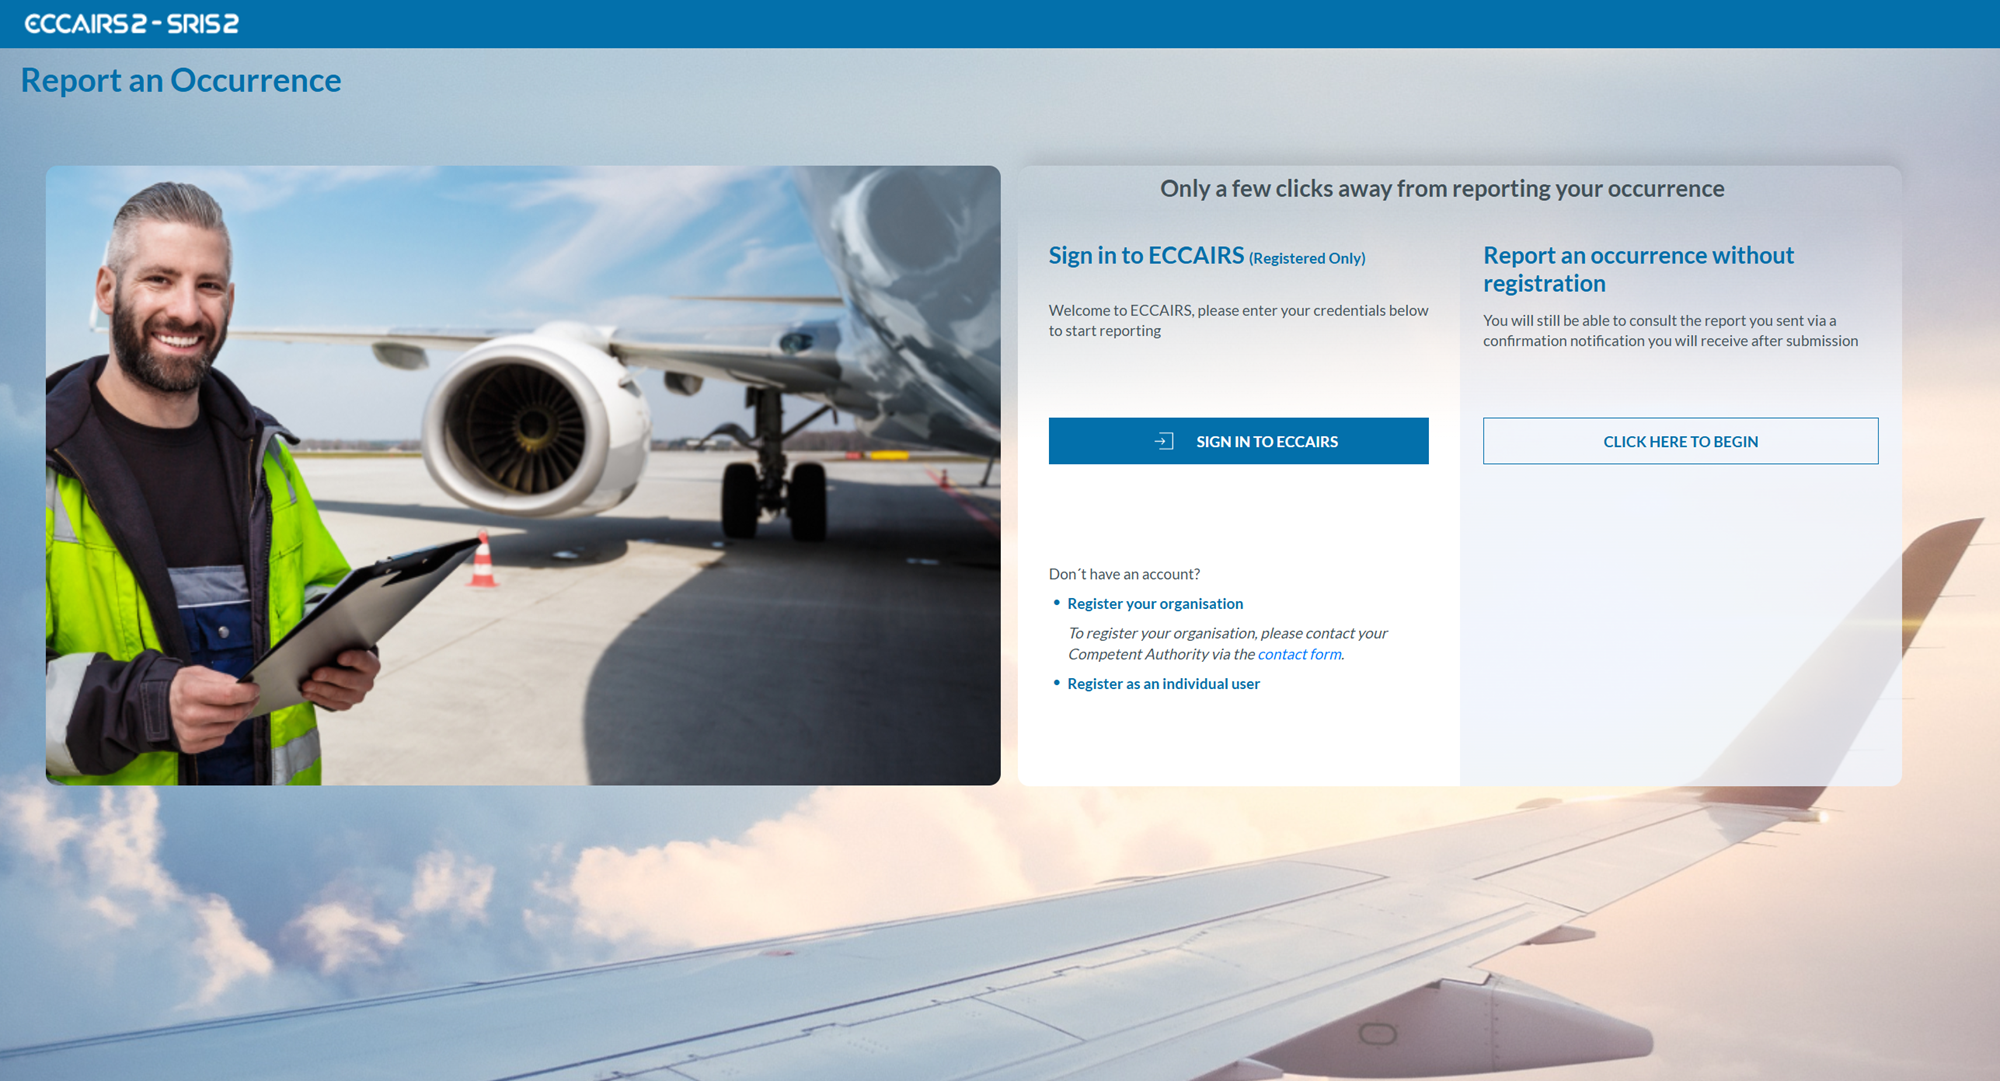
- Click on 'SIGN IN TO ECCAIRS'. You will be redirected to the following page:
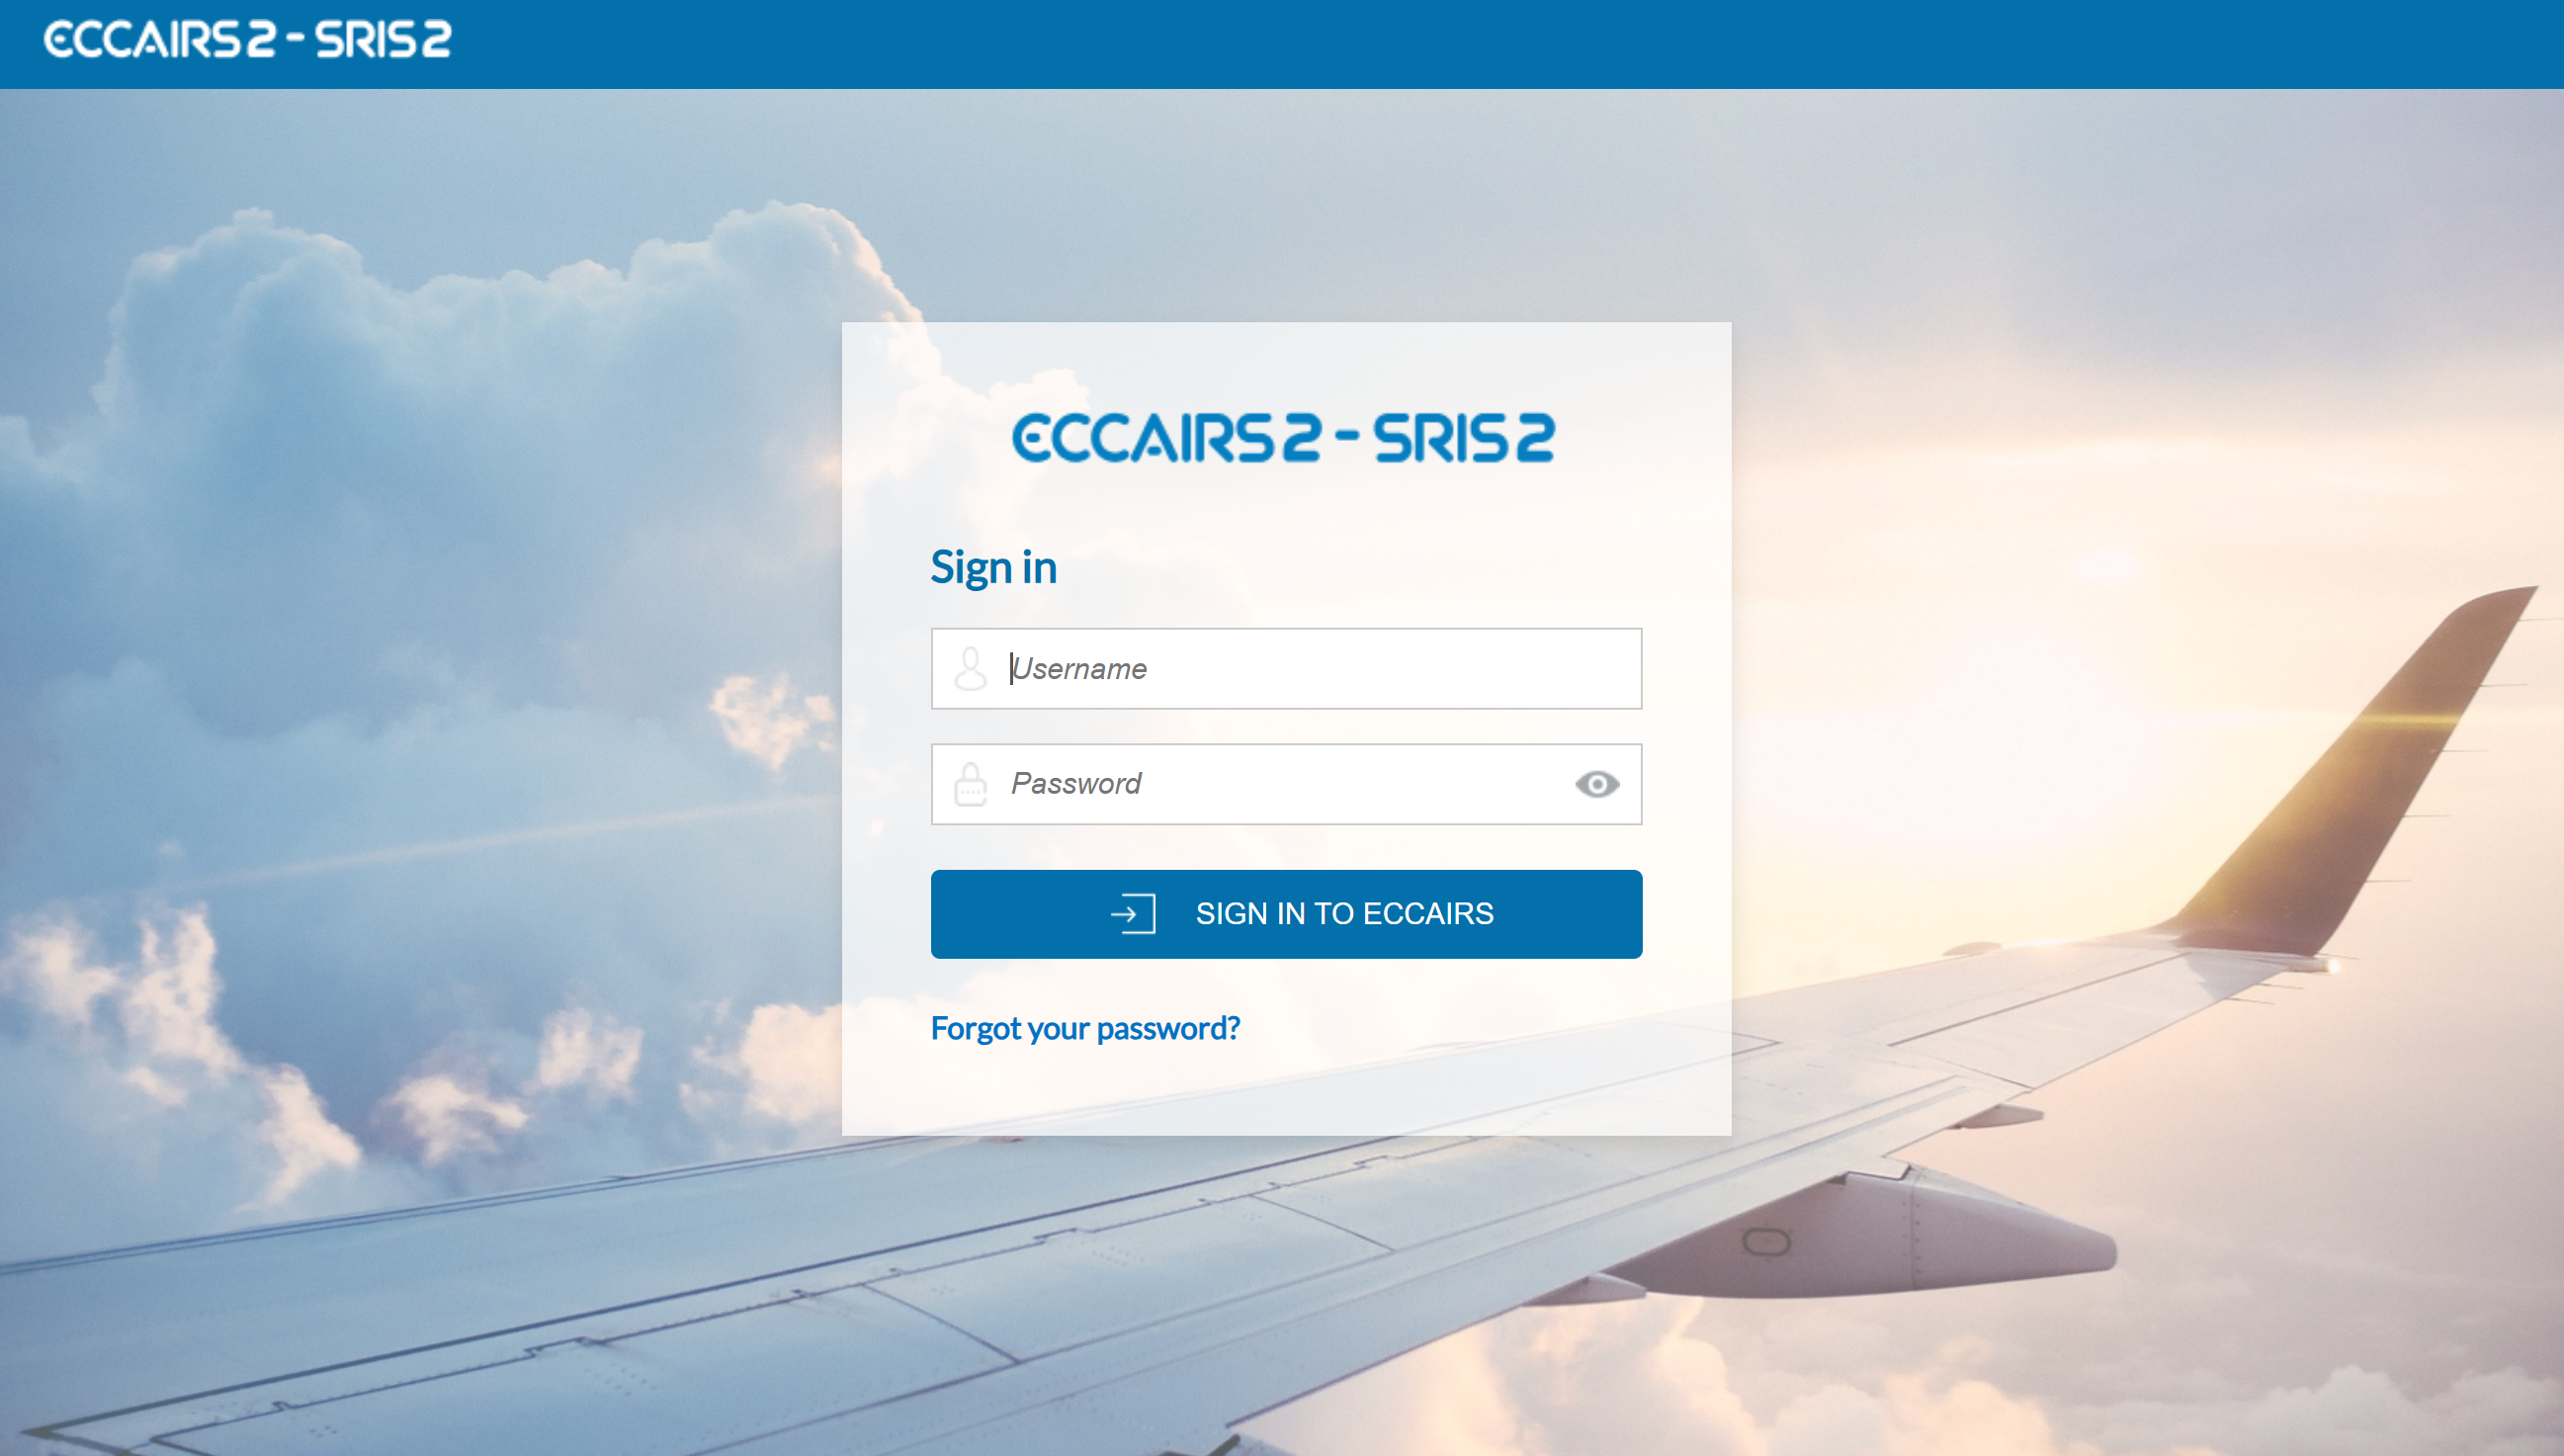
- Fill out your Username and Password.
-
Click on 'SIGN IN TO ECCAIRS'. The system will display the following page:

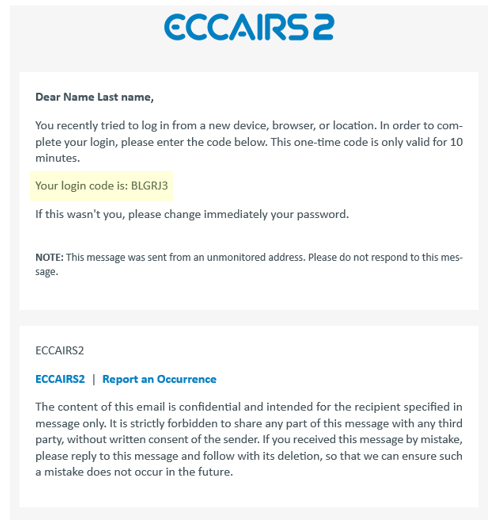
- Please check your email. The system will send a one-time security code to the email address linked to your user account. The message will be sent from the address 'do-not-reply@aviationreporting.eu'.
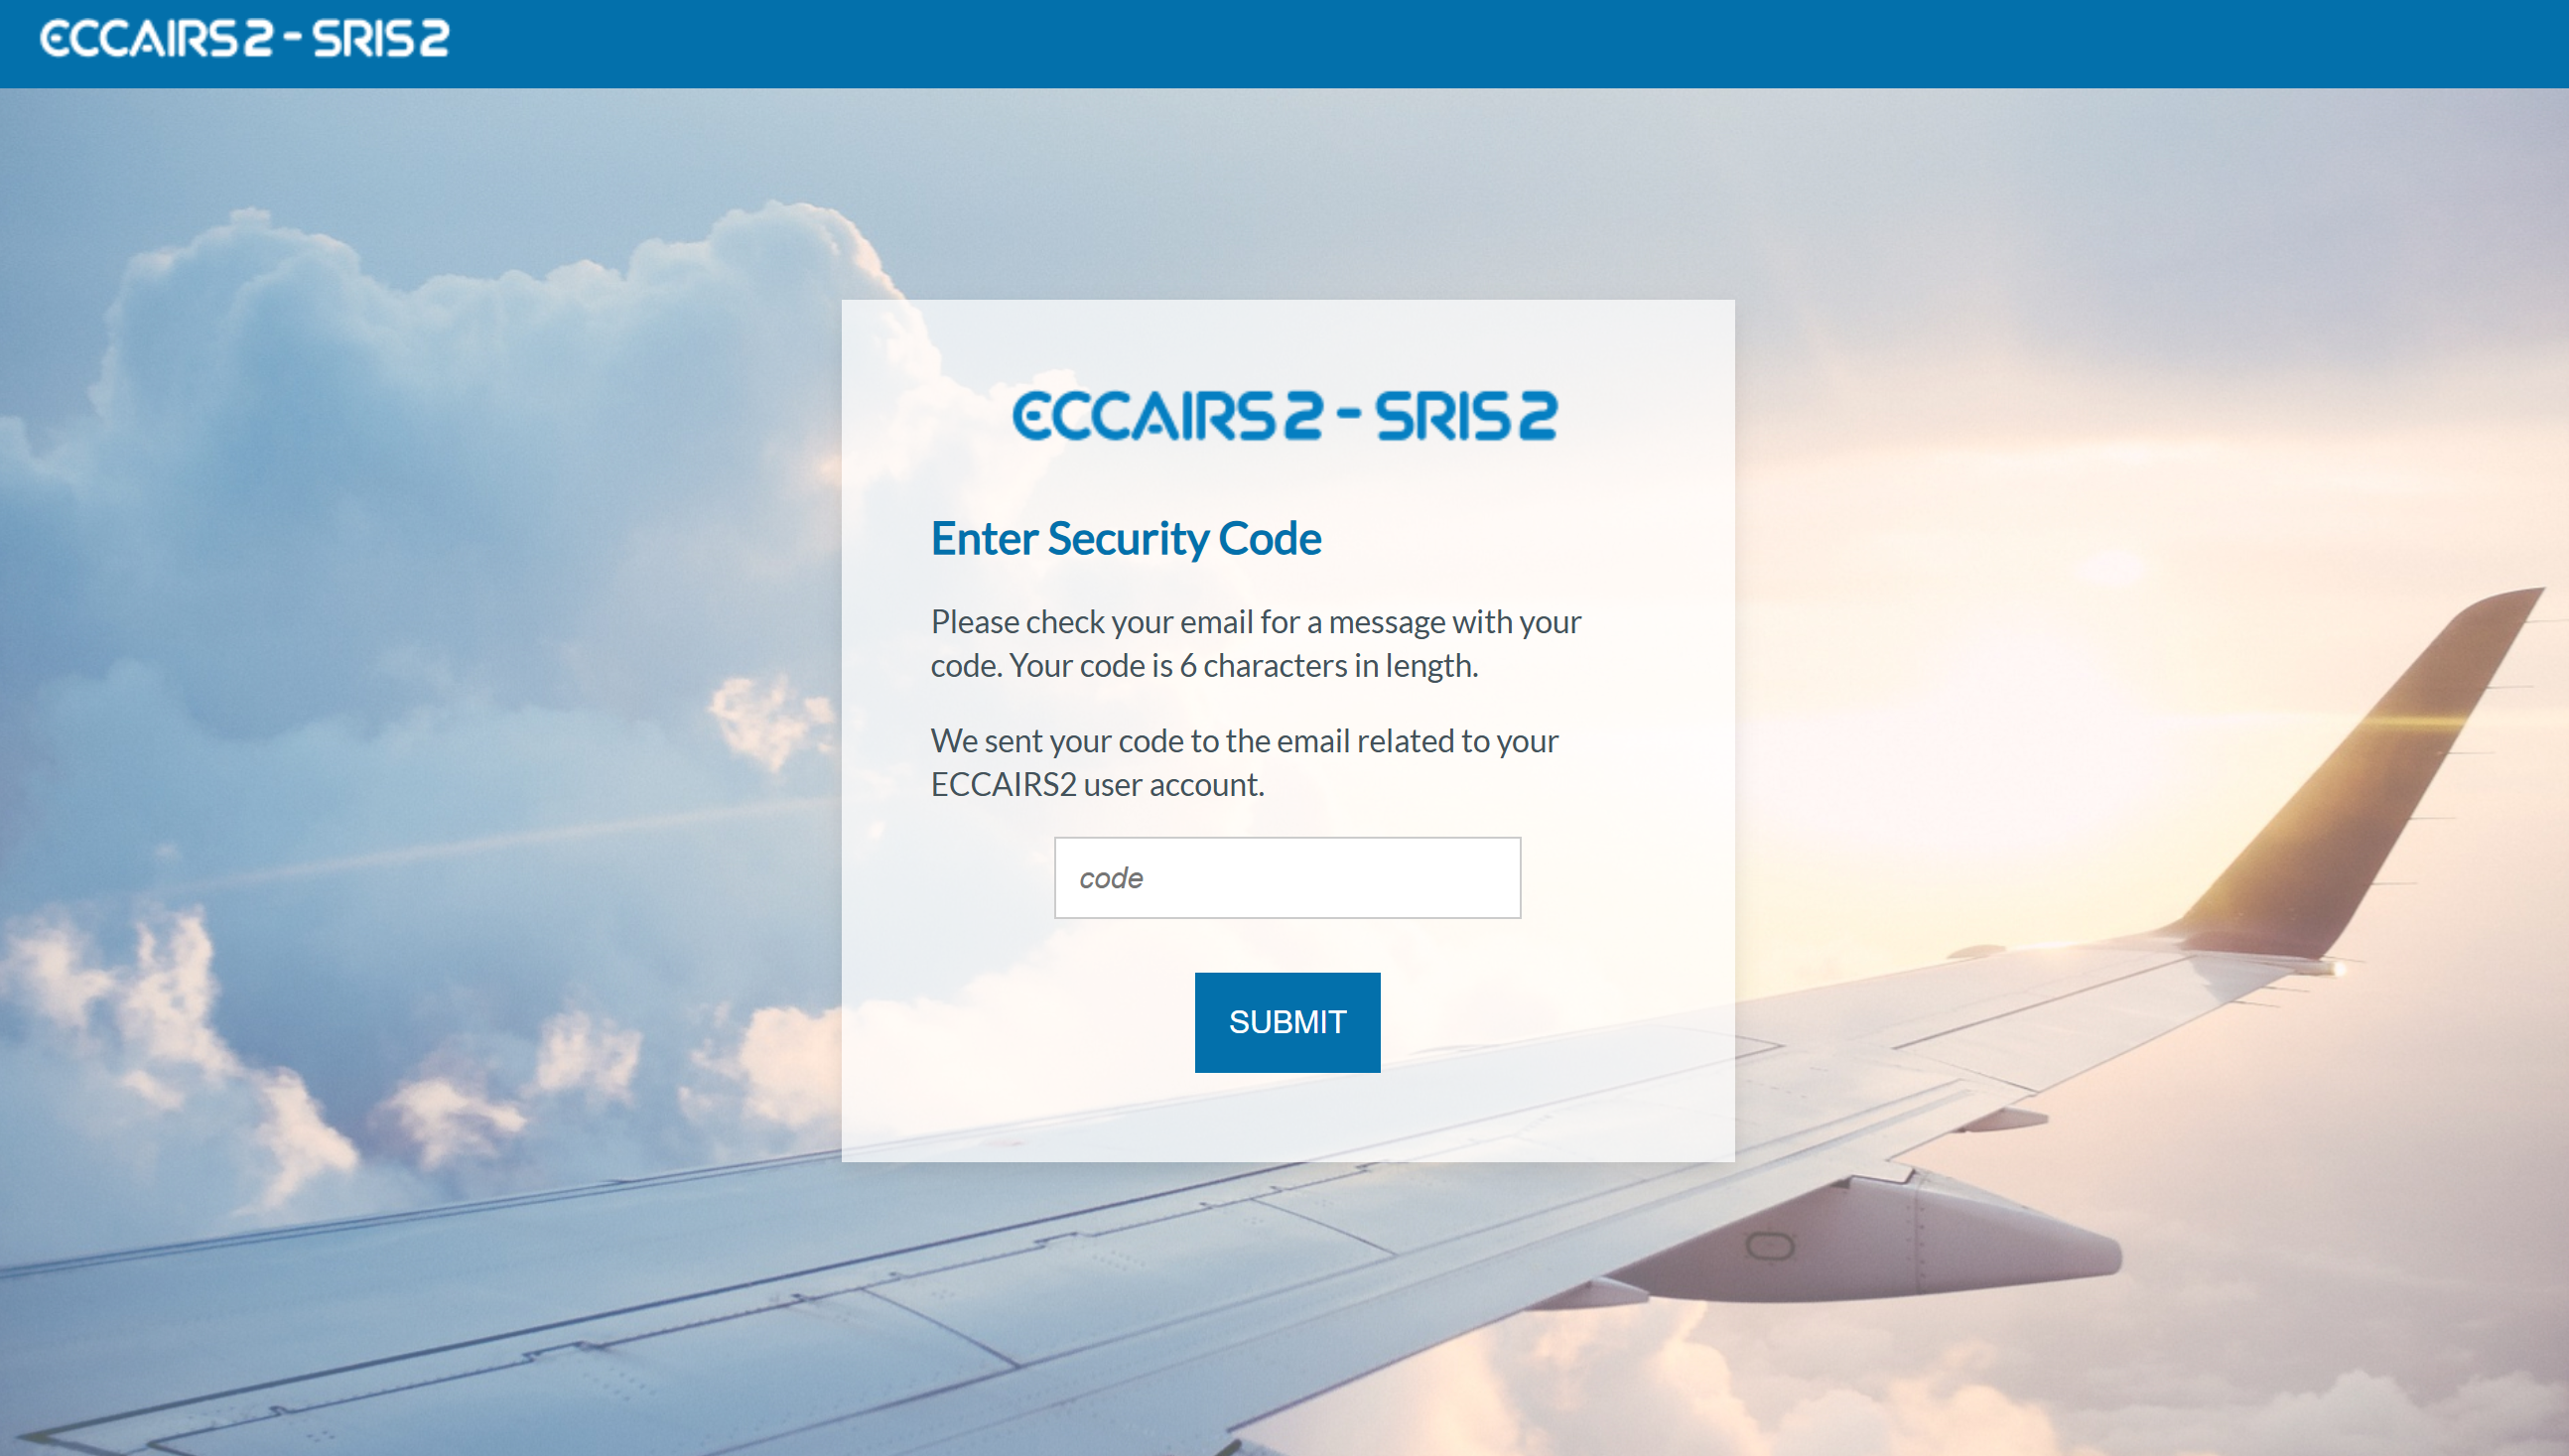
-
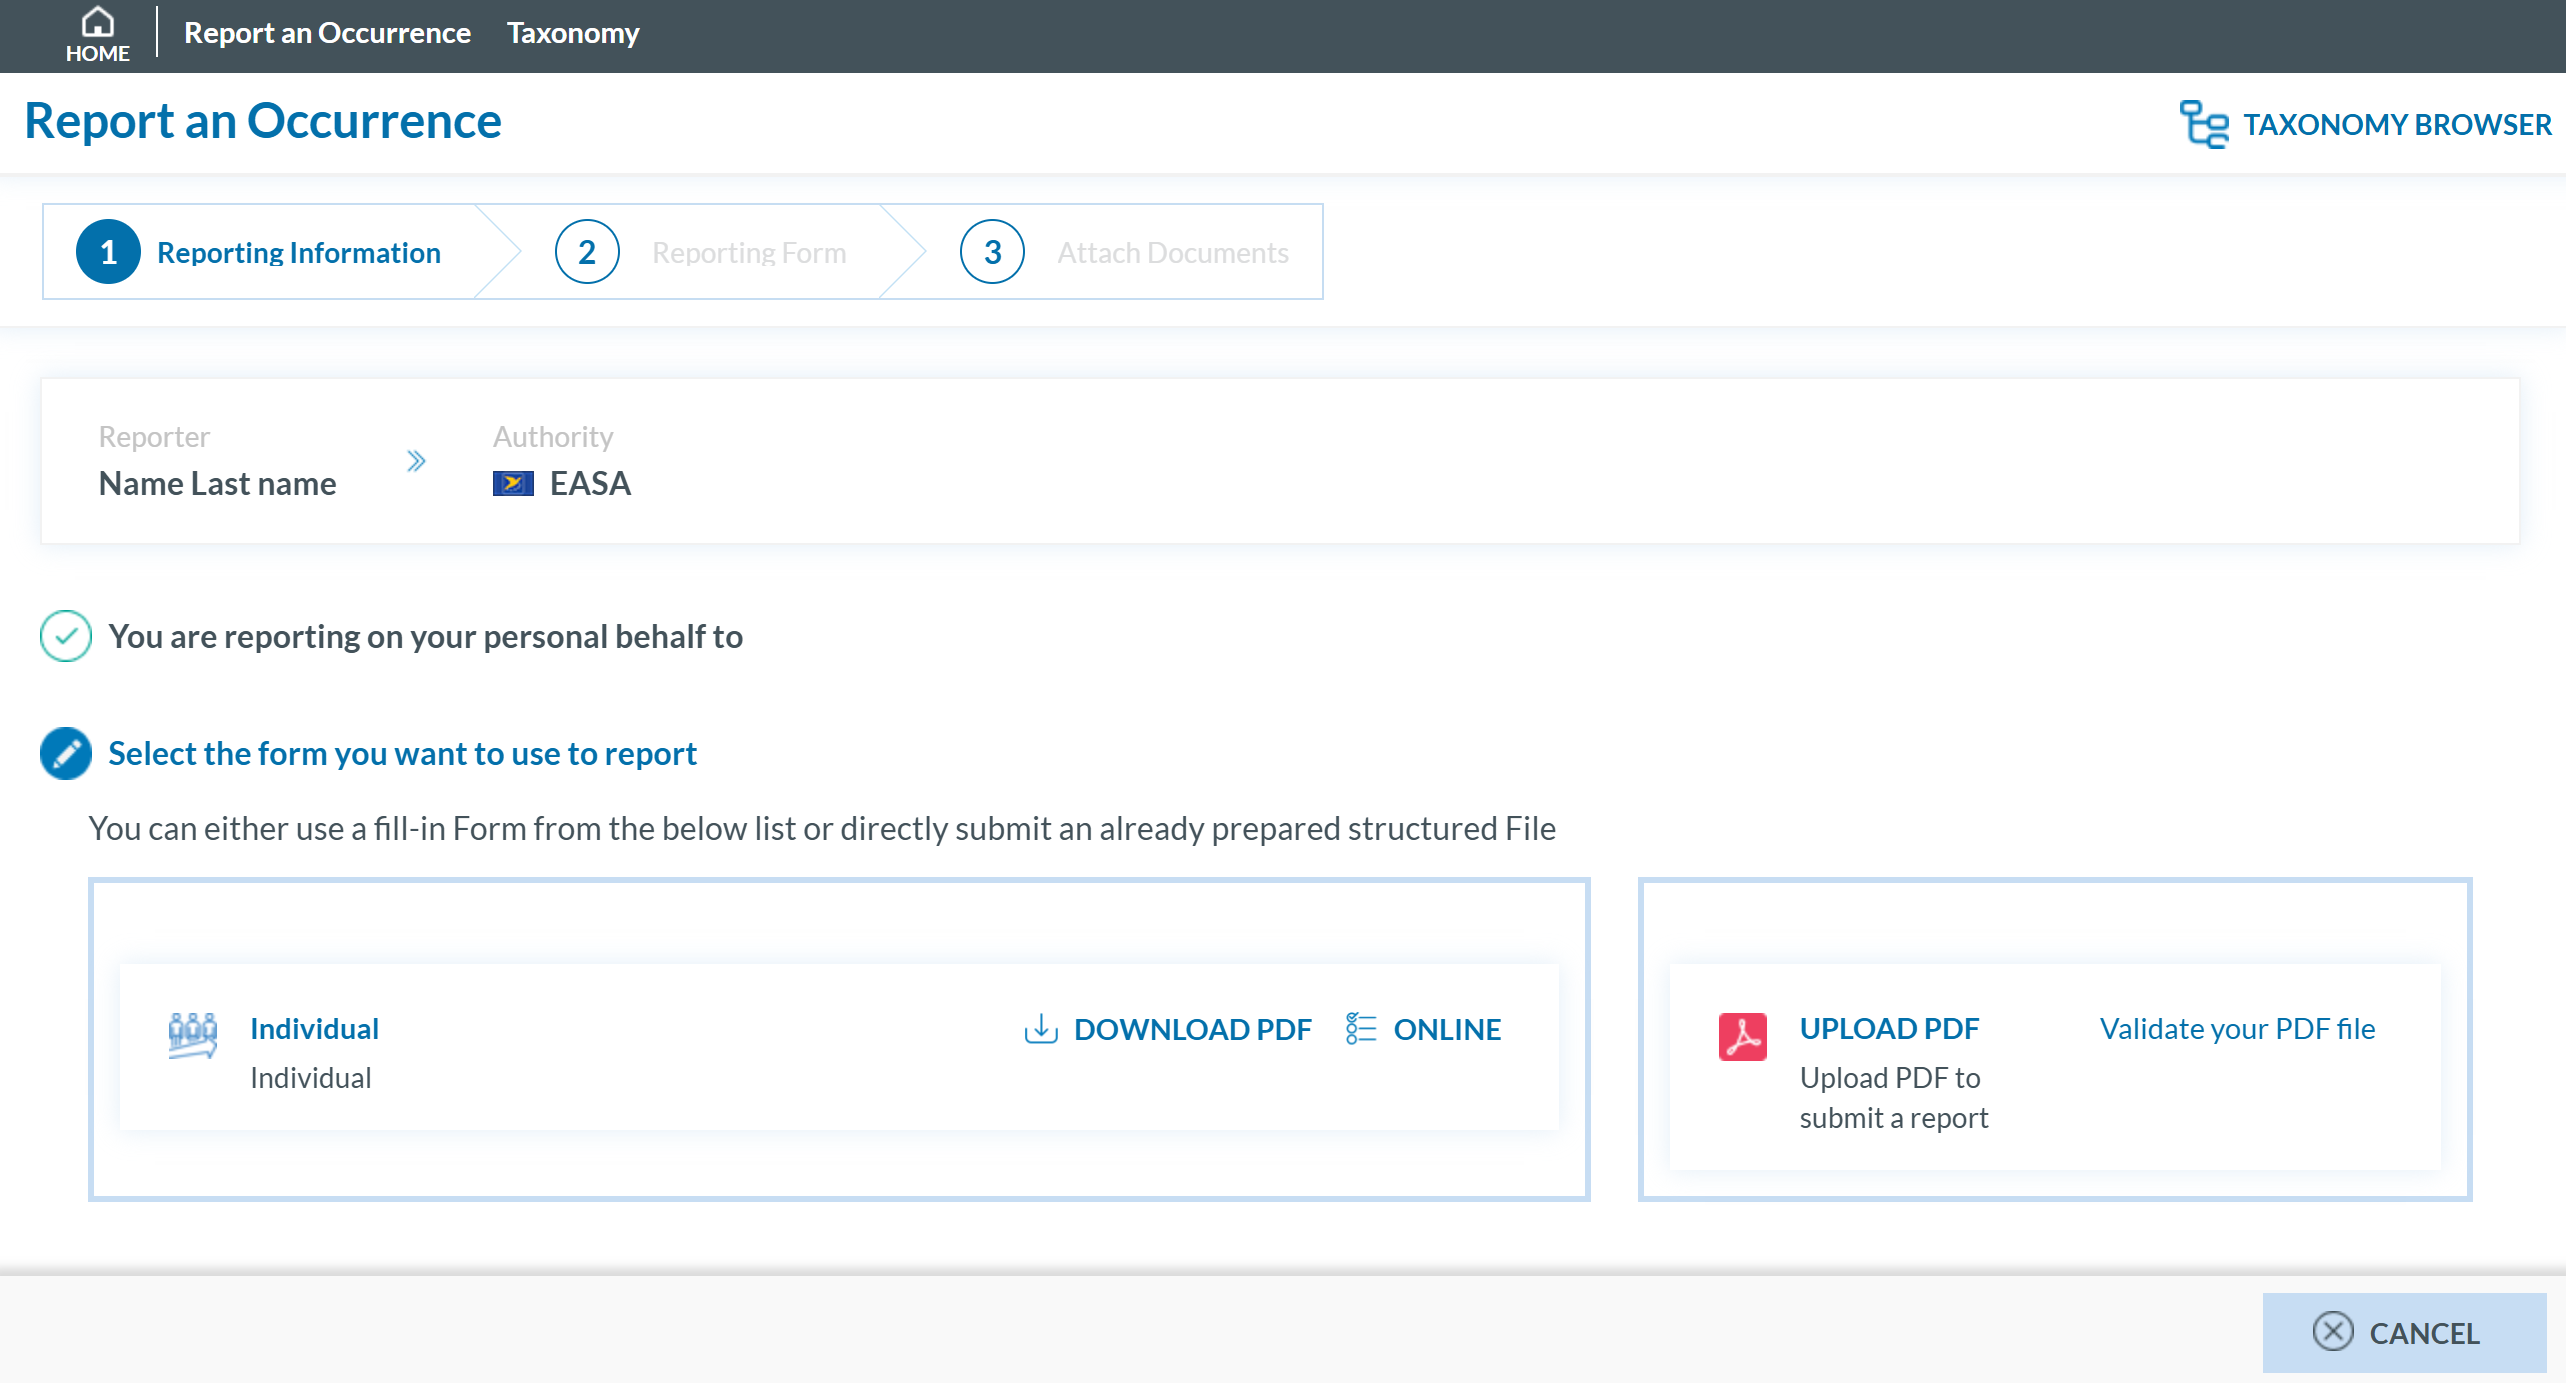
Enter your security code and click 'SUBMIT'. You will be redirected to the 'Report and Occurrence' page.
Report as an Individual
As an individual registered reporter, there are two ways to submit a report:
- Online
- Offline
Report online
To report online as an individual registered reporter:
- Sign in to access the 'Report an Occurrence' page.
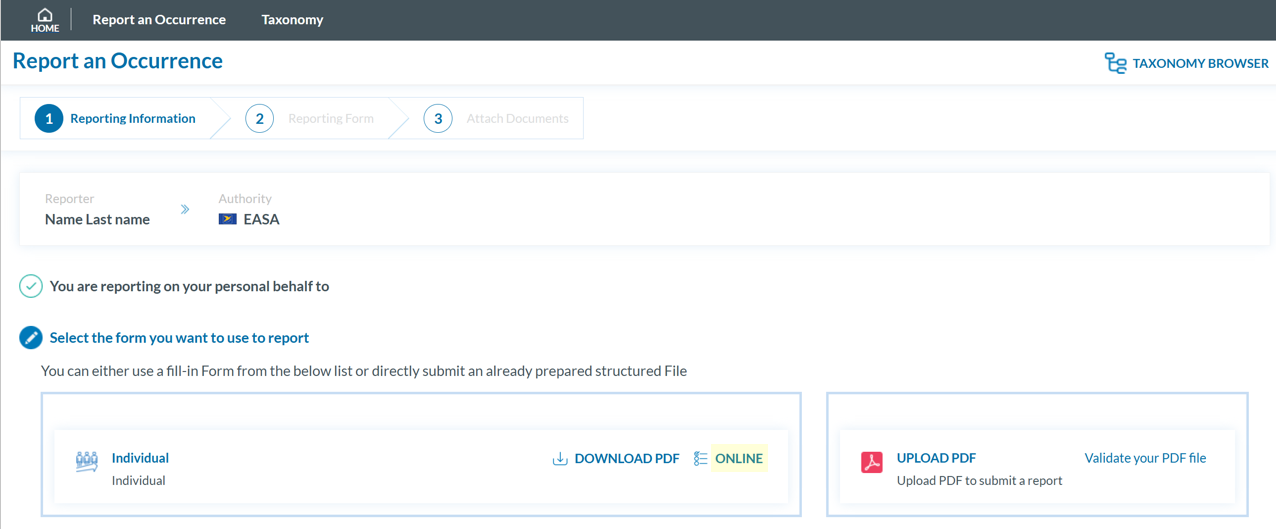
- Click the ‘ONLINE’ button next to one of the available webforms.
-
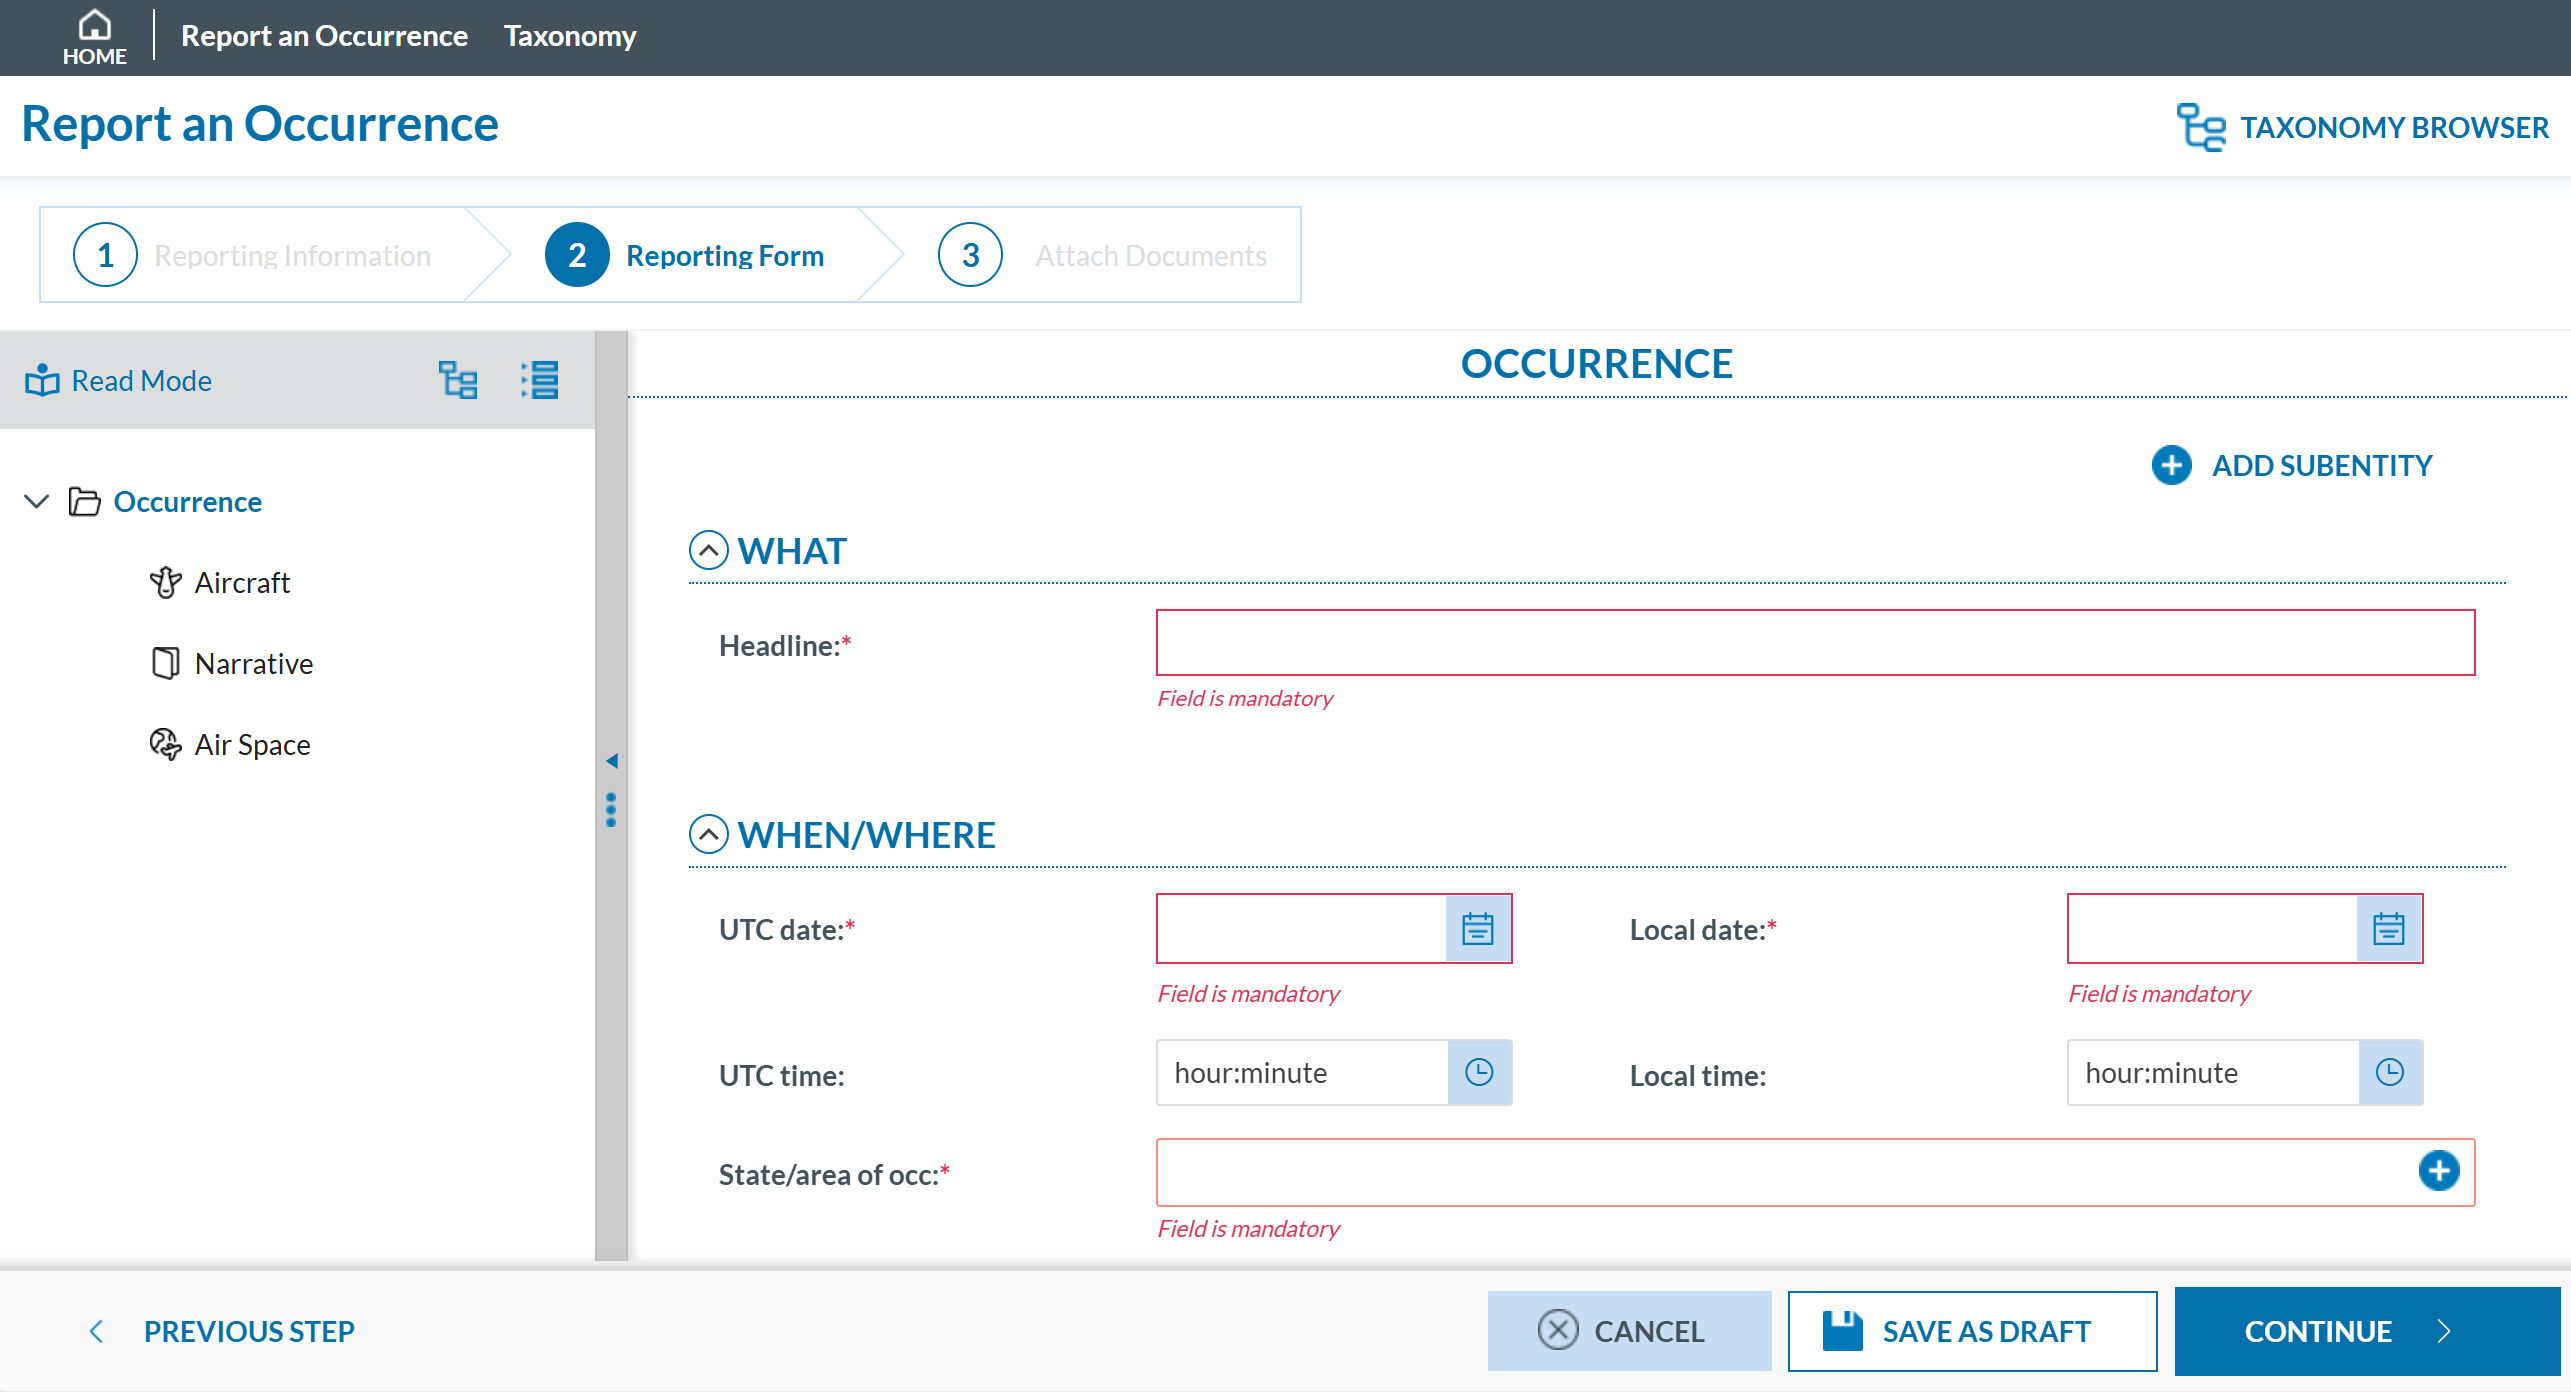
Fill out the form. Mandatory fields are highlighted —please provide the required information where available.
How to fill the Reporting Form
-
Moving between topics: You can move between topics—Occurrence, Aircraft, Narrative, and Airspace—using the navigation tree on the left pane.
-
Adding entries:
-
To add a new aircraft:
-
Click on 'Aircraft' (left pane).
-
Select 'ADD AIRCRAFT' (top-left corner of the right-hand pane).
-
-
To add a new 'Air space':
-
Click on 'Air space' (left pane).
-
Click 'ADD AIR SPACE' (top-left corner of the right-hand pane).
-
-
To add elements under 'Occurrence':
-
Click on 'Occurrence' (left pane).
-
Select "ADD SUBENTITY" (top-right corner of the right-hand pane).
-
-
-
Saving the report:
To save a draft version, click ‘SAVE AS DRAFT’ below the form.
The report will be stored in the 'Reports' list, accessible via the 'HOME' button at the top left of the page.
You will also receive an email with a link to review and edit your saved draft report.
-
Once you've completed the report, click 'CONTINUE' to proceed.
- If applicable, attach any relevant documents by clicking 'Select files...' or by drag and drop.
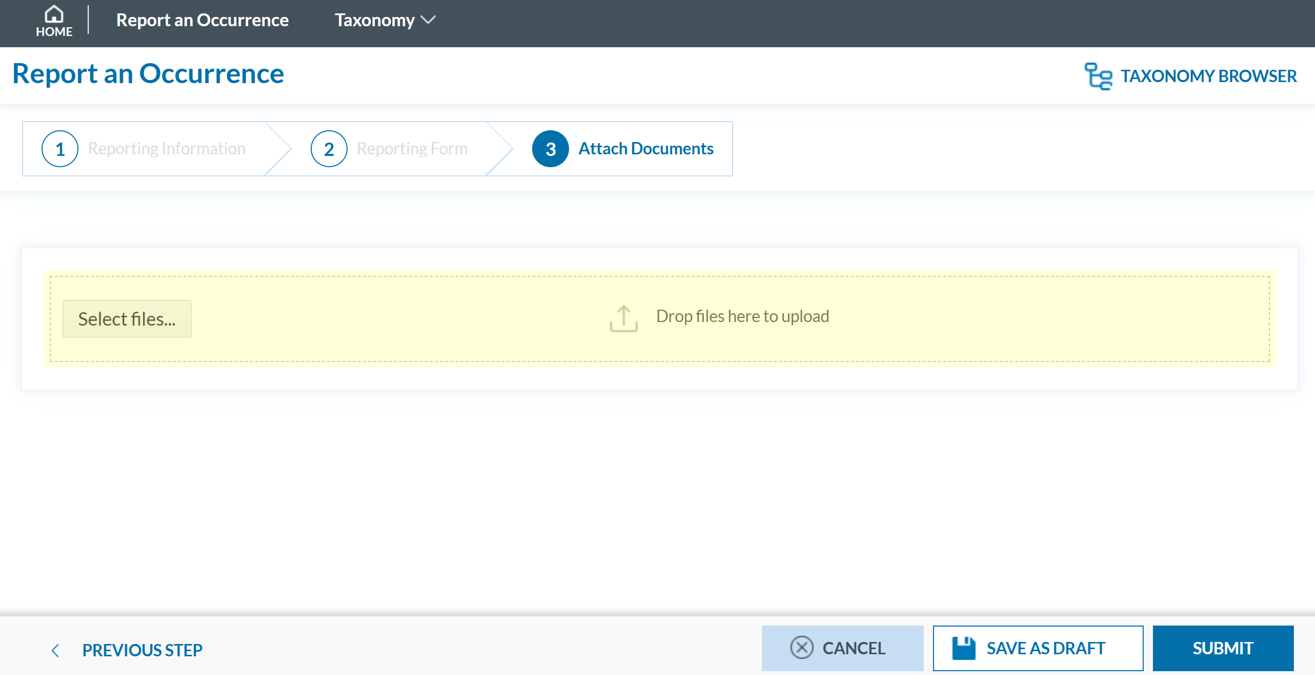
The system accepts files up to 4,000 MB in total. Supported formats include:
- Documents: .pdf, .doc/.docx, .ppt/.pptx, .xls/.xlsx/.xlsm, .xml, .rtf**, .odt**
- Images: .jpg/.jpeg, .png, .gif, .jtif**, .heic
- Media: .mp3, .mp4, .mov
- Others: .e5x, .e5z, .msg, .eml**, .zip**
❌ Files with .dll, .exe, .sys, or unknown extensions are not allowed.
You can add a description or remove the attached file by clicking on ‘x’ on the right.

Then click ‘CONTINUE’ to proceed.
- If needed, you can return to the previous step using the 'PREVIOUS STEP' button.
- Click 'SUBMIT' to send your report to the competent Authority.
- You will get a confirmation saying that "You have successfully submitted your report(s).'
If any mandatory fields are left incomplete, a warning message will appear indicating which fields are missing. If you do not have the required information at the moment, you may still proceed by clicking ‘SUBMIT’.
Report offline
This section outlines how to report offline as an individual registered reporter and how to validate a PDF to submit a report.
Report Offline
To report offline as an individual registered reporter:
- Sign in to access the 'Report an Occurrence' page.
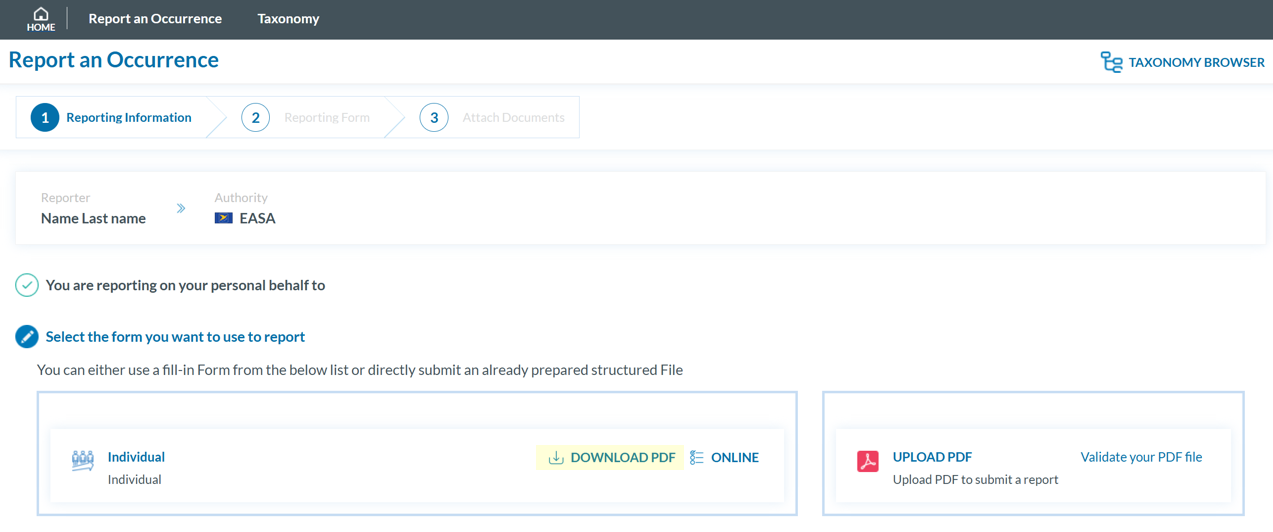
-
Click ‘DOWNLOAD PDF’ to obtain the reporting form in PDF format.
-
Use the free Acrobat Reader (Adobe's website) to fill the form. Other PDF applications may not work or corrupt the PDF form.

- Save the file to your device.
- Click ‘UPLOAD PDF’.
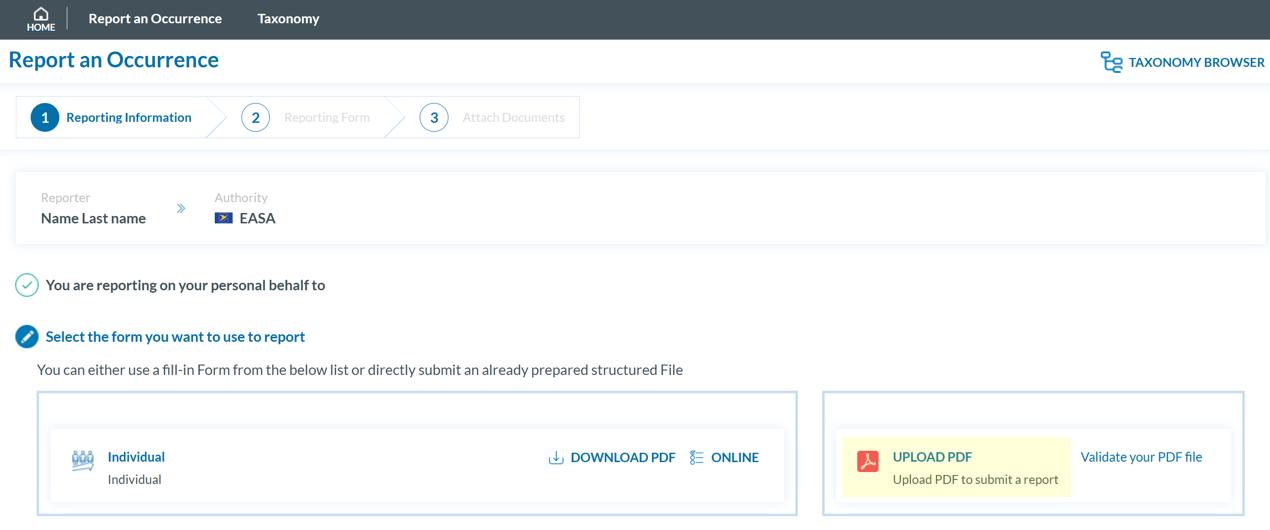
-
Attach the saved report by clicking the ‘Select files...’ button or by using drag and drop.
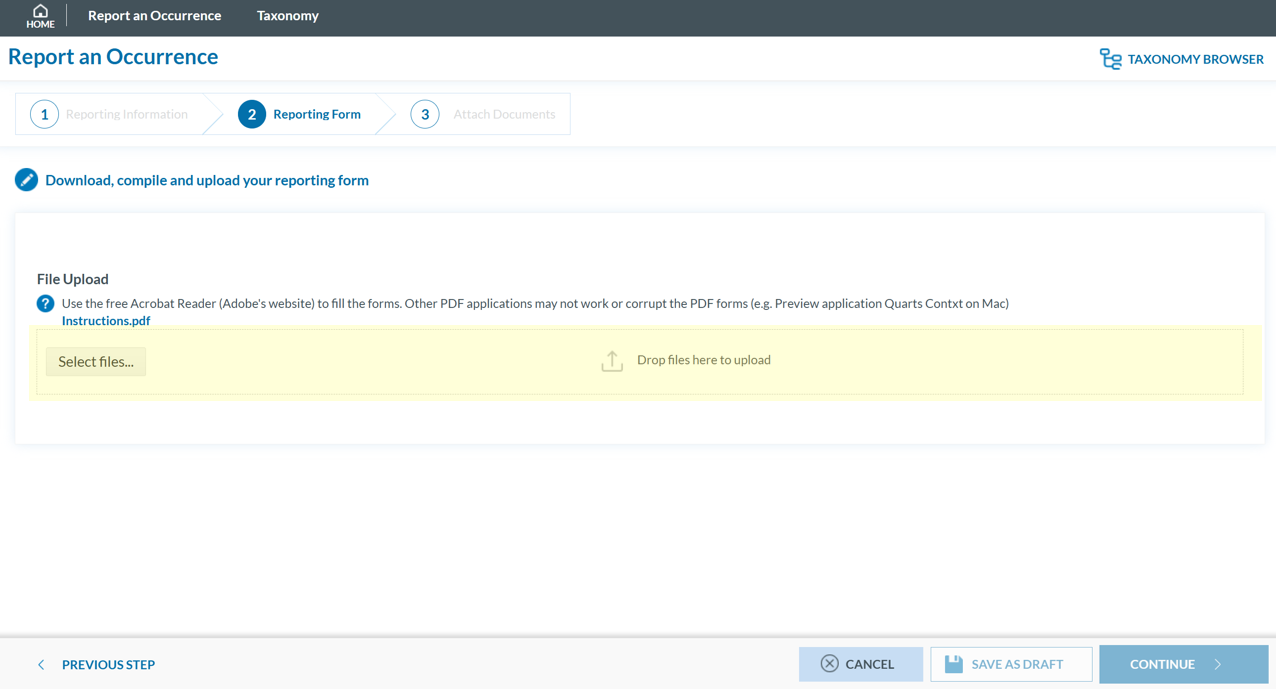
-
When the process is finish you will see a message stating "Your file(s) have been successfully uploaded."
To save a draft version, you can click ‘SAVE AS DRAFT’ below the form. The report will be stored in the 'Reports' list, accessible via the 'HOME' button at the top left of the page. You will also receive an email with a link to review and edit your saved draft report.
-
If applicable, attach any relevant documents by clicking 'Select files...' or by drag and drop.
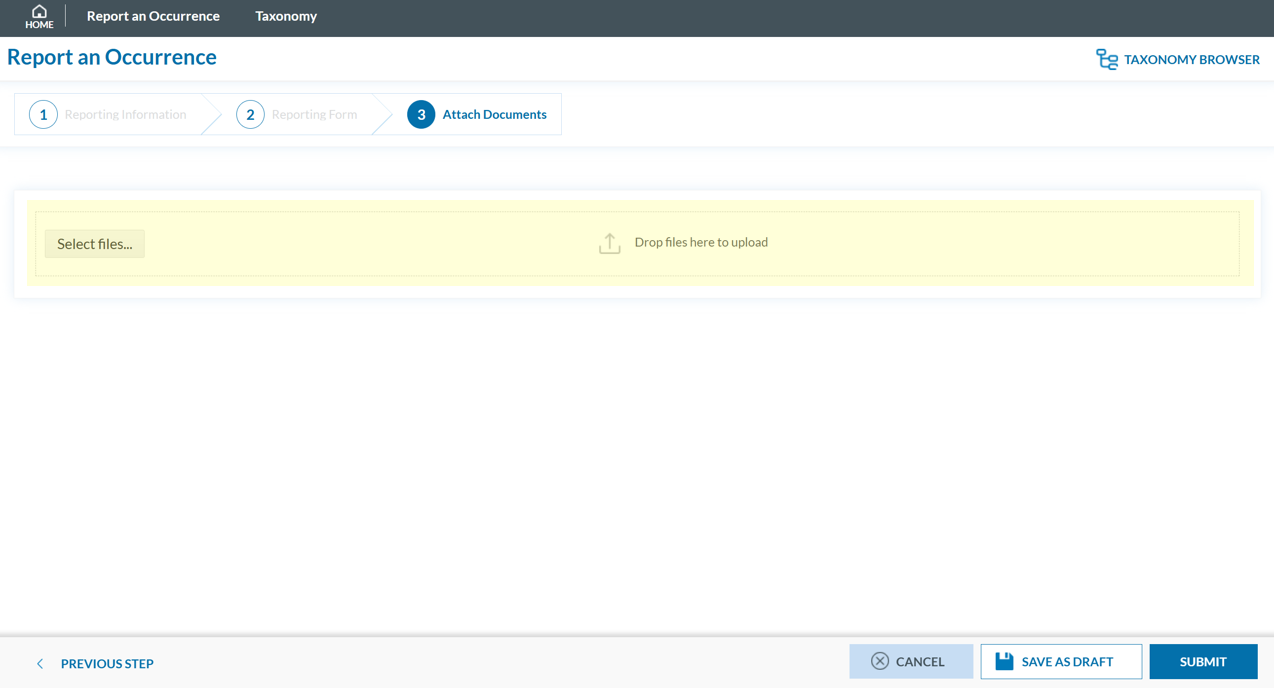
The system accepts files up to 4,000 MB in total. Supported formats include:
- Documents: .pdf, .doc/.docx, .ppt/.pptx, .xls/.xlsx/.xlsm, .xml, .rtf**, .odt**
- Images: .jpg/.jpeg, .png, .gif, .jtif**, .heic
- Media: .mp3, .mp4, .mov
- Others: .e5x, .e5z, .msg, .eml**, .zip**
❌ Files with .dll, .exe, .sys, or unknown extensions are not allowed.
You can add a description or remove the attached file by clicking on ‘x’ on the right.

Then click ‘CONTINUE’ to proceed.
-
If needed, you can return to the previous step using the 'PREVIOUS STEP' button. In the 'Report Form' section, you can replace the uploaded report by clicking the pencil icon to the right of the document name. In the 'Attach Documents' section, you can upload additional files or remove them by clicking the 'X' icon.
- You may click 'SUBMIT' to send your report.
- You will get a confirmation saying that "You have successfully submitted your report(s).'
If any mandatory fields are left incomplete, a warning message will appear indicating which fields are missing. If you do not have the required information at the moment, you may still proceed by clicking 'SUBMIT'. However, the UTC Date is the only field required in order to submit a report.
Validate your PDF
To validate your PDF:
-
Sign in to access the 'Report an Occurrence' page.

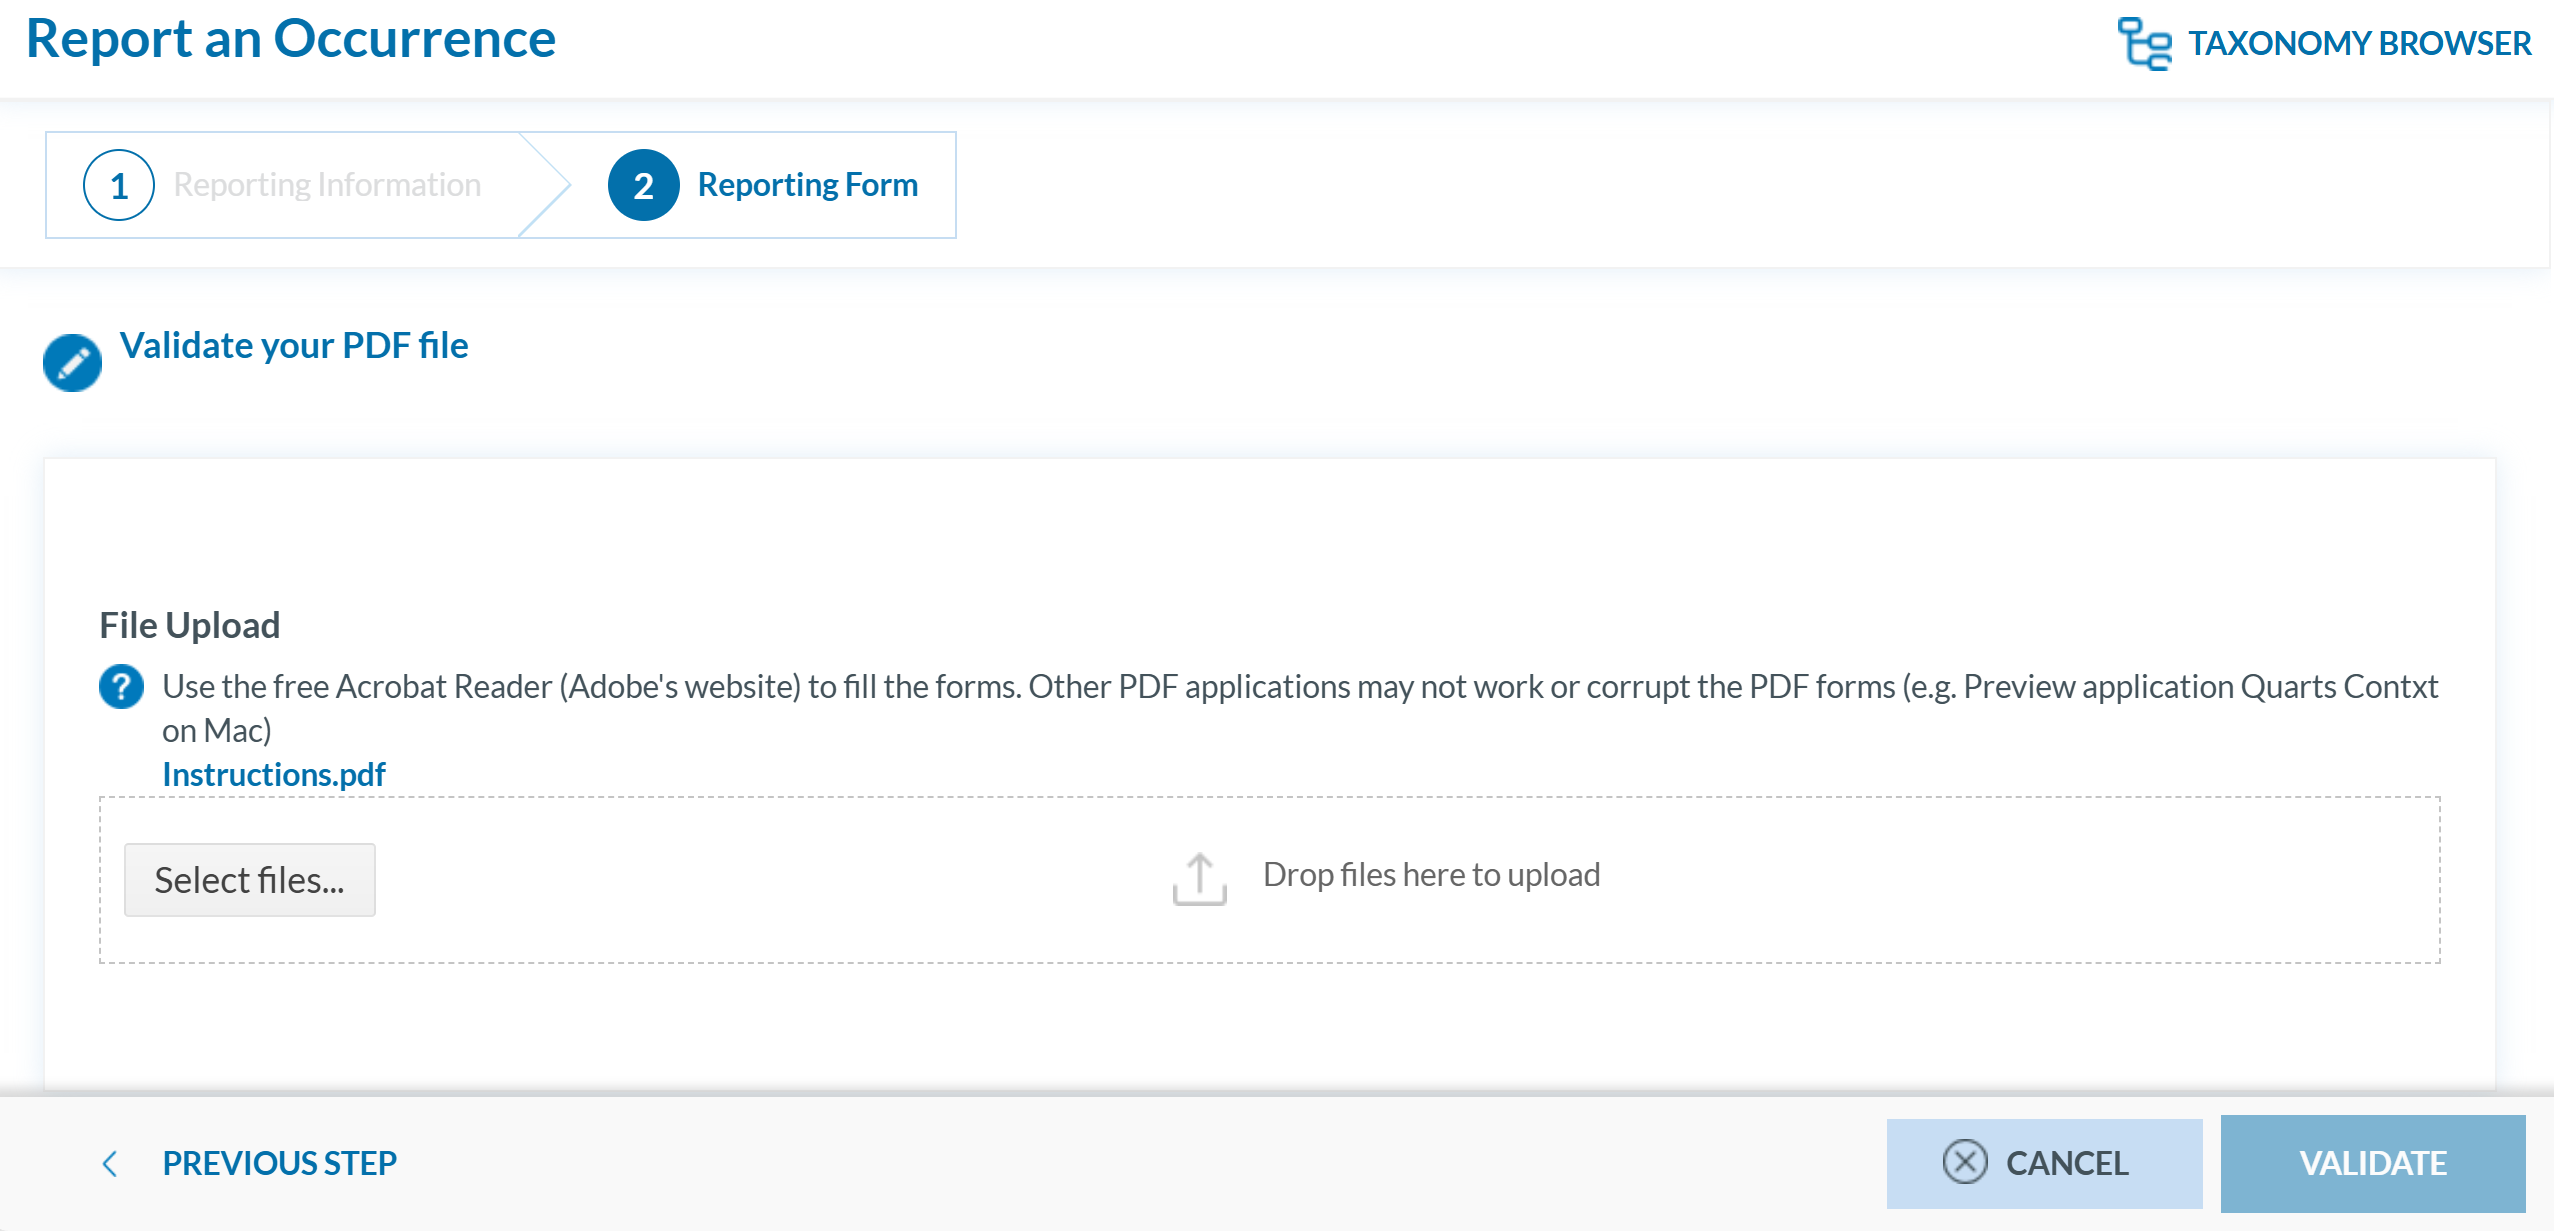
- Click 'Validate your PDF File'. The system will open the validation page:
-
Attach the PDF report to validate by clicking the ‘Select files...’ button or by using drag and drop. When the process is finish you will see a message stating 'Your file(s) have been successfully uploaded.'
-
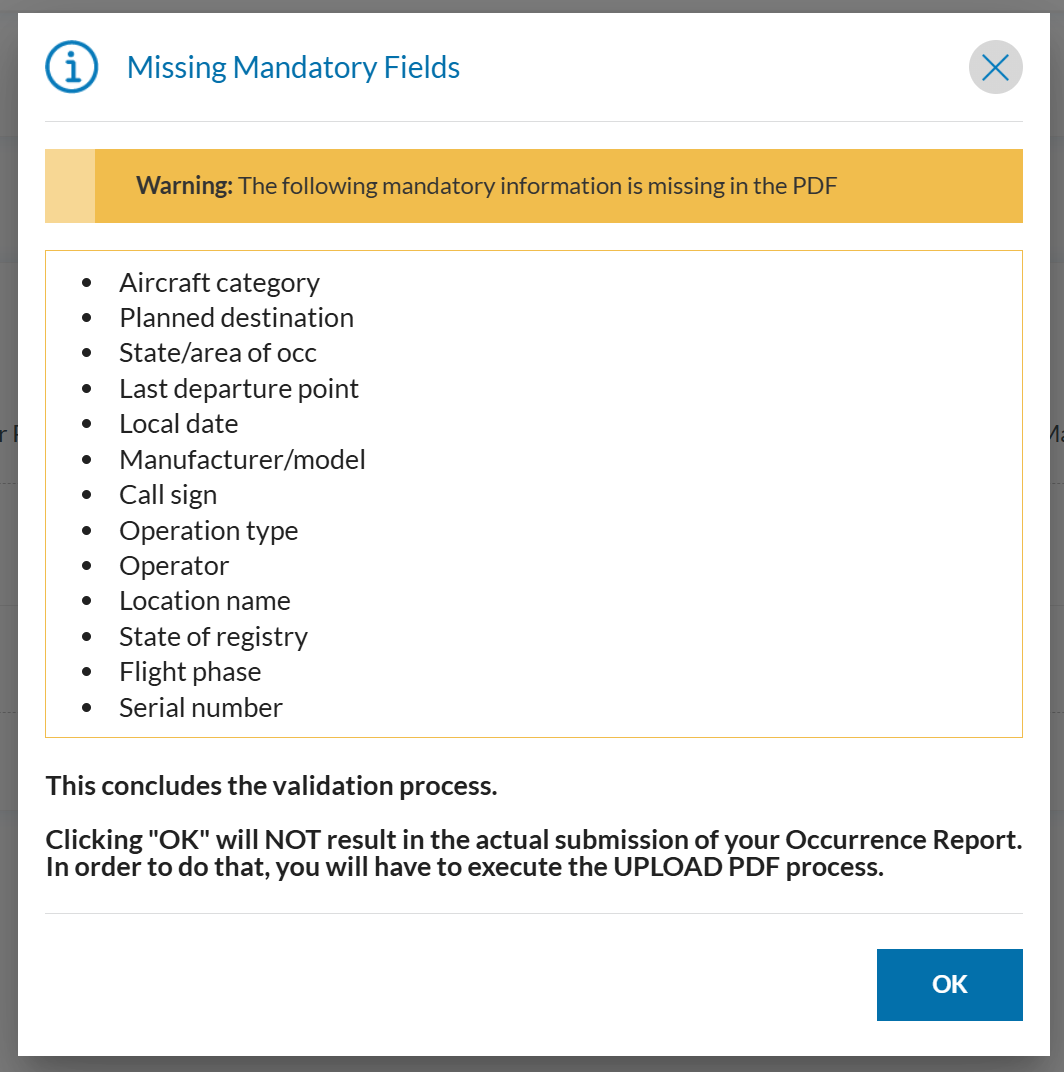
Click 'VALIDATE'. The system will either display a message stating 'Your PDF has been successfully validated' or highlight the mandatory fields that are missing in the PDF:
-

Report as an Organisation
To report on behalf of your organisation, there are different ways to do depending on your user role:
- Preparator or Preparator Limited: You can only create reports online however you cannot submit them.
- Reporter: You can create and submit reports online, offline or you can submit E5X.
Preparator or Preparator limited
As Preparators or Preparators Limited, you are authorized to create OR within the system, but you cannot submit them to the Authority. Reports must be prepared online; although you may download the PDF form for completion, uploading it is not possible. If the report is completed offline, a designated Reporter from your organisation is responsible for submitting it.
Preparator Limited
As a Preparator Limited, you can only create, view, edit, and delete your own reports.
The status of the OR can be: Draft and Prepared.
Preparator
As a Preparator, you can:
- Create, view, edit, and delete your own reports
- View and edit all organisation reports
The status of the OR can be: Draft, Prepared and Sent.
Create an OR by a Preparator or Preparator Limited
To create an OR as a Preparator or Preparator Limited:
- Sign in to access the 'Report an Occurrence' page.

- Click the ‘ONLINE’ button next to one of the available webforms.
-
Fill out the form. Mandatory fields are highlighted —please provide the required information where available.

How to fill the Reporting Form
-
Moving between topics: You can move between topics—Occurrence, Aircraft, Narrative, and Airspace—using the navigation tree on the left pane.
-
Adding entries:
-
To add a new aircraft:
-
Click on 'Aircraft' (left pane).
-
Select 'ADD AIRCRAFT' (top-left corner of the right-hand pane).
-
-
To add a new 'Air space':
-
Click on 'Air space' (left pane).
-
Click 'ADD AIR SPACE' (top-left corner of the right-hand pane).
-
-
To add elements under 'Occurrence':
-
Click on 'Occurrence' (left pane).
-
Select "ADD SUBENTITY" (top-right corner of the right-hand pane).
-
-
-
Saving the report:
To save a draft version, click ‘SAVE AS DRAFT’ below the form.
The report will be stored in the 'Reports' list, accessible via the 'HOME' button at the top left of the page.
You will also receive an email with a link to review and edit your saved draft report.
-
Once you've completed the report, click 'CONTINUE' to proceed.
- If applicable, attach any relevant documents by clicking 'Select files...' or by drag and drop.

The system accepts files up to 4,000 MB in total. Supported formats include:
- Documents: .pdf, .doc/.docx, .ppt/.pptx, .xls/.xlsx/.xlsm, .xml, .rtf**, .odt**
- Images: .jpg/.jpeg, .png, .gif, .jtif**, .heic
- Media: .mp3, .mp4, .mov
- Others: .e5x, .e5z, .msg, .eml**, .zip**
❌ Files with .dll, .exe, .sys, or unknown extensions are not allowed.
You can add a description or remove the attached file by clicking on ‘x’ on the right.

- If needed, you can return to the previous step using the 'PREVIOUS STEP' button.
- Click 'TO BE REVIEWED' to send your report to the competent Authority.
- You will get a confirmation email, and the system will display a message saying that "You have successfully sent your report(s) for review.'
If any mandatory fields are left incomplete, a warning message will appear indicating which fields are missing. If you do not have the required information at the moment, you may still proceed by clicking ‘SAVE’.
Submission of the OR by a Reporter
When a Preparator or Preparator Limited creates an OR, the application sends an email to the Organisation's Reporters so they are aware of the new reports. In the landing page, they see the OR to be reviewed under the label Prepared

Reporters can view any report in this label.
To submit a Prepared OR, Reporter has to enter in Edit mode and follow the normal reporting method. More information on this procedure can be found in the section Edit a Report.
Reporter
With the Reporter role, you can view, create, edit, delete, and submit reports on behalf of your organisation.
There are three different ways to report:
- Online
- Offline
- E5X
Report online
To report online on behalf of your organisation:
- Sign in to access the 'Report an Occurrence' page.
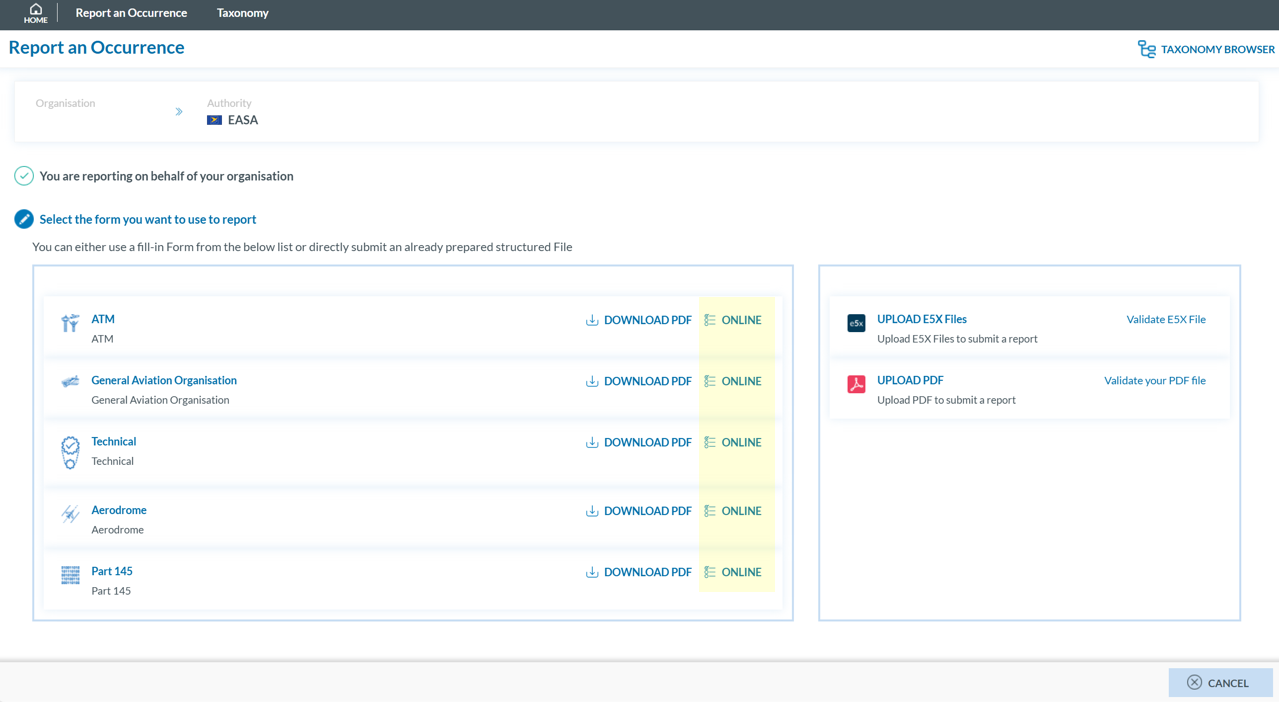
- Click the ‘ONLINE’ button next to one of the available webforms.
-
Fill out the form. Mandatory fields are highlighted —please provide the required information where available —.
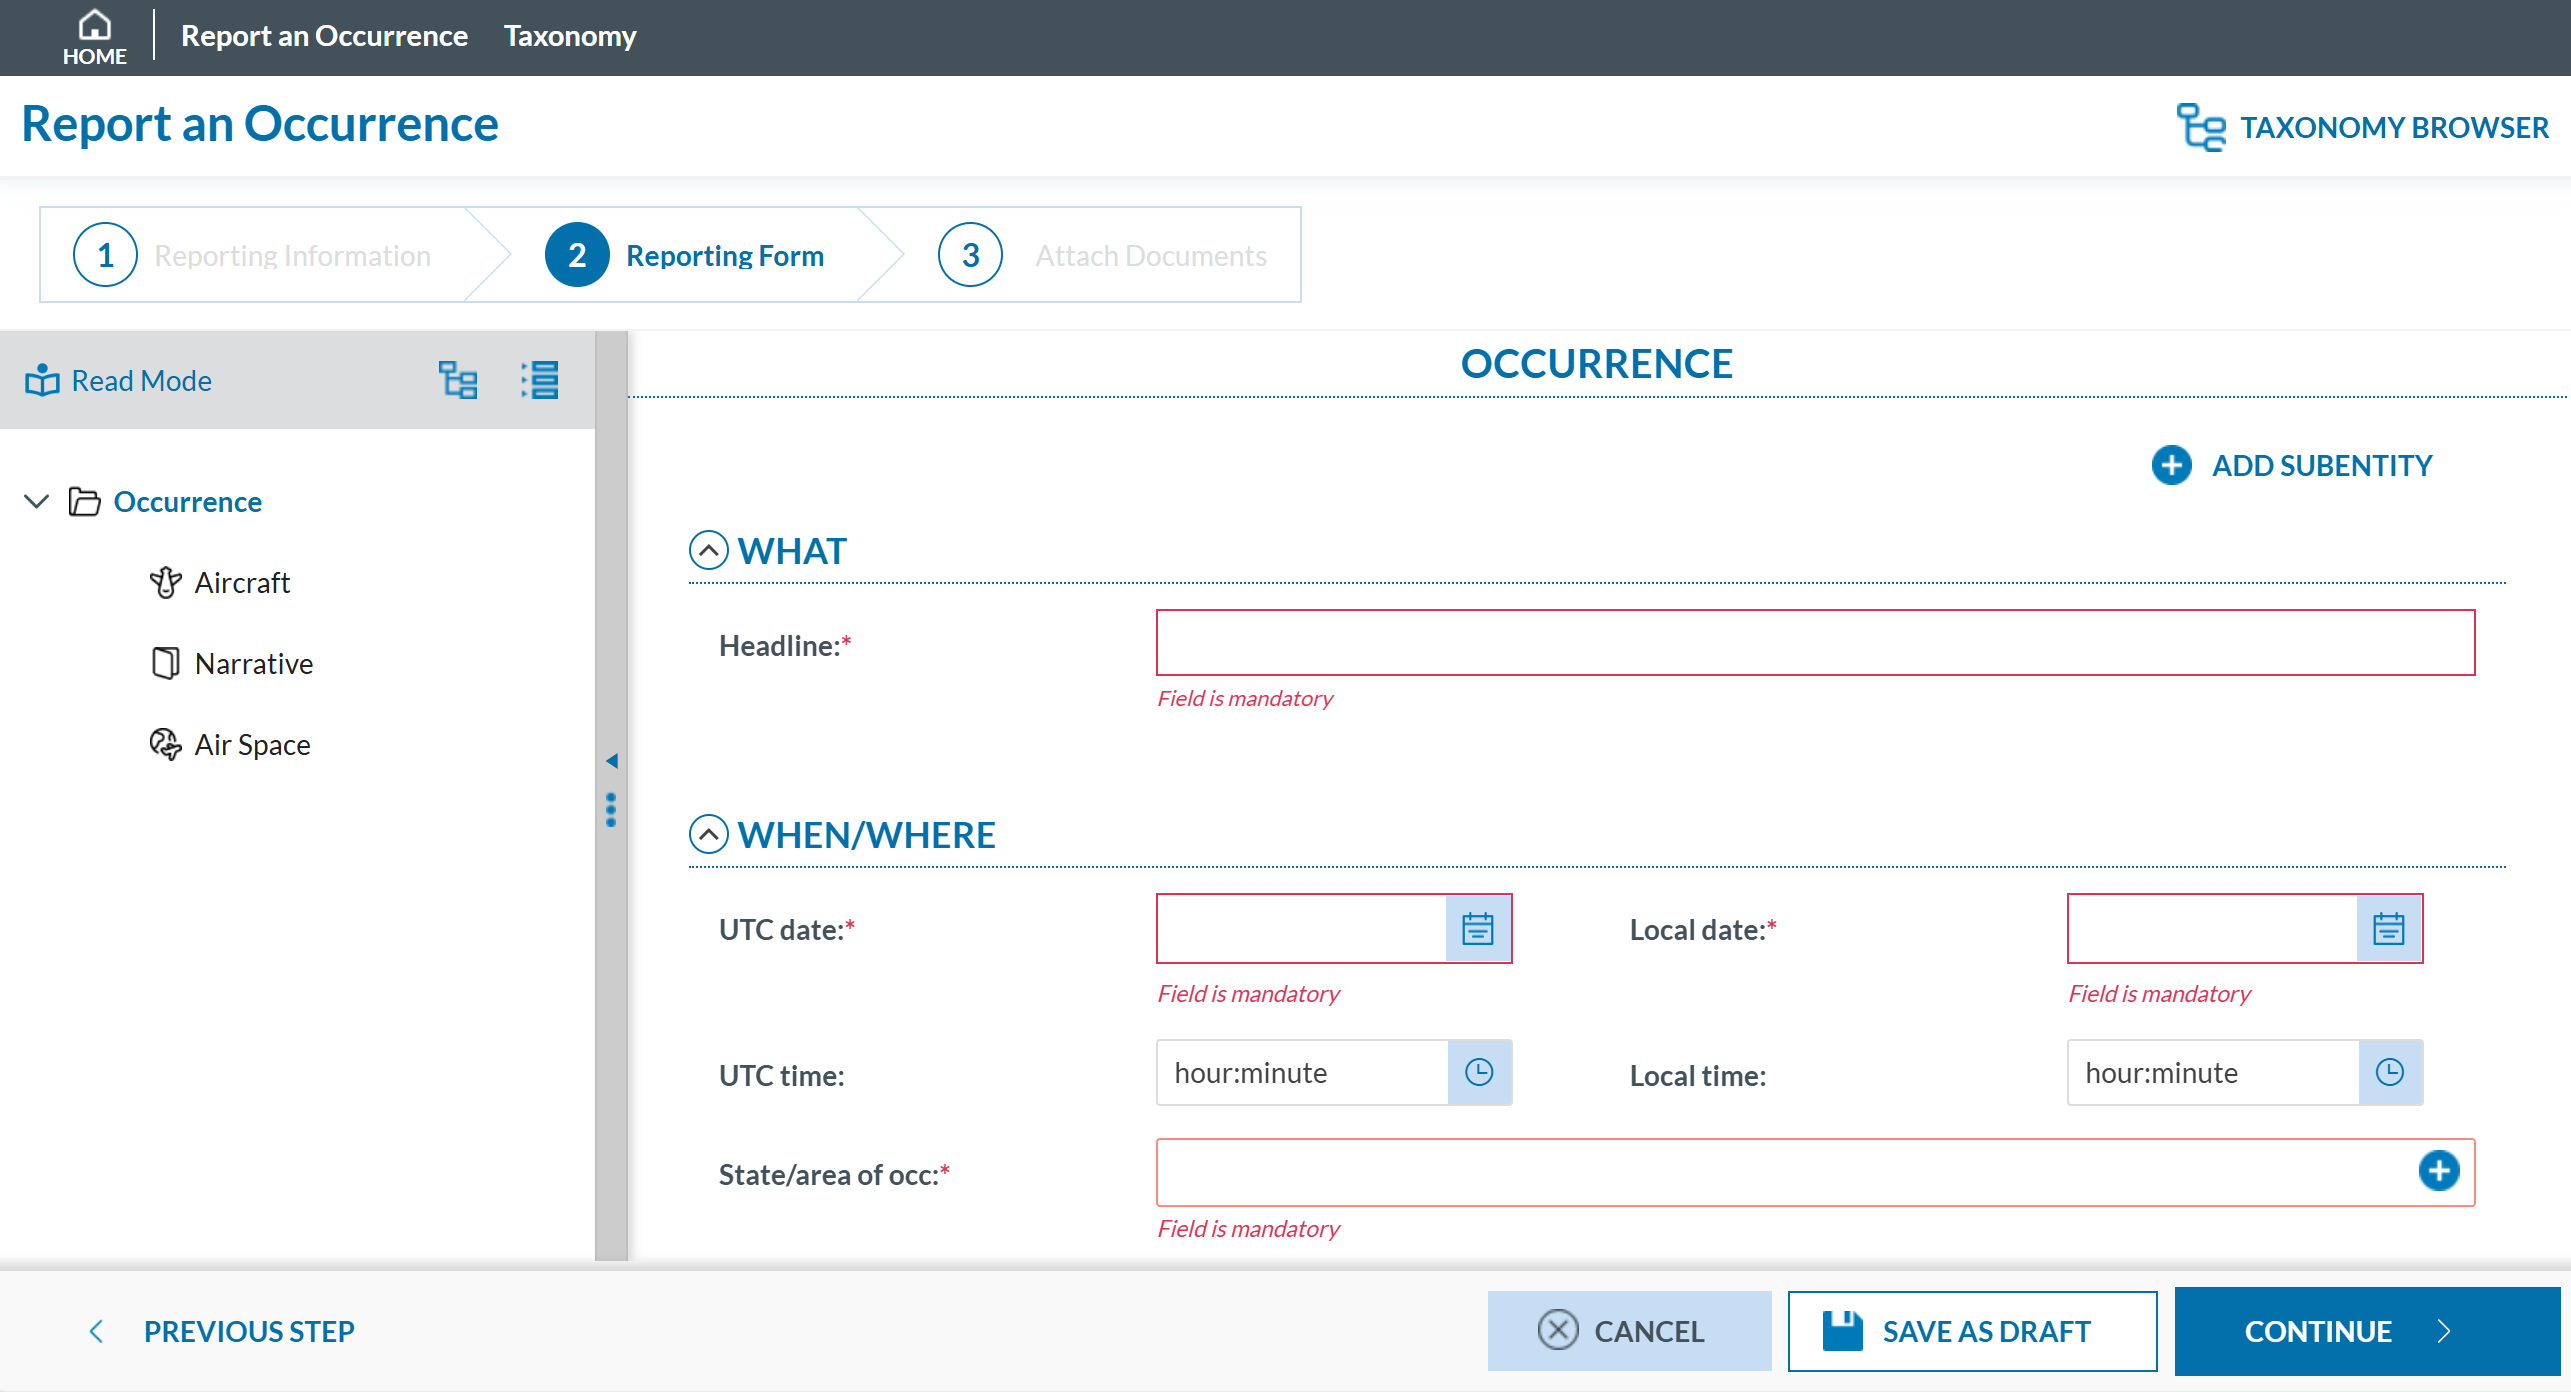
How to fill the Reporting Form
-
Moving between topics: You can move between topics—Occurrence, Aircraft, Narrative, and Airspace—using the navigation tree on the left pane.
-
Adding entries:
-
To add a new aircraft:
-
Click on 'Aircraft' (left pane).
-
Select 'ADD AIRCRAFT' (top-left corner of the right-hand pane).
-
-
To add a new 'Air space':
-
Click on 'Air space' (left pane).
-
Click 'ADD AIR SPACE' (top-left corner of the right-hand pane).
-
-
To add elements under 'Occurrence':
-
Click on 'Occurrence' (left pane).
-
Select "ADD SUBENTITY" (top-right corner of the right-hand pane).
-
-
-
Saving the report:
To save a draft version, click ‘SAVE AS DRAFT’ below the form.
The report will be stored in the 'Reports' list, accessible via the 'HOME' button at the top left of the page.
You will also receive an email with a link to review and edit your saved draft report.
-
Once you've completed the report, click 'CONTINUE' to proceed.
- If applicable, attach any relevant documents by clicking 'Select files...' or by drag and drop.
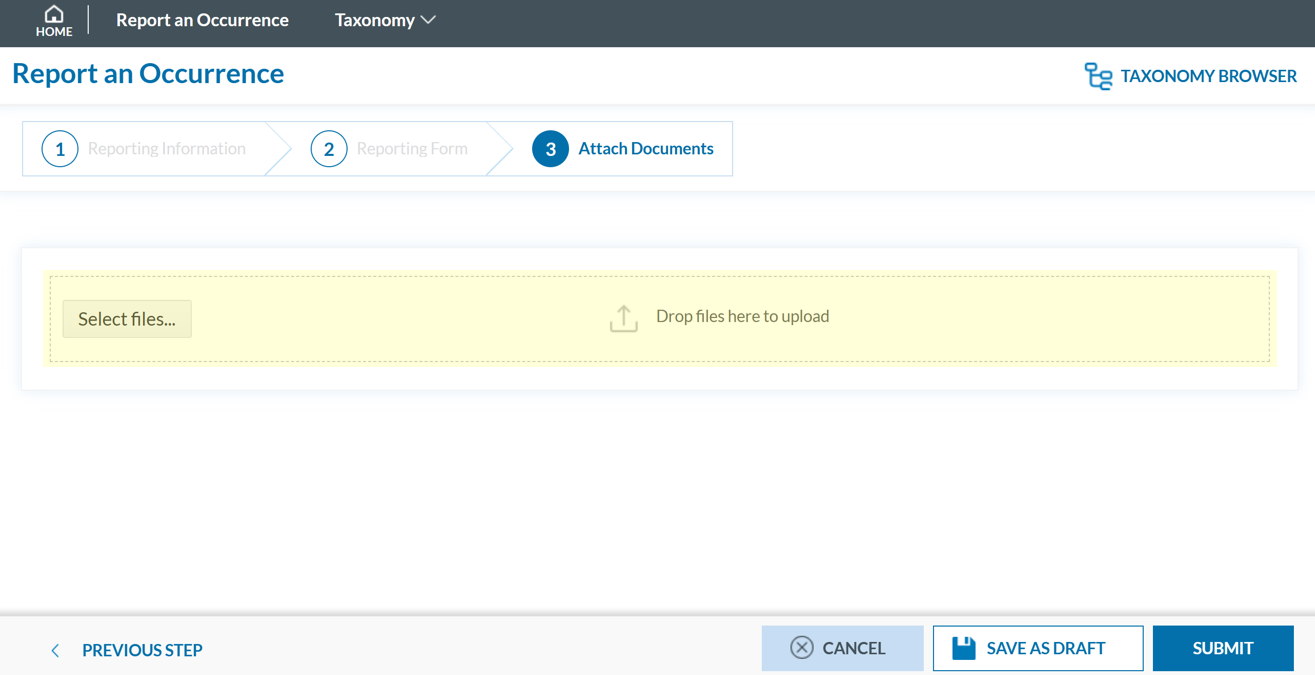
The system accepts files up to 4,000 MB in total. Supported formats include:
- Documents: .pdf, .doc/.docx, .ppt/.pptx, .xls/.xlsx/.xlsm, .xml, .rtf**, .odt**
- Images: .jpg/.jpeg, .png, .gif, .jtif**, .heic
- Media: .mp3, .mp4, .mov
- Others: .e5x, .e5z, .msg, .eml**, .zip**
❌ Files with .dll, .exe, .sys, or unknown extensions are not allowed.
You can add a description or remove the attached file by clicking on ‘x’ on the right.

If needed, you can return to the previous step using the 'PREVIOUS STEP' button.
- Click 'SUBMIT' to send your report to the competent Authority.
- You will get a confirmation saying that "You have successfully submitted your report(s).'
If any mandatory fields are left incomplete, a warning message will appear indicating which fields are missing. If you do not have the required information at the moment, you may still proceed by clicking ‘SUBMIT’.
Report offline
This section outlines how to report offline on behalf of your organisaion and how to validate a PDF to submit a report.
Report offline
To report offline on behalf of your organisation:- Sign in to access to the 'Report an Occurrence' page.
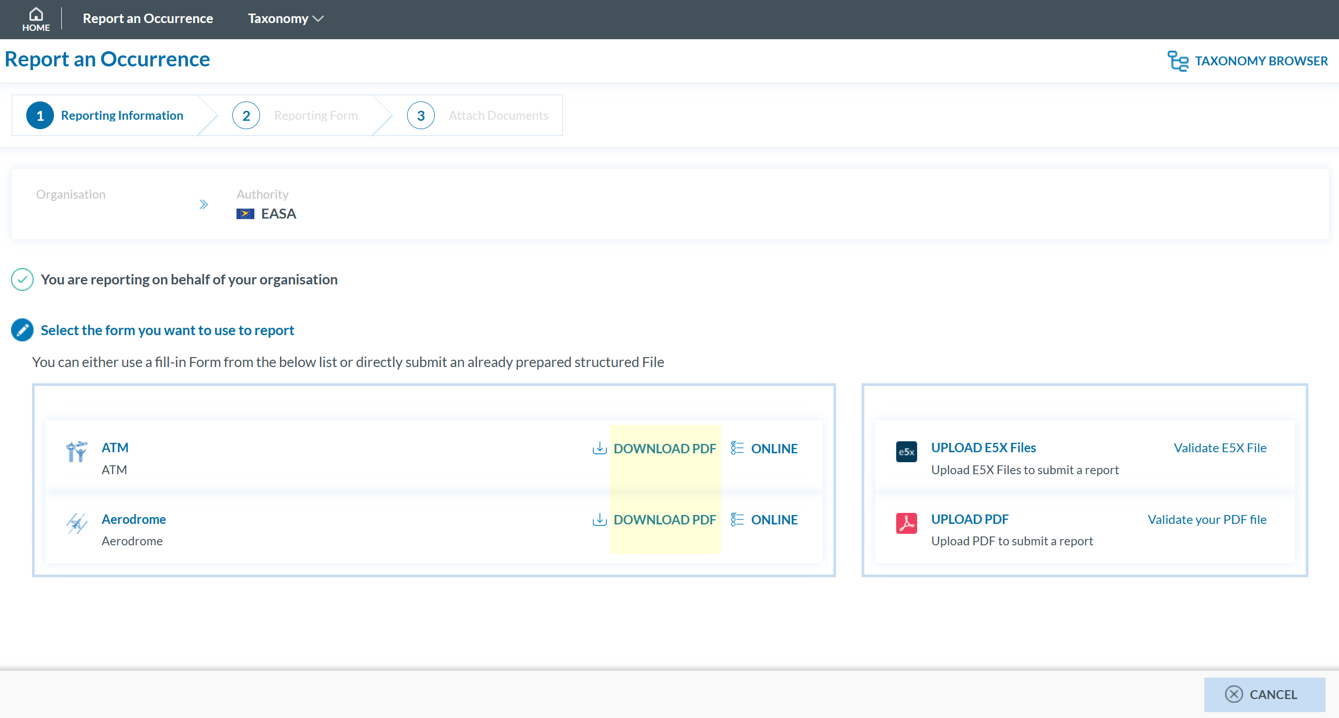
- Click ‘DOWNLOAD PDF’ to obtain the reporting form in PDF format.
- Use the free Acrobat Reader (Adobe's website) to fill the form. Other PDF applications may not work or corrupt the PDF form.
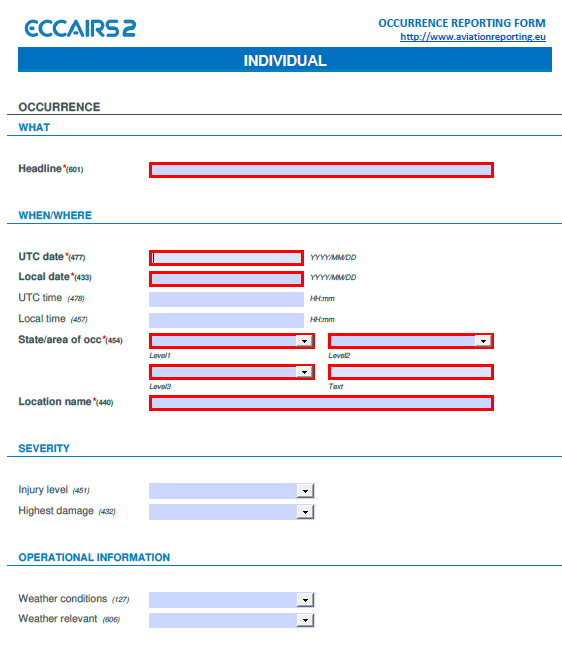
- Save the file to your device.
- Click ‘UPLOAD PDF’.
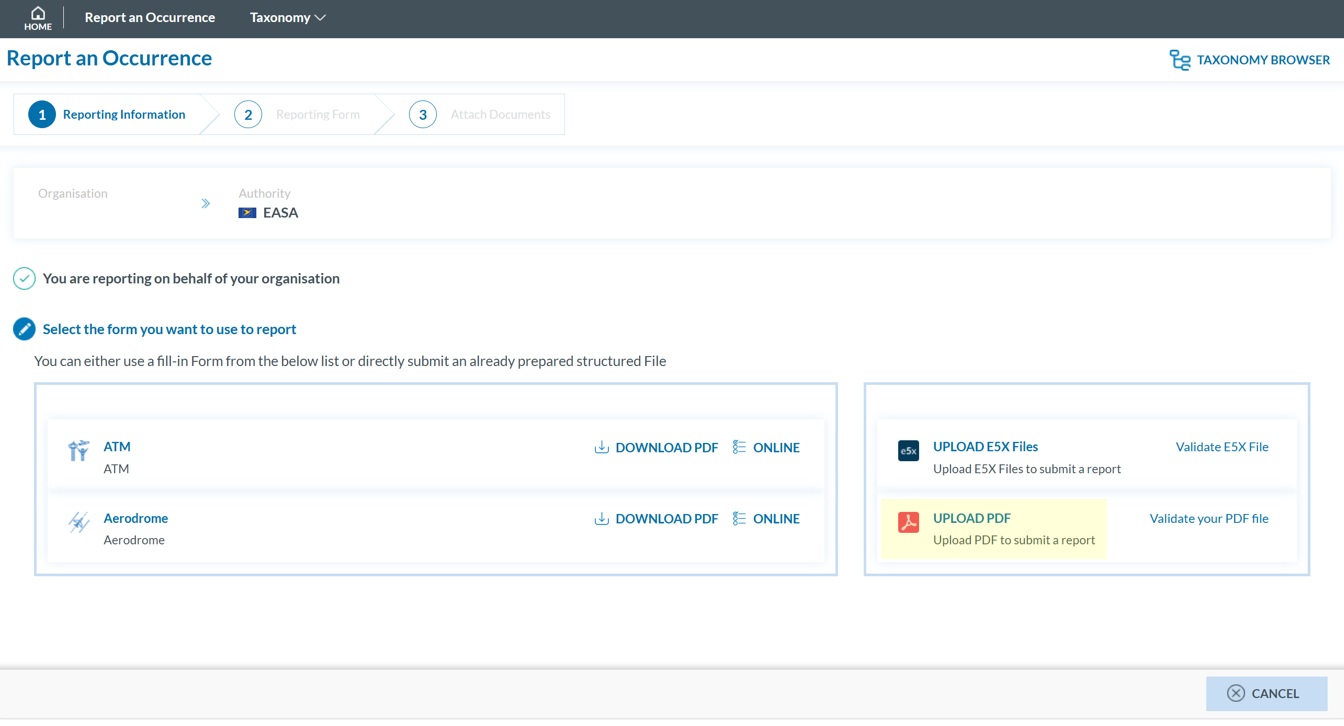
-
Attach the saved report by clicking the ‘Select files...’ button or by using drag and drop.
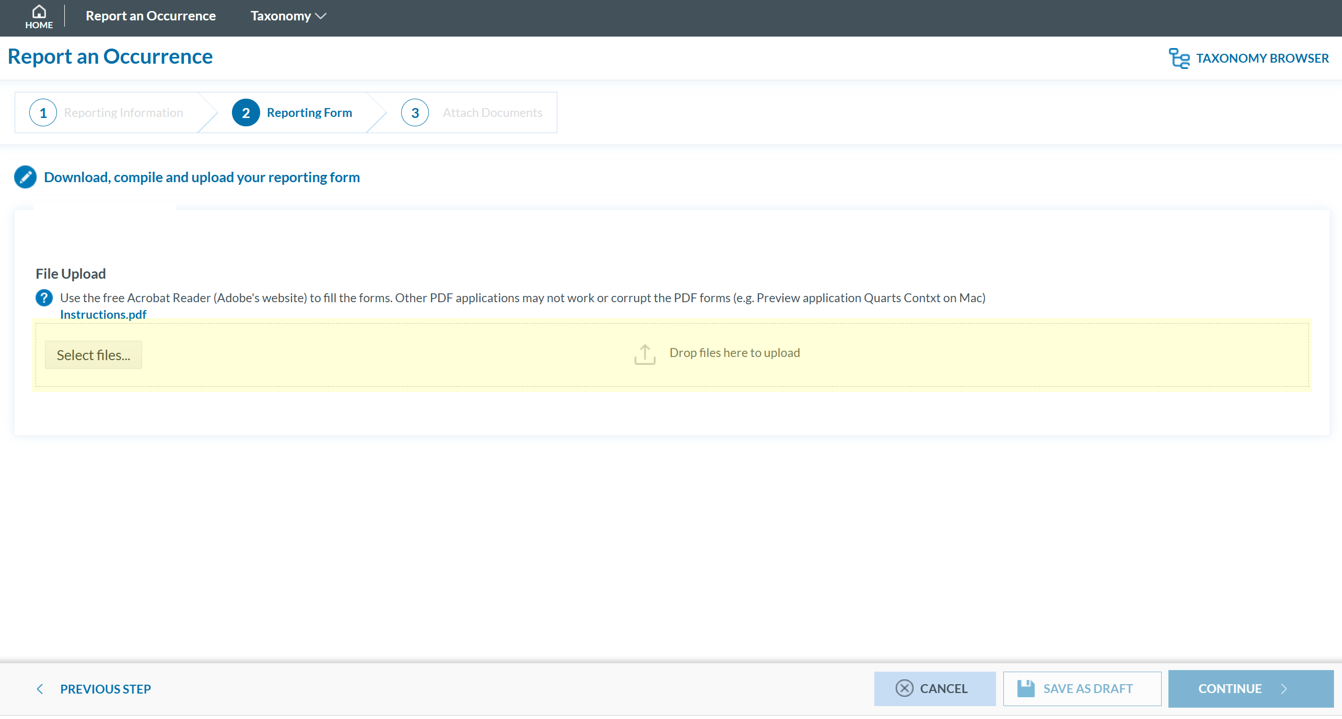
-
When the process is finish you will see a message stating "Your file(s) have been successfully uploaded."
To save a draft version, you can click ‘SAVE AS DRAFT’ below the form. The report will be stored in the 'Reports' list, accessible via the 'HOME' button at the top left of the page. You will also receive an email with a link to review and edit your saved draft report.
-
If applicable, attach any relevant documents by clicking 'Select files...' or by drag and drop.
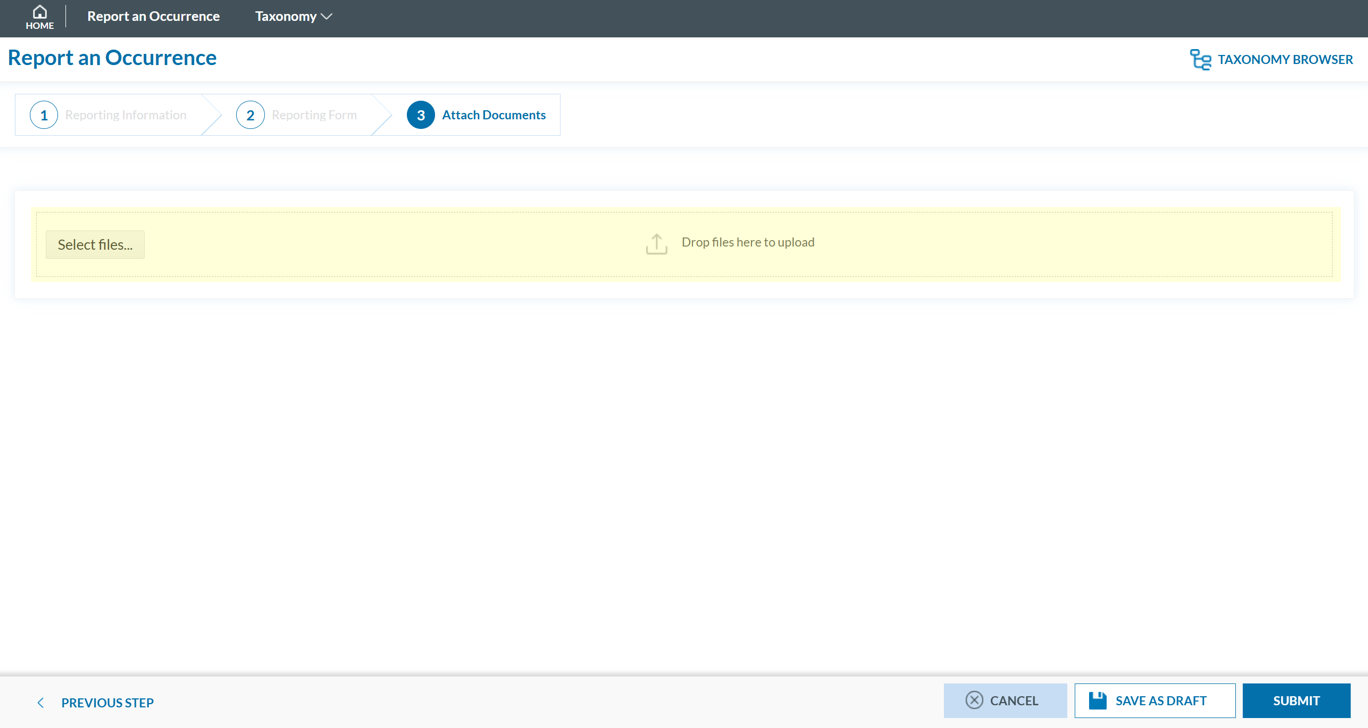
The system accepts files up to 4,000 MB in total. Supported formats include:
- Documents: .pdf, .doc/.docx, .ppt/.pptx, .xls/.xlsx/.xlsm, .xml, .rtf**, .odt**
- Images: .jpg/.jpeg, .png, .gif, .jtif**, .heic
- Media: .mp3, .mp4, .mov
- Others: .e5x, .e5z, .msg, .eml**, .zip**
❌ Files with .dll, .exe, .sys, or unknown extensions are not allowed.
You can add a description or remove the attached file by clicking on ‘x’ on the right.

Then click ‘CONTINUE’ to proceed.
-
If needed, you can return to the previous step using the 'PREVIOUS STEP' button. In the 'Report Form' section, you can replace the uploaded report by clicking the pencil icon to the right of the document name. In the 'Attach Documents' section, you can upload additional files or remove them by clicking the 'X' icon.
- You will get a confirmation saying that "You have successfully submitted your report(s).'
- You may click 'SUBMIT' to send your report.
If any mandatory fields are left incomplete, a warning message will appear indicating which fields are missing. If you do not have the required information at the moment, you may still proceed by clicking 'SUBMIT'. However, the UTC Date, Reporting Entity and Report identification are the only fields required in order to submit a report.
Validate your PDF
To validate your PDF:
- Sign in to access the 'Report an Occurrence' page.
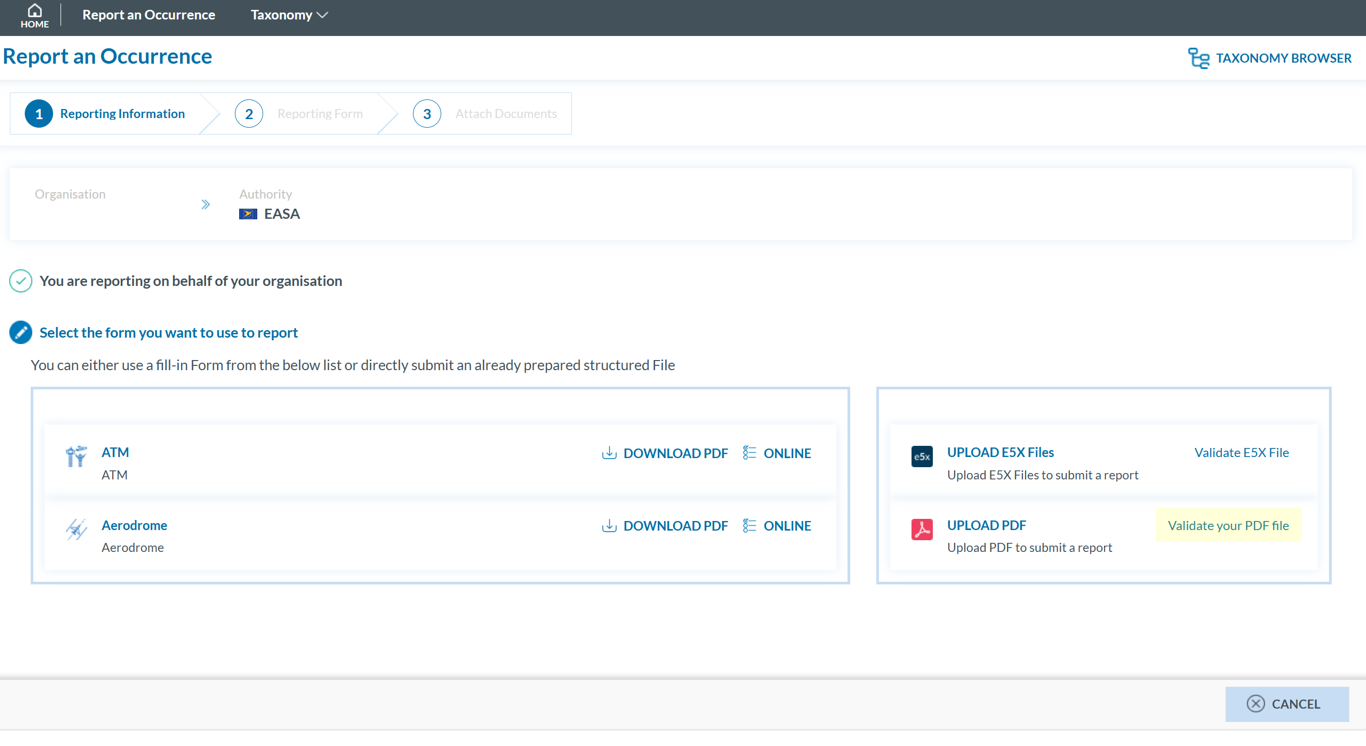
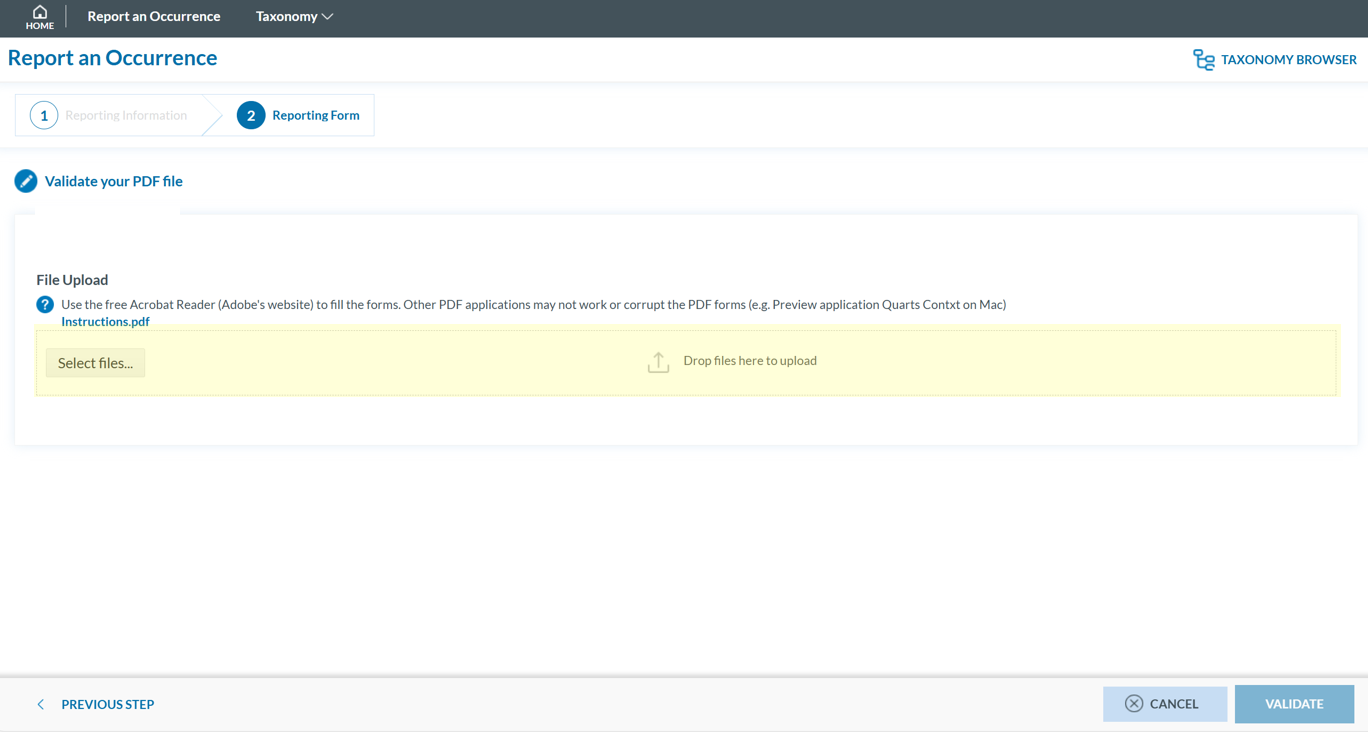
- Click 'Validate your PDF File'. The system will open the validation page:
-
Attach the PDF report to validate by clicking the ‘Select files...’ button or by using drag and drop. When the process is finish you will see a message stating 'Your file(s) have been successfully uploaded.'
-
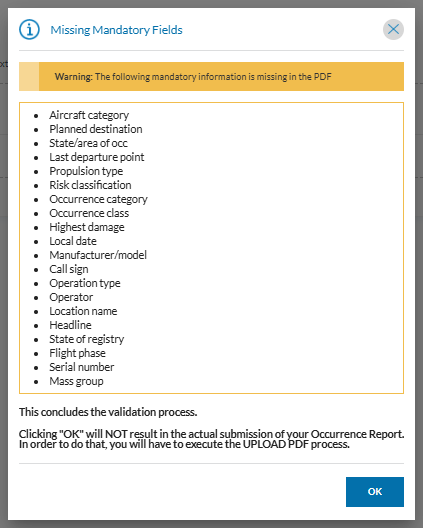
Click 'VALIDATE'. The system will either display a message stating 'Your PDF has been successfully validated' or highlight the mandatory fields that are missing in the PDF:
E5X
Only organisations are allowed to report using E5X files. These files must be generated in advance by an external system. This section outlines how to validate an E5X and how to report using an E5X.
Validate an E5X file
To validate an E5X file before reporting:
- Sign in to access the 'Report an Occurrence' page.
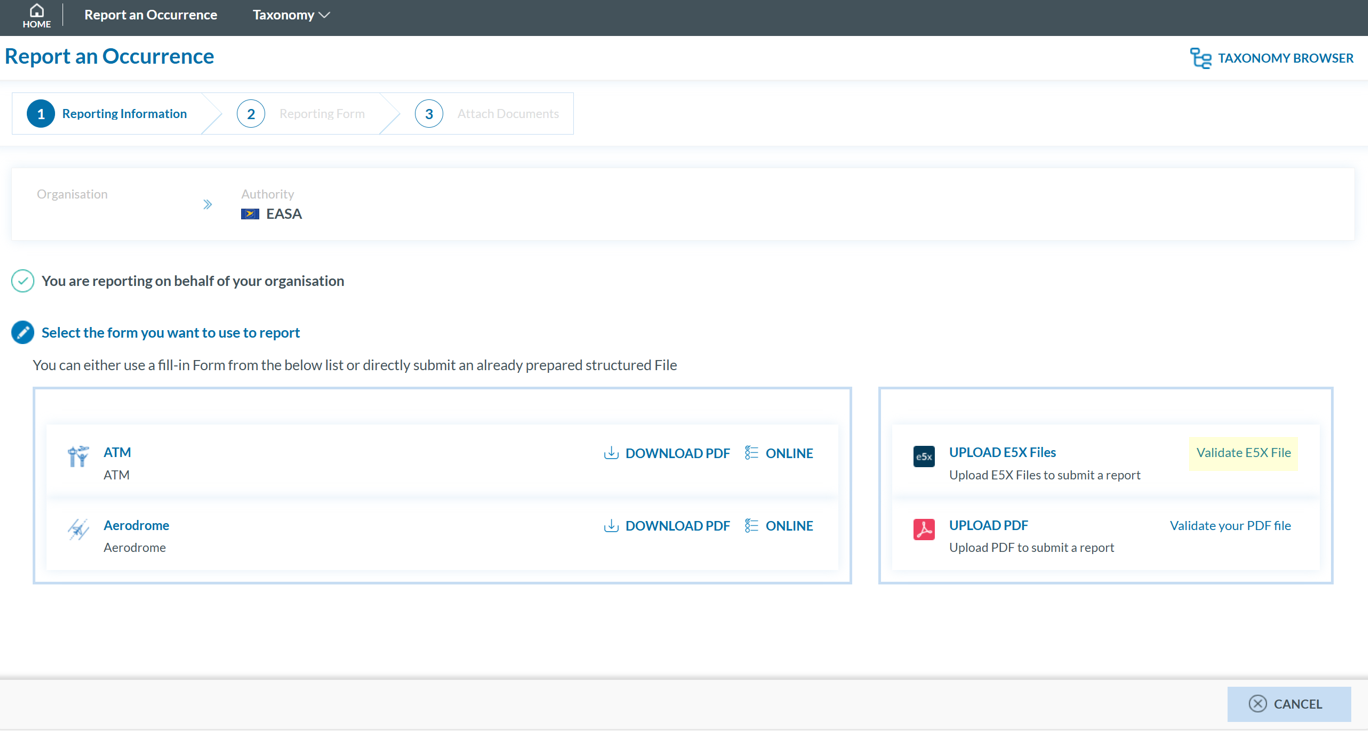
- Click 'Validate E5X File'.
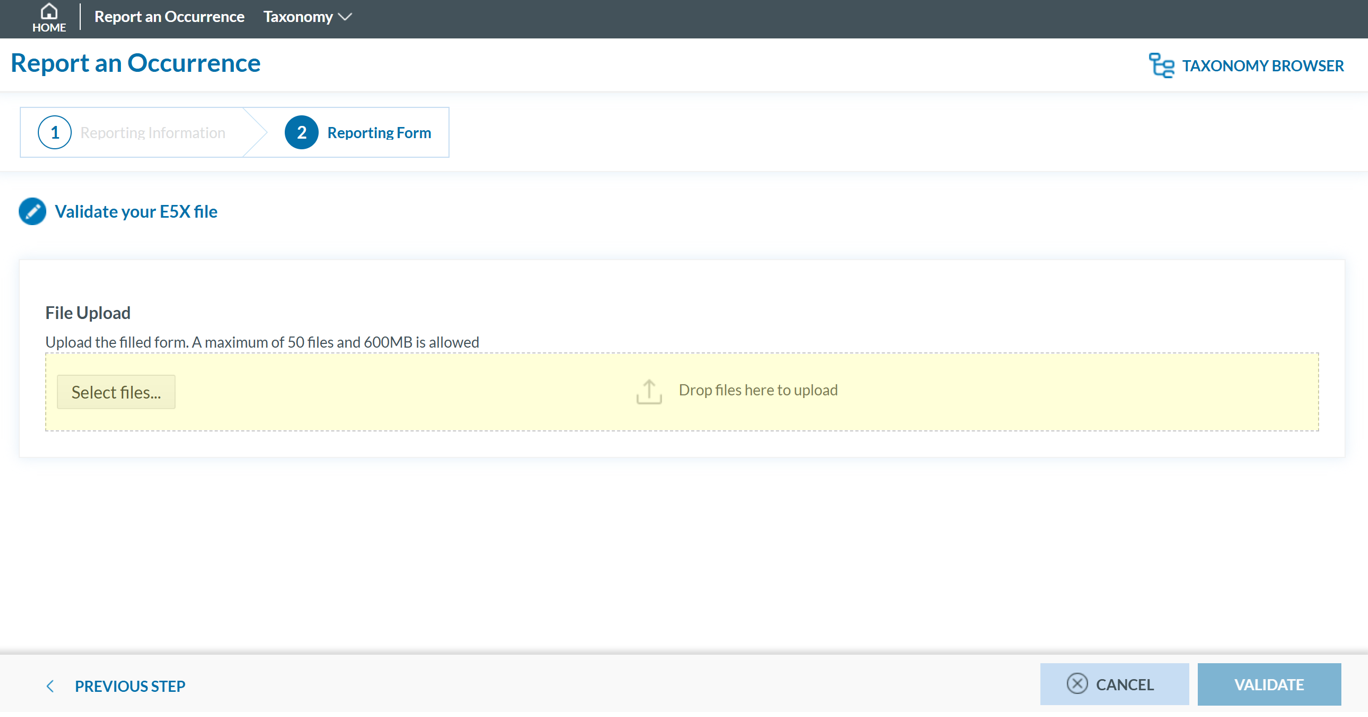
- Click 'Select files...' or drag and drop to upload (max 50 files, 600 MB total).
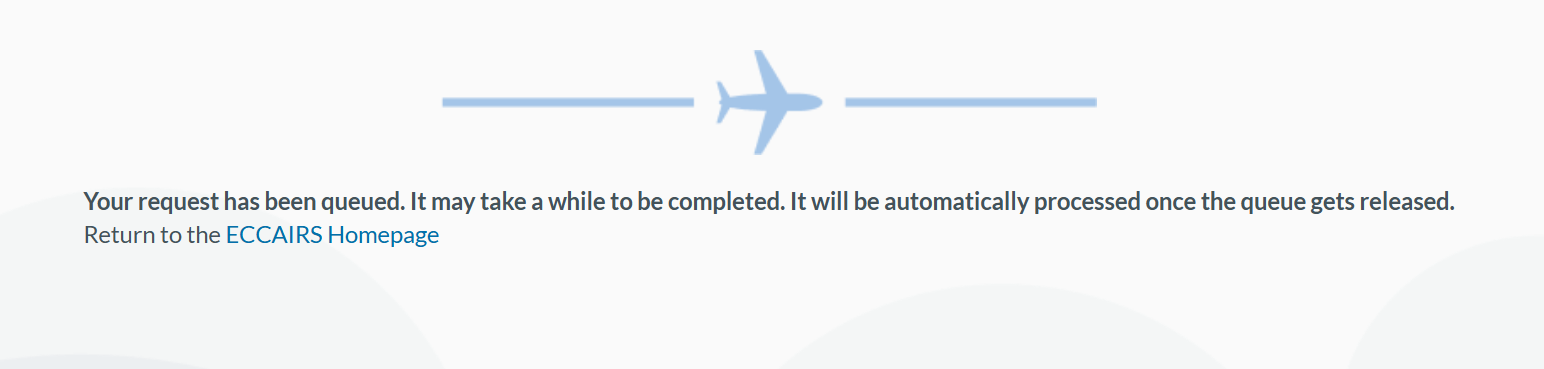
- Click 'VALIDATE'. The following message is displayed, and an automatic confirmation email will be sent to the Reporter’s email address.
Report using an E5X file
To report through E5X on behalf of your organisation:
-
Sign in to access the 'Report an Occurrence' page.

-
Click 'UPLOAD E5X Files'.
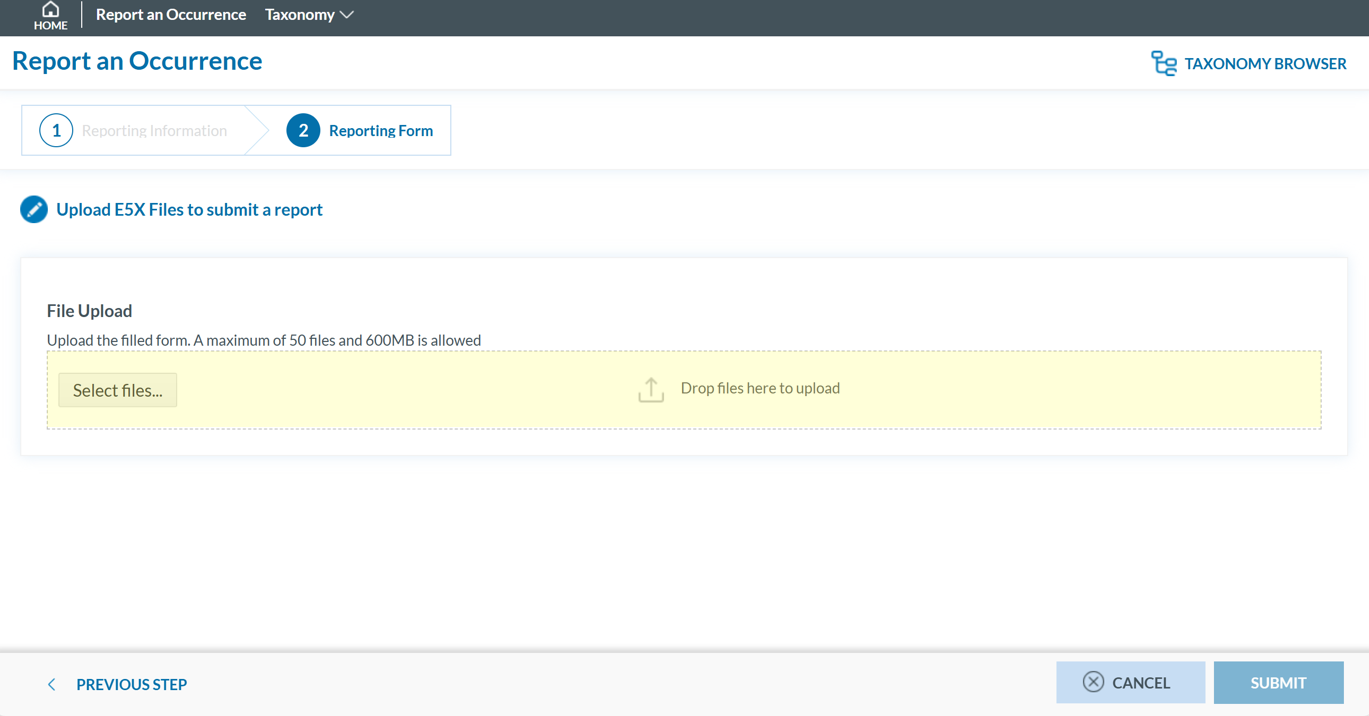
- Click 'Select files...' or drag and drop to upload (max 50 files, 600 MB total).
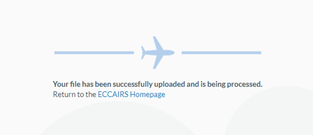
- Click 'SUBMIT'. The following message is displayed, and an automatic confirmation email will be sent to the Reporter’s email address.
The record(s) contained in the E5X file(s) will be saved in the database as Original Reports.
Reset Password
To reset your password if you've forgotten it, please follow these steps:
- Visit the E2 Reporting Portal at https://e2.aviationreporting.eu/.
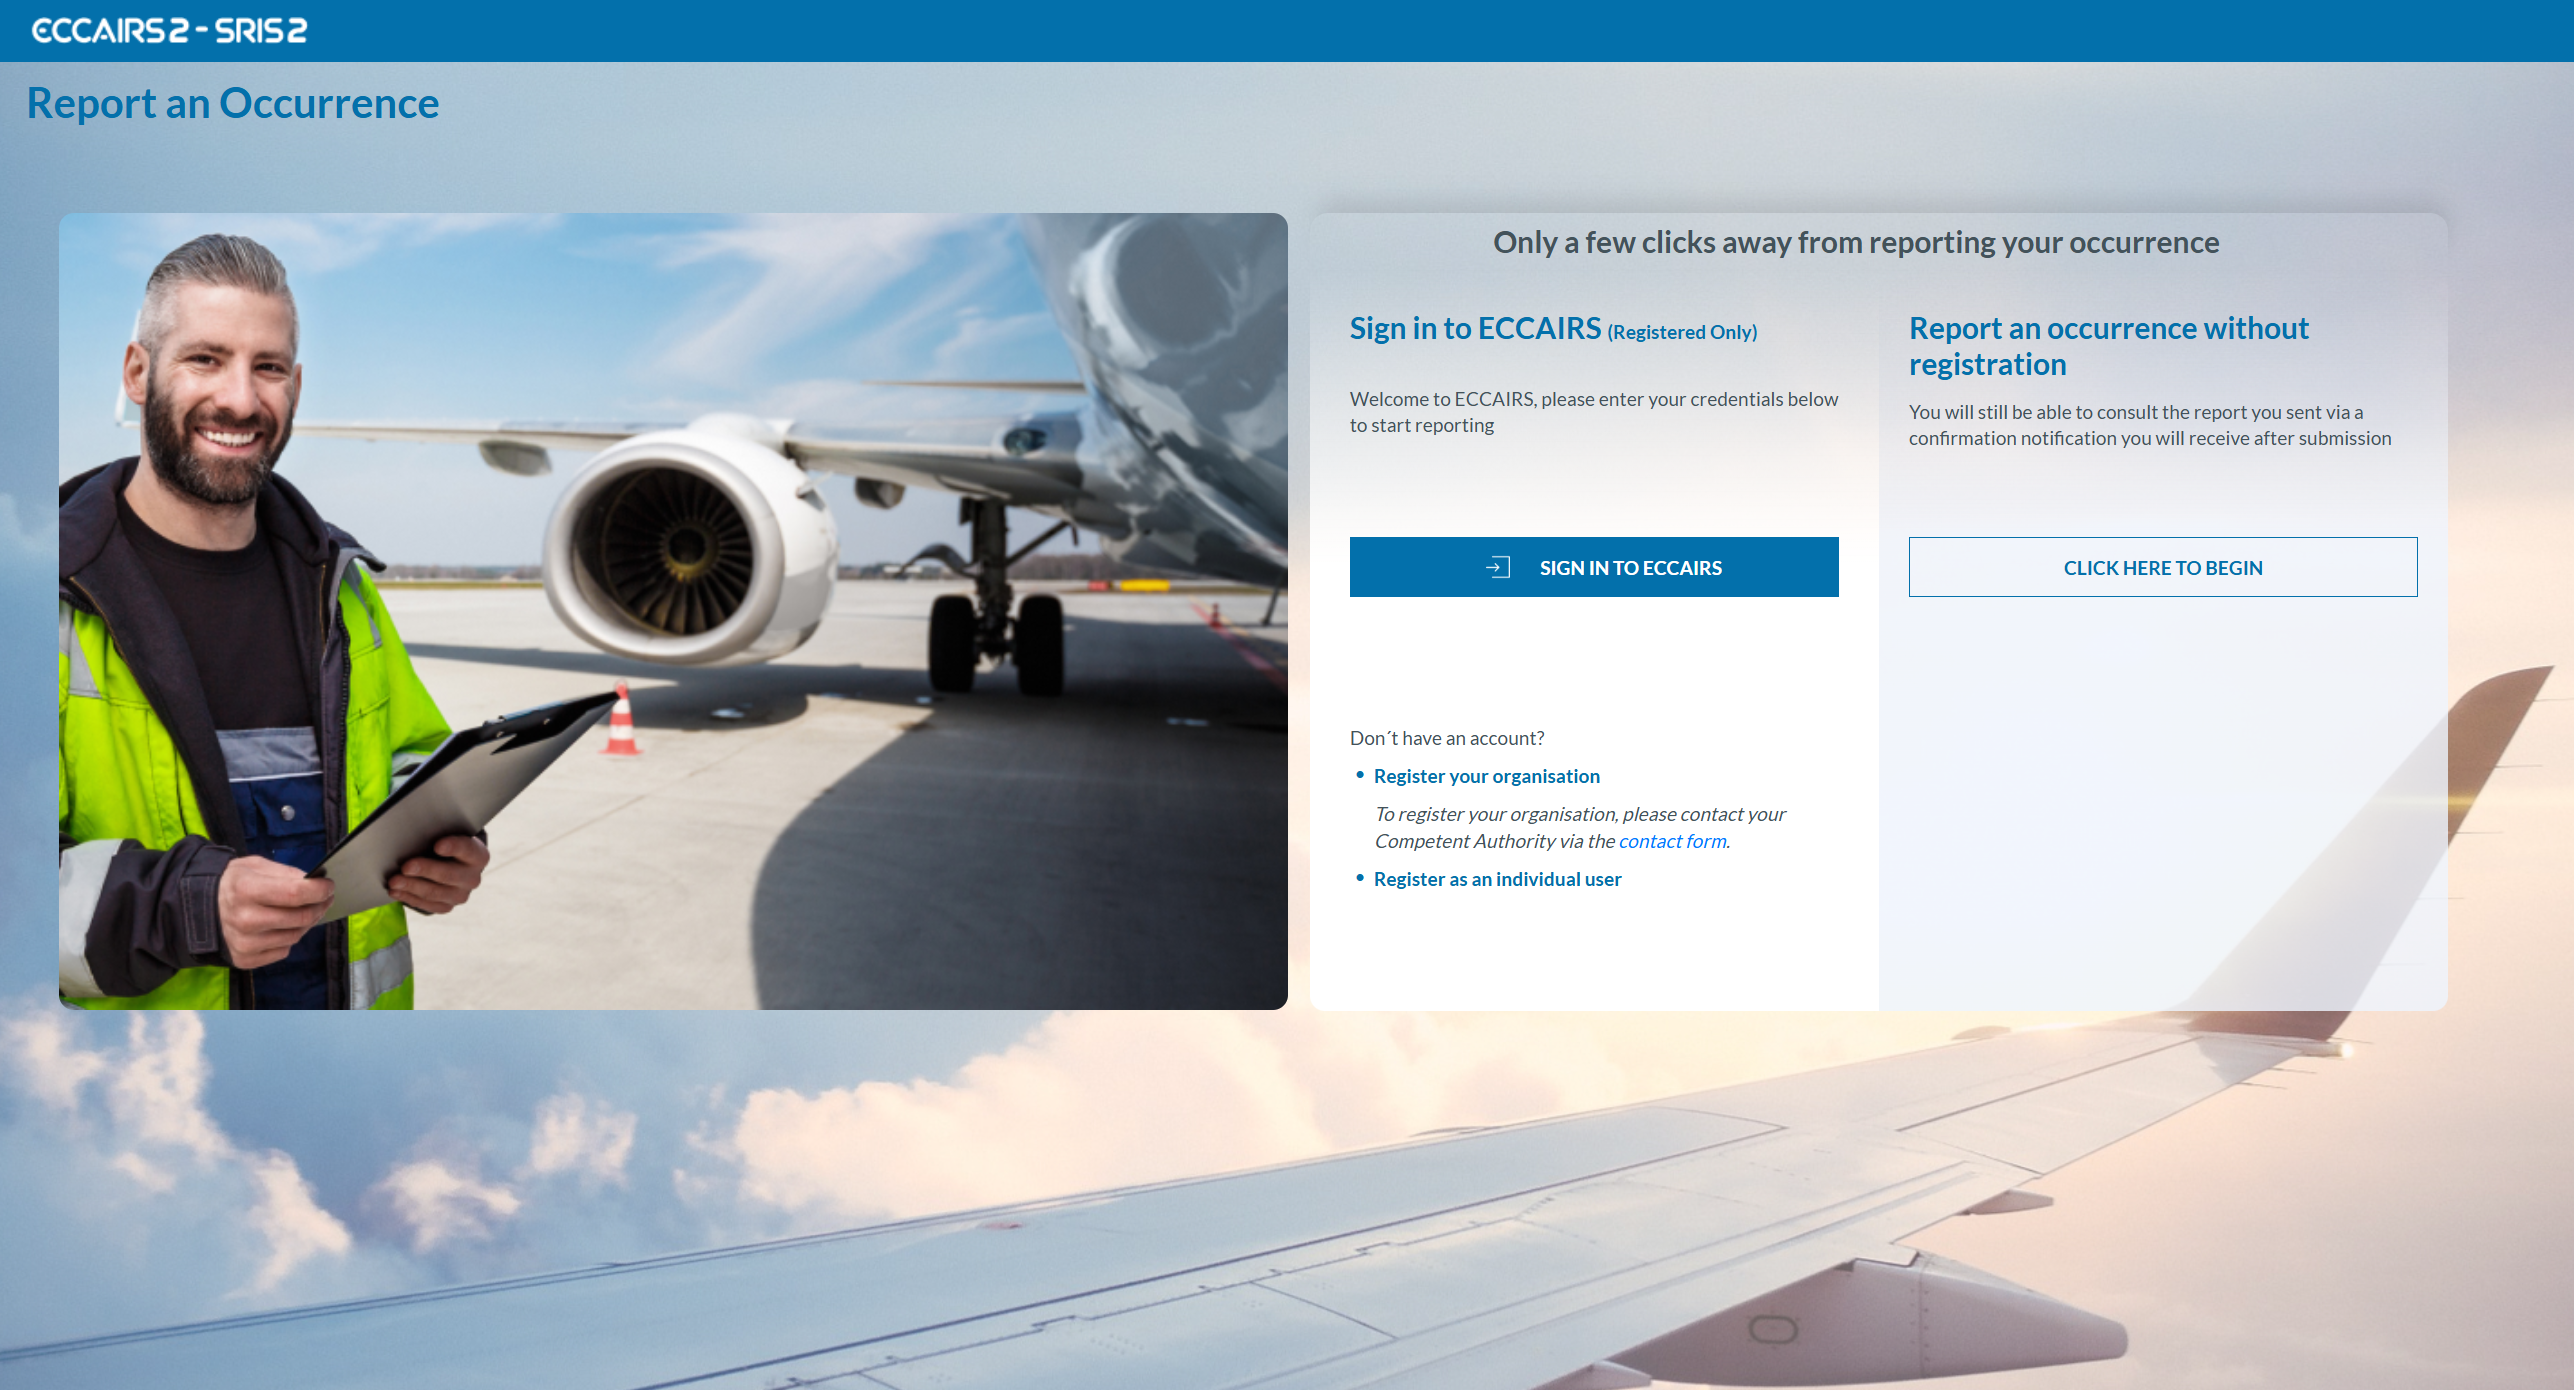
- Click on 'SIGN IN TO ECCAIRS'. You will be redirected to the following page:
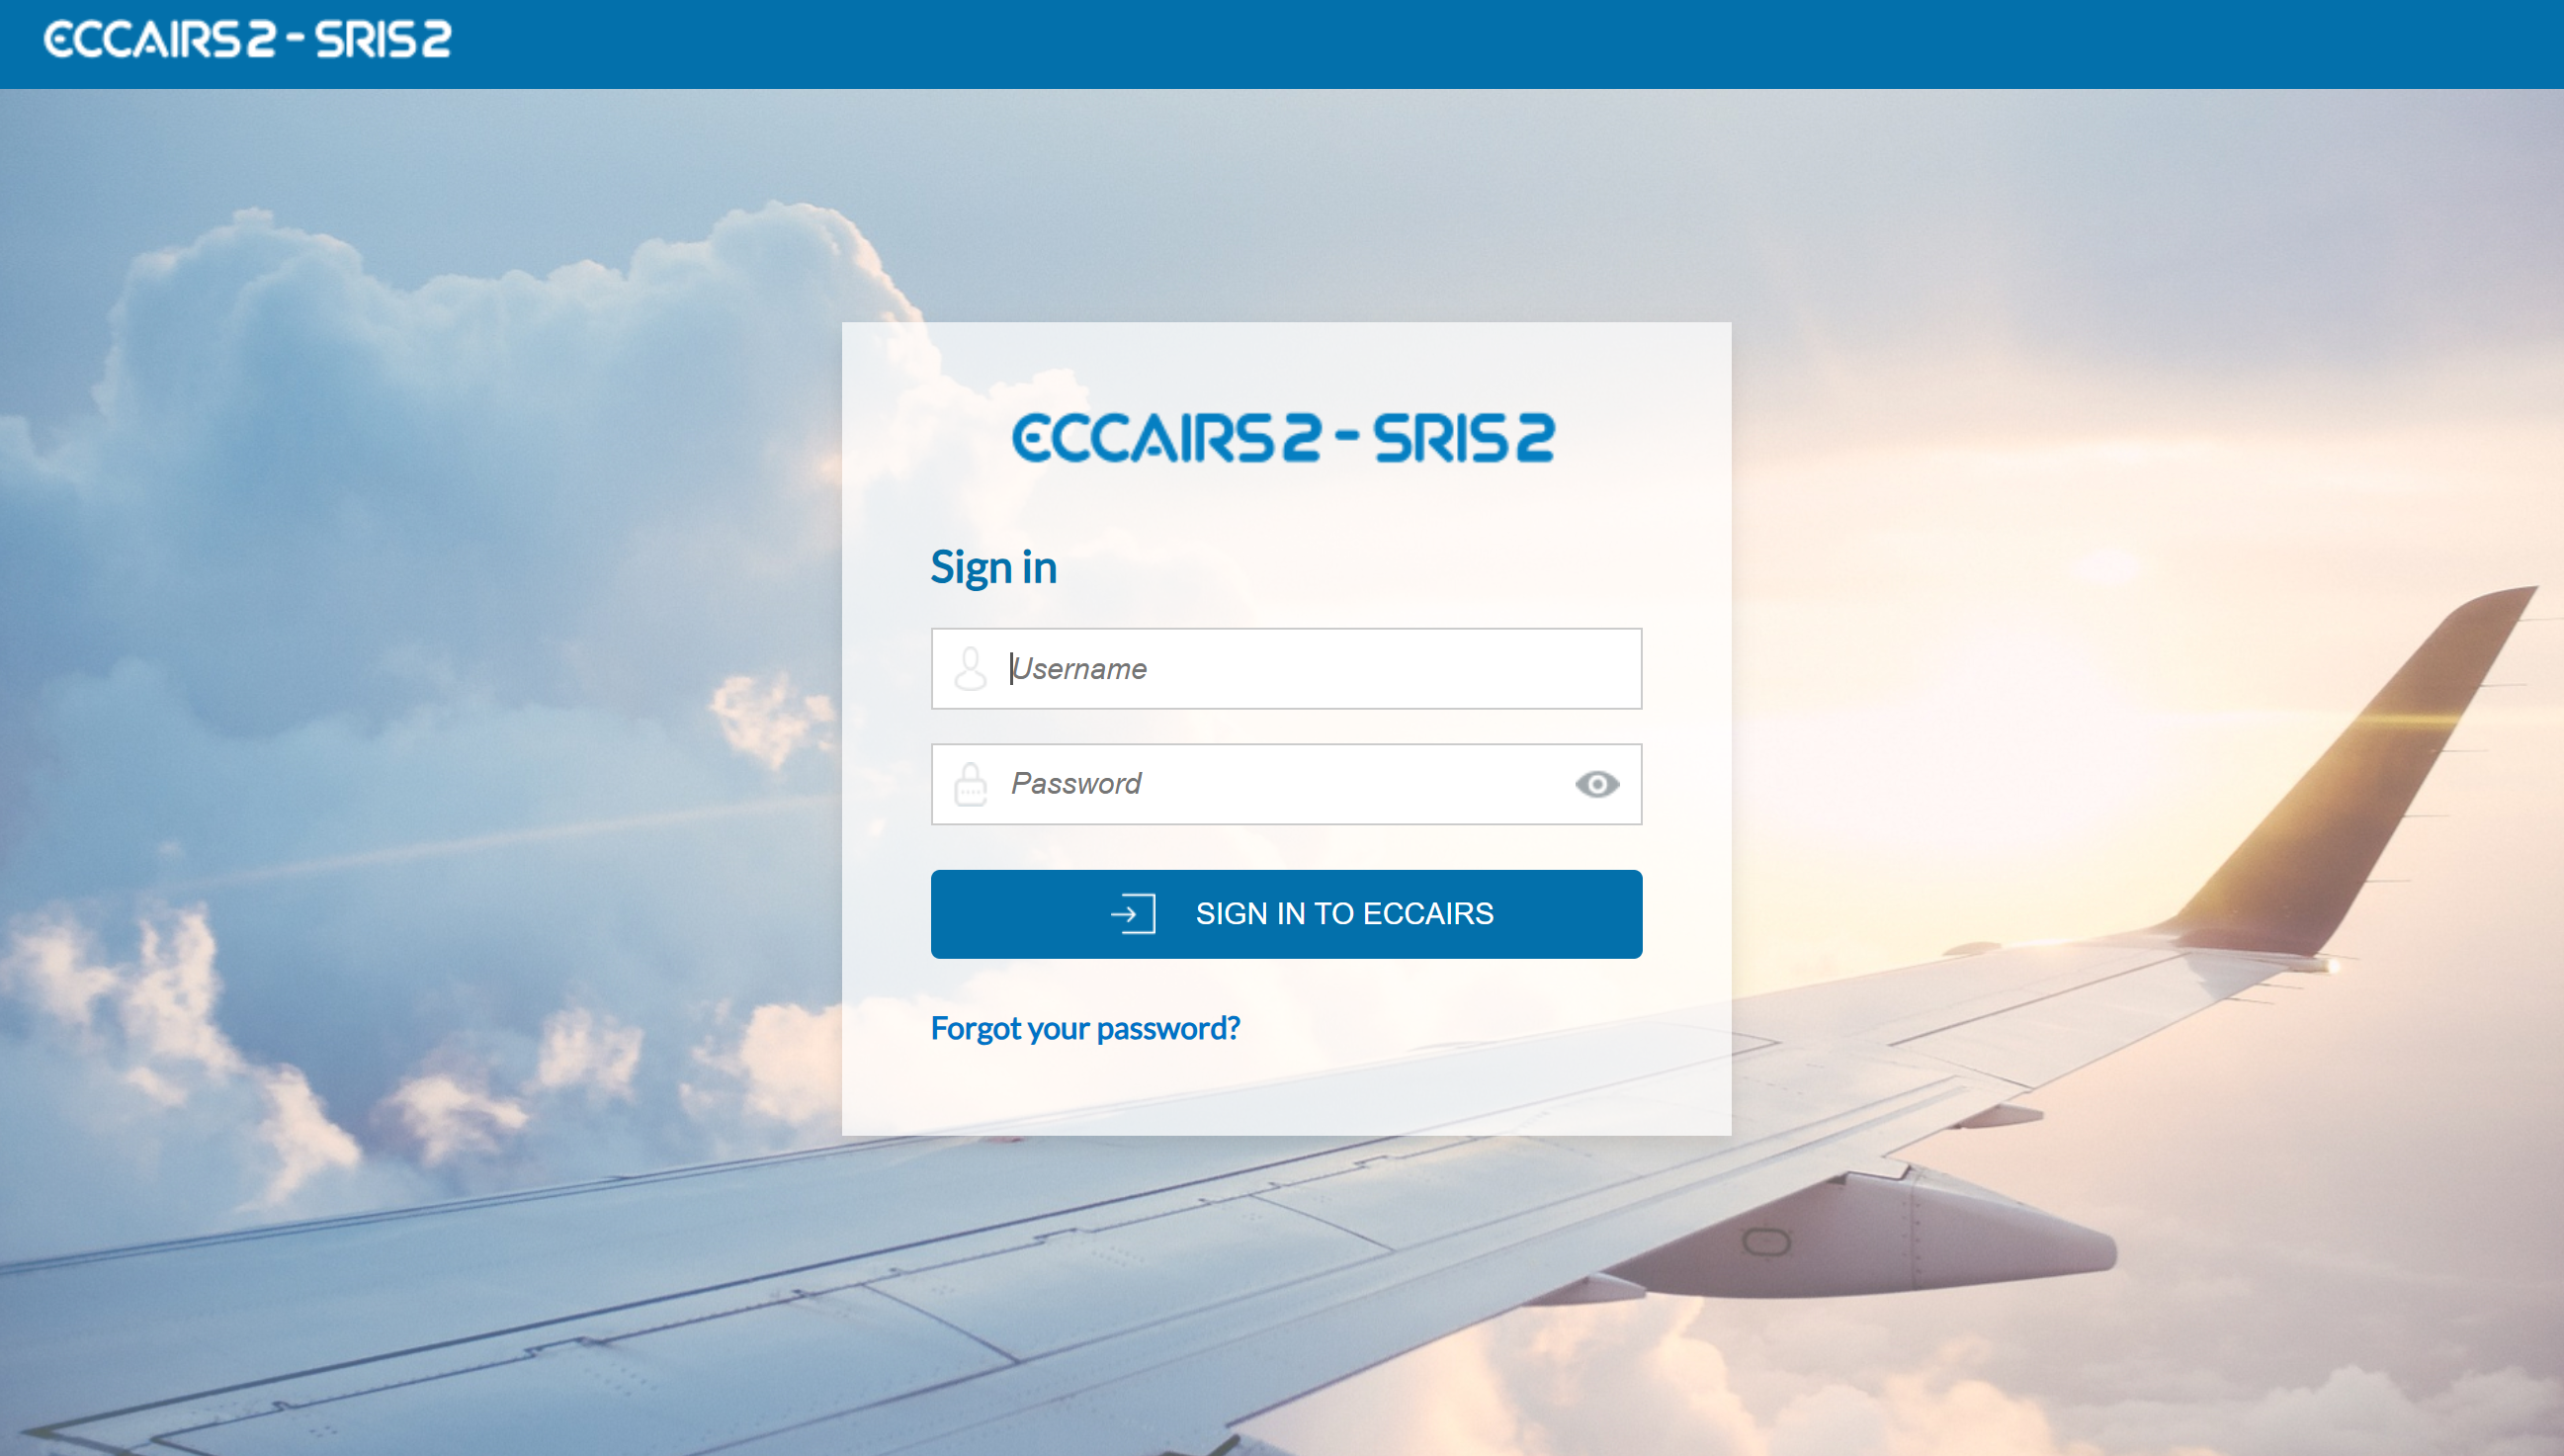
-
Click on the 'Forgot your password?' link and fill out your username (not your email):

- Click 'RECOVER PASSWORD'. You will receive an email with instructions on how to recover the password.
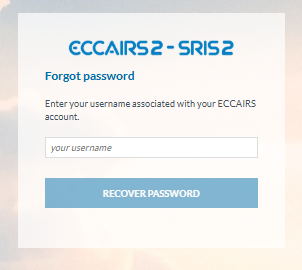
If you're already signed in, you can reset your password via your user icon:
- Click 'Reset password' The system will display:
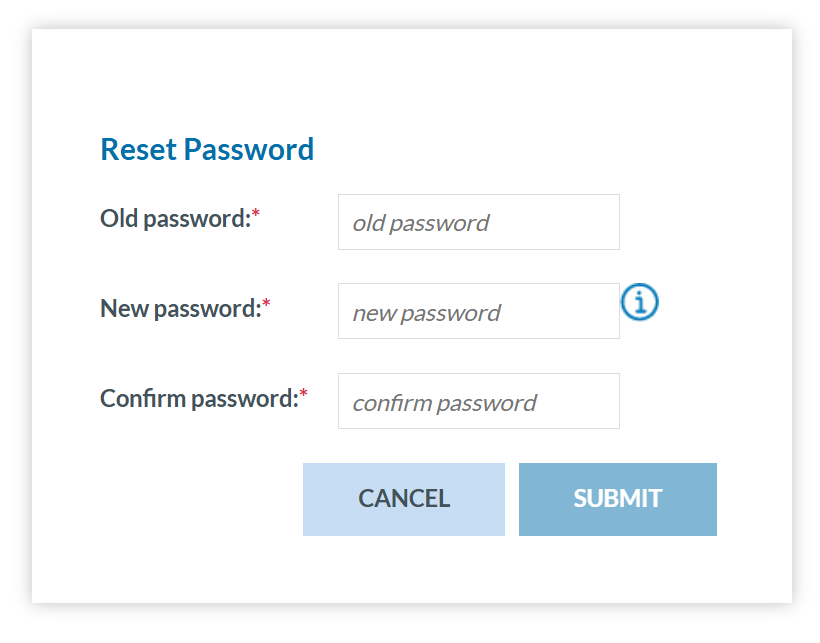
- Fill-in the formular and click 'SUBMIT'.
Home
Registered users can access the list of reports by clicking on 'Home':
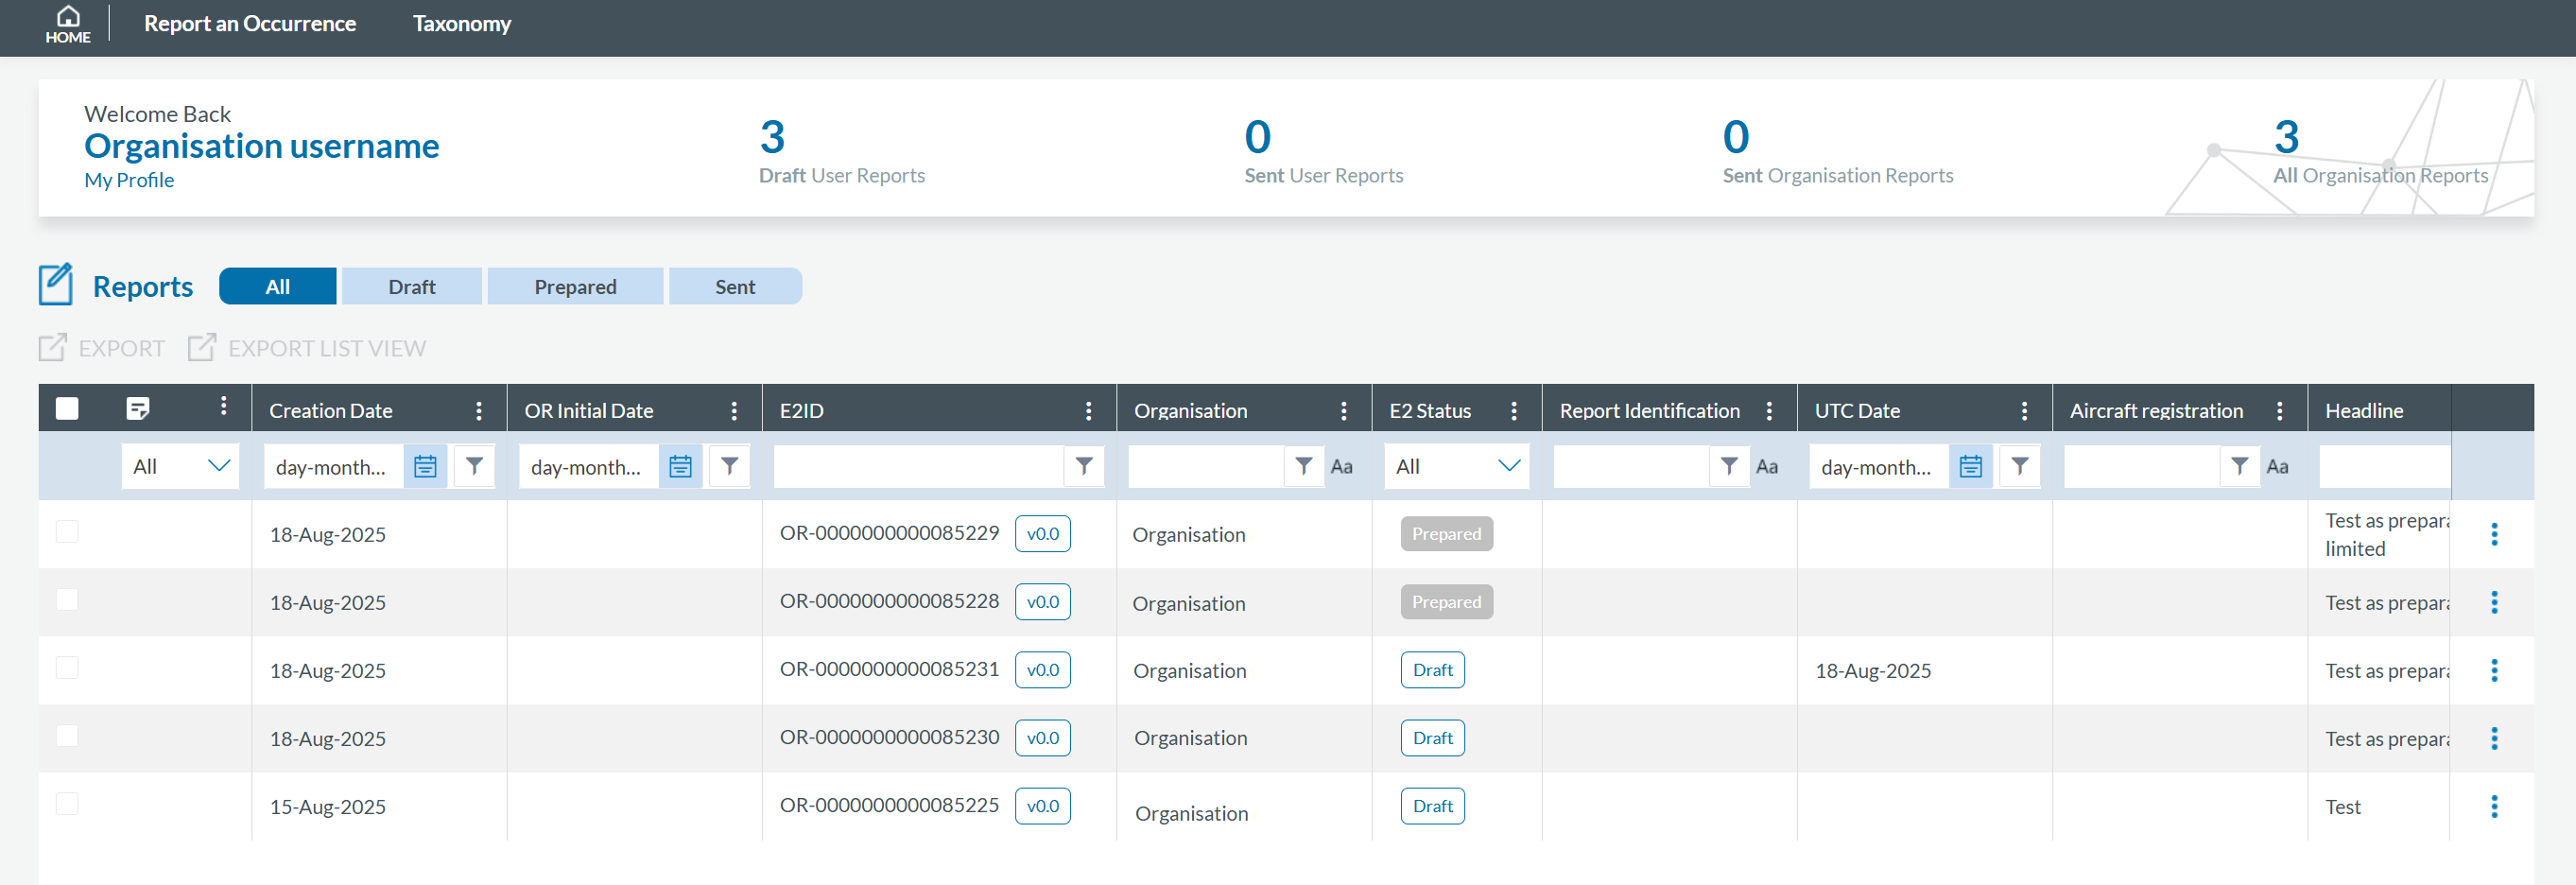
· Number of Draft User Reports;
· Number of Sent User Reports;
· Number of Sent Organisation Reports (only for organisations):
· Number of Organisation Reports (only for organisations).
Opposite to the tabs, the system displays the following buttons:
· Upload PDF (for individual reporters)/ Upload E5X/PDF(for organisations);
· E5X Results (only for organisations);
· E5X Validation Results(only for organisations).
Below, the system displays the Table of Reports with columns also working as filters, which are attributes or metadata of the reports.
The Reporter can alter the position of each column by dragging and dropping them.
Next to the title of each column, there is a 3-dot menu through which the Reporter can filter the columns to be displayed:
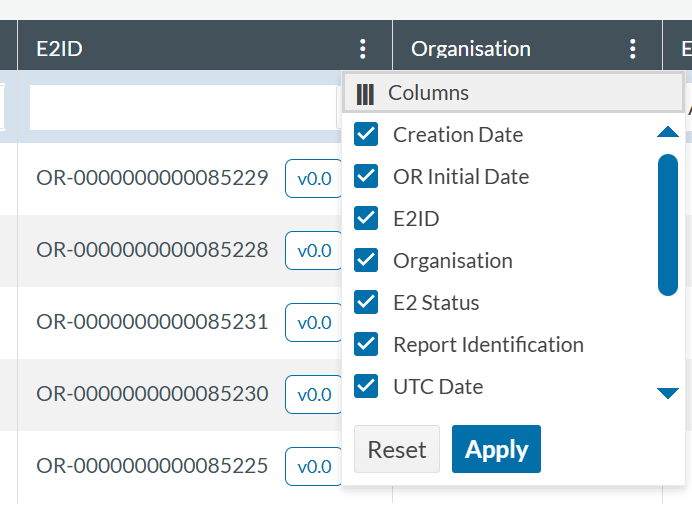
Another customization of the List of reports is explained in Section Custom Columns
The status of Original Reports can be:
- Sent: Reports that have already been submitted to the competent authority by the user.
- Draft: Temporary documents the user is currently working on. When a report is in Draft status, only the Reporter who created it can access and modify it. For other Reporters, the report is locked and displays the following icon in the report list:

Organisation Administrators can delete Drafts created by other Reporters within their organisation.
- Prepared: Reports created by users with the Preparator or Preparator Limited role that have not yet been submitted to the competent authority.
All the rows of reports are preceded by a checkbox to select the records. Organisation Administrators can also perform a multiple selection per page through the checkbox located on the left corner of the table, before the heading of the columns:

Next to this check box, the first column is the ‘Authority Comments’:
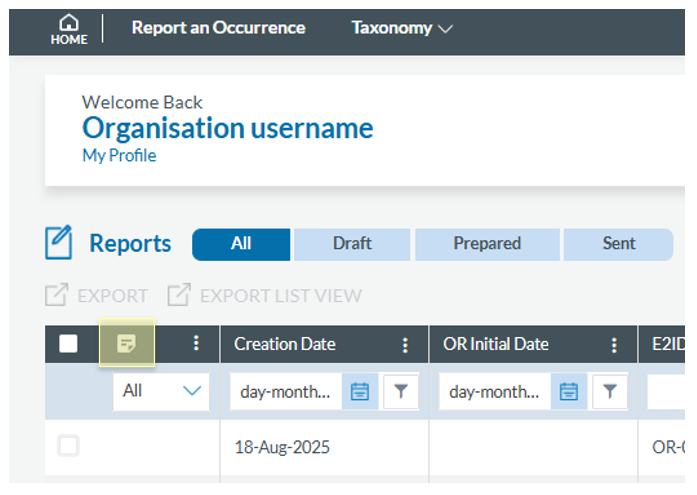
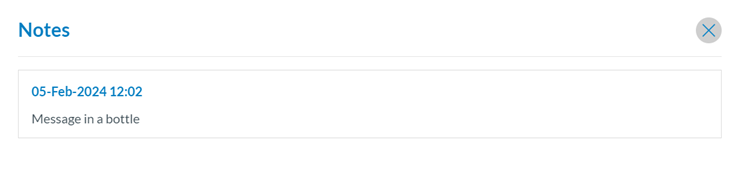
This column can only be filtered by 'Yes' or 'No' option. It displays the OR that have received a comment from the Authority. By clicking in the icon in each row, the user can open the comment the OR has received. These comments cannot be replied to and are displayed in descendant chronological order.
Above the table of Reports, the system displays an ‘Export’ link. This feature is detailed in Export Reports section.
The system displays a kebab menu in the last section of each table row:
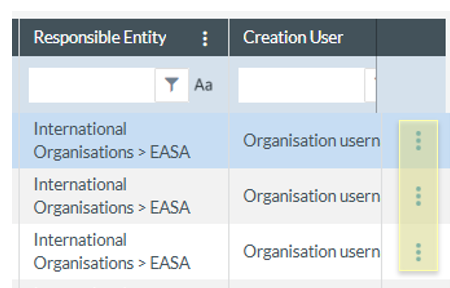
The options of this menu vary depending on the status of the report.
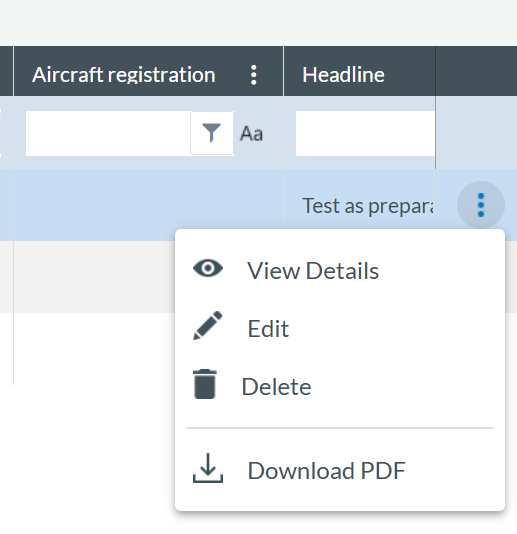
- View Details
- Edit
- Delete
- Download PDF
At the top of the report list, you'll find the options for 'EXPORT' or 'EXPORT LIST VIEW'.
View Details
As a registered user, you can access OR details directly from the report list by clicking on the 3-dots menu of the specific report in the list and click on ‘View Details’:
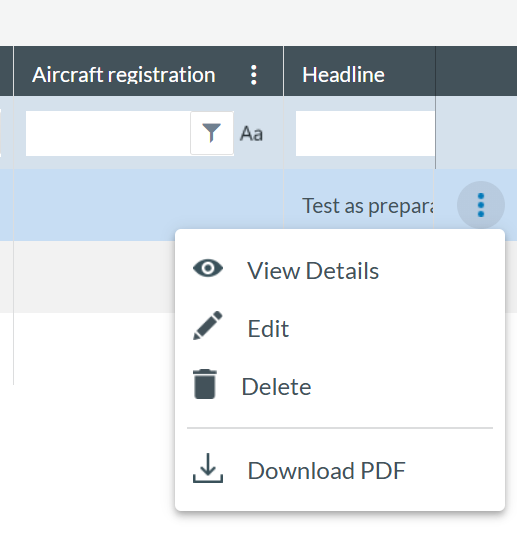
Alternatively, you can double-click on any field of the report on the list of reports, and the system will show the webform of the specific report:
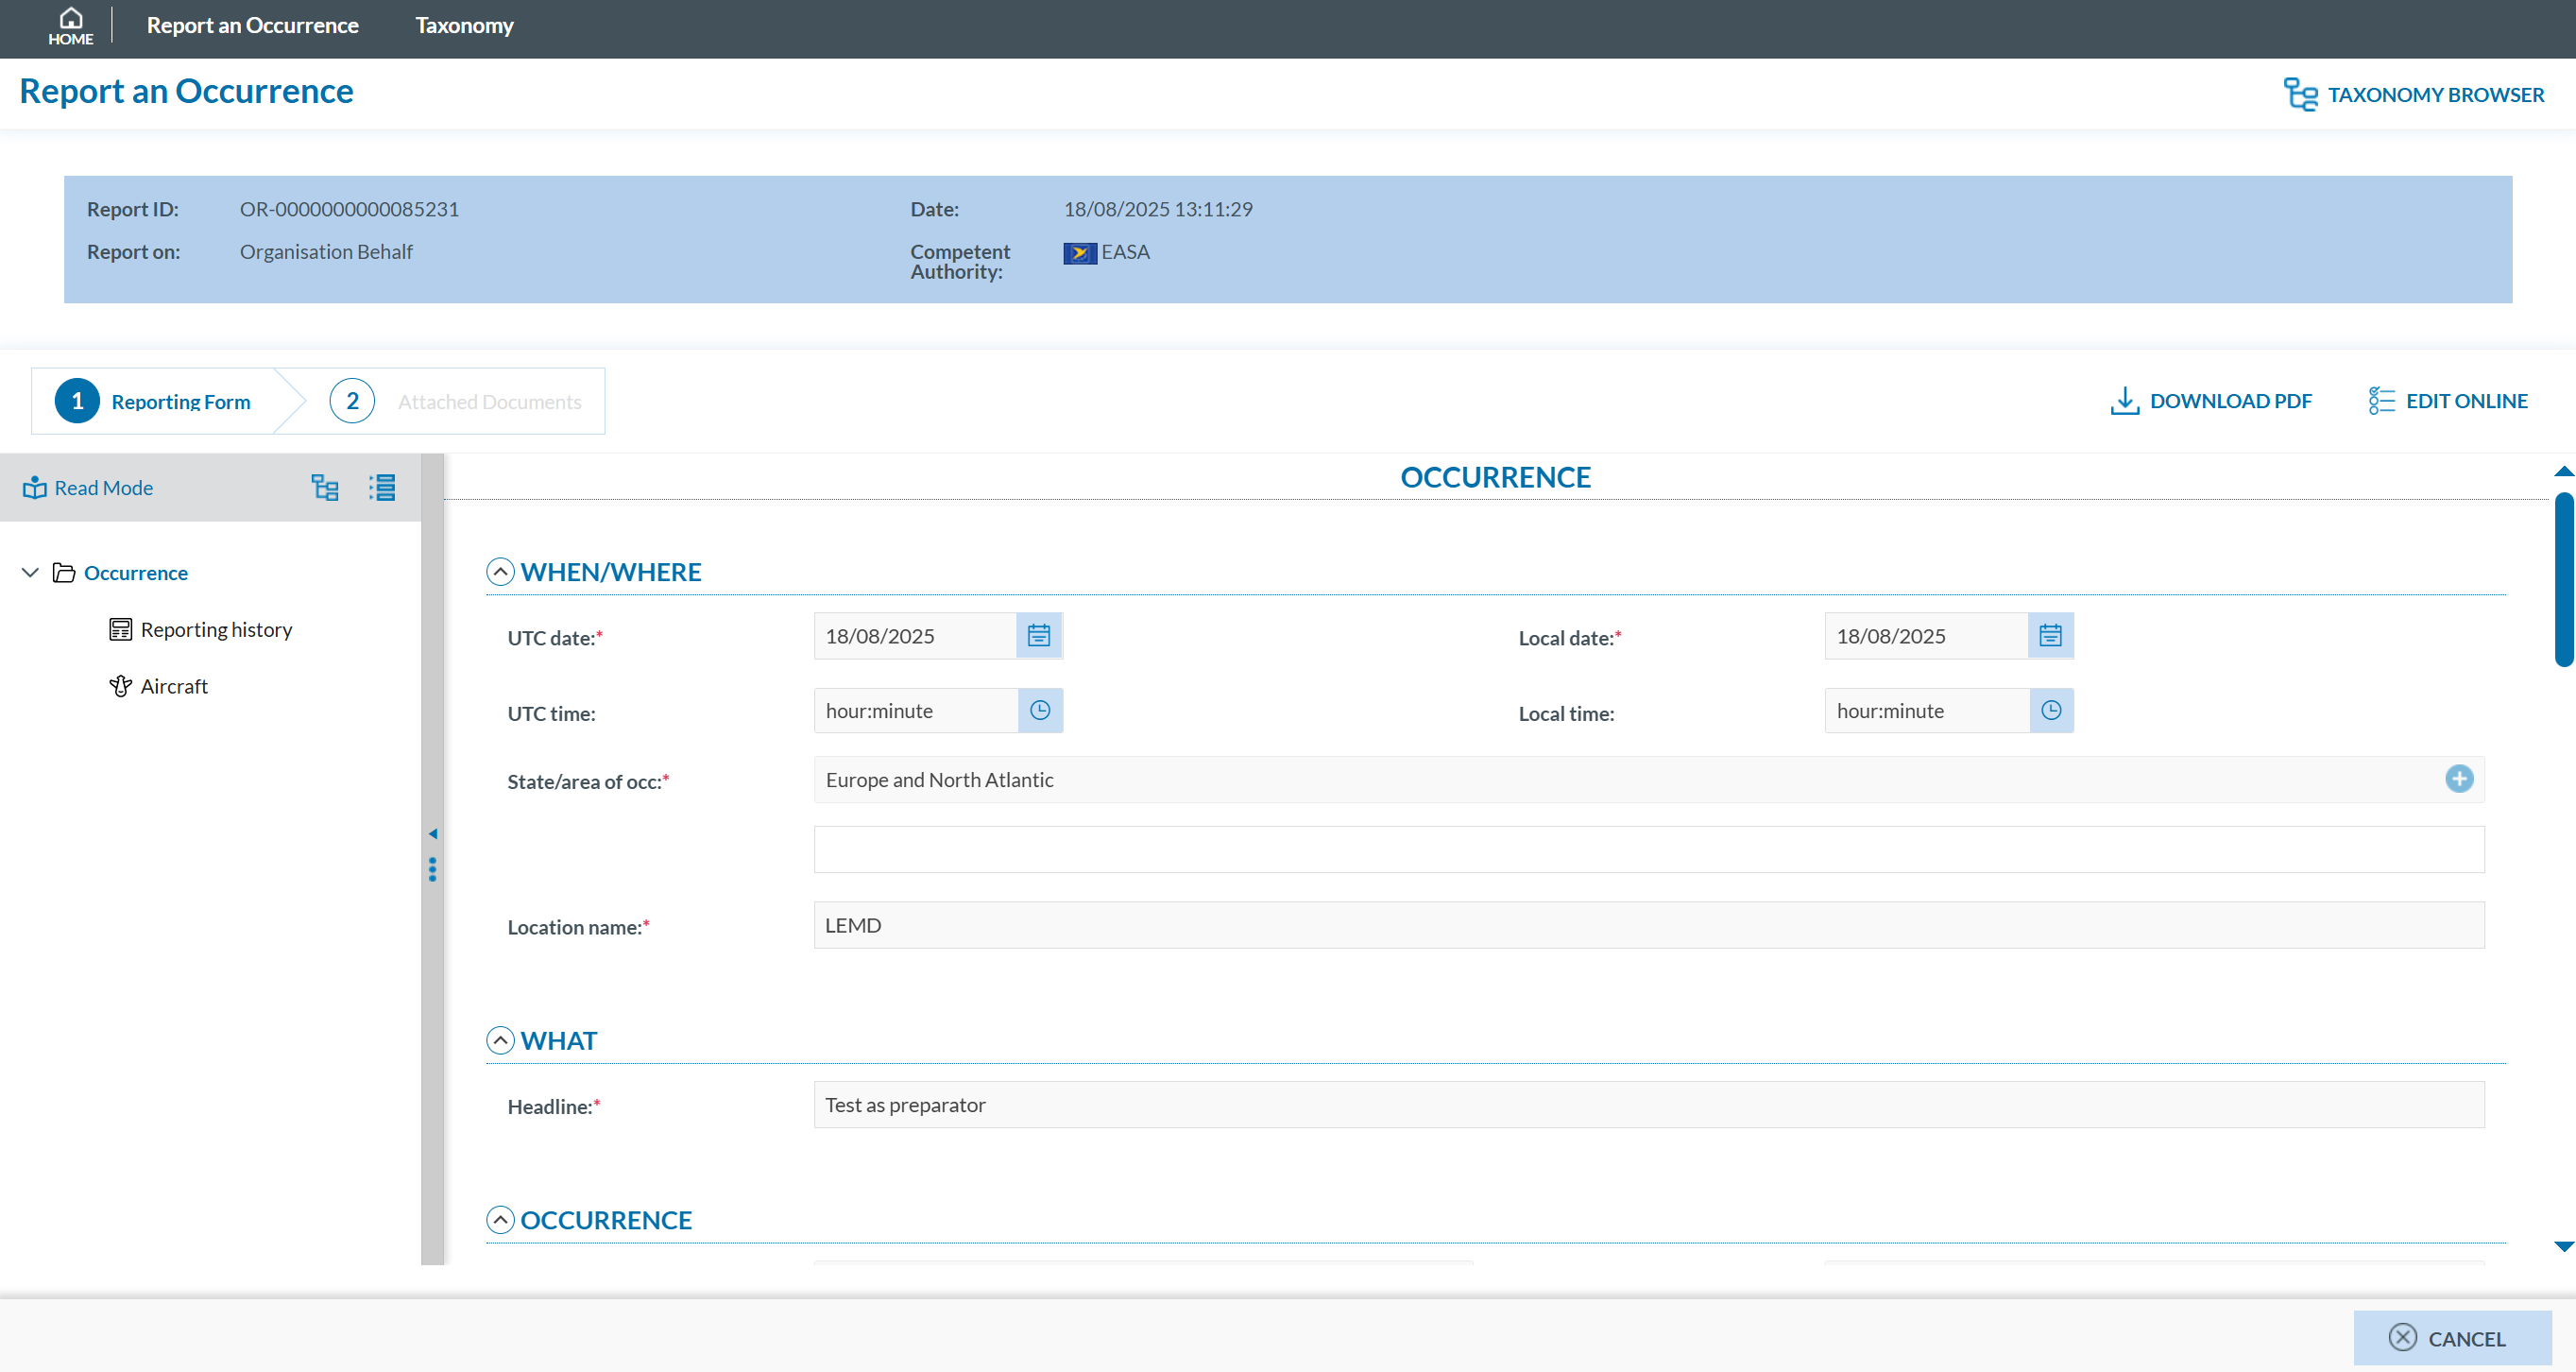
On top of the page the system displays the following information:
· Report ID;
· Report on: if it is an Organisation or not.
· Date;
· Competent Authority.
Below the Reports information, the system displays the Report webform (Reporting form tab).
You can click on the ‘DOWNLOAD PDF’ button if you want to access the report in PDF format or click on 'EDIT ONLINE' if you intend to update the fields through the web form. If this is the case, the system will make the form editable; see Edit a report section for further details.
On the left of the page, you can click on 'Read Mode'. The system will display the report as a printable page:
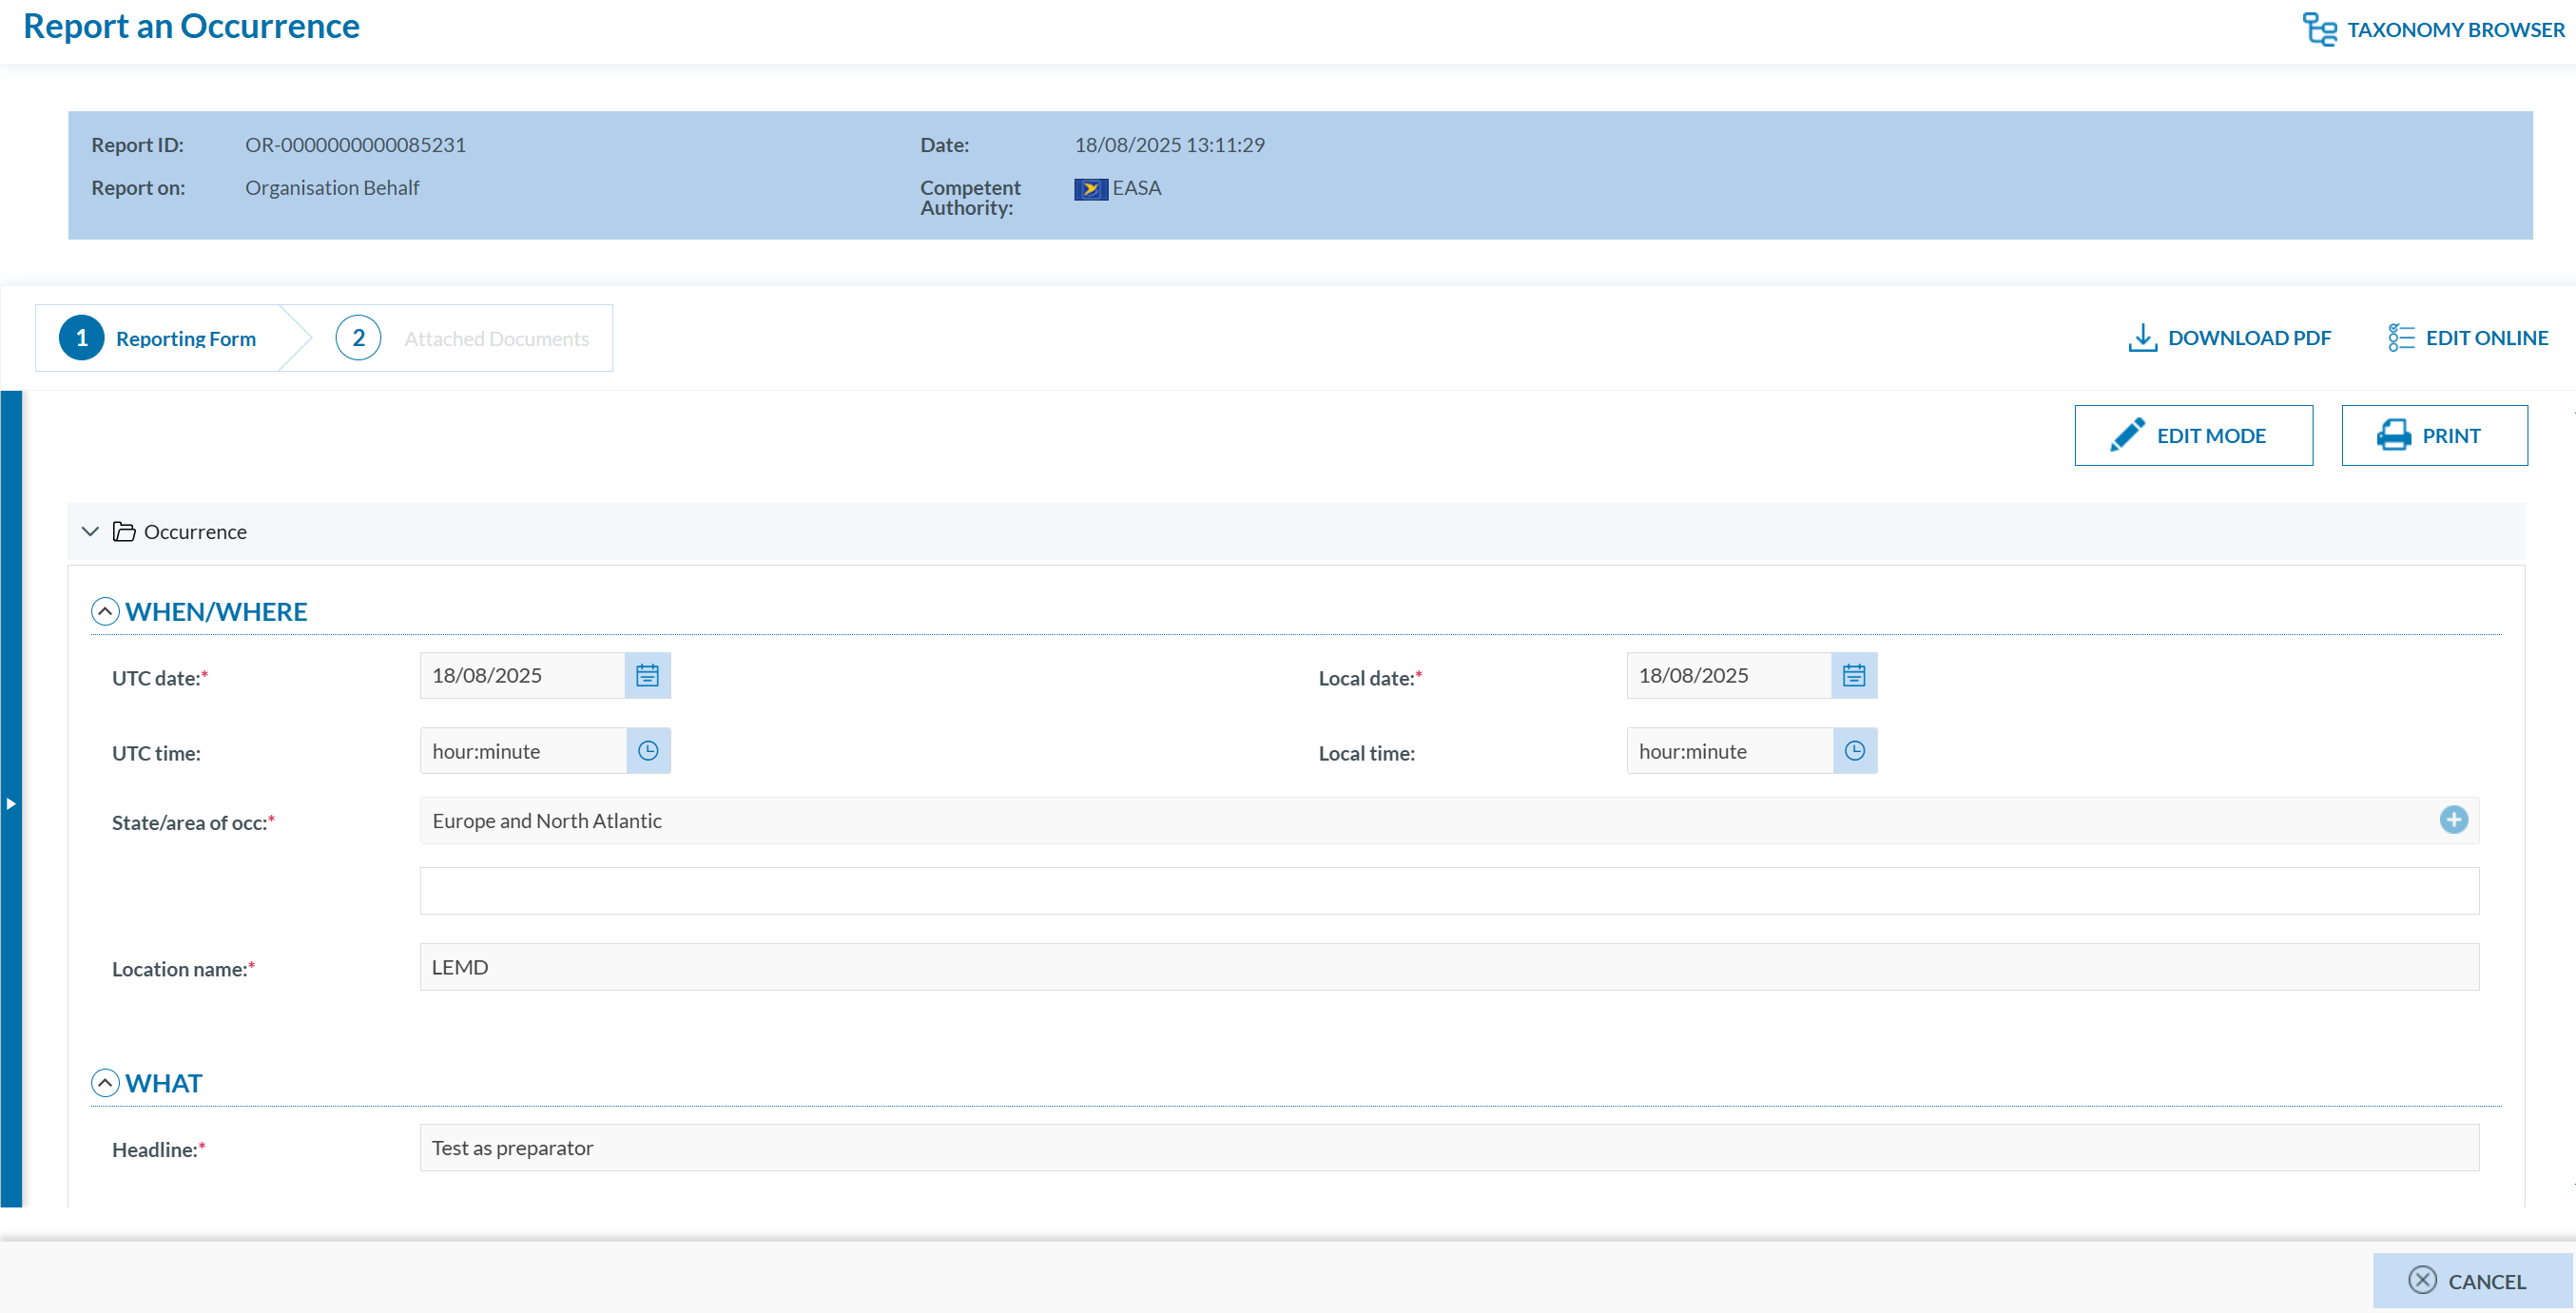
You can click on the 'PRINT' button to print the complete report, and as in the previous page, you can download a pdf of the report through the 'DOWNLOAD PDF' button or update the report through the 'EDIT ONLINE' button. Click the 'EDIT MODE' button to return to the previous page.
Edit
As a registered user, you can edit an OR from the report list by clicking the 3-dots menu next to the specific report and selecting 'Edit'.
Note that if the status of the report is ‘Sent’, the system will display the following message:

Once you confirm the action, the report will open in a web form where you can make your changes.
At the bottom of the page, four options are available:

- ‘CANCEL’ leaves the edition page without saving any changes made to the document. A confirmation message is displayed.
- ‘SAVE AS DRAFT’ saves the document with status Draft and it reflects the changes made (if any). This blocks the document so no other Reporter can work with the document until the draft is either discarded or submitted.
- ‘DISCARD DRAFT’ closes the edition of the document and deletes the Draft so the document is no longer blocked.
- By clicking the ‘CONTINUE’ button, the system will display the ‘ATTACH DOCUMENTS’ page. See Online section for further details on how to finish the process.
You can click ' DOWNLOAD PDF ' instead of editing the report in the web form. The document is downloaded in a PDF file with all the information so you can edit the corresponding fields and save the changes. After this, you can click on ‘UPLOAD PDF’. See Offline section to see how to finish the submission process.
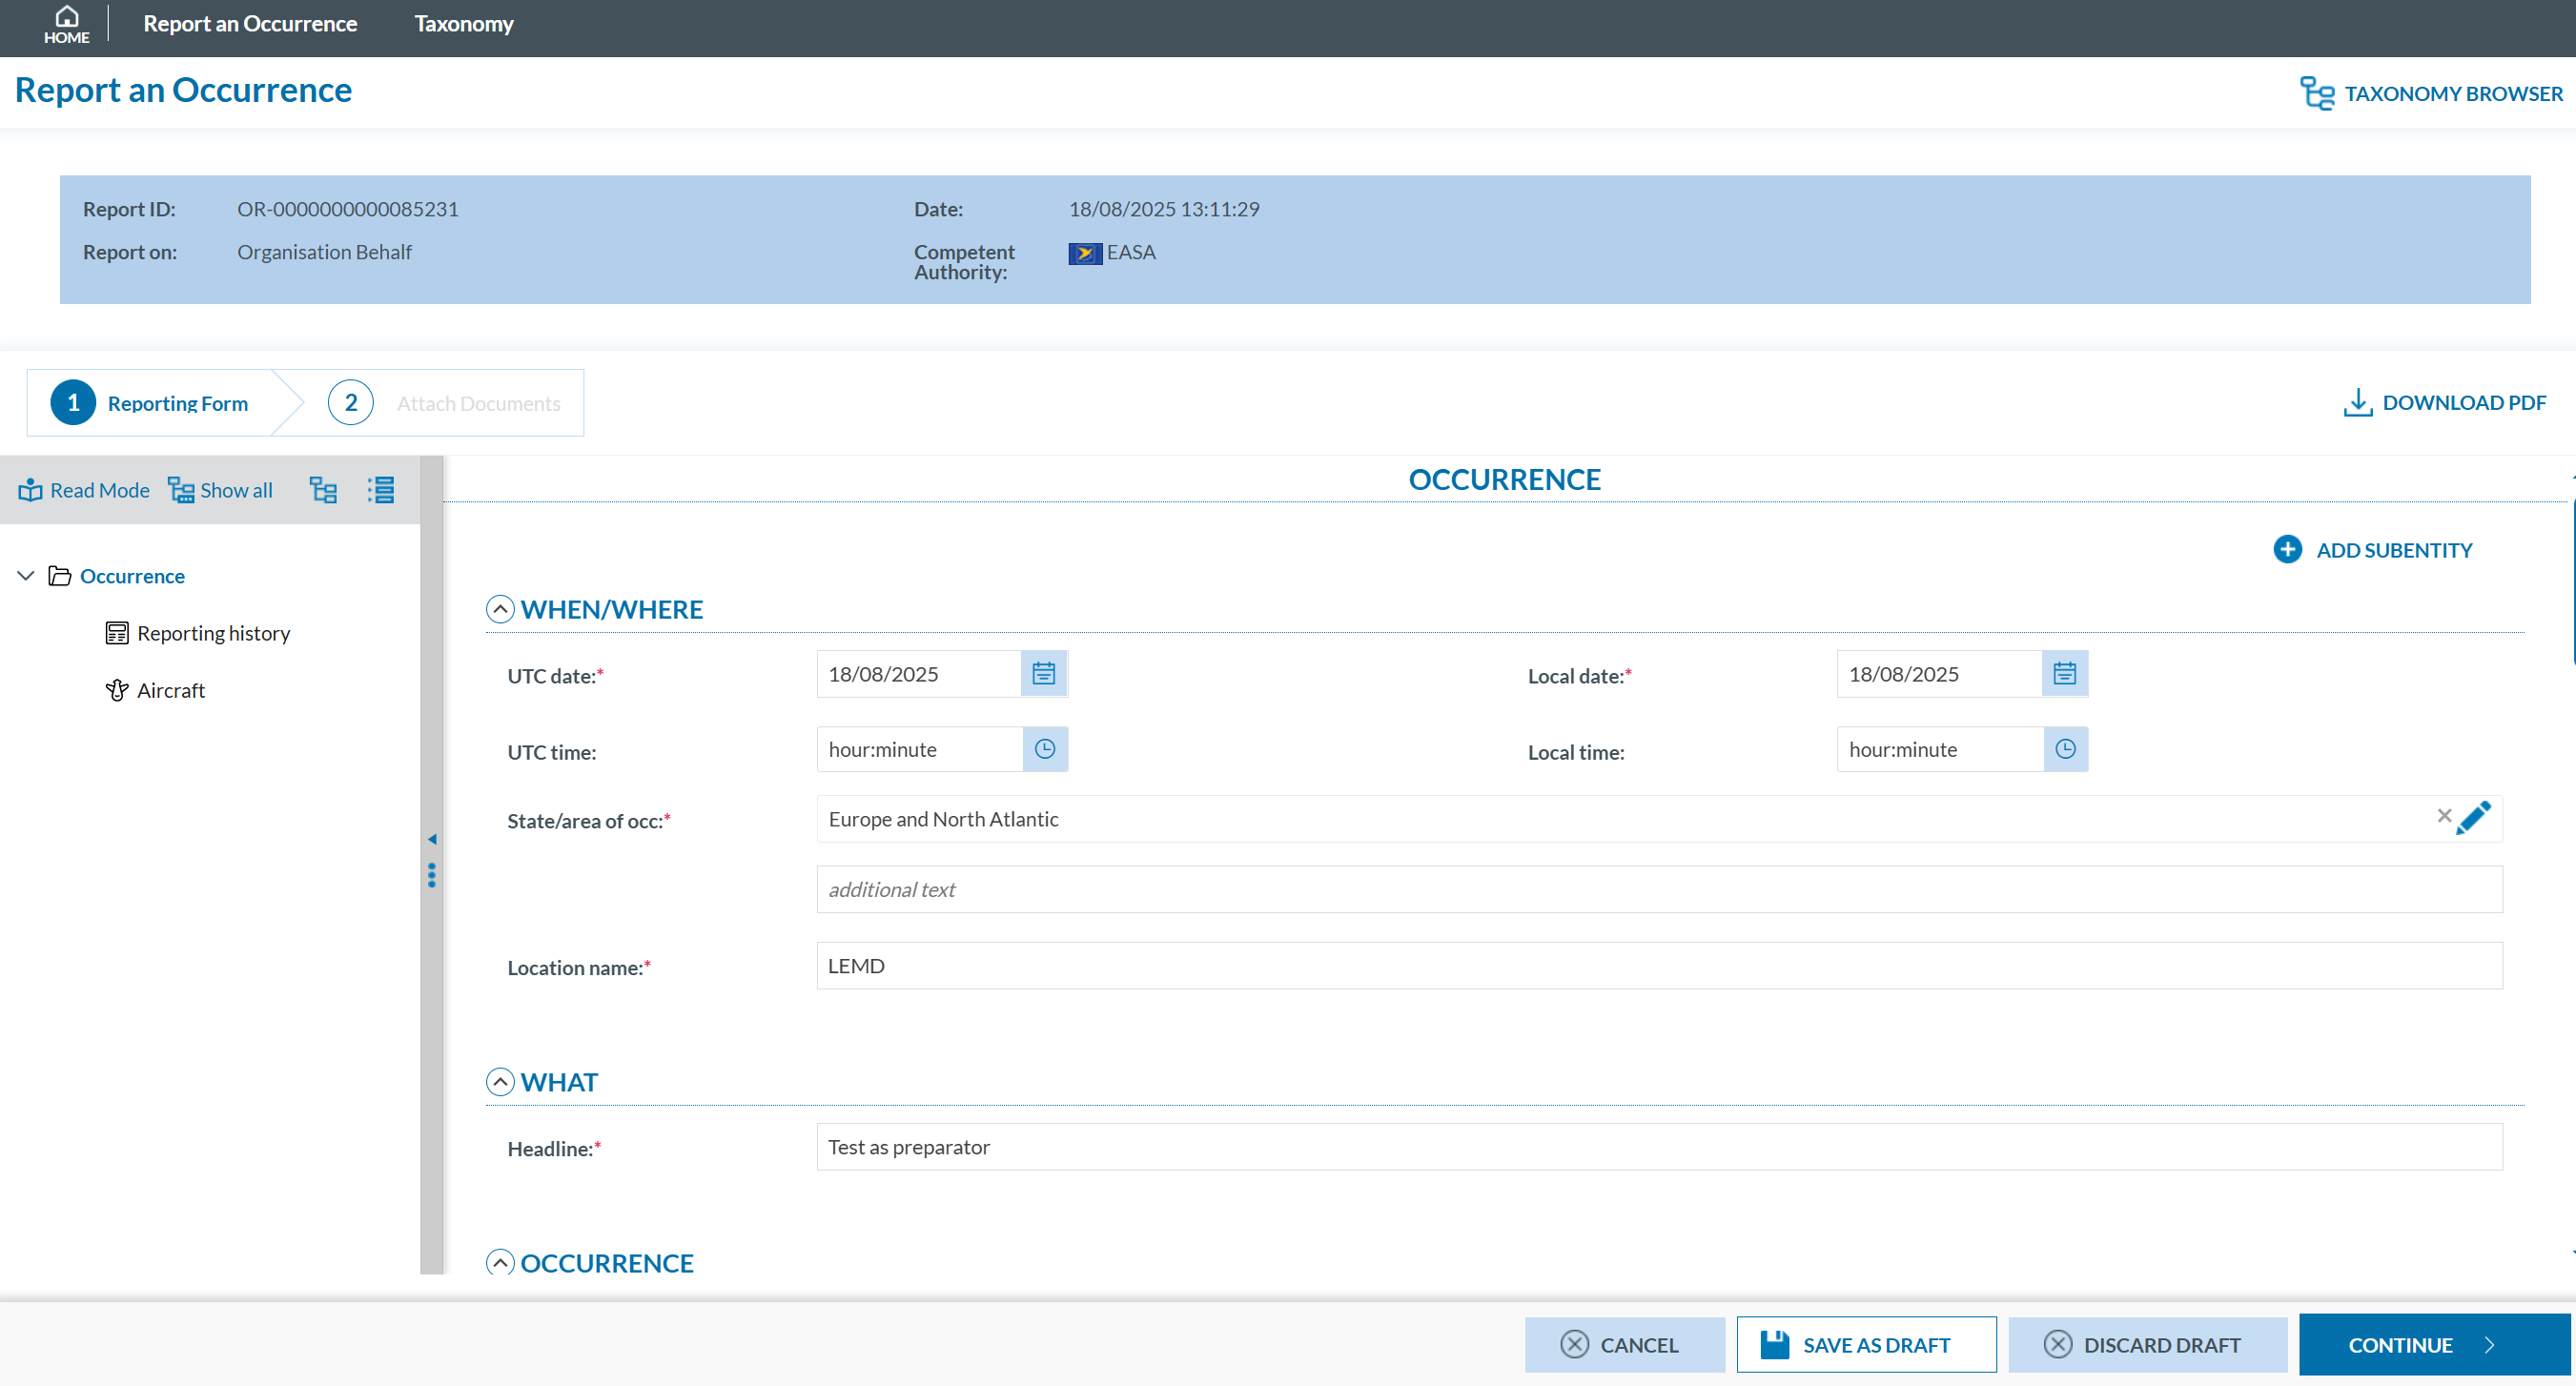
You can also edit the report via the editing options accessible through the ‘View Details’ feature.
Delete
As a registered user, you can delete an OR from the report list by clicking the 3-dots menu next to the specific report and selecting 'Delet'.
The system will display the following message:
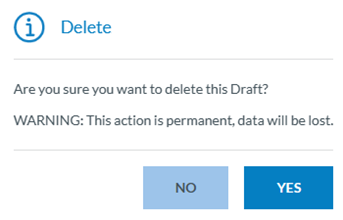
When you click on 'Yes', the report will disappear from the list of reports.
Download a PDF
As a registered user, you can download a PDF file from an OR reportby clicking the 3-dots menu next to the specific report and selecting 'Download PDF'.
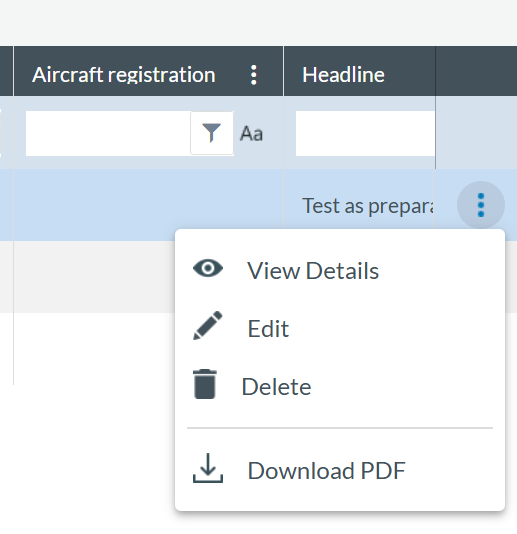
The system will download a PDF of the report that you can edit or save it.
This Download PDF option is also accessible through the following:
-
‘Edit a report’ feature. See Edit section for details and
-
‘View details’ feature. See View Details section for further details.
Export
As a registered user, you can click the check button on the left side of the specific report rows in the list, then click ‘EXPORT’ above the list. The system will display the Export window, where you can select either the CSV or Excel option and click ‘Export’.
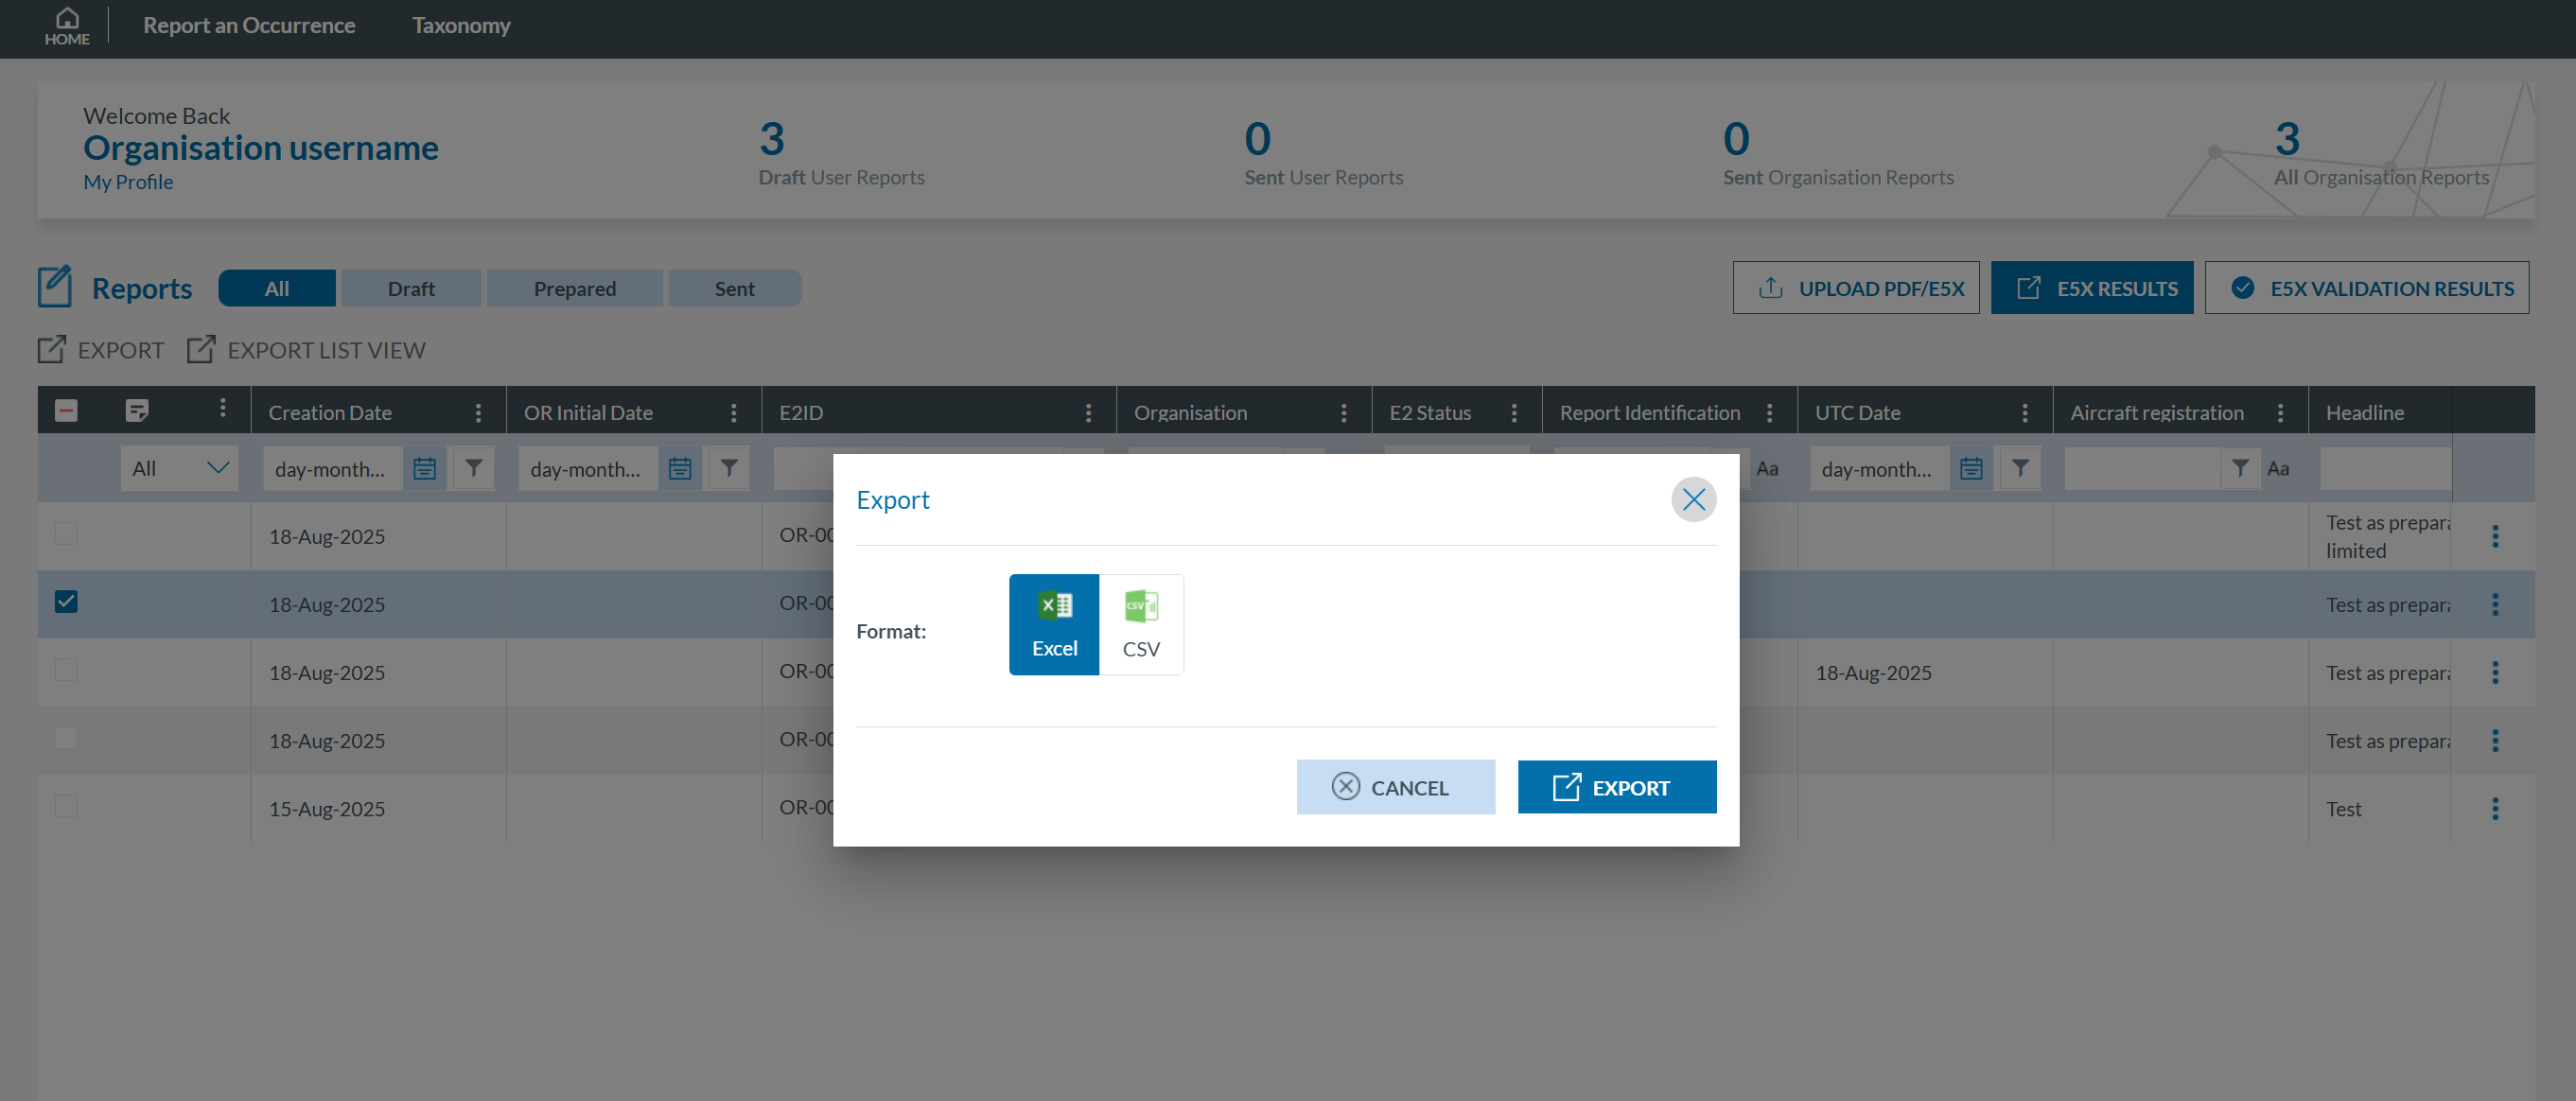
You can select multiple ORs by holding down the CTRL key.
The system will send you an email with a zip containing the file in the selected format with the reports.
Export list view
“The 'Export list view' option is equivalent to 'Export' (as explained above), but the exported file includes only the columns configured in the current view.
Taxonomy Browser
Taxonomy
The taxonomy is the catalogue describing what information can be stored in the reports and how this information is encoded in the data fields.
The ECCAIRS2 Taxonomy is publicly available and serves as the standard reference for all Occurrence Reports. Users can access the latest published version without registration. Additionally, Authorities may create custom taxonomies with tailored attributes, entities, or value lists, which require user registration to view.
Accessing the Taxonomy
To access the Taxonomy Browser you can follow this link: Taxonomy Browser.
Alternatively, you can access the Taxonomy Browser directly from the E2 Central Hub homepage:
- Click on 'REPORT AN OCCURRENCE' and then select 'Taxonomy' from the top menu:
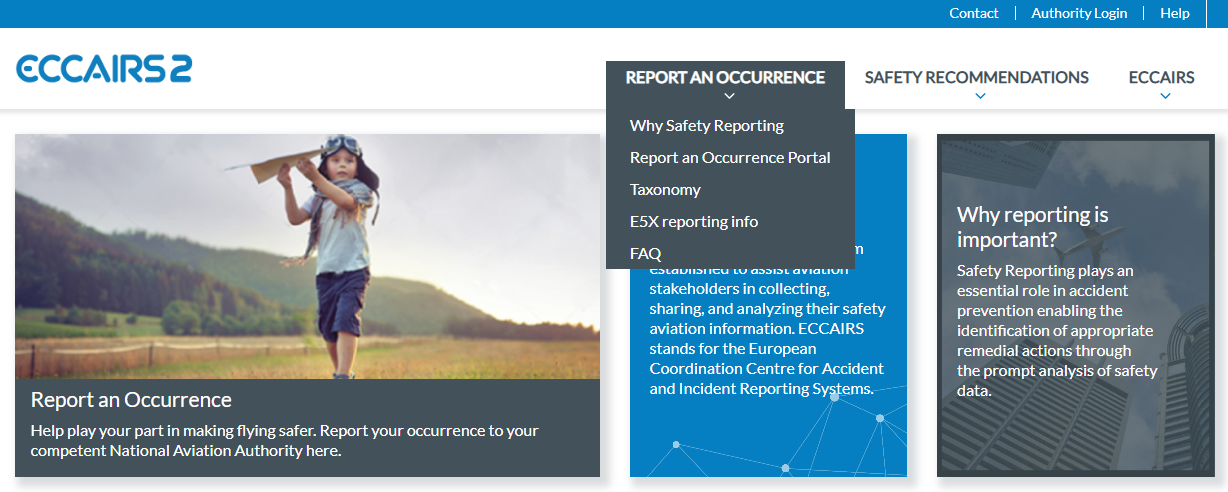
The system will display the ECCAIRS Taxonomy page with a link to the Taxonomy Browser:

-
Click on 'Taxonomy Browser'. You will be redirected to:
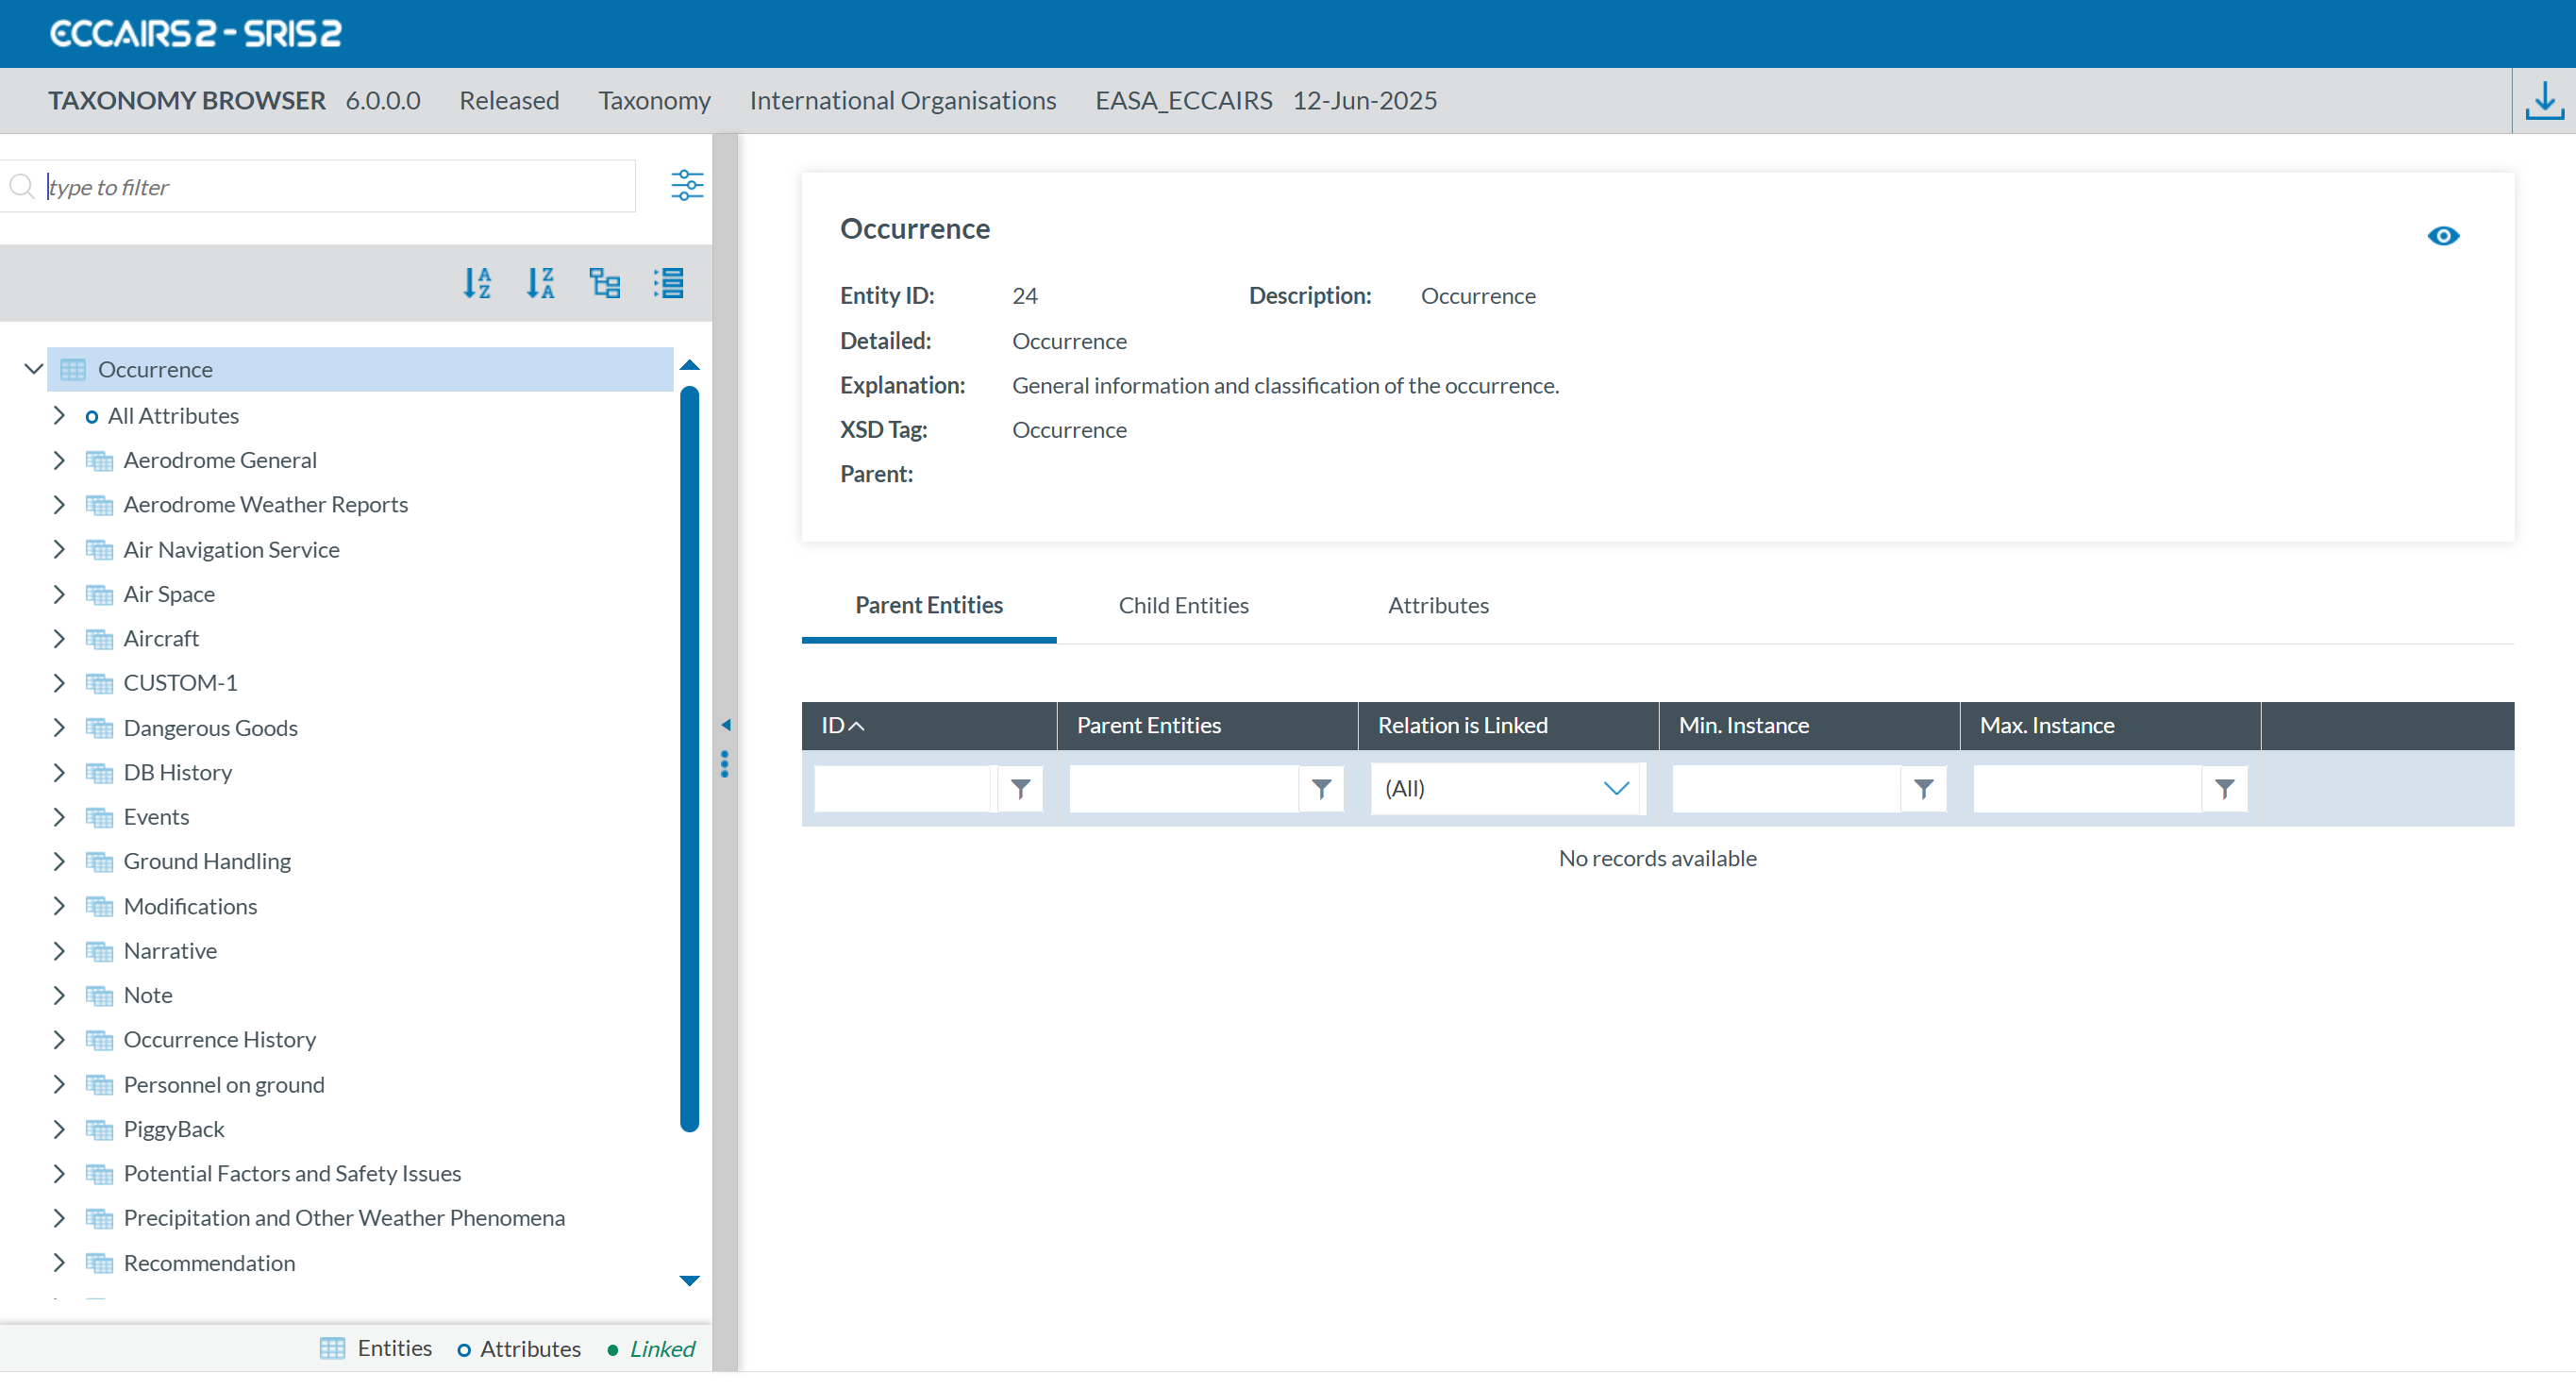
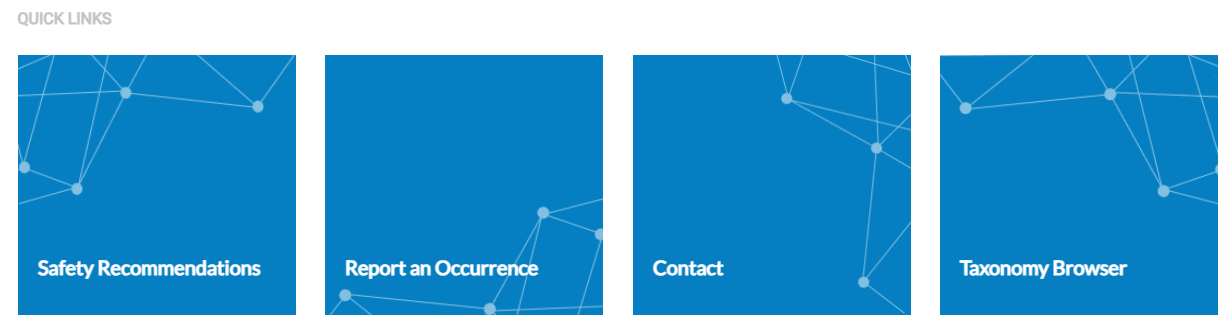
Quicklinks are also available at the bottom of the ECCAIRS Taxonomy page:
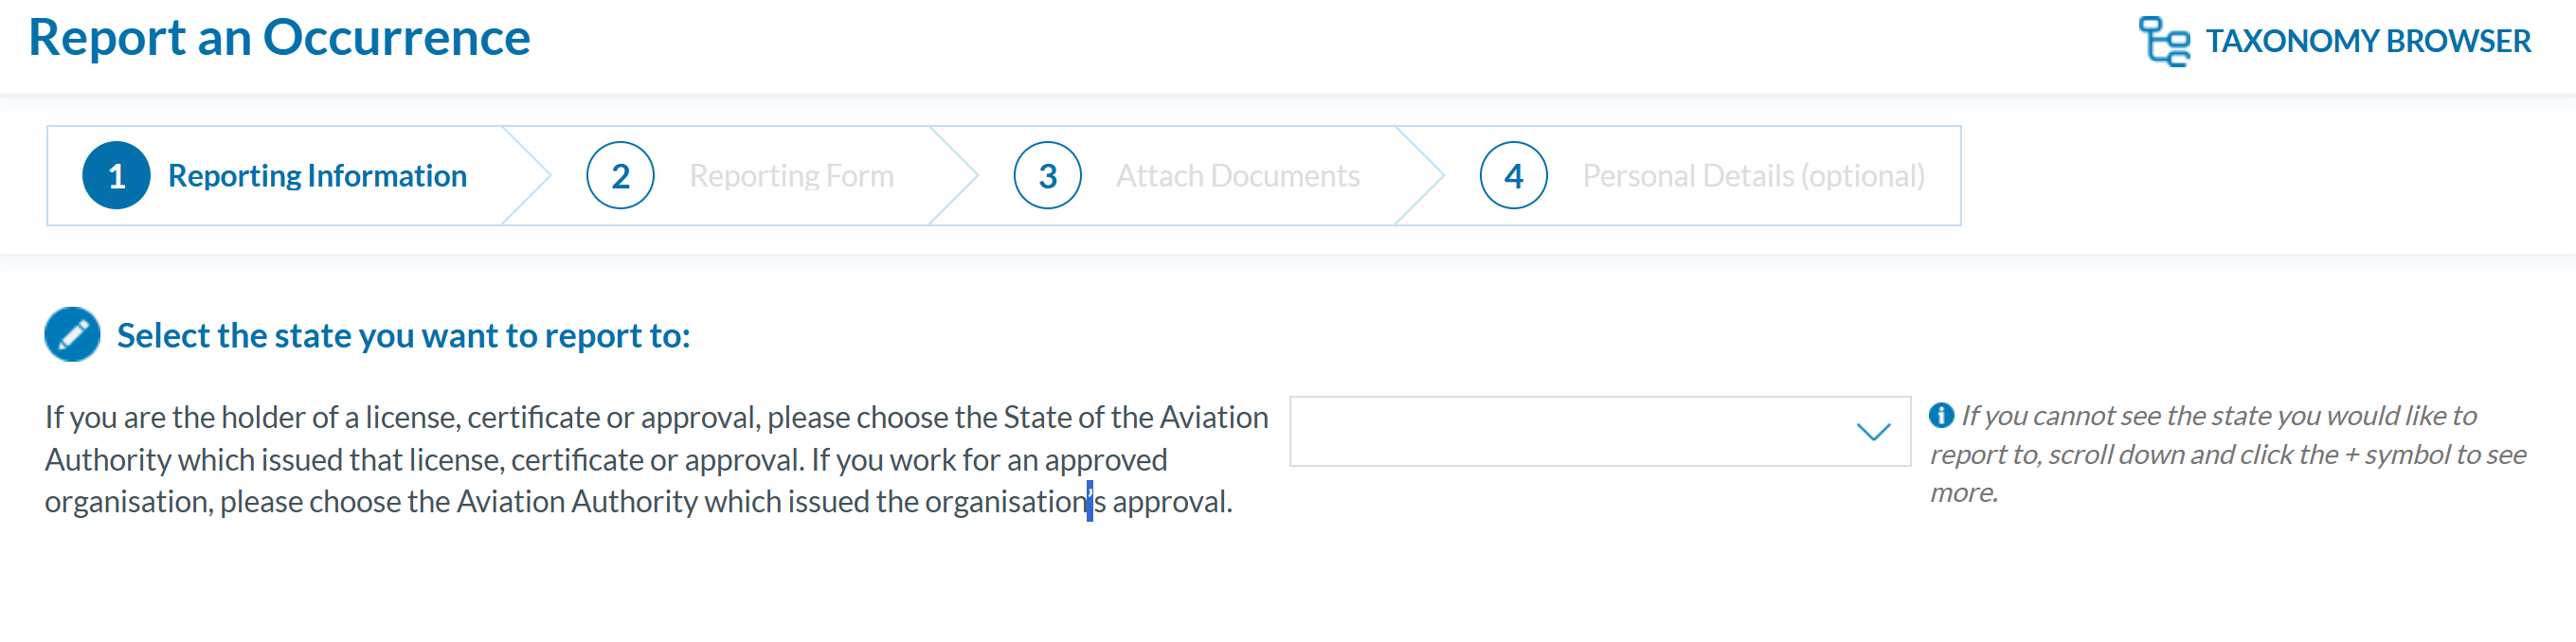
The Taxonomy Browser is also accessible via the link located at the top right corner of the 'Report an Occurrence' page.':
Taxonomy Browser
The Taxonomy Browser is a feature that organizes the entire ECCAIRS Taxonomy into a structured format, enabling easy navigation through its elements. For individual users or organizations, it is intended solely for consultation purposes.
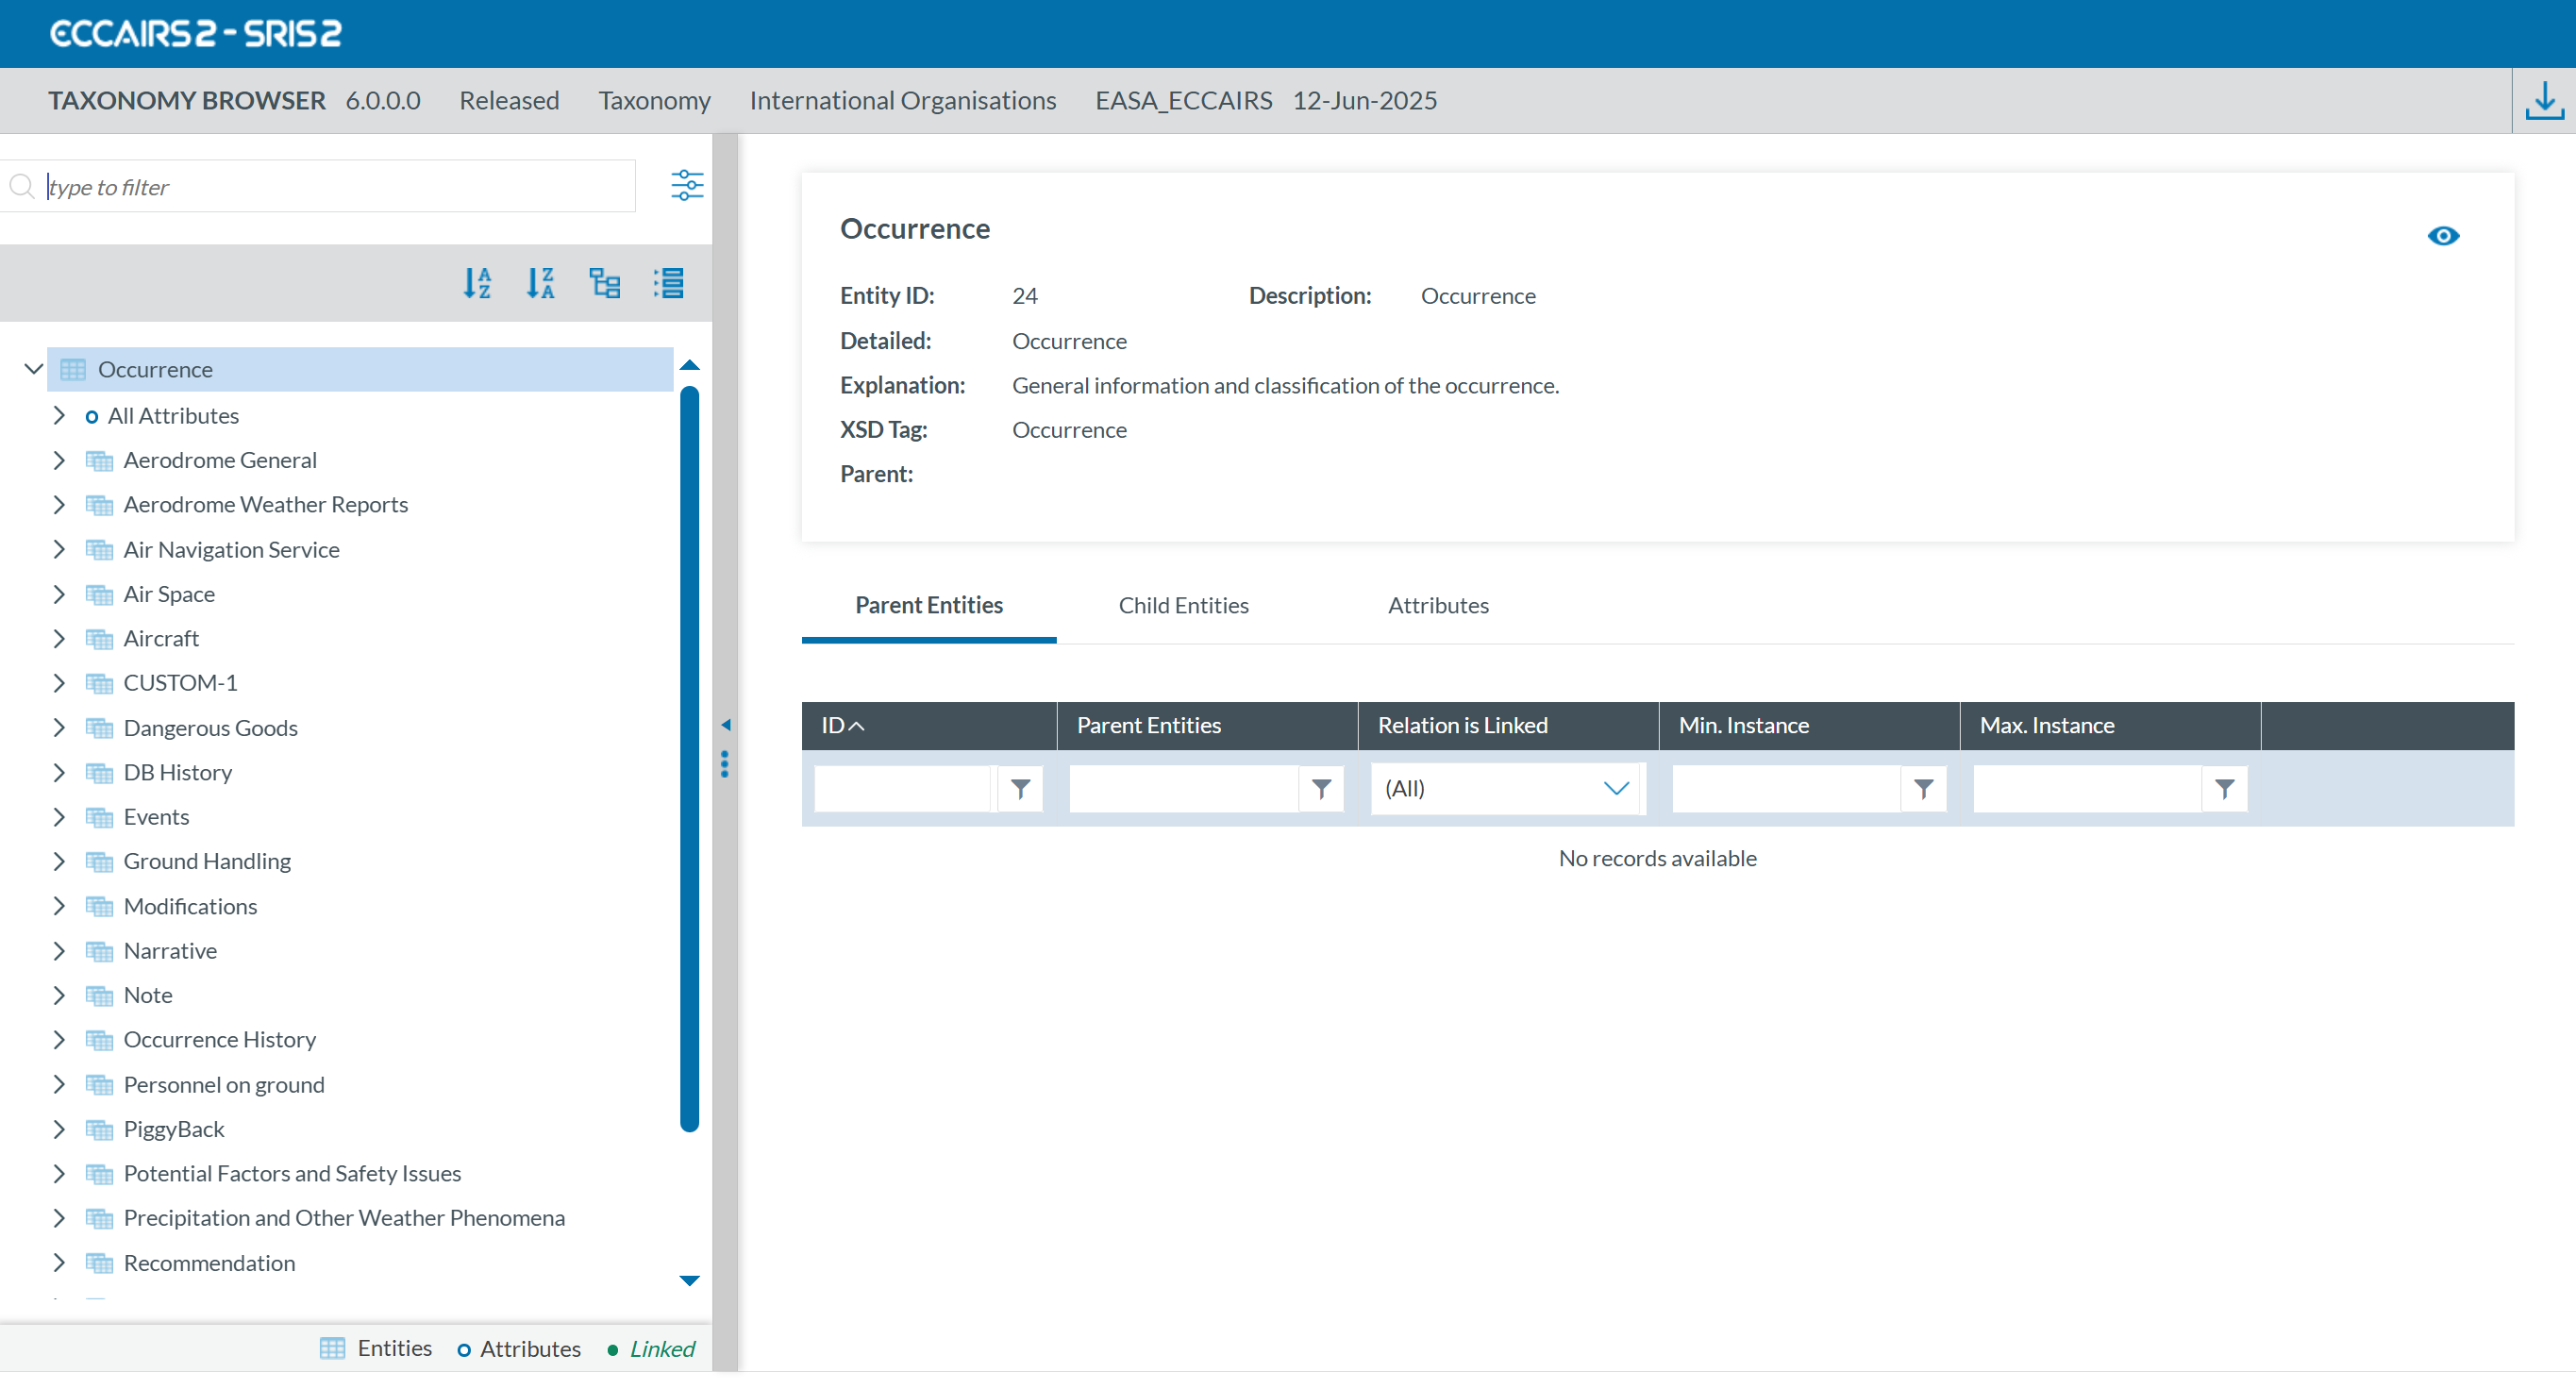
The taxonomy tree and the search bar are displayed on the left side of the screen. You can hide them by clicking the 'arrow' icon.

The left panel is resizable by clicking the 'three dots' icon

and dragging it left or right.
Taxonomy Copy TEST to export
The taxonomy is the catalogue describing what information can be stored in the reports and how this information is encoded in the data fields.
The ECCAIRS2 Taxonomy is publicly available and serves as the standard reference for all Occurrence Reports. Users can access the latest published version without registration. Additionally, Authorities may create custom taxonomies with tailored attributes, entities, or value lists, which require user registration to view.
Accessing the Taxonomy
To access the Taxonomy Browser you can follow this link: Taxonomy Browser.
Alternatively, you can access the Taxonomy Browser directly from the E2 Central Hub homepage:
- Click on 'REPORT AN OCCURRENCE' and then select 'Taxonomy' from the top menu:
The system will display the ECCAIRS Taxonomy page with a link to the Taxonomy Browser:
-
Click on 'Taxonomy Browser'. You will be redirected to:
Quicklinks are also available at the bottom of the ECCAIRS Taxonomy page:
The Taxonomy Browser is also accessible via the link located at the top right corner of the 'Report an Occurrence' page.':
Taxonomy Browser
The Taxonomy Browser is a feature that organizes the entire ECCAIRS Taxonomy into a structured format, enabling easy navigation through its elements. For individual users or organizations, it is intended solely for consultation purposes.
The taxonomy tree and the search bar are displayed on the left side of the screen. You can hide them by clicking the 'arrow' icon.
The left panel is resizable by clicking the 'three dots' icon
and dragging it left or right.
Search
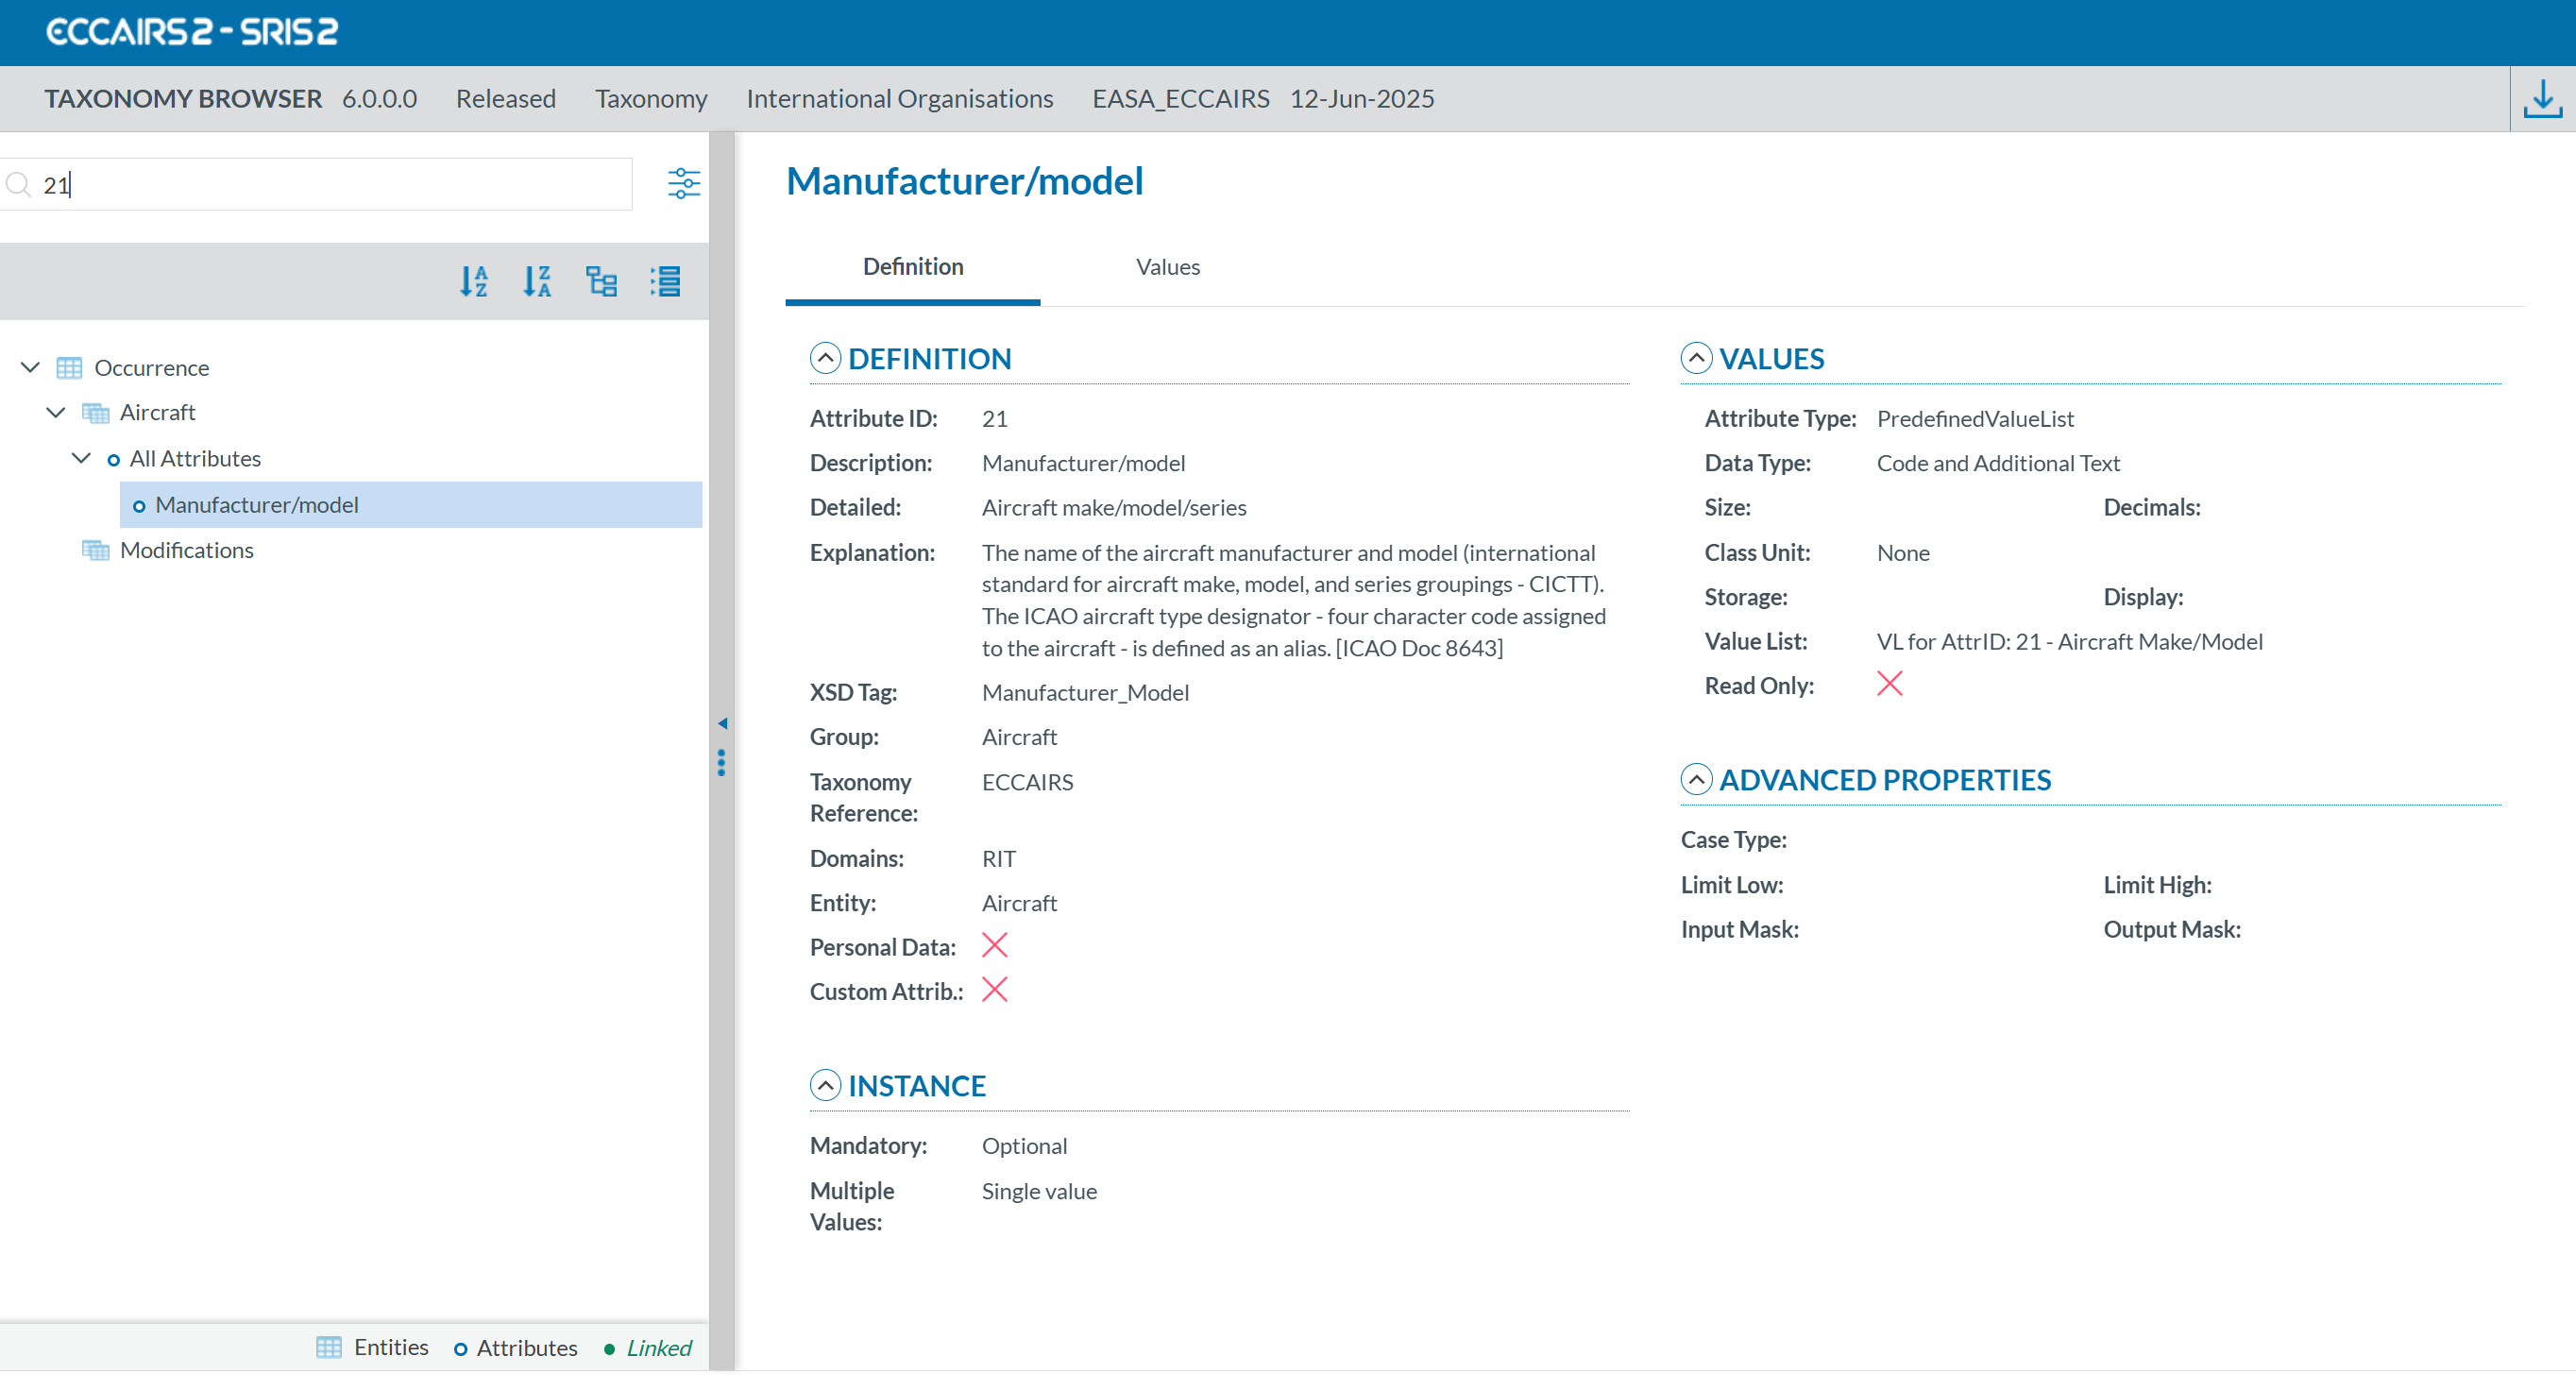
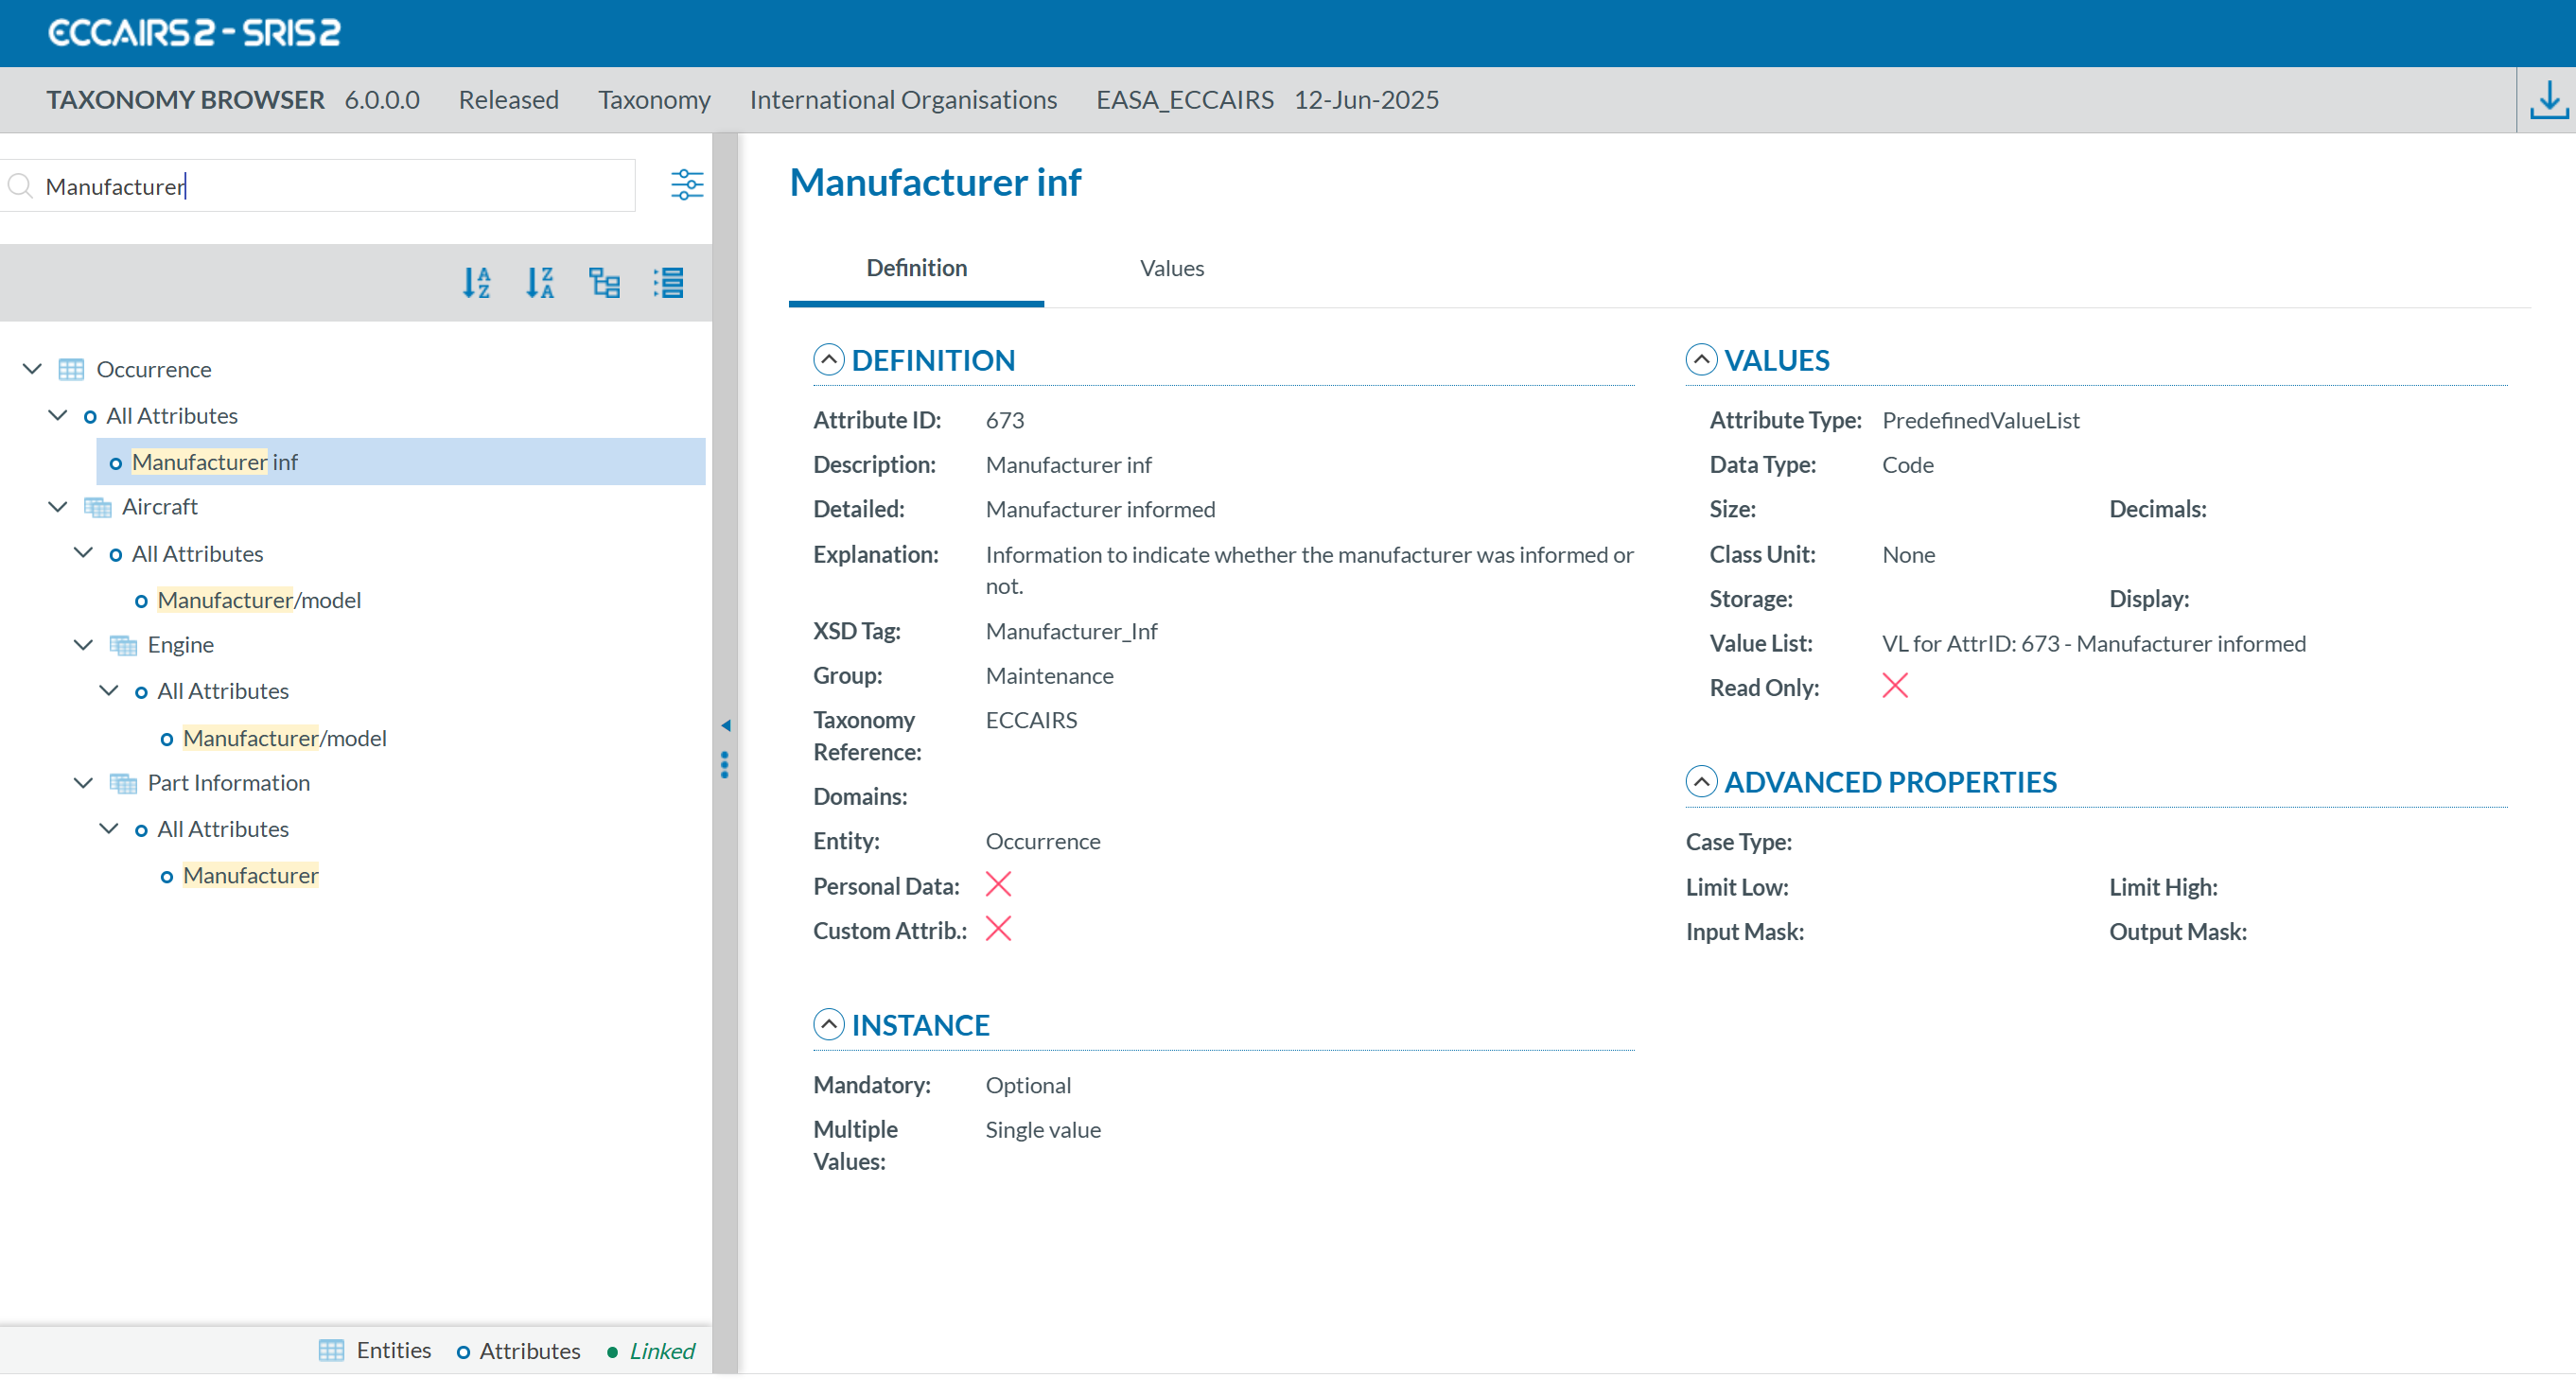
Entities and attributes can be found by entering the taxonomy code or description in the search box located at the top left.
For example, if you search by Taxonomy Code using '21':
If you search by description using 'Manufacturer':
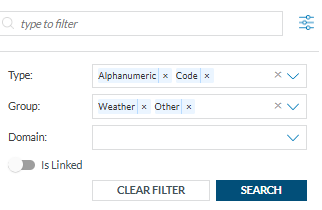
If you click on the 'Filter' button: , a layer with more filters will be displayed.
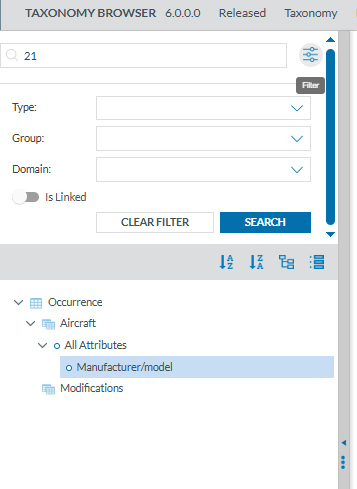
For each filter you can select one or more values. When you have finished click on 'SEARCH' to refresh the tree with your filters.
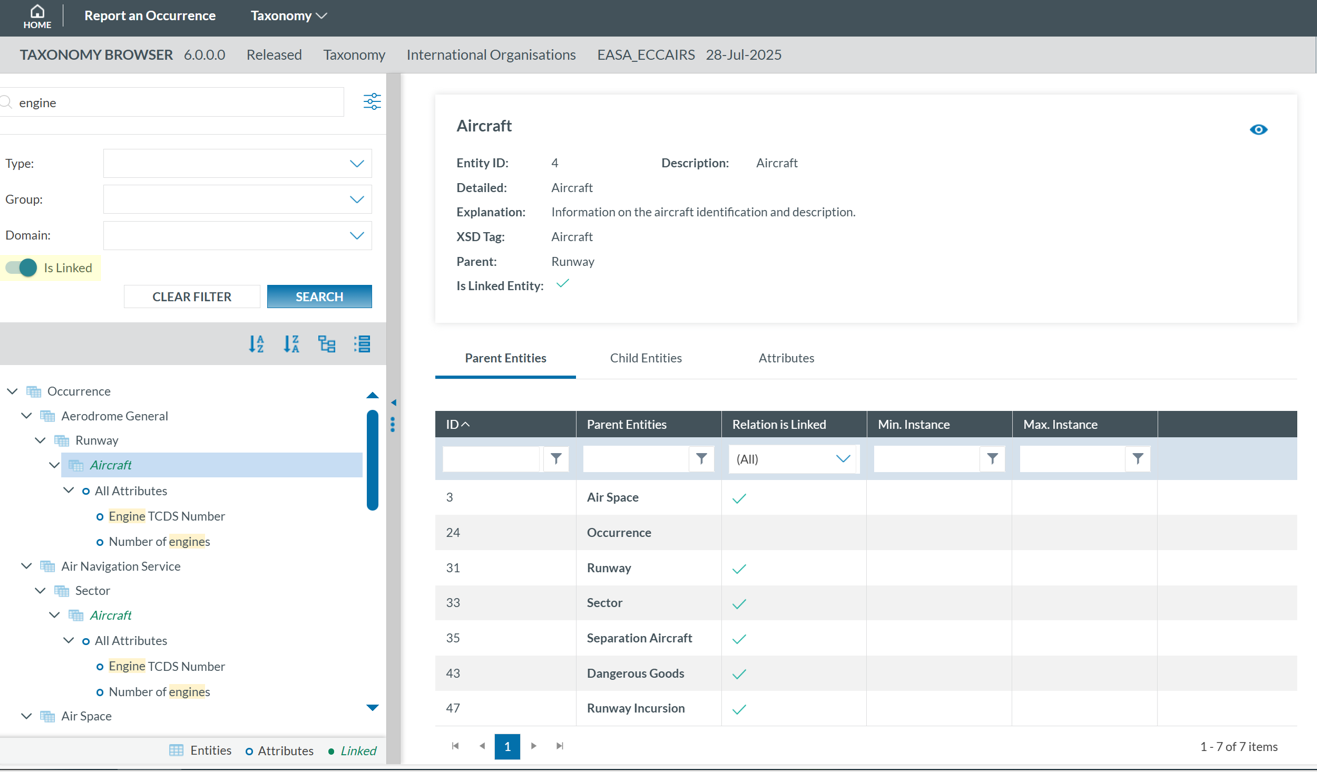
The Taxonomy Tree can be ordered alphabetically by clicking on the 'A-Z' icon or 'Z-A' icon :

You can collapse or expand all item of the Taxonomy Tree with the following buttons:
- Expand all

- Collapse all


When an entity is a Linked Entity, it is highlighted in green in the Taxonomy Tree with the toggle switch:
Taxonomy structure
ECCAIRS taxonomy elements are structured as follows:
-
Entities
-
Attributes
-
Value Lists
-
Values
Entities
Entities represent items to which specific attributes are assigned—for example, an “Aircraft” involved in an incident or the associated “Events” description.
Multiple instances of an entity may exist when several items are involved (e.g., multiple aircraft in a single incident).
Entities can have child entities (e.g., an “Engine” belonging to an “Aircraft”).
Entities may also be linked to other entities (e.g., “Airspace” or “Aerodrome” where the “Aircraft” is operating).
Entities information
Entities in the Taxonomy Tree are represented by  or
or  .
.
The following information will be displayed in the right side of the screen when you click on an Entity in the Taxonomy Tree:
-
Entity information: A brief summary of the selected Entity.
-
Parent Entities: The list of its parent Entities
-
Child Entities: The list of its children Entities
-
Attributes. The list of its Attributes
Click on each tab (Parent Entities, Child Entities, Attributes) to view its information.
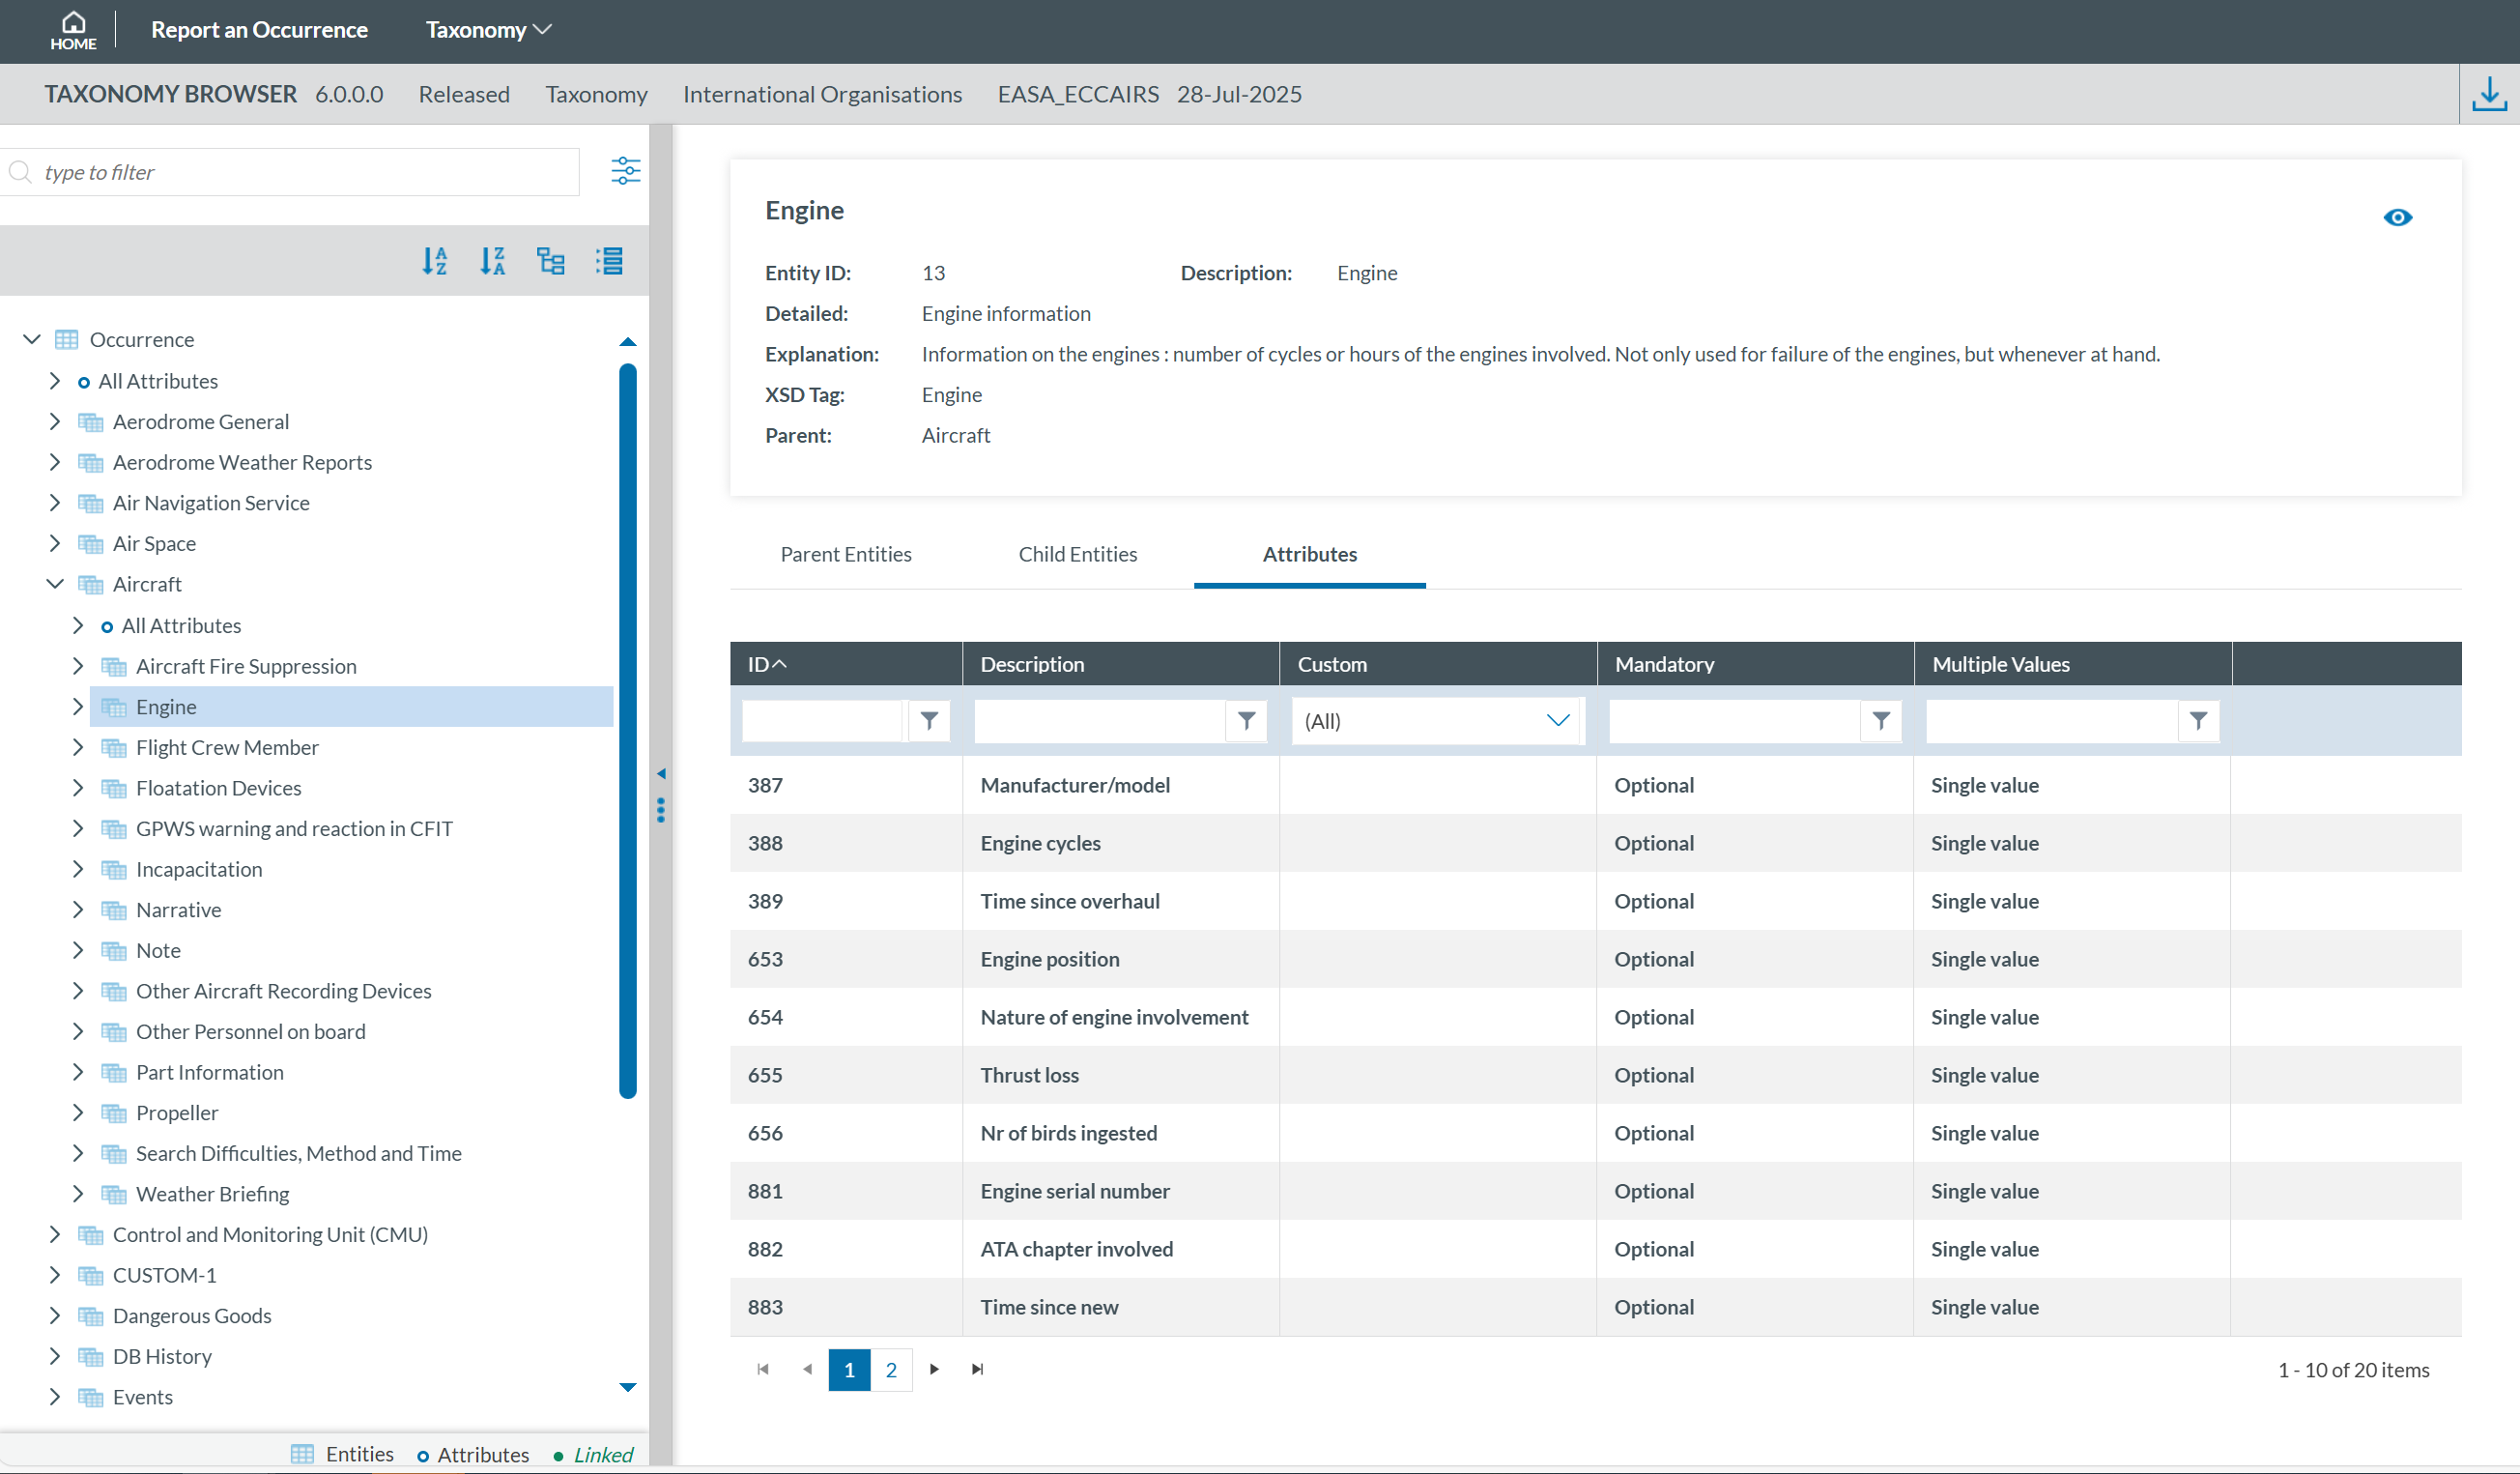
Clicking the 'eye' icon  you can see detailed information from the entity.
Attributes
Attributes describe properties/values associated to an entity and represented by  . An example of an attribute of the “Aircraft” entity is its "manufacturer/model". Attributes may have either single or multiple values and can be of the following types:
-
Number
-
Decimals
-
Text
-
Alphanumeric
-
Date
-
Time
-
DateTime
-
Longitude
-
Latitude
-
Code
-
Code and Additional Text
-
Code or Alternative Text
-
ECCAIRS Resource Locator
-
ECCAIRS Data Link
-
ECCAIRS Embedded Data
Attributes information
Attribute information can be viewed from two locations within the Taxonomy Browser:
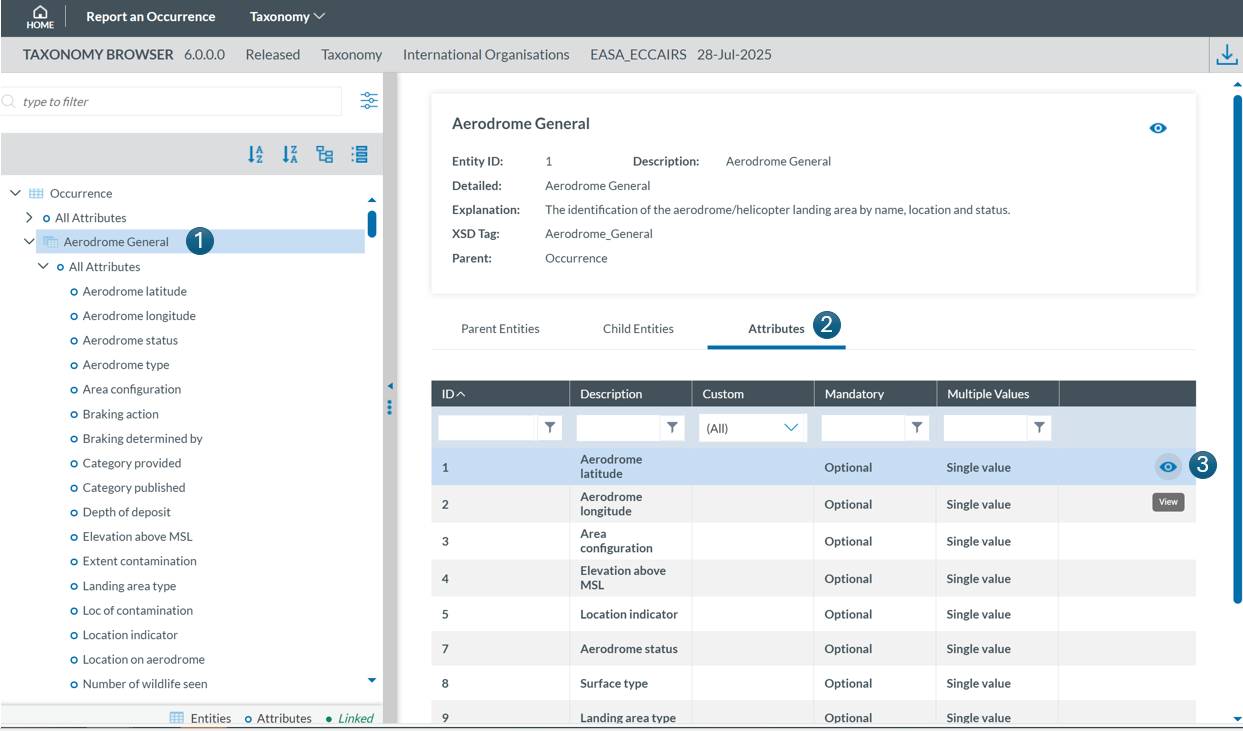
- Locate the attribute in the Taxonomy Tree and click on it (1). The information will then be displayed in the right-hand pane.

-
Select the entity to which the attribute belongs in the Taxonomy Tree (1), then click the 'Attribute' tab in the right-hand pane (2). Finally locate the attribute in the list and click the 'eye' icon
 to view its detailed information (3):

The information will be displayed:
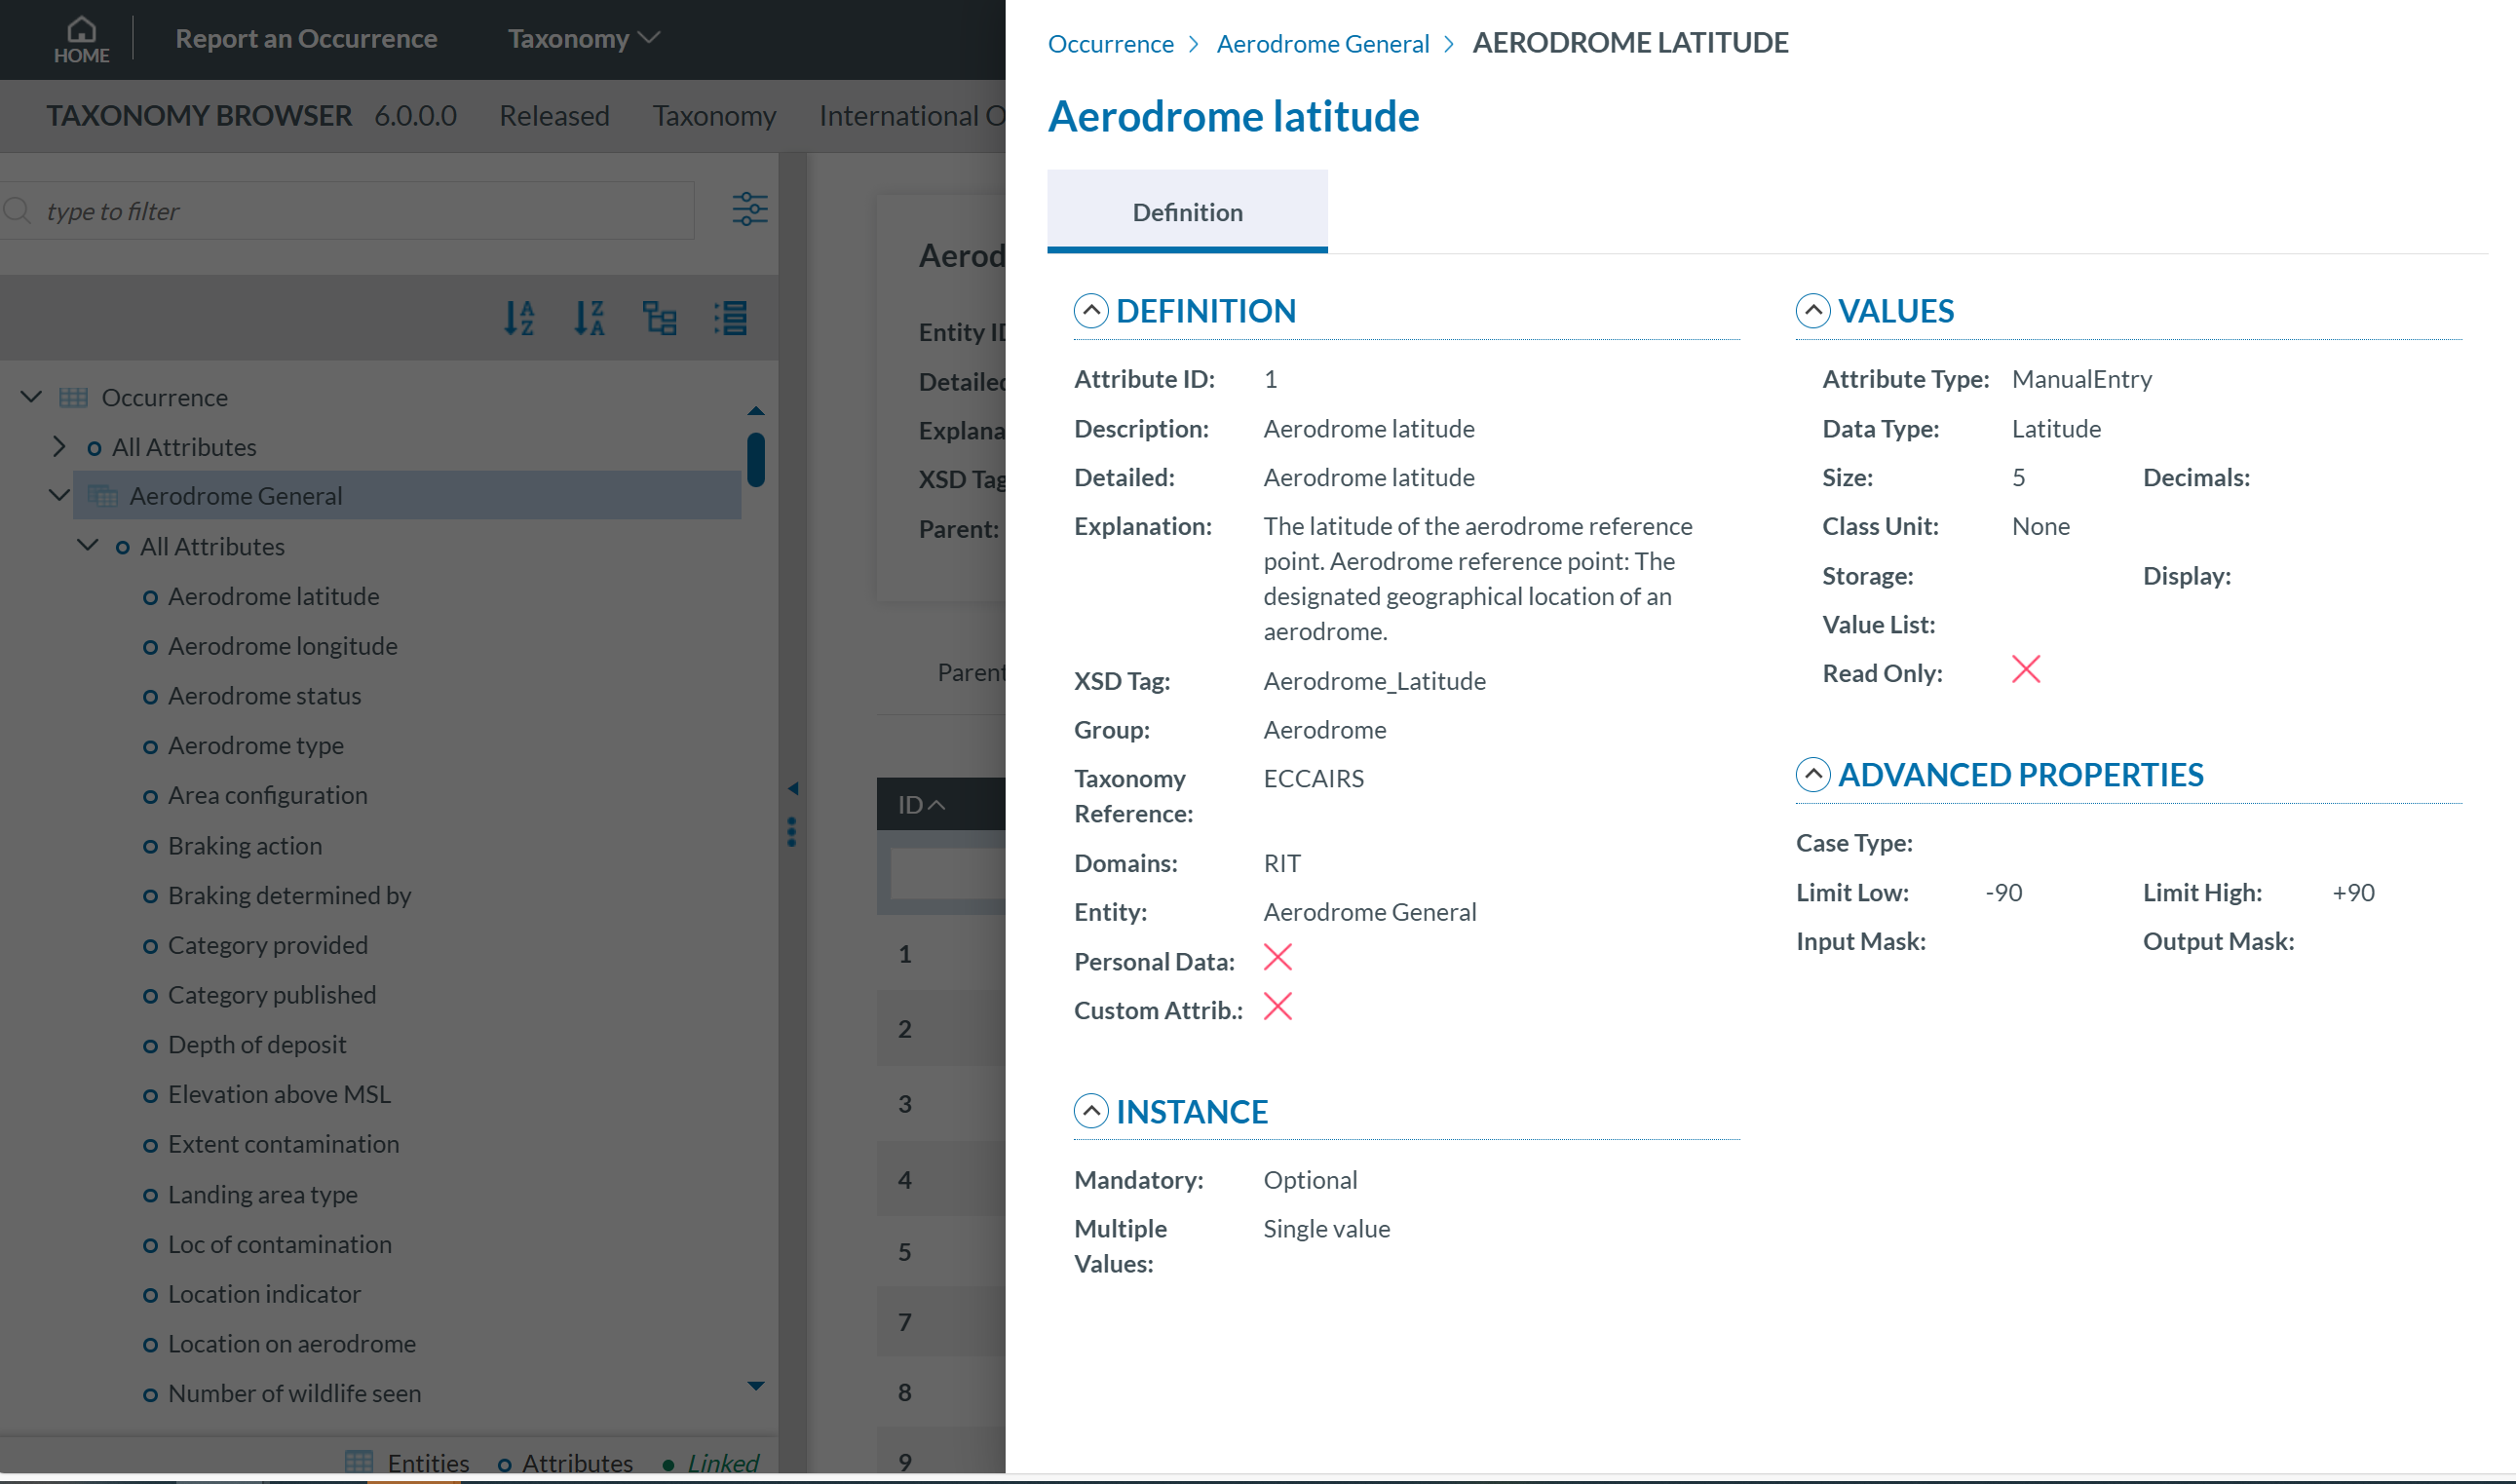
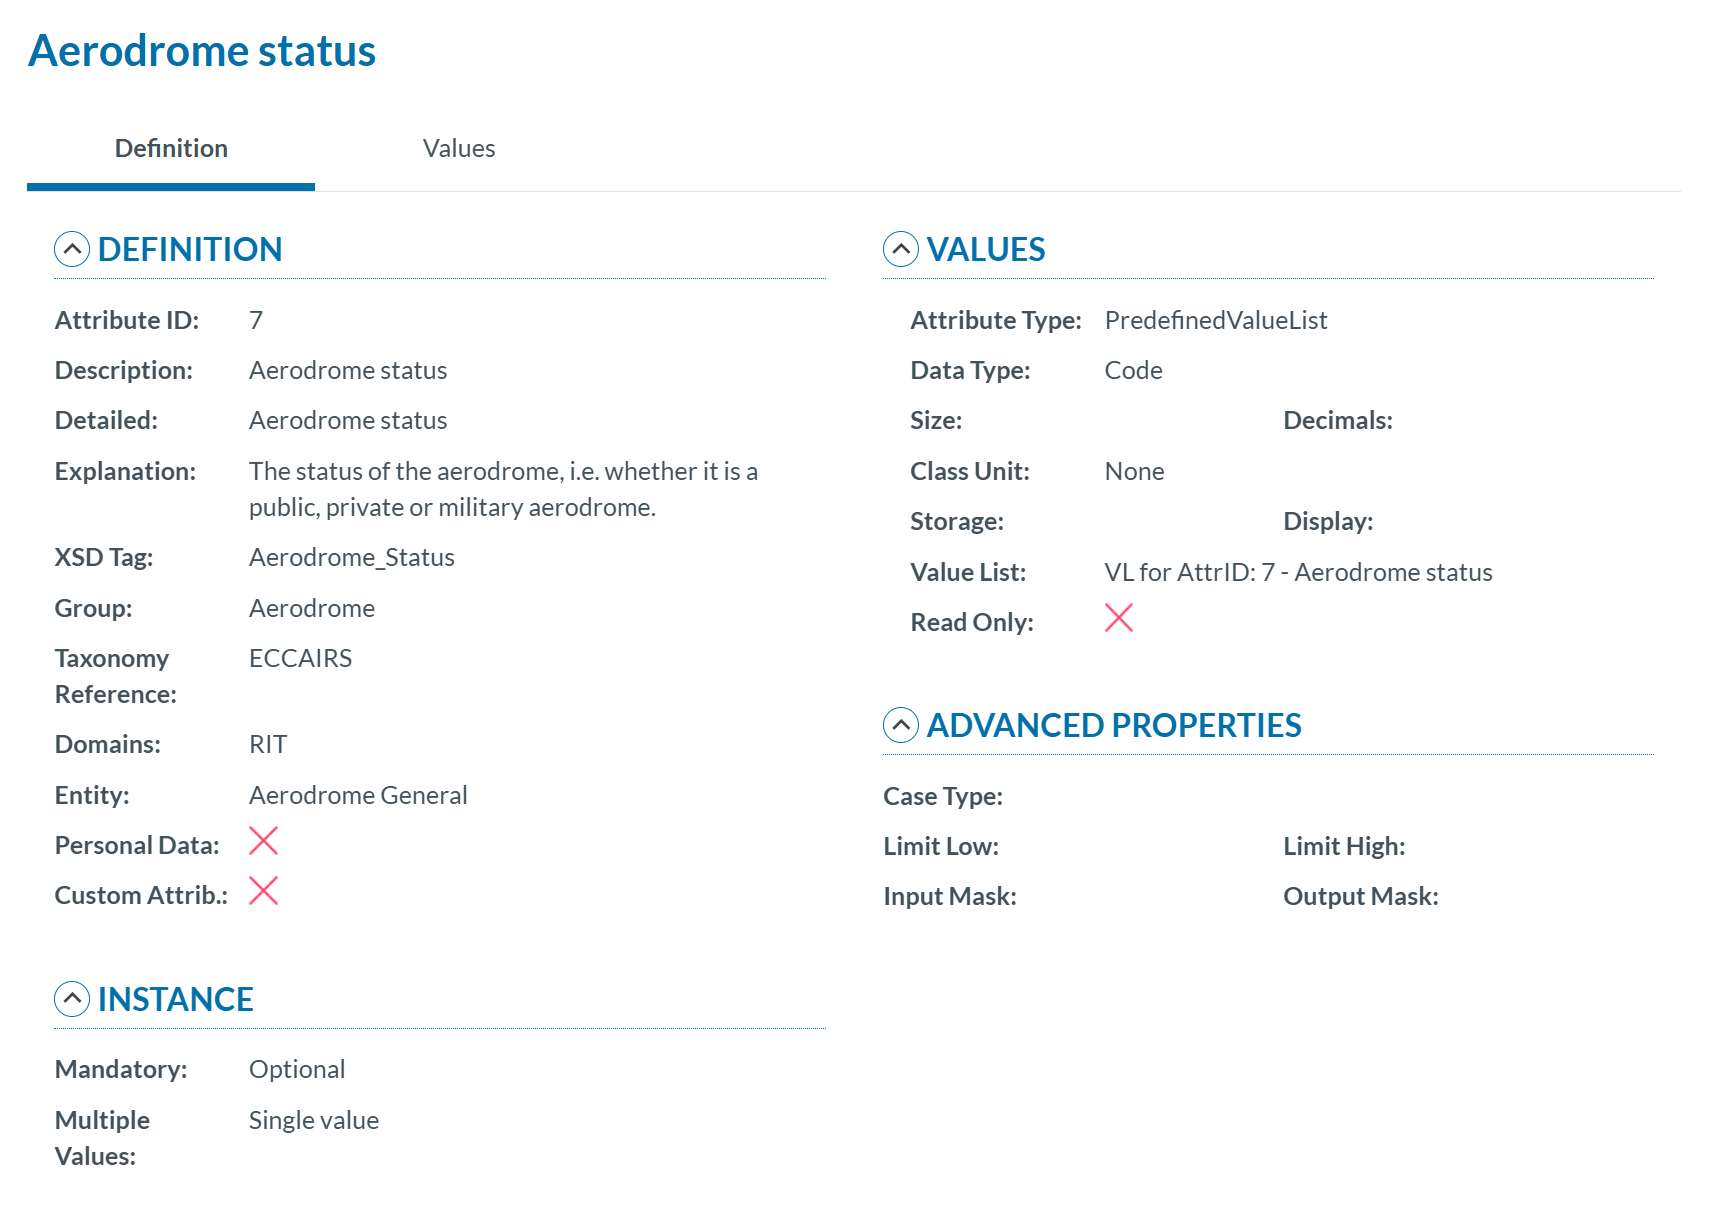
Attribute information may be displayed across two tabs:
- Definition
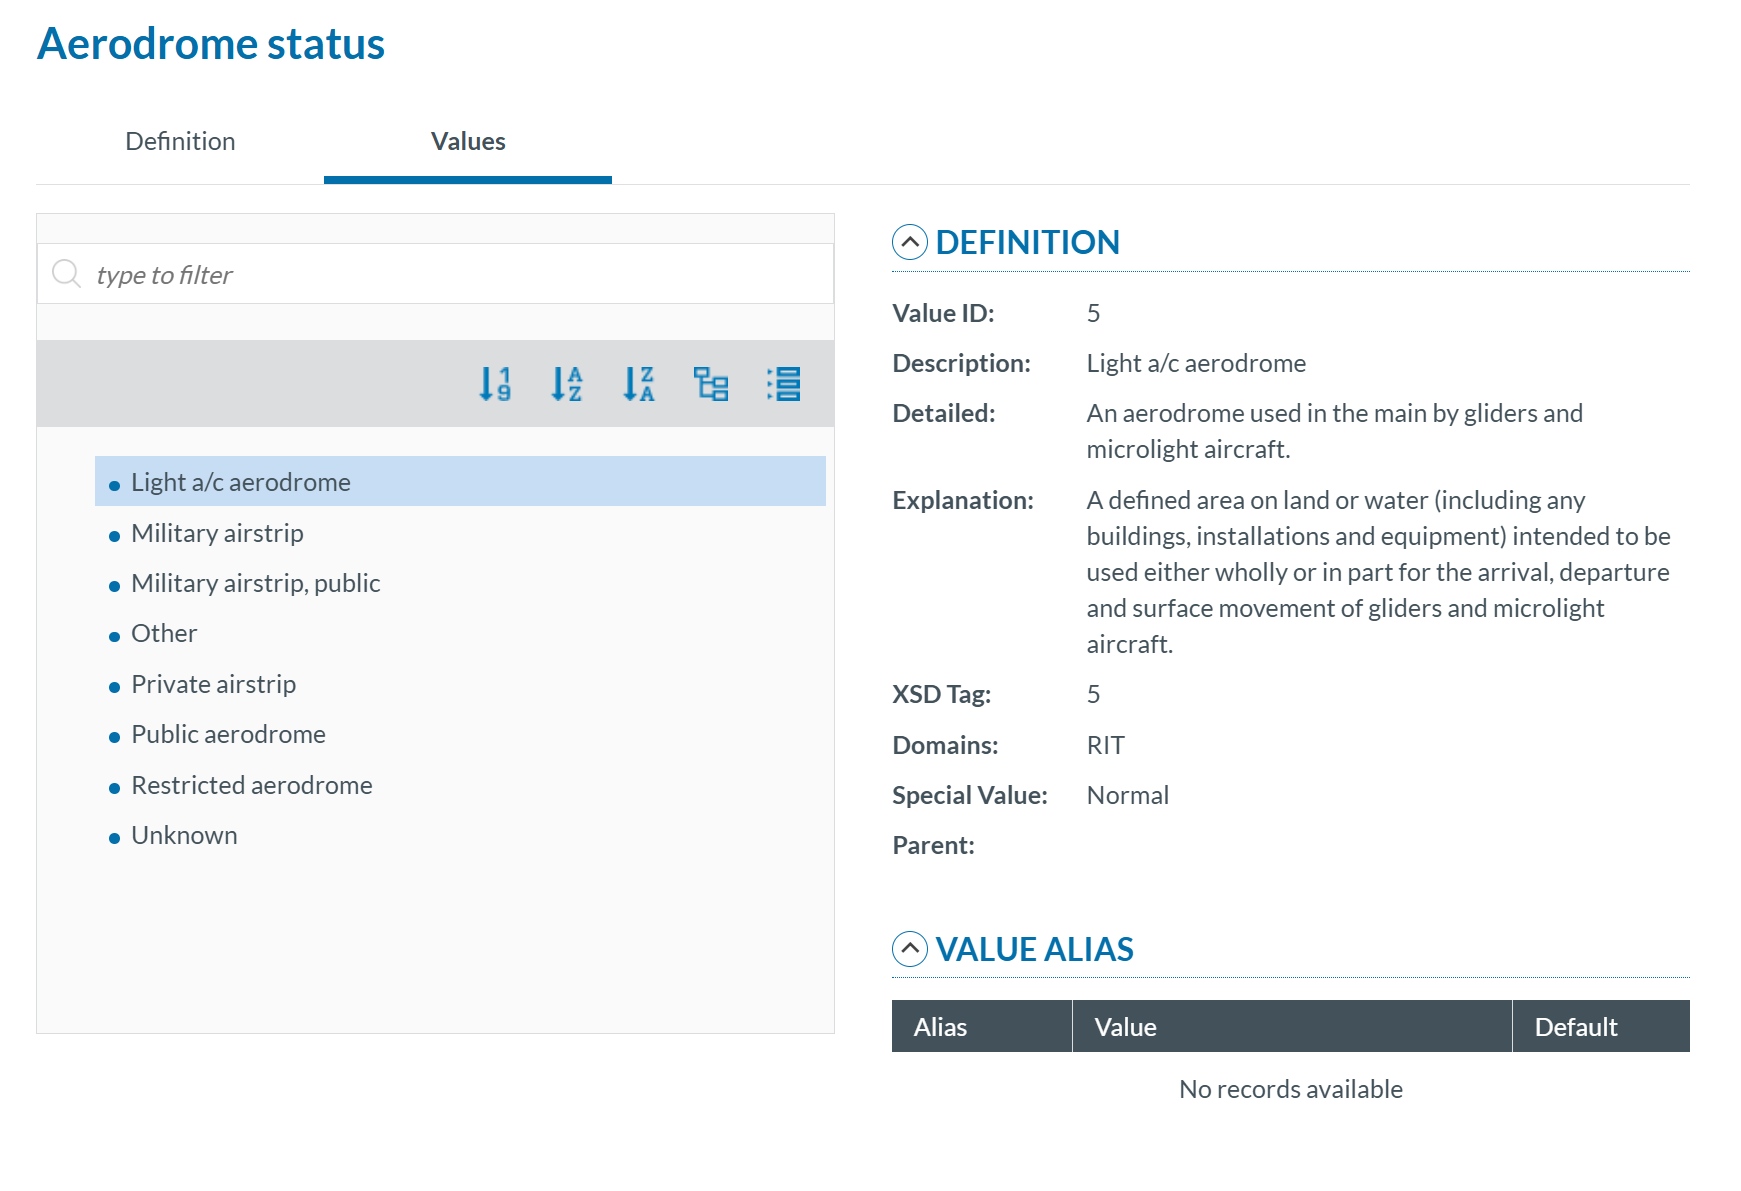
- Values: If the attribute has a predefined value list, you can navigate through the values in the Values Tree by clicking on each element. The selected value will display its definition. Values can be searched by Taxonomy Code or Description and can be sorted alphabetically.
Value Lists
The list of values an attribute can have is defined in a Value List. The Value List can have multiple level where values are organized in a tree mode.
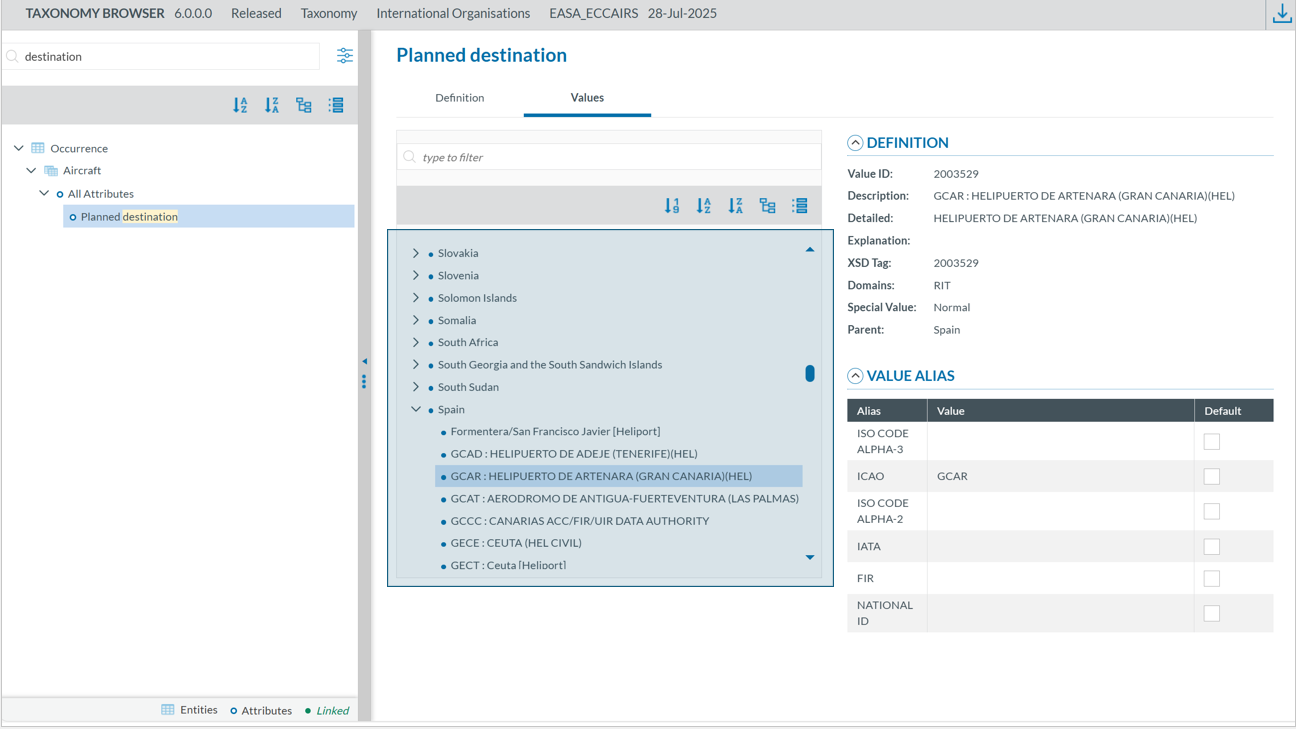
Value list can have Alias:
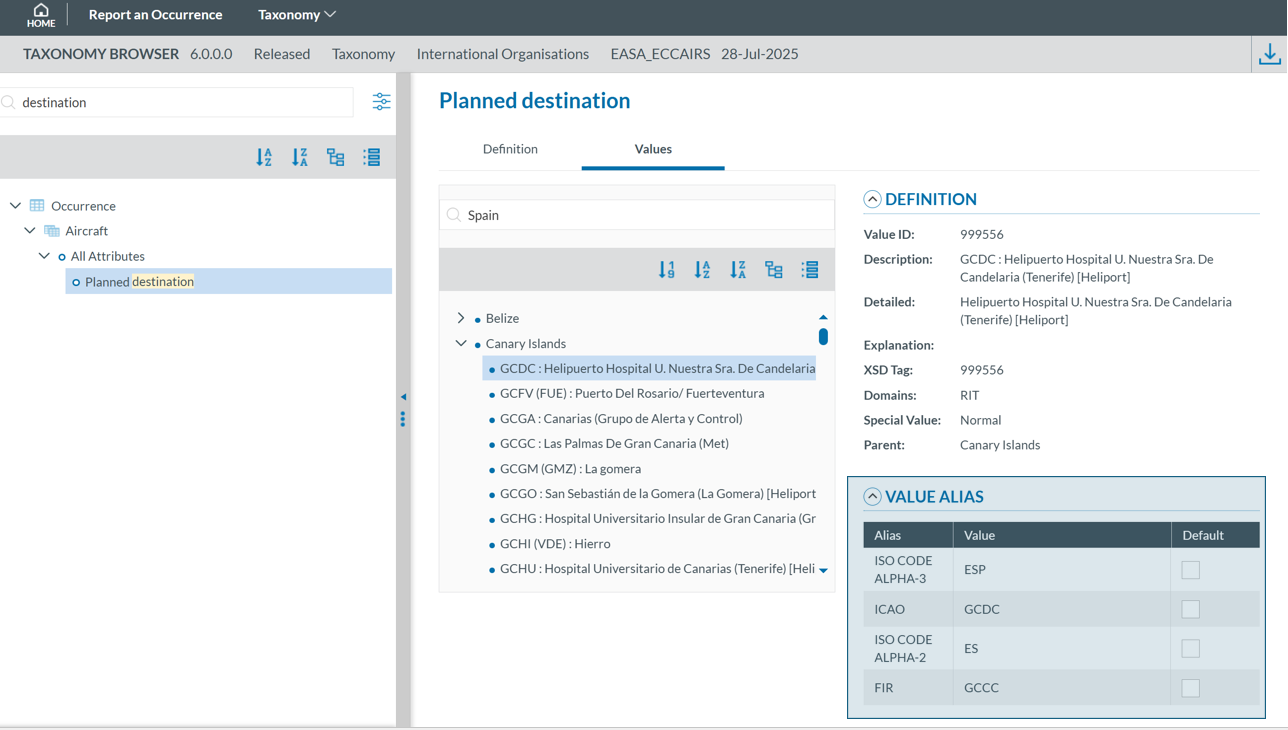
Values
Depending on the attribute type, values may either be manually entered or selected from a predefined list (Value List). For example, for the Manufacturer/Model of an aircraft, a value can be chosen from a Value List:
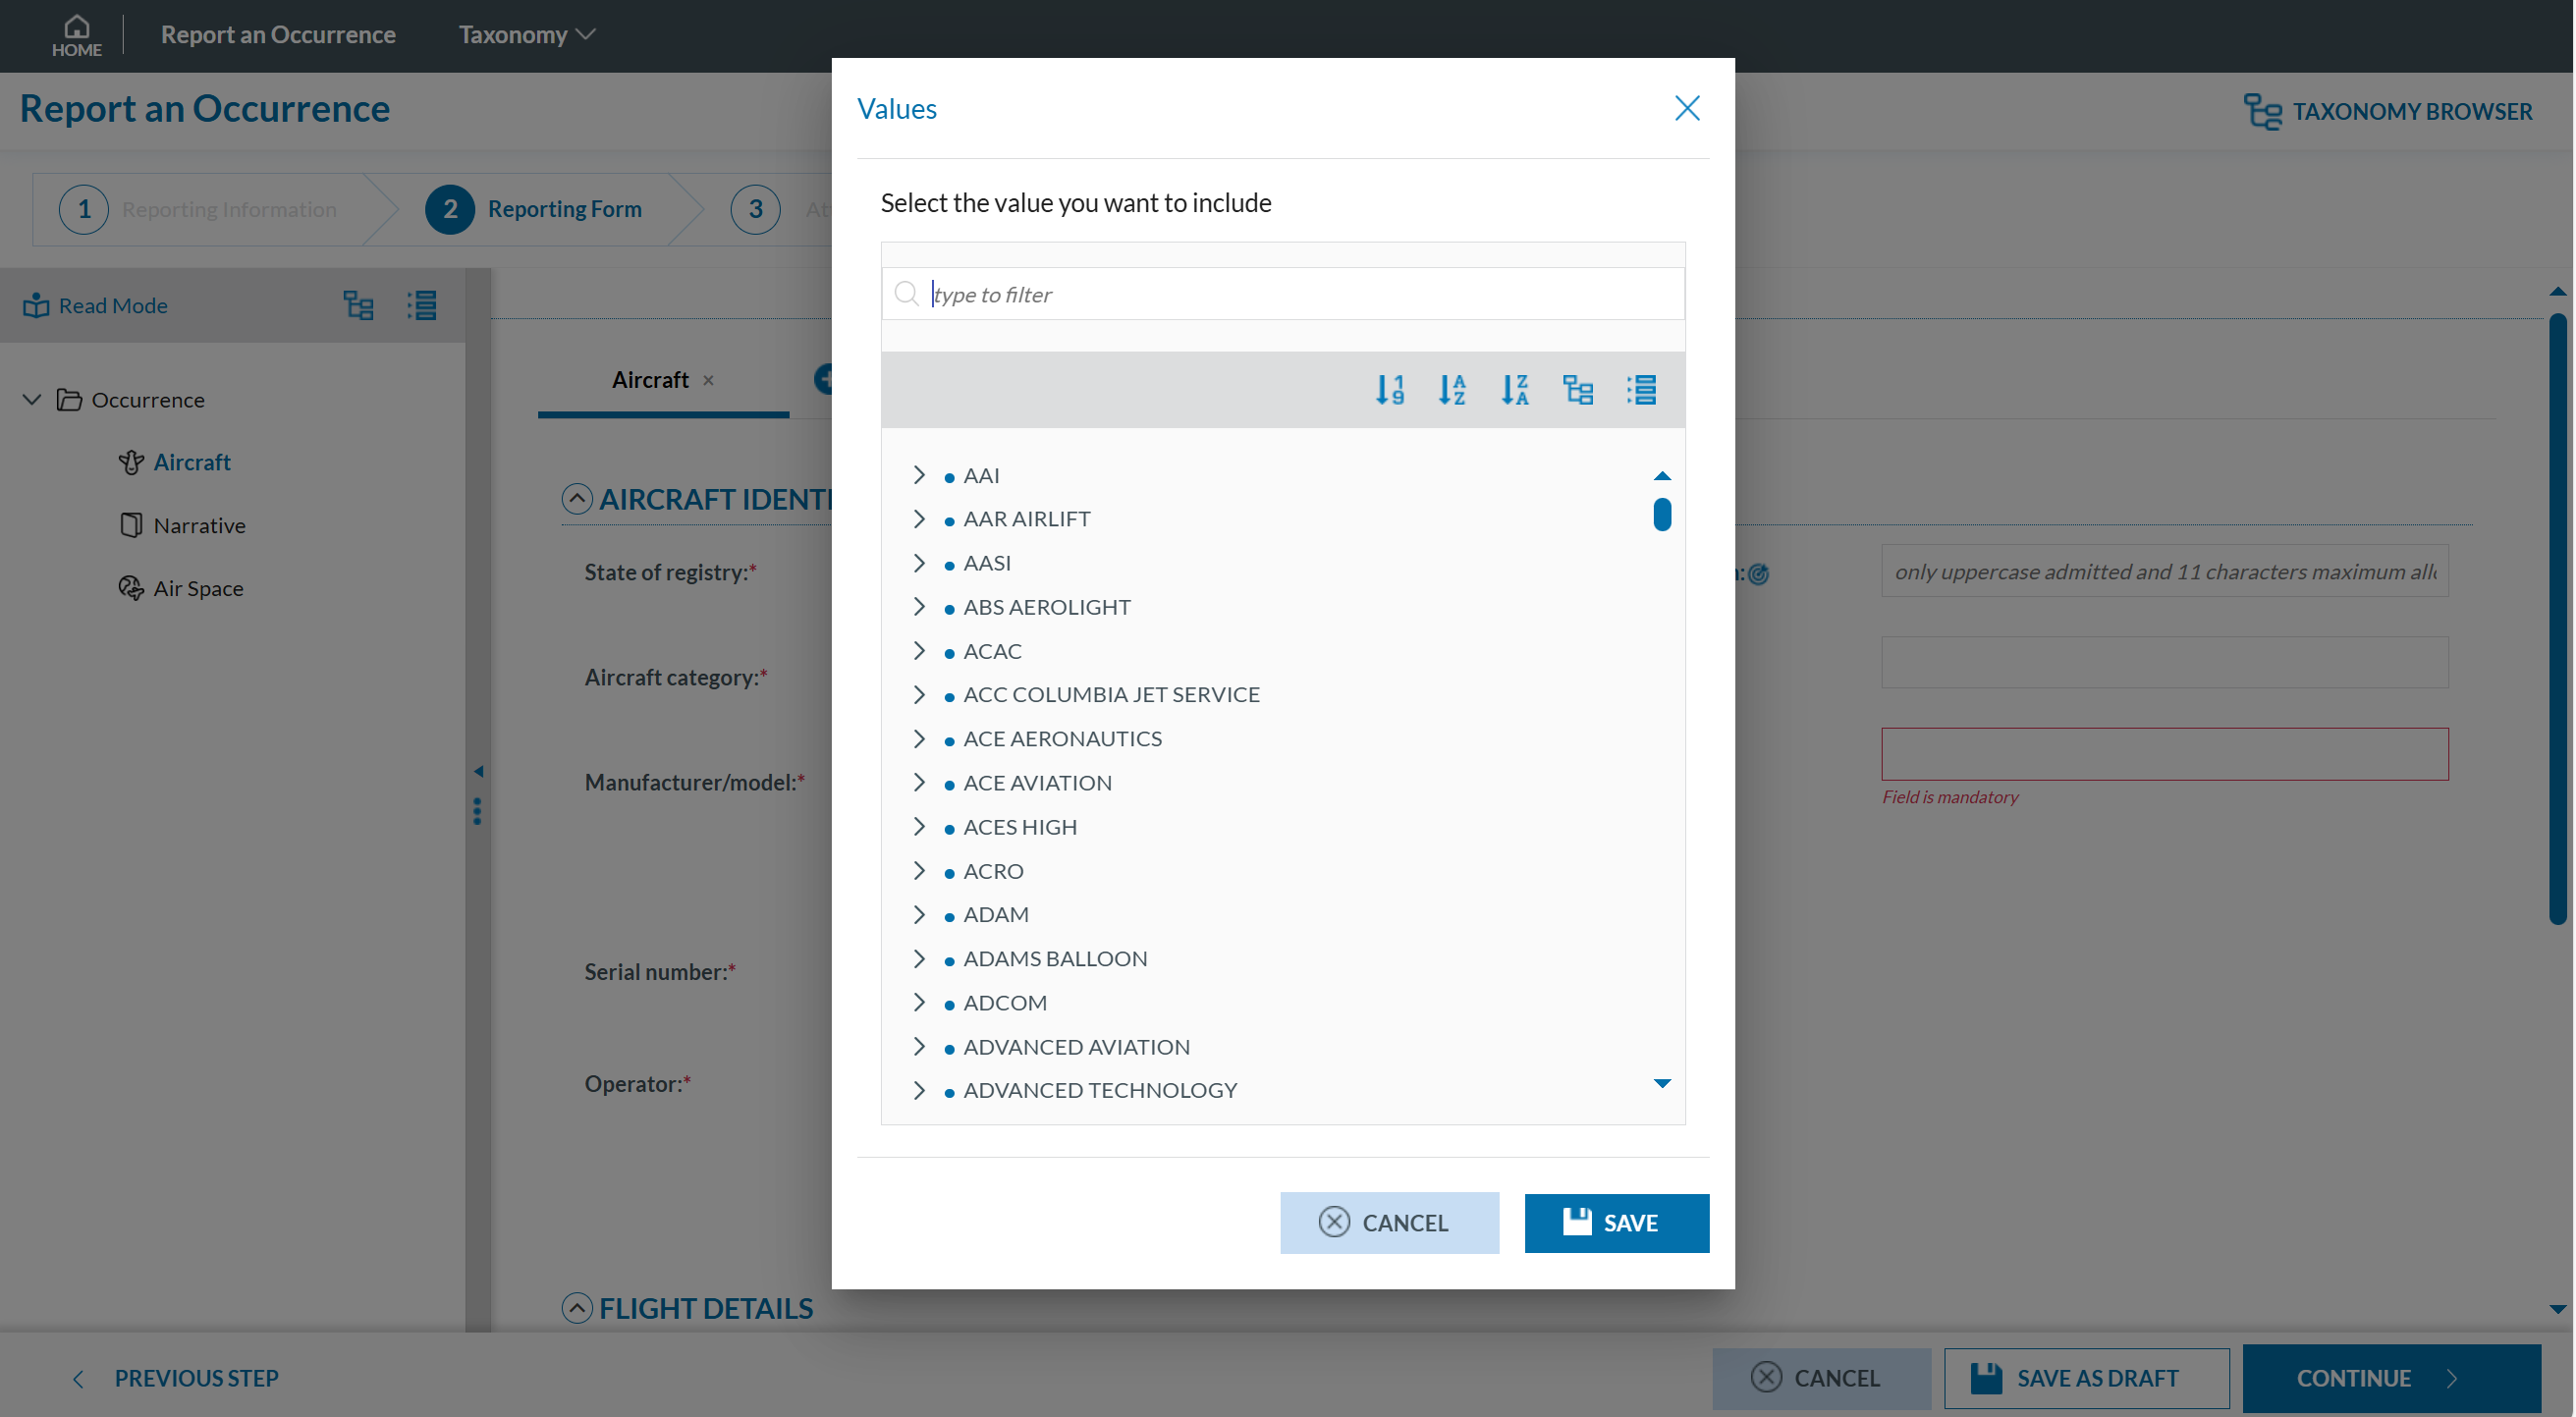
However, for the Location Name attribute, values must be entered as free text only:

Filter the information
You can filter the Parent Entities, Child Entities and Attributes table by typing the term to be searched in the filter row. You can restrict the results by clicking the 'filter' icon  To delete the filter, you must click the
  'clear filter' icon.
By default, the 'contains' condition is selected:
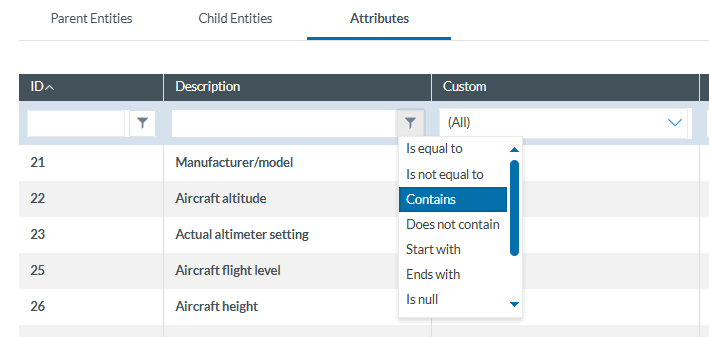
The filter options are:
-
Is equal to: the filter will look for fields that match the exact same string
-
Is not equal to: the filter will avoid the fields that match the exact same string
-
Contains: the filter will display all the fields that have the string written in any position
-
Does not contain: the filter will display the fields that do not have the string written in any position
-
Start with: the filter will look for the string at the beginning of the field
-
Ends with: the filter will look for the string at the end of the field
-
Is null: field does not exist
-
Is not null: field exists
-
Is empty: fields exist but does not have information
-
Is not empty: field exists and has information
List of Taxonomies
You can access the list of taxonomies through the ‘Taxonomy’ menu displayed in the bar next to 'Report an Occurrence':

By clicking on this link, the system displays the list of taxonomies in force for the Reporter’s competent Authority:

If the competent Authority the user is reporting to has defined a custom taxonomy, the system displays both the central and the custom taxonomies:
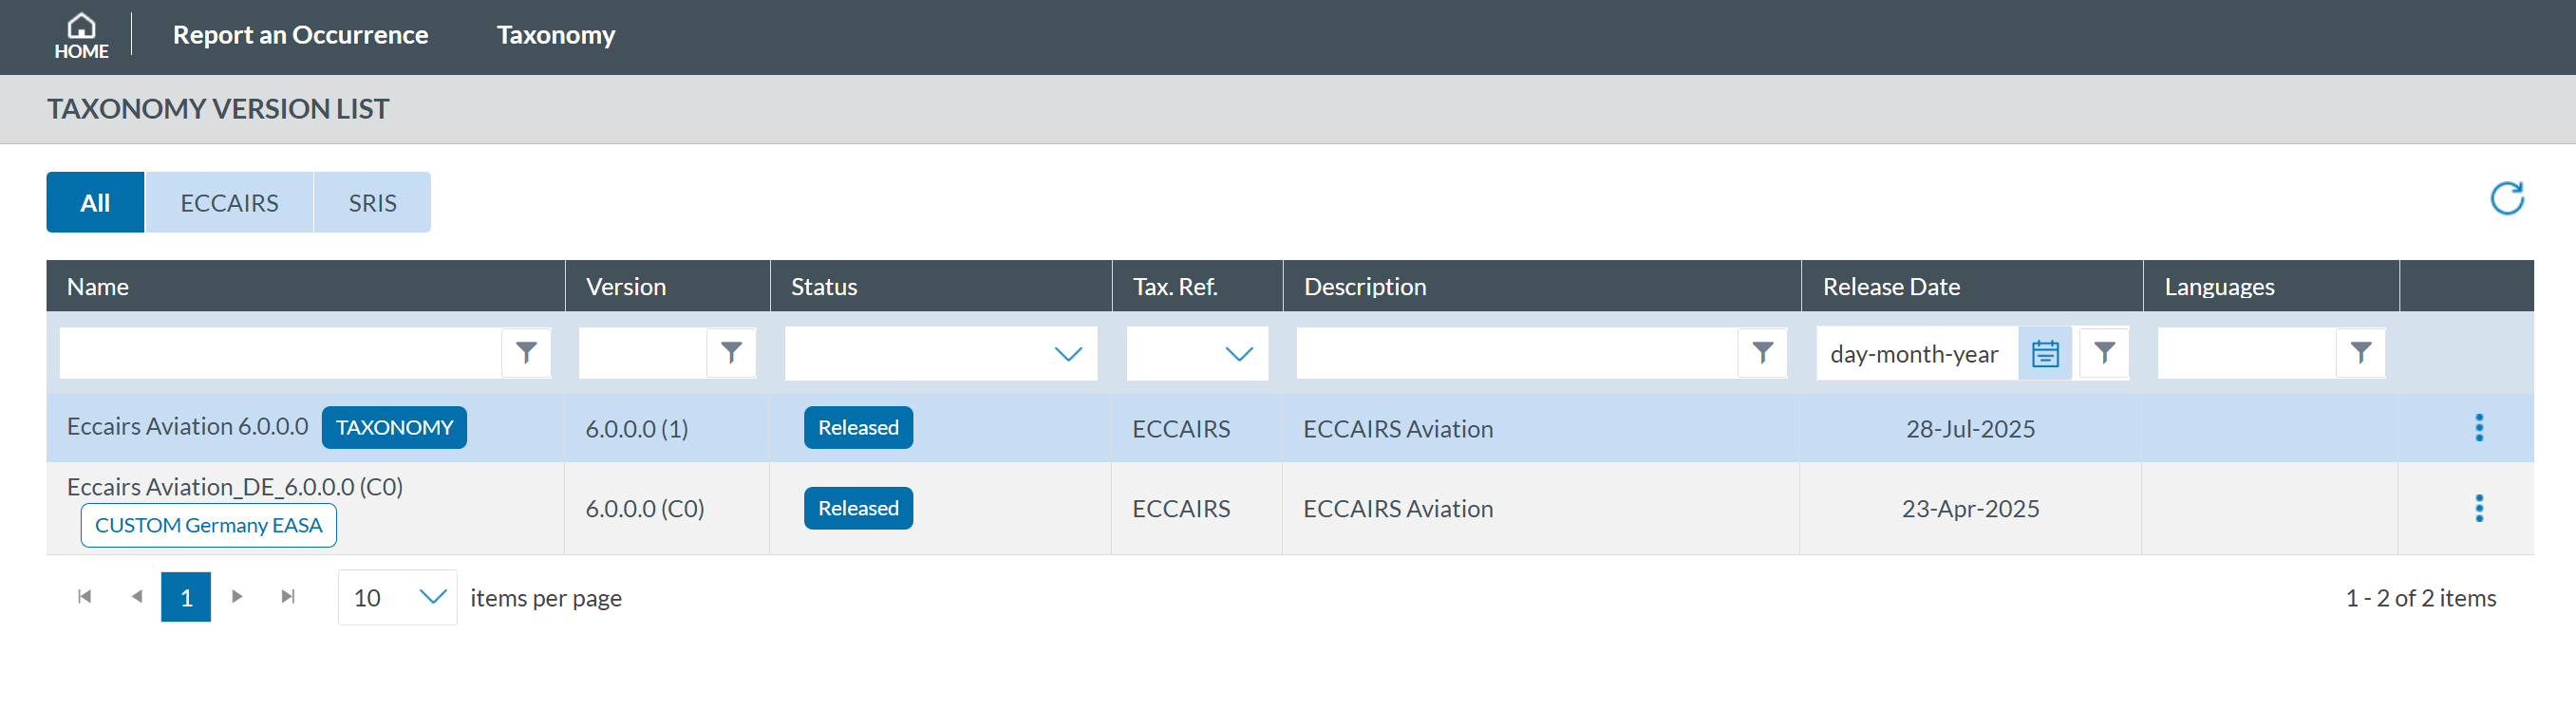
If you click on any of them,you will access the taxonomy browser for that taxonomy. By clicking on the 3-dots button of each taxonomy of the list, the system will display the following options:
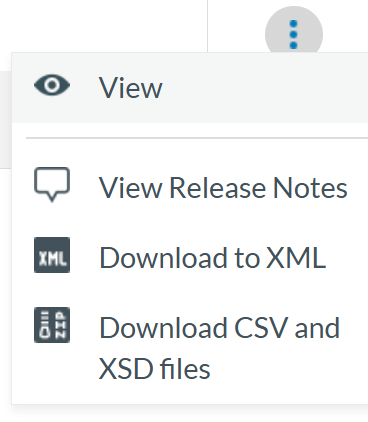
- 'View' shows the taxonomy as detailed in Taxonomy section.
-
‘View Release Notes’ this option shows the user the changes made in the Taxonomy with the latest update.

- ‘Download to XML’ allows any user to download the taxonomy in an xml file format with all the Entities and Attributes.
- ‘Download CSV and XSD files’ by clicking in this option the user downloads a compressed file in zip format that includes all the Value List and Attribute List in that Taxonomy
Organisation Management
Introduction
This section describes all the tasks that an Organisation Administrator can perform through the ECCAIRS2 website once registered on it.
To access the Organisation Management:
-
Click 'Administration'

- Click 'Organisation Management':

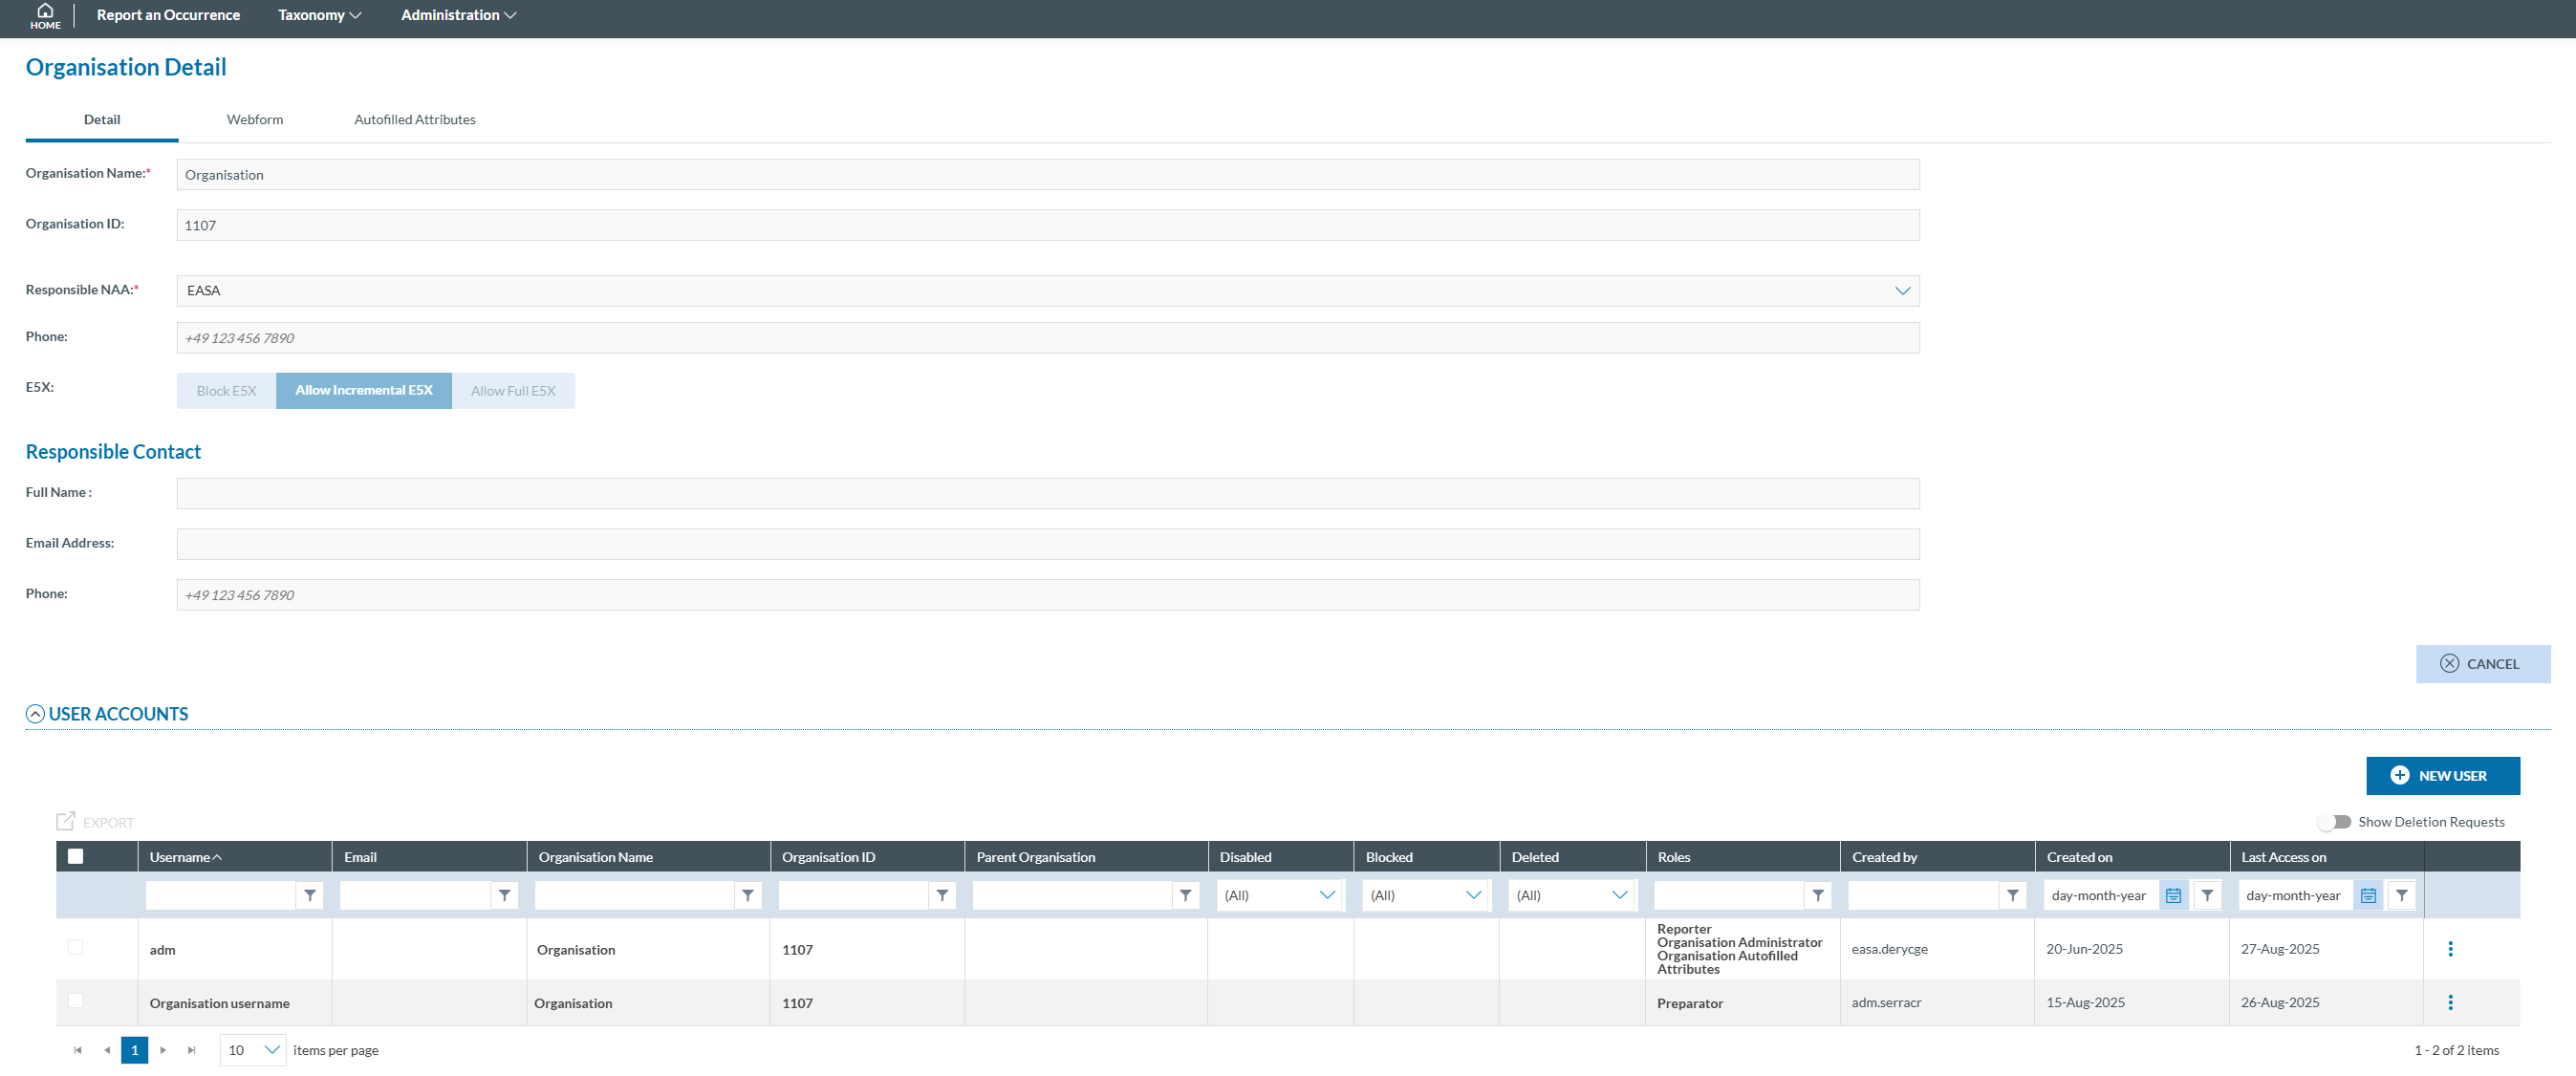
The system provides access to the following tabs:
-
Detail
-
Webform
-
Autofill Attributes
Detail
The Details tab provides the following information, which is read-only:

-
Organisation Name: mandatory and unique
-
Organisation ID: automatically generated and unique
-
Responsible NAA: mandatory
-
Phone: numeric field and not editable
-
E5X: this information is not editable by the Organisation Administrator, but three options are showed:
-
Block E5X: with this option selected the Organisation Users cannot submit OR through an E5X file. They can validate the files but are not allowed by the Authority to do so.
-
Allow Incremental E5X: this option indicates the User that each update of the OR through an E5X file is added to the latest version, merging the new information with the old one.
-
Allow Full E5X: last option indicates that each update of the OR made by an E5X file completely overwrites the information in the latest OR version submitted.
-
To modify this setting the Organisation Administrator must contact its Authority to request the change.
Responsible contact Information is displayed:
-
Full Name: First and last name of the responsible contact
-
Email Address: Email of the responsible contact
-
Phone: Phone number of the responsible contact (numeric field)
Below there is the table of User Accounts. It displays the following columns that also work as filters:
-
Username: mandatory and unique for each account;
-
Email: email address of each account; it can be the same for different accounts;
-
Organisation Name: Organisation to which the user belongs
-
Organisation ID: ID of that Organisation
-
Parent Organisation: to which the Organisations’ user belongs, if any
-
Disabled: if disabled, the system displays a ‘green tick’
-
Blocked: if blocked, the system displays a ‘green tick’
-
Deleted: if deleted, the system displays a ‘green tick’
-
Roles: the assignation of roles for that user, if any
-
Created by: author of the user account
-
Created on: date of the creation
-
Last access on: date of last access

All user accounts rows are preceded by a check box to select them.
Above that check box, the system displays an ‘EXPORT’ link that is enabled when any row is selected.
Above the table of accounts, on the right side the system displays a ‘NEW USER’ button and below it a ‘Show deletion requests’ toggle.
On the last section of each row, there is a 3-dot menu providing different options depending on the status of each account, if they are disabled or block.
Edit a User account
To edit a user account:
- Click on the 'Edit' option of the 3-dot menu of the specific account:

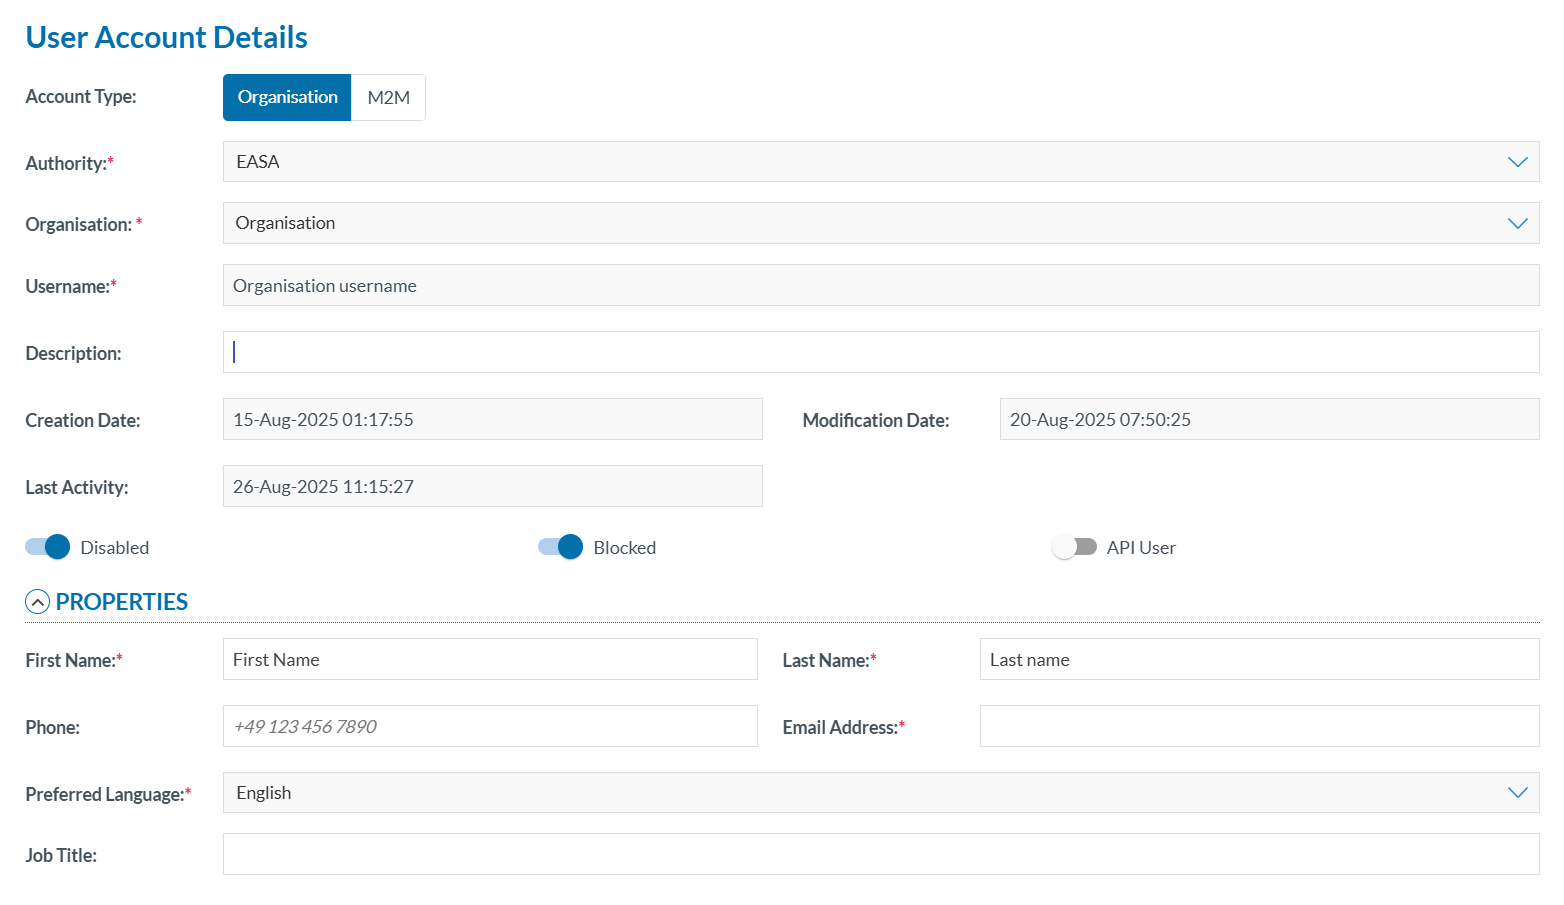
The system will display the 'User Account Details' page:
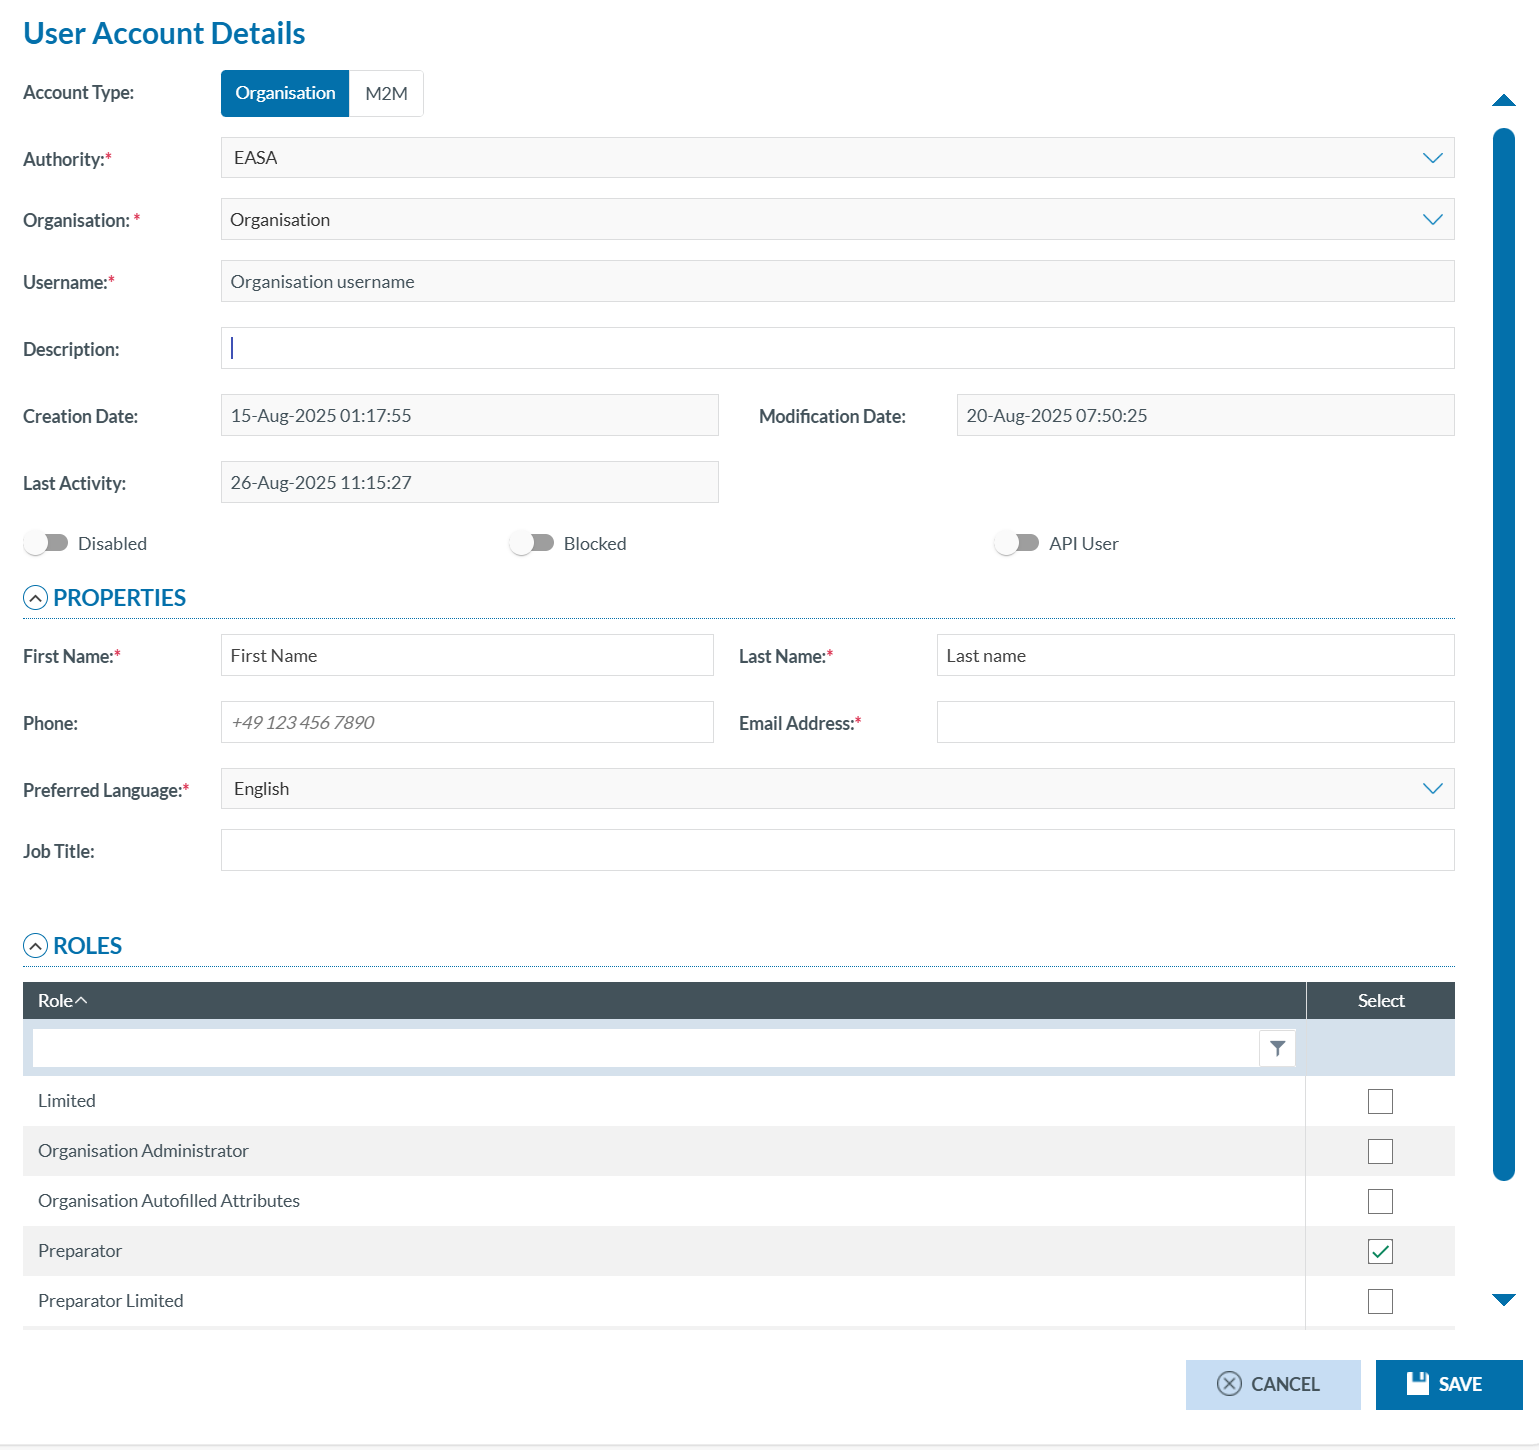
It provides the following fields:
- Account Type: Always Organisation and not editable;
- Authority: Not editable;
- Organisation: Not editable;
- Username: Not editable;
- Description: Optional free text field;
- Creation Date: Automatically generated, not editable;
- Modification Date: Automatically generated, not editable;
- Last Activity: Automatically generated, not editable;
- Disabled toggle: If activated, the account is disabled;
- Blocked toggle: If activated, the account is blocked;
- API User toggle: If activated, the account can access the platform programmatically via its API. This allows organizations to integrate E2 with their own internal systems for reporting, retrieving, and managing aviation safety occurrences.
The Properties information provides the following information:
- First Name: mandatory, free text;
- Last Name: mandatory, free text;
- Phone: Optional, numeric field;
- Email address: mandatory, email format is required;
- Preferred language: English is set and it is not editable;
- Job Title: Optional, free text field;
The Roles section displays a table containing a unique 'Roles' column, which also functions as a filter. Each row includes a 'Select' checkbox column, allowing the administrator to choose the role.
The following predefined roles are available:
- M2M;
- Organisation Administrator;
- Organisation Autoffilled Attributes;
- Reporter;
- Preparator;
- Preparator Limited.
Note that the Reporter, Preparator and Preparator Limited are excluding each other. A user can only have one of those three roles at the same time.
- Make any necessary changes to the fields that are open for editing.
- Ensure mandatory fields are completed.
- Review and Update Roles (if needed).
- Click ‘Save’. The Table of User Accounts will be updated accordingly.
Assign webforms to users
To assign webforms to a user account, follow these steps:
-
In the 'USER ACCOUNTS' table, click the three-dot menu next to the desired account and select 'Assign Webform'.
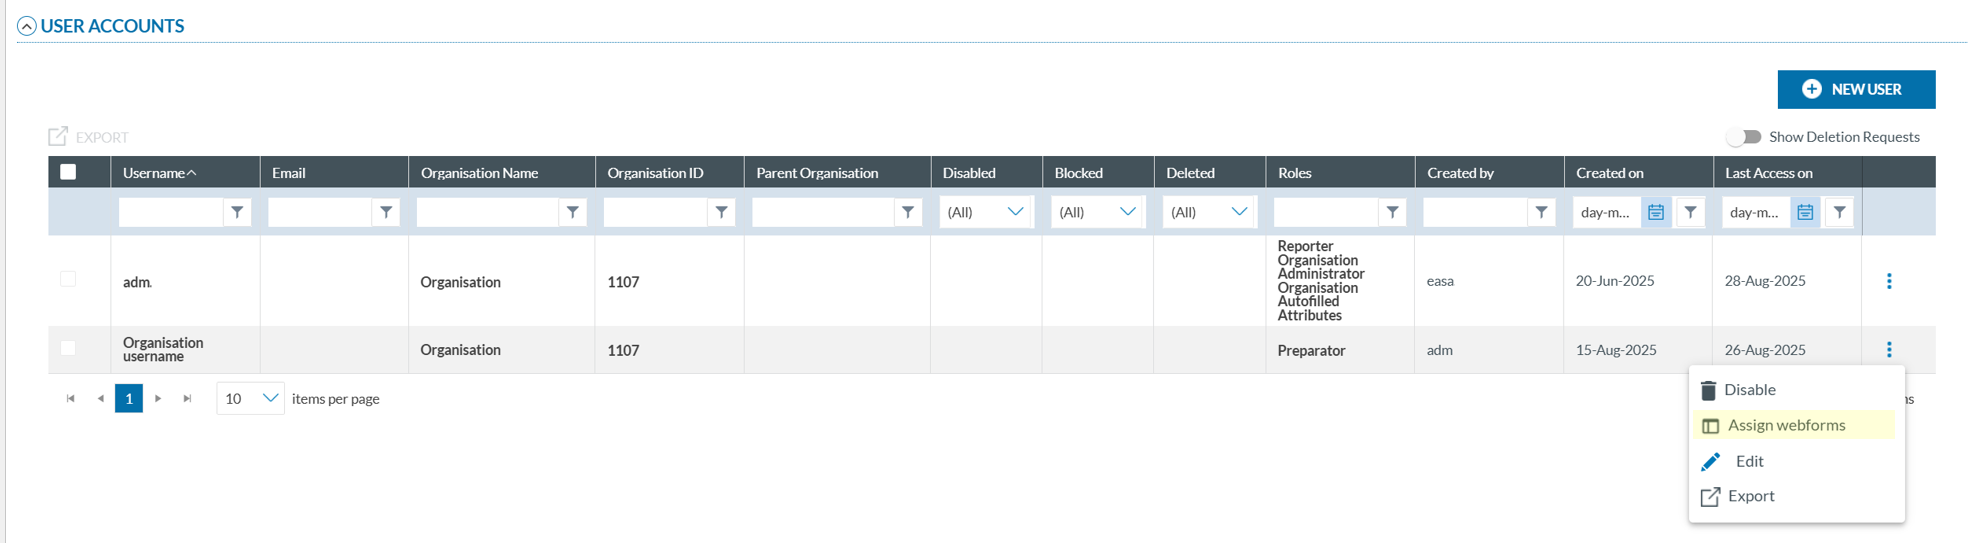
The system will open the Assign Webforms window. The window is divided into two panels:

- Available Webforms (left Panel): It displays webforms defined by the Organisation’s Authority. Ten records are shown per page and can be filtered. Each webform has a checkbox for selection, including a master checkbox to select all.
- Selected Webforms (right Panel): It shows webforms already assigned. Checkboxes allow individual or bulk selection. Items can be reordered via drag-and-drop.
- You can:
- select webforms from the left panel using the checkboxes, then click 'Add' (located between the panels) to assign webforms.
-
select webforms from the right panel using the checkboxes, then click 'Remove' (located between the panels) to unassign webforms.
- Click 'SAVE' to confirm (the system will store the selected webforms for the specific user account) or click 'CANCEL' to discard changes.
Disable and enable a user account
Disable a user account
To disable a user account:
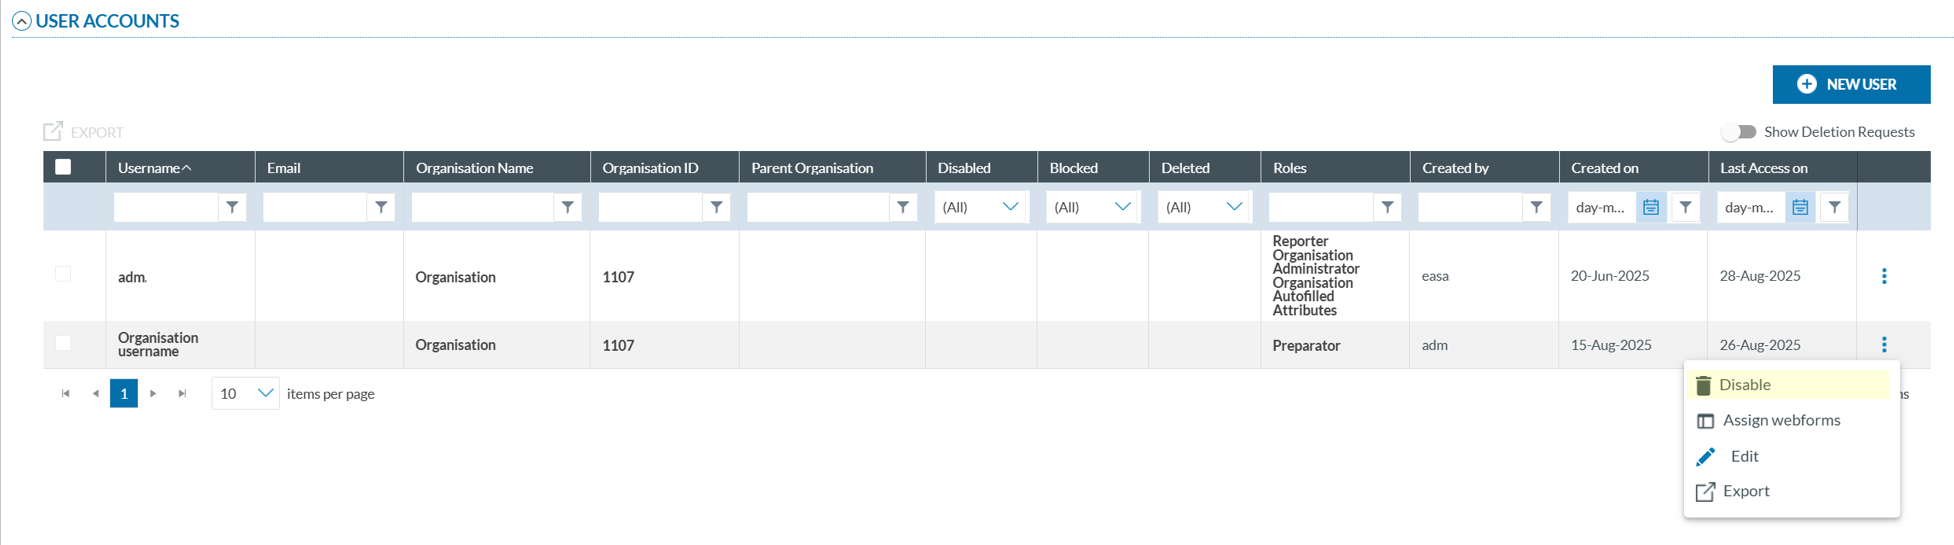
- Click ‘Disable’ from the 3-dot menu of the desired user in the 'USER ACCOUNTS' table. A confirmation message will appear.
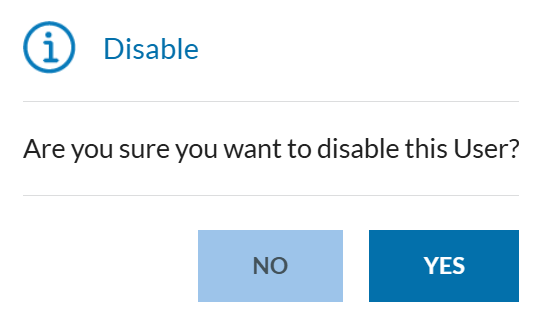
- Click 'YES' to confirm the action (or 'NO' to cancel). The system disables the account.
When an account is disabled, it is also automatically blocked. Both 'Disabled' and 'Blocked' columns will show a green tick.
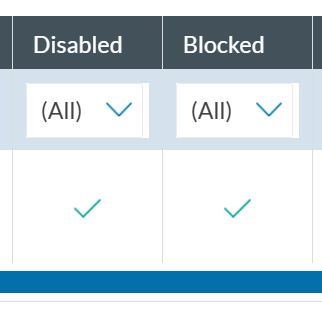
Enable a user account
To enable and unblock a user account:
- Click ‘Edit’ from the 3-dot menu:
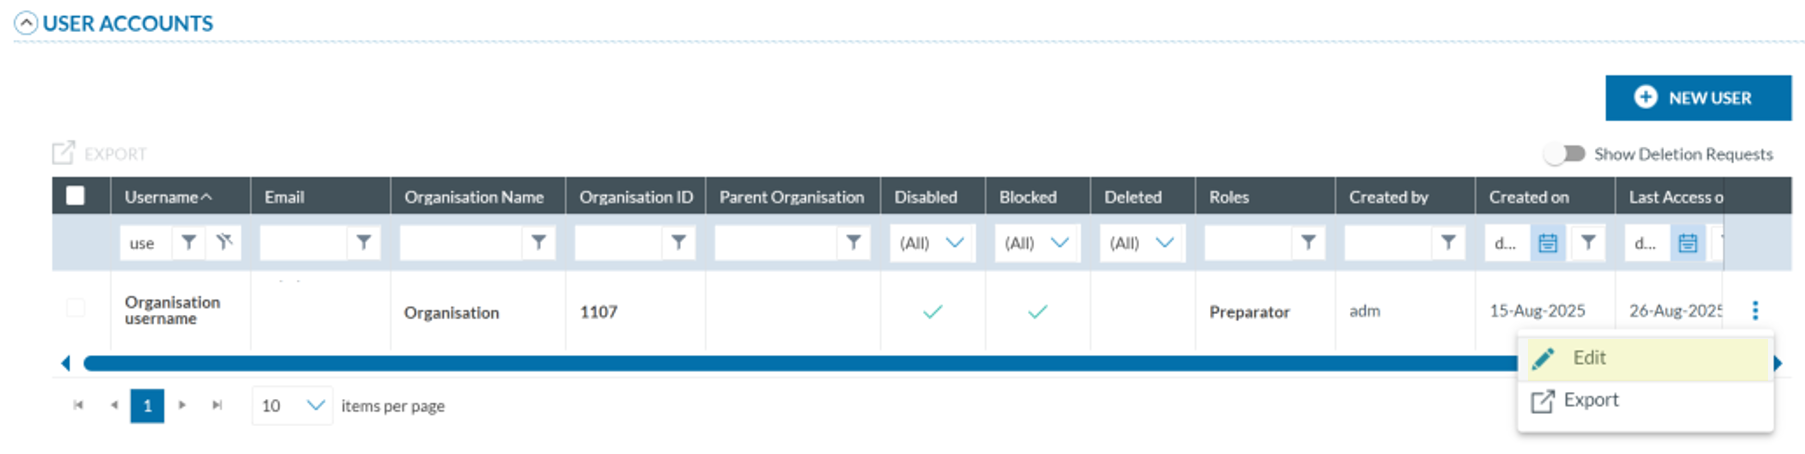
The system will open the 'User Account Details' window:
-
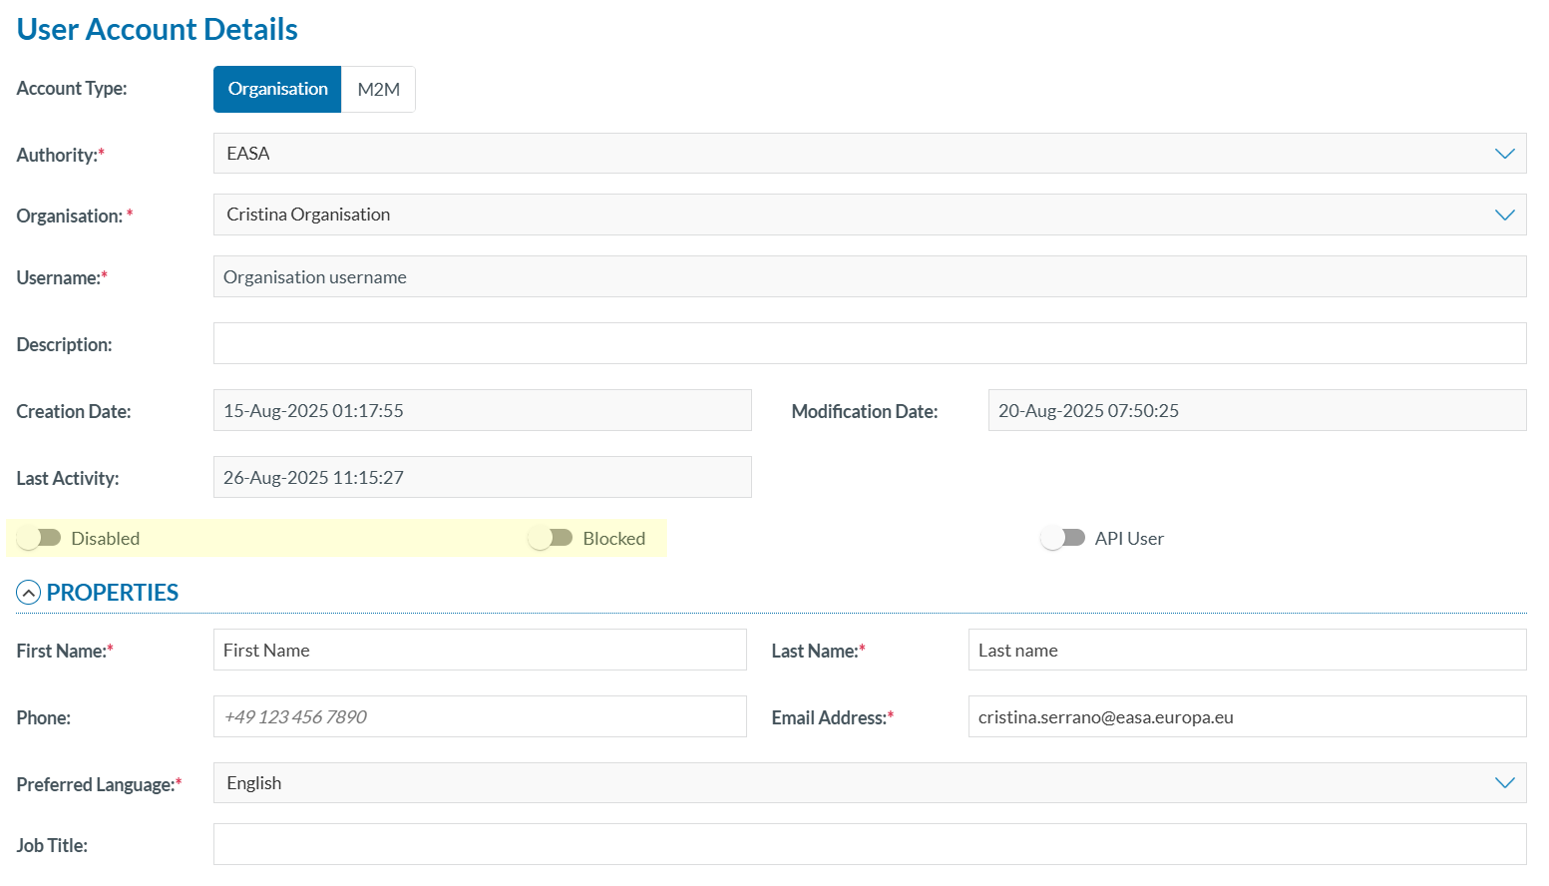
Slide the ‘Disable’ and ‘Blocked’ toggles to the left to deactivate them:
-
Click ‘SAVE’ to enable the user accounts.
Export user accounts
To export user account data to Excel files, either individually or multiple a once. Follow the steps below for each method:
Individual Export
To export a single user account:
- Click ‘Export’ from the 3-dot menu of the desired user in the 'USER ACCOUNTS' table.
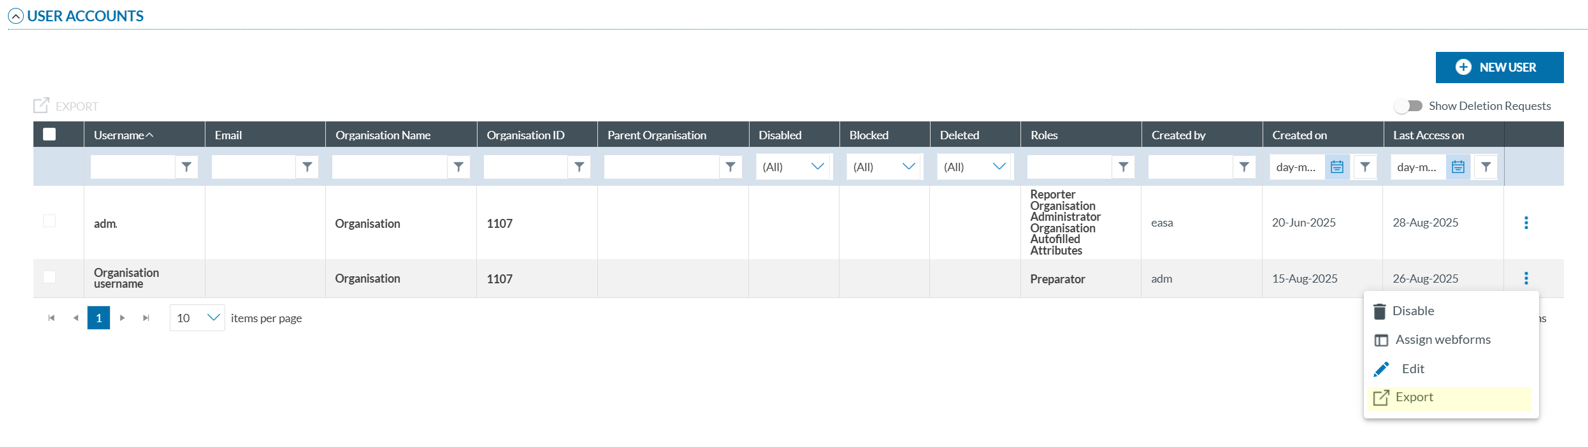
The system will automatically generate and download an Excel (.xlsx) file with the data of the selected account.
Multiple Export
To export multiple user accounts at once:
- Select the checkboxes next to the accounts you wish to export from the 'User Accounts' table:
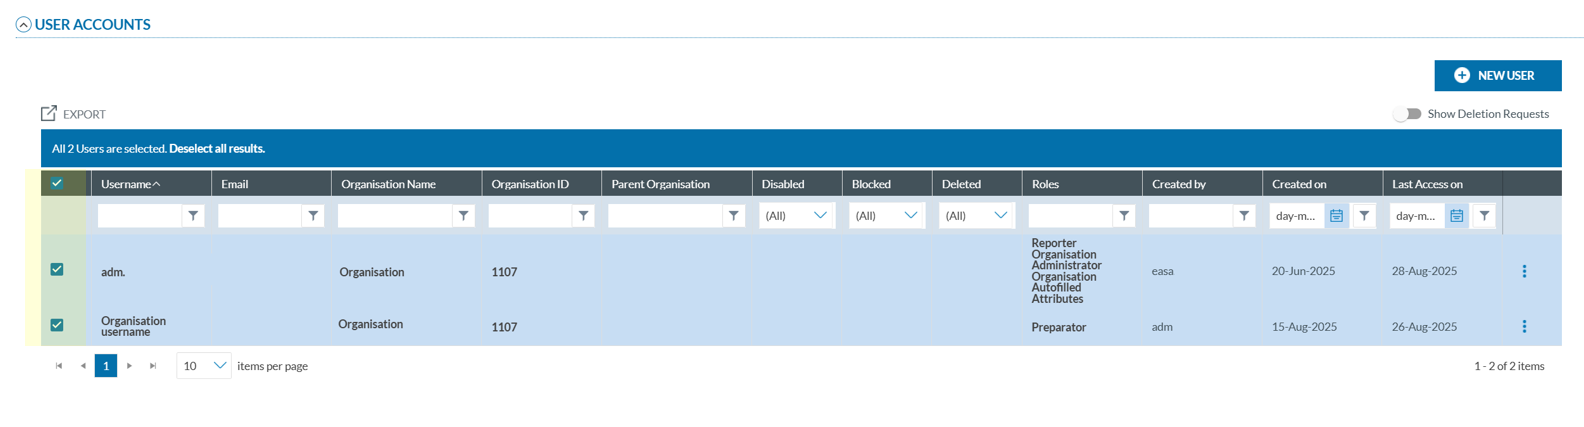
- Click 'Export' button located above the table:
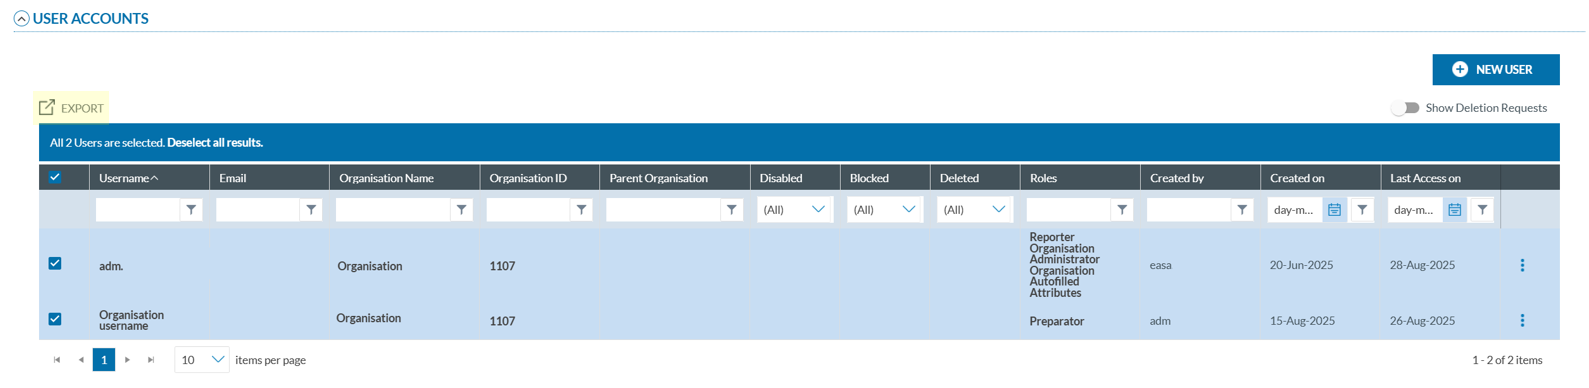
- A confirmation message will appear indicating that the export is being processed:

Once complete, a ZIP file containing the exported Excel files will be sent to the organization’s registered email address.
Create a user
To create a new user:
- Click the ‘NEW USER’ button located above the 'User Accounts' table:
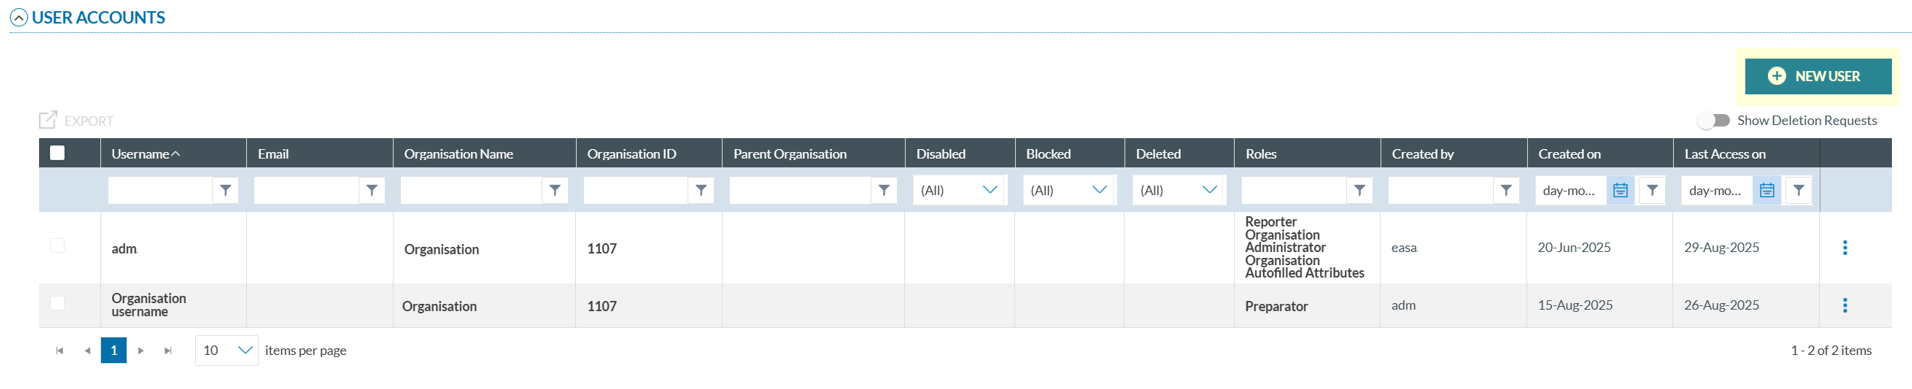
The system will open a page similar the 'User Account Details' page:
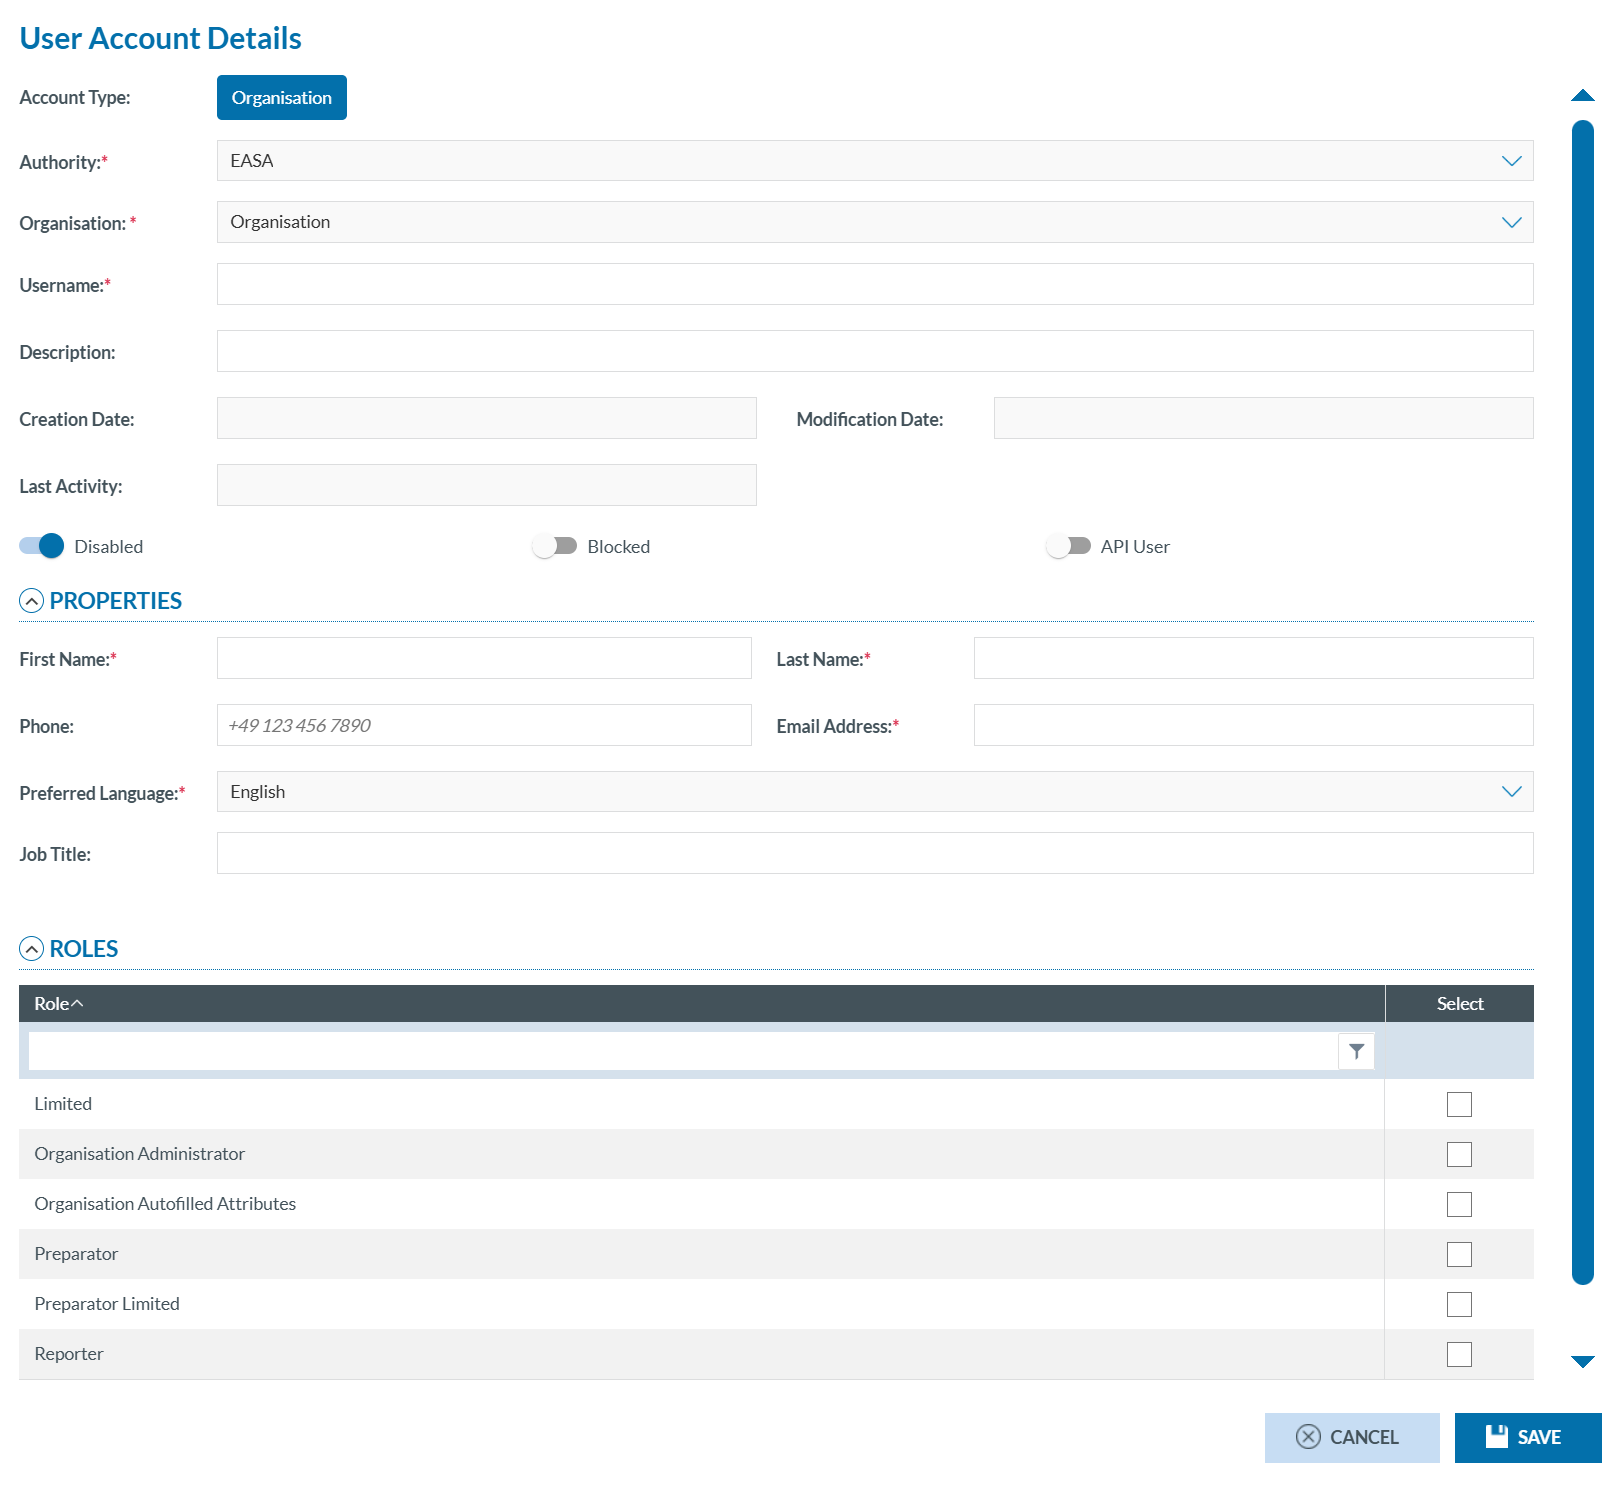
- Fill in all required fields (refer to the Edit a user account section for more information).
- Click ‘SAVE’ to finish.
Until the user logs in for the first time, the account will appear as 'Disabled'.
Webform
To access and manage webforms, you must click the 'Webform' tab. The system will display a structured interface with the following components:
-
The system will open the Assign Webforms window. The window is divided into two panels:
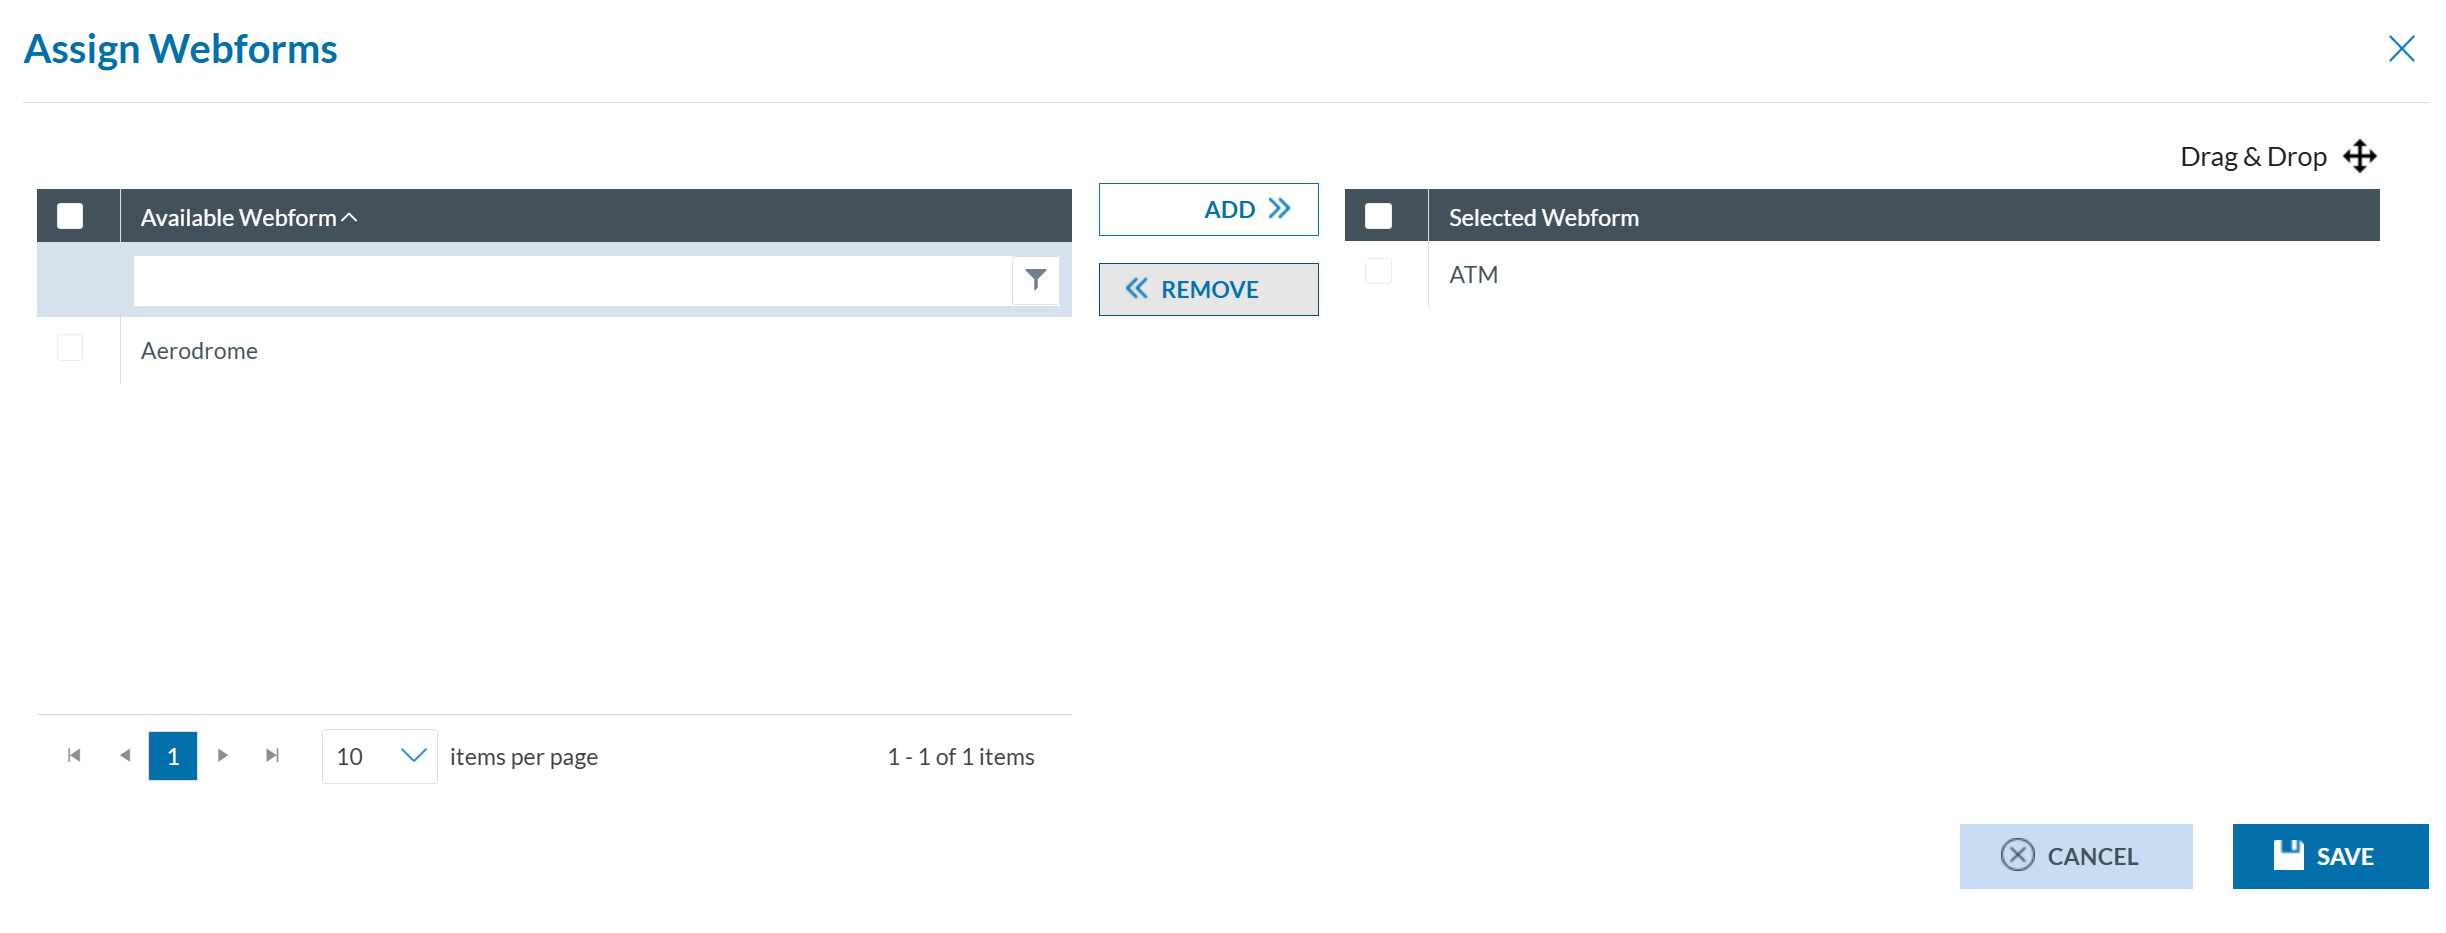
- Available Webforms (left Panel): It displays webforms defined by the Organisation’s Authority. Ten records are shown per page and can be filtered. Each webform has a checkbox for selection, including a master checkbox to select all.
-
Selected Webforms (right Panel): It shows webforms already assigned. Checkboxes allow individual or bulk selection. Items can be reordered via drag-and-drop.
- You can:
- select webforms from the left panel using the checkboxes, then click 'Add' (located between the panels) to assign webforms.
- select webforms from the right panel using the checkboxes, then click 'Remove' (located between the panels) to unassign webforms.
Autofilled Attributes
The Autofill Attributes tab lets Organisation Administrators predefine values for specific webform fields. When users from the organisation fill out a form, these values appear automatically. Upon clicking the tab, Organisation administrators will see the following screen:

To Configure Autofill Attributes
1. Explore Available Attributes (left pane)
- On the left pane, use the search filter to find attributes by name or ID.
- Browse the Taxonomy Browser below to locate the desired attribute.
2. Add Attributes to the Selection
- Click 'ADD' next to the search filter.
- Only one attribute can be added at a time.
- The selected attribute will appear in the right pane (Selected Attributes).
3. Edit or Remove Attributes
- Hover over the last section of any row to reveal the 'Edit' and 'Delete' icons.
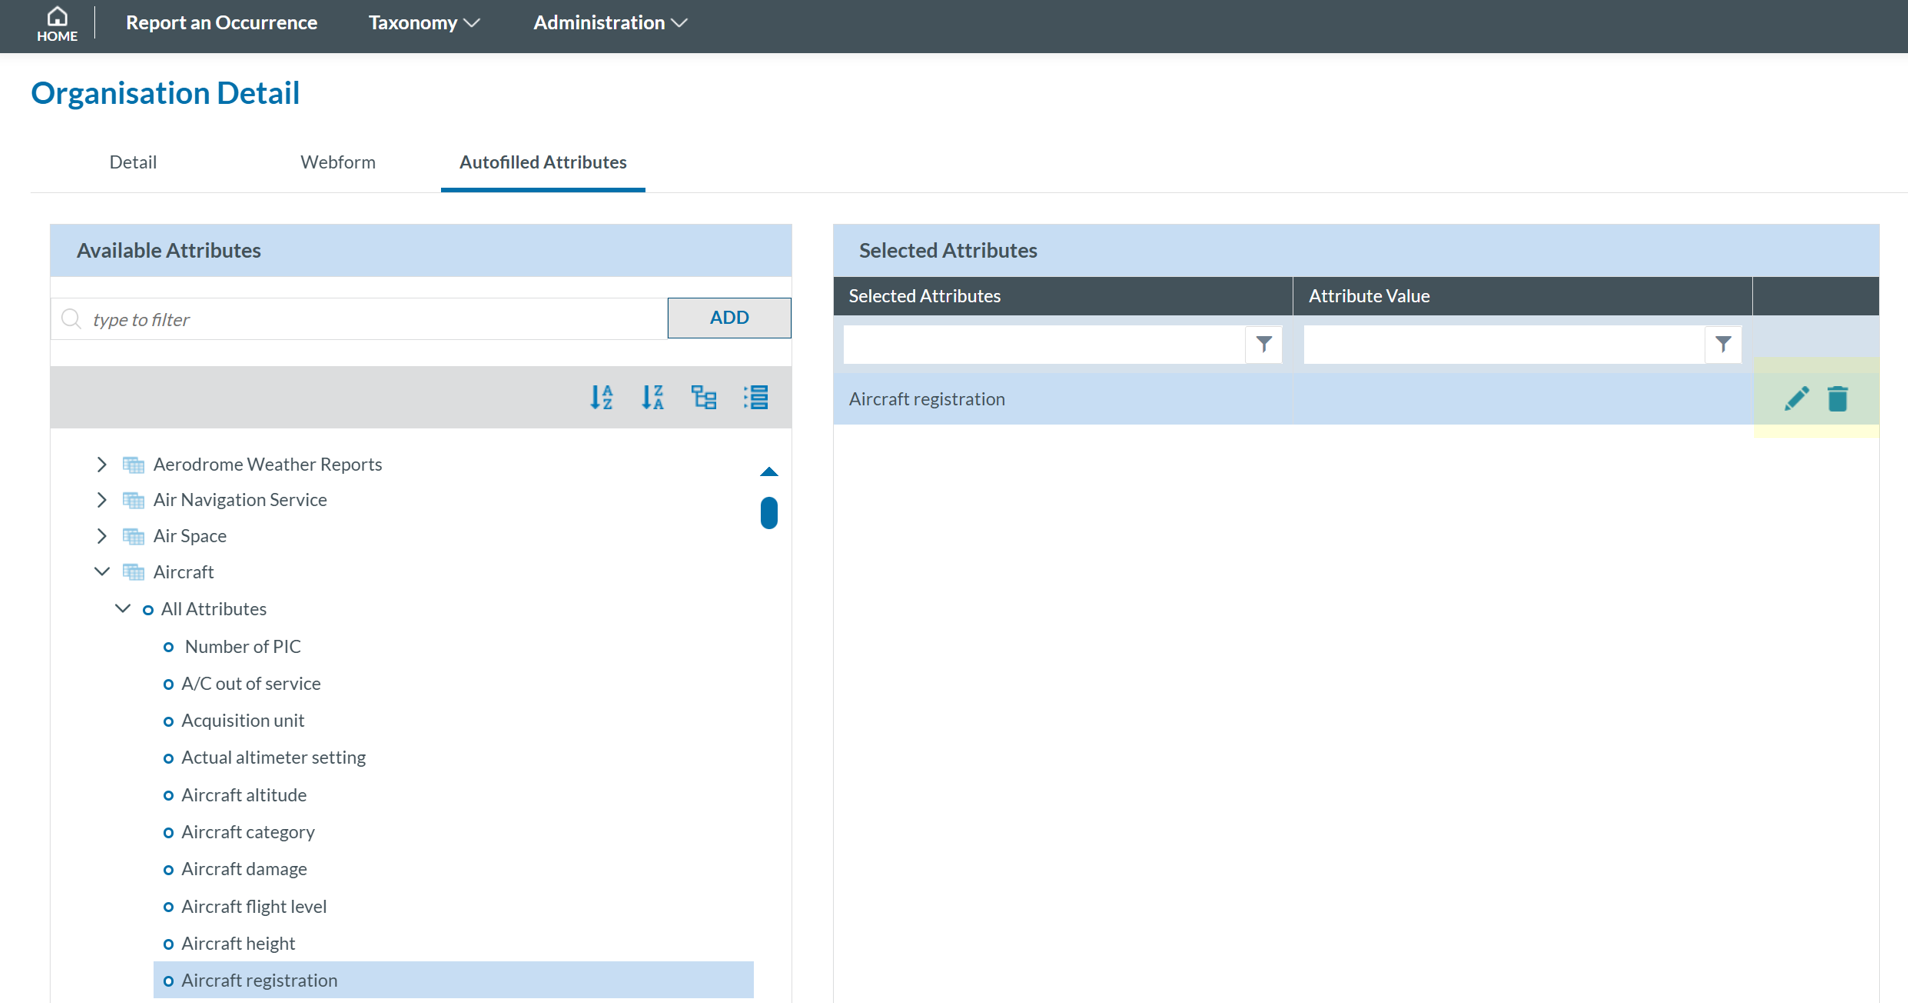
- Click 'Edit' to open the Attribute Value window 'Delete' to remove the attribute.
4. Assign a Value
- Click Select Attribute Value.
- A selection page will appear based on the attribute type.

- Choose a value and click 'SAVE'.
- The selected value will return to the Autofilled Attributes window.
5. Finalize and Save
- Once all desired attributes and values are set, click 'SAVE'.
Note that the Authority of the Organisation may assign selected attributes to the Organisation. These attributes will have associated values. In some cases, the Authority will allow the Organisation to update these values, while in others, the values will remain non-editable.
My account
This part of the Reporting portal includes the personal information of the User and the parts they can customize.
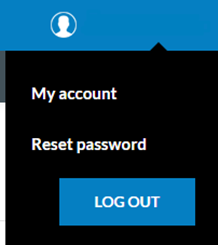
Clicking on 'My account' will show the following page:
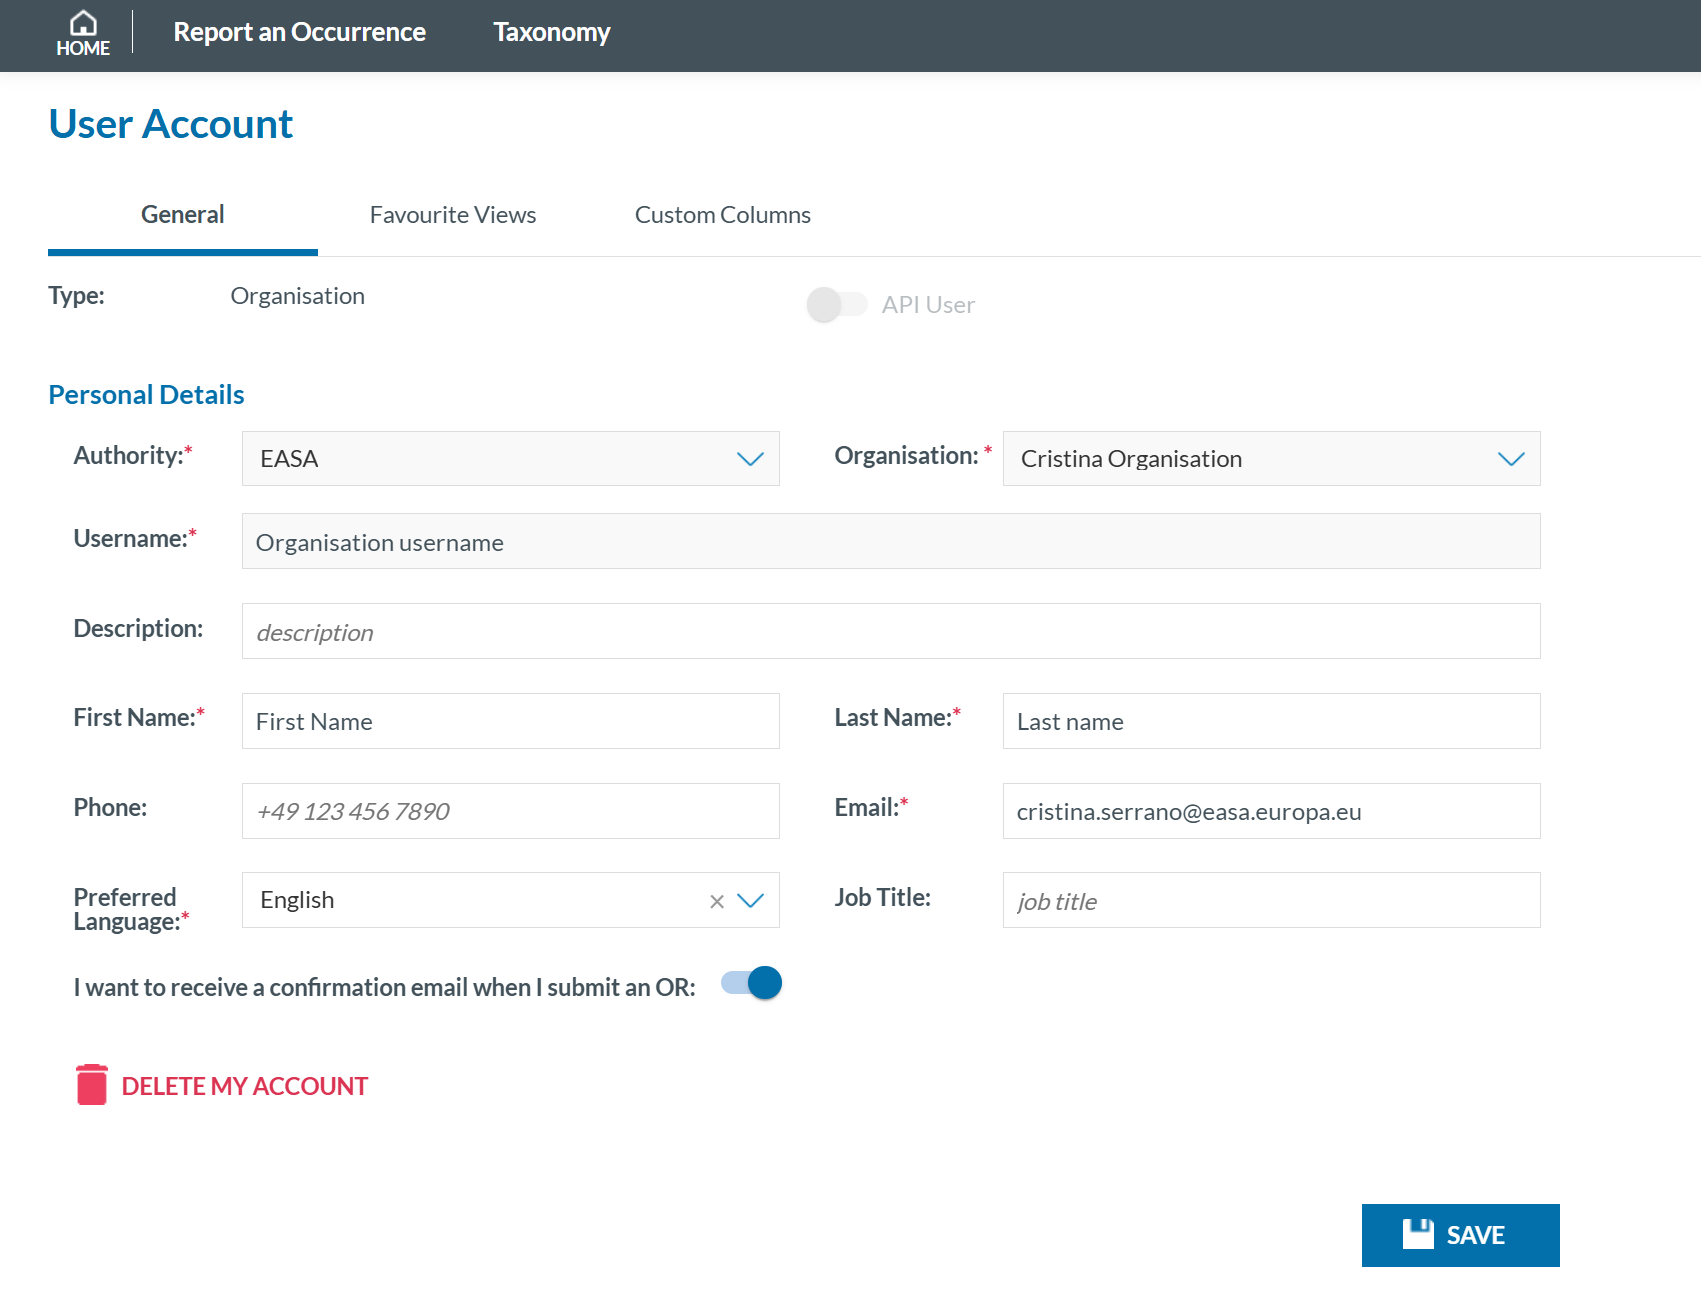
General
Here are the user's personal details. Some fields are read-only and cannot be modified:
You can choose whether to receive email confirmations when submitting an OR by using the toggle switch.
You can delete your account by clicking the 'DELETE MY ACCOUNT' button.
Custom Columns
As explained in the Home section, the information displayed in the table is customizable. You can edit it directly from the table on the 'Home' page or here, using the Custom Columns option.
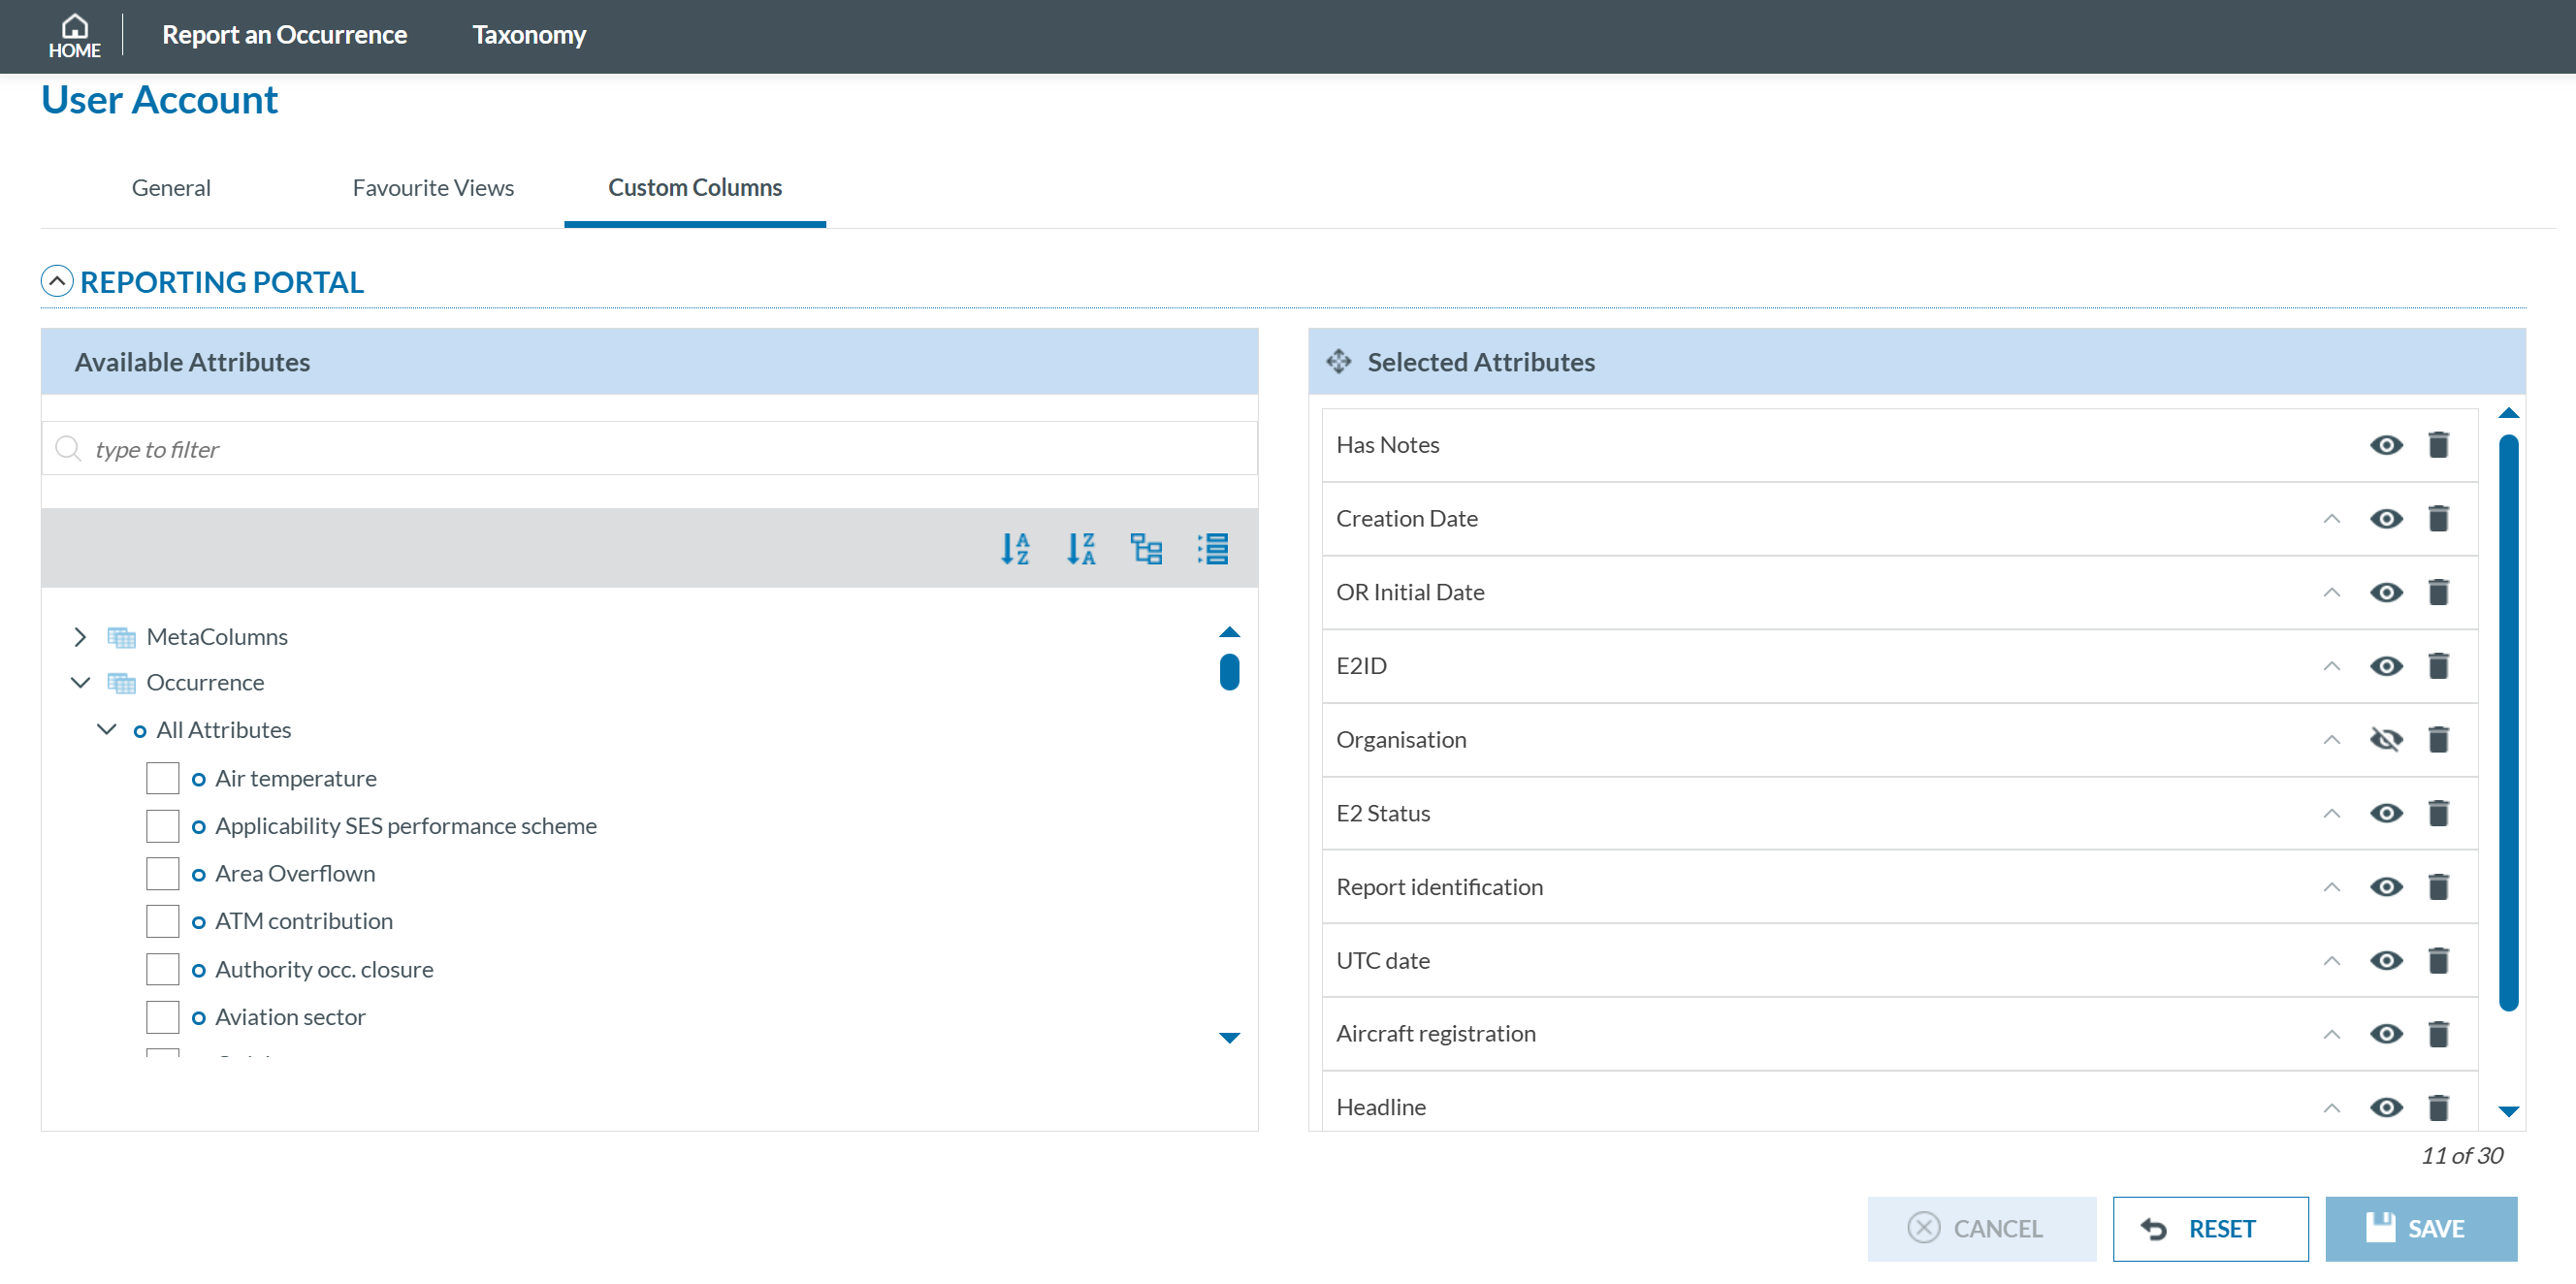
On the left side there is the list of metadata fields and attributes that can be selected to include in the List of Reports table. The maximum number of fields the table can display is 30. There is a count under the left part of the screen advising how many are currently displayed.
The list is customizable. To add a metadata or attribute you have only to tick on the box  near to the metadata/attribute you want to include and it is automatically added at the bottom of the list.
You can rearrange the metadata/attributes on the left by clicking in one and, without releasing the field, move it up or down, as indicated in the top left with this icon  ..
..
The fields are also sortable. It is important to remark that the sorting is done by sequence as marked. One click on the arrow 
of the metadata/attribute will arrange them in ascending order, second click will arrange the same field in descending order and the third click will remove the sorting of that field. The number in red under the arrow indicates the sorting sequence of the field.
The eye icon  is to automatically hide or display the field in the table. By default, the eye is active and the field is displayed to the user.
The bin icon  is to remove the field from the list. This can also be done by unclicking the box of the metadata/attribute in the tree on the left side of the screen.