5. Views Management
5.1. Introduction
A View is a visual representation of ordered data (Attributes) concerning a safety event (accident or incident) to facilitate human analysis and its collection and introduction in a report. Views are groups of Topics placed in a particular sequence (hierarchical tree).
The specific Views available depend on the particular Authority the E2 user is connected to and their user roles.
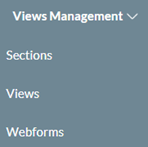
Administrators can build Authority Views in E2. They can access the Views management through the ‘Views management’ menu displayed in the bar:

5.2. Sections
A section is a cohesive set of Attributes of the Central or Custom Taxonomy depicting a sub-domain of a safety event registered in an E2 report.
The Views consist of sections. As long as a section is associated with a view, the section cannot be edited.
Administrators can access and manage ‘Sections’ by clicking on ‘Sections’ of the ‘Views management’ menu (image above).
The system will display the Sections management page:
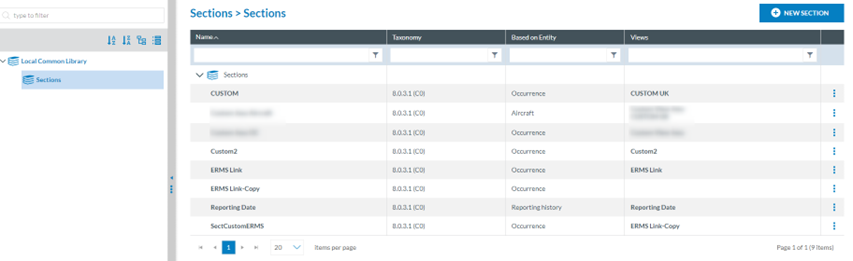
The Sections available to the Administrator are saved under the Local Common Library, Sections folder or its subfolders.
The table of sections displays the folder where Sections are stored and the following columns that also work as filters:
· Name: unique for each Section
· Taxonomy: The Administrator can only select the last released version
· Based on Entity: it sets the Entity of the Taxonomy on which the section is based
· View: the view to which it is associated
Above the table, there is a ‘New section’ button to create sections.
5.2.1. Section Management
5.2.1.1. Create a section
The Administrator can create a section through the ‘New Section’ button above the table of sections. The Administrator has to click on this button, and the system will display the Section page:
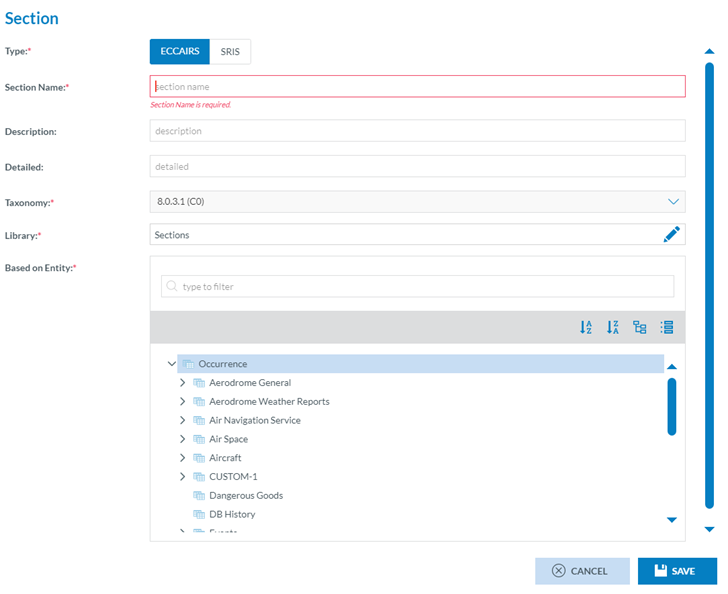
The mandatory fields are the following:
· Type: ECCAIRS or SRIS, depending on the Authority type
· Section Name: unique for each section
· Taxonomy: it sets by default the last released version
· Library: it sets the ‘Sections’ Library under the Local Common Library. If existing, it could be a subfolder of sections
· Based on Entity: it displays the Taxonomy tree, so the Administrator has to select an Entity or sub-Entity
The not mandatory fields are only Description and Detailed, which is like a long Description.
The Administrator must fill in all the mandatory fields and click the ‘Save’ button.
The system will save the data in the database and display the new section in the list of sections.
5.2.1.2. Preview a section
The Administrator has to click on the ‘Preview’ option of the 3-dot menu of the specific section, and the system will display the Preview page of that section:
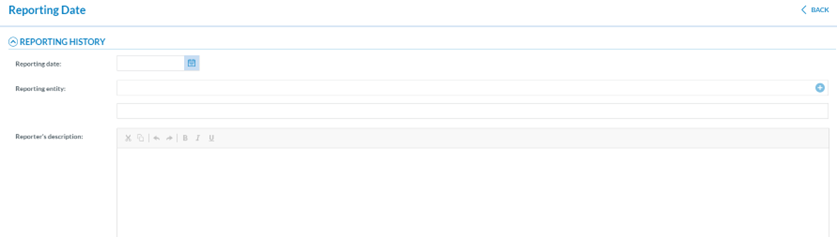
The fields are not editable since it is a Preview page.
5.2.1.3. Copy a section
The Administrator has to click on the ‘Copy’ option of the 3-dot menu of the specific section. The system will add a section to the table of sections with the same name + ‘Copy’, i.e., if the copied section is called ‘Custom’, the resulting section is called ‘Custom-Copy’; it will be identical to the copied section with the addition of ‘Copy’ in the name.
5.2.1.4. Edit a section
Only sections not being used in Views will provide the' Edit' option in the 3-dot menu of the table of sections.
The Administrator has to click on the ‘Edit Section’ option of the 3-dot menu of the specific section, and the system will display the ‘Edit’ page:
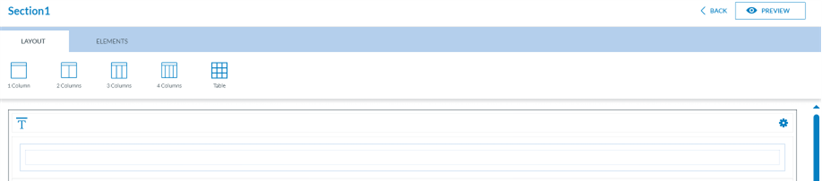
5.2.1.5. Layouts
The system displays the ‘Layout’ tab by default, where the Administrator has to select a number of columns (from one to four) or a table layout. The system will add as many sections in the different layouts as needed:
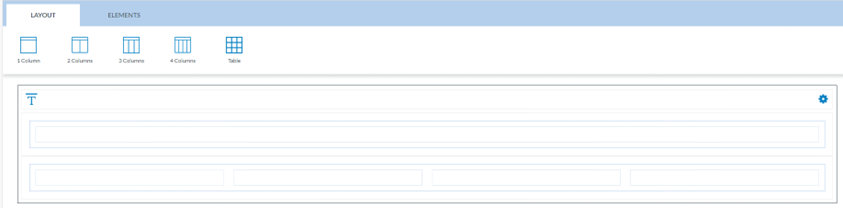
Above the added layouts, the system provides a ‘Title’ area with a configuration icon:

The Administrator can update it by clicking through the icon.
The system will display an Edit window:
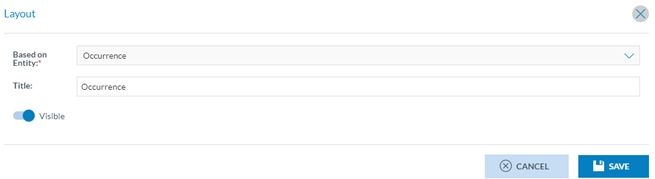
The Based on Entity field will be filled in by default with the Entity in which the section is based.
By default, the Title field will be filled in with a copy of that Entity. This field will be editable by Administrators.
The Visible toggle will be activated by default. The Administrator can deactivate it and make it invisible.
Each one of the fields below the Title area can be updated through the configuration icon, as well as being moved or deleted:

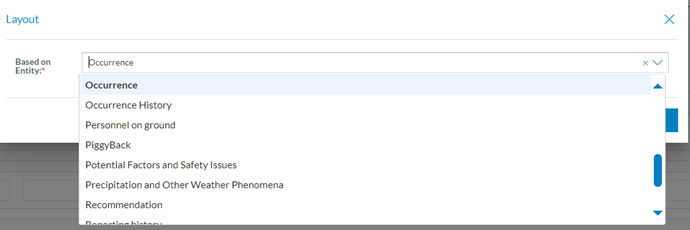
The configuration icon displays an edit window where the Administrator can update the Based on Entity field. The entities provided in the Based on Entity drop-down menu are children of the Based on Entity of the current section. The Administrator can update the field and click on the Save button:
The rubbish icon deletes the specific field, and the Administrator can alter the order of the fields by clicking the arrows.
5.2.1.6. Element
The second tab of the Section preview page is the Elements tab. The Administrator can click on this tab next to the Layout tab, and the system displays:
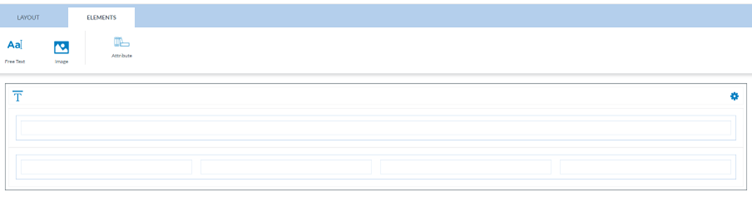
The Administrator can add a free text field, an image, or Attributes through this tab.
The Administrator has to drag the specific elements and drop them in the necessary fields individually.
Free text: When dropping it, the system will open a Free text window:
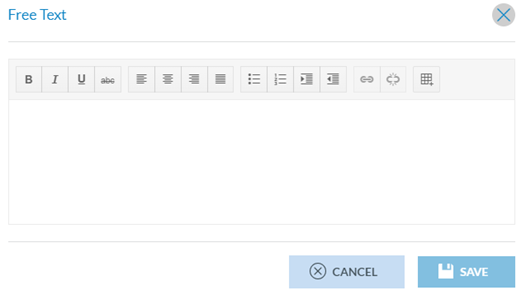
The user must fill it in with text and click on Save. Once saved, the system will display the Free text Attribute in the selected field:

Image: to add an image, the Administrator has to drag the ‘Image’ element to the specific field, and the system will open the upload image window:
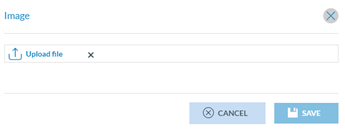
The Administrator has to click on ‘Upload file’, and the system will open the image browser. The Administrator has to select an image and click on the Save button.
The system will add the image element to the selected field:

Attribute: The Administrator has to drag the ‘Attribute’ icon and drop it in the desired field. The system will open the Attribute window:
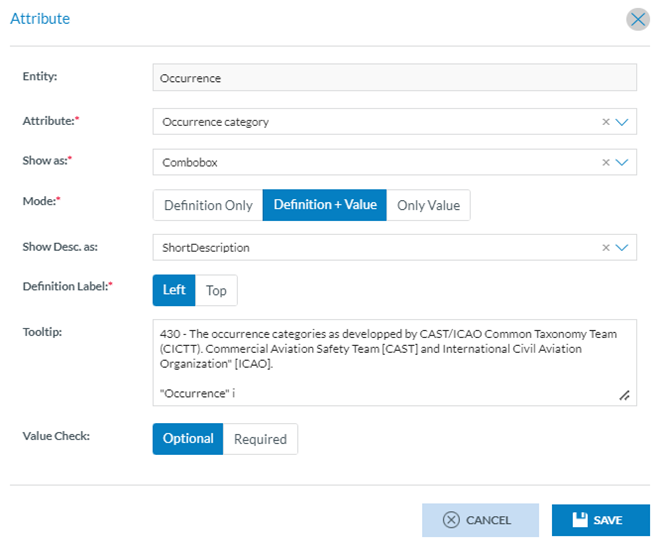
Therein, the Administrator has to fill in the
· Attribute: this drop-down menu provides the Attributes of the Entity of the section (Occurrence in this case)
· Show as: depending on the selected Attribute datatype. This drop-down menu offers different options, i.e., combo box, radio button, tree-view, etc.
· Mode: By default, the system provides ‘Definition+Value’, but Definition Only or Only Value instead can be selected
· Show Desc.: This field does not appear when selecting the ‘Only Value’ Mode. When appearing, by default, it sets Short description, but the following are also available:
ü Description
ü Explanation
ü Extended
· Definition Label: By default, it sets ‘Left’, but the Administrator can also select ‘Top’
· Tooltip: it is set by the system once the Attribute is selected; it includes the Attribute number, as referred to in the Taxonomy, and a Taxonomy definition that the Administrator can extend
· Value check: By default, it sets ‘Optional’, meaning that filling this Attribute in the section is not mandatory. The Administrator can put ‘Required’ if the field is compulsory in the section.
Once the Administrator has filled in the mandatory fields, they have to click on the Save button, and the system saves the updates of the section in the database and returns to the ‘Edit section’ page in the Elements tab, including the selected Attribute in the chosen field.
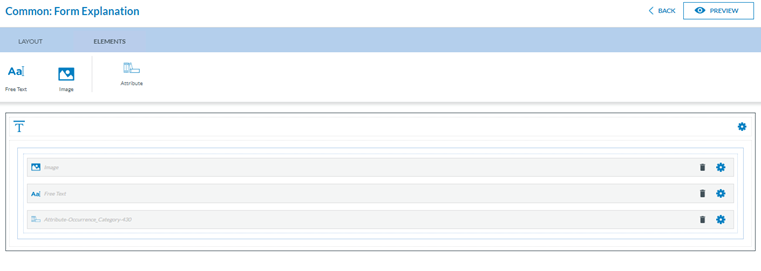
The Administrator can click on the ‘Preview’ button above the tabs, and the system will display the Preview page for that section, with the layout and elements previously selected:

5.2.1.7. Edit properties of the section
The Administrator has to click on the ‘Edit Section properties’ option of the 3-dot menu of the specific section, and the system will display the Edit Section properties page:
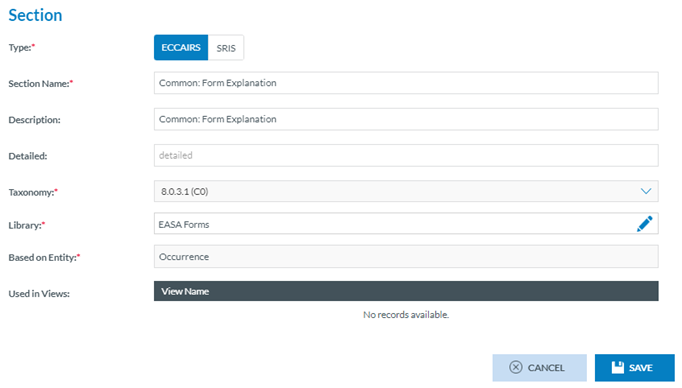
All the fields are editable except the Taxonomy and the ‘Based on Entity’, which is the Entity selected through the section creation process. The Type can be chosen amongst ECCAIRS and SRIS only if the Authorities are dual (NAA and SIA).
The ‘Used in Views’ in the example is empty because this section is not associated with any view yet, but when used, this association is not editable through this page. The association is created through the ‘Views’ menu.
The Administrator must update the desired fields and click the ‘Save’ button. The system will save the database updates and update the table of sections accordingly.
5.2.1.8. Delete a section
The Administrator can only delete the sections if they are not used in a view.
The Administrator has to click on the ‘Delete’ option of the 3-dot menu of the specific section, and the system will display a confirmation message. Suppose the Administrator confirms the action and the section is not used. In that case, the system will be deleted from the database, a message will be displayed on the section deletion, and the section of the table of sections will be removed.
5.3. Views
Views are made of sections grouped into topics based on a Taxonomy Entity.
Views and Topics only change the way the data becomes visible. Reports created in any View can be looked at in any other View since the Attributes that contain the information are always shared.
The Administrator has to unfold Views management and click on ‘Views’, and the system will display the Views menu:
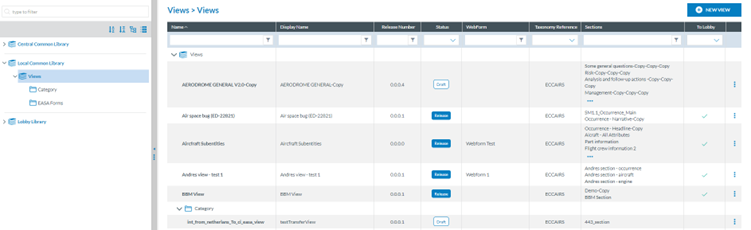
The left page shows the Libraries available to the Administrator:
The Central Common Library: it is an EASA ECCAIRS level library. The Authority’s Administrator cannot add views to this library, edit or delete them; only preview and copy them and view their properties.
Local Common Library: The views of this Library are available to Authority users with the correct privileges. The Administrator can create views in its View folder or subfolders and manage them: edit, delete, copy, and preview.
Lobby Library: They are the Libraries where the Administrator receives the Views (and queries) transferred through the ‘To Lobby’ functionality. Administrators can view, access the views, or copy them to the Local Common Library ( Views libraries, but neither edit nor delete them in the Lobby Library.
List of Views: The system displays in the centre of the page the table or list of Views, with the following columns per each view row working as filters:
· Name: it is an internal term for a view. It is unique for each view
· Display Name: it is unique and how it is displayed to the users of the E2 platform
· Release number: it is composed of four groups of numbers
· Status: can be Draft, Released or Archived
· Webform: to which it is associated
· Taxonomy reference: on which the view is built: ECCAIRS or SRIS Taxonomy;
· Sections: the sections used in the view
· To Lobby: if the view can be transferred to another environment or Authority.
Above the table, the system displays the ‘New View’ button.
5.3.1. Views Management
5.3.1.1. Create a view
The Administrator can create a View in the Local Common Library but not in the Lobby.
The Administrator has to click on the specific folder of the desired Library where to store the new view, click on ‘New View’ above the table of views, and the system will open the ‘New View’ page:
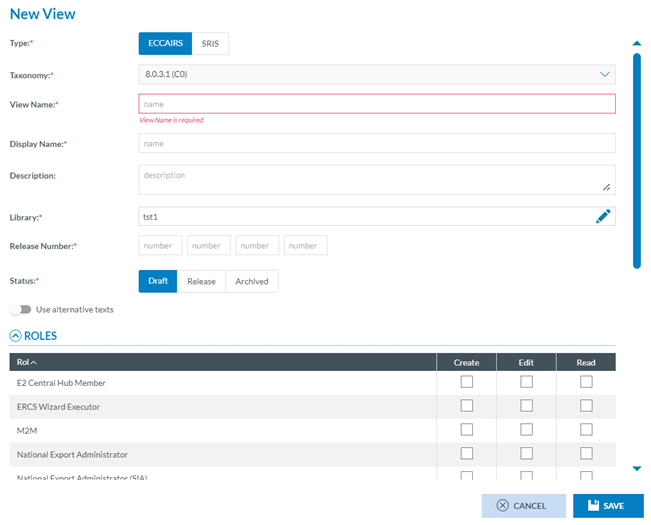
· The type is ECCAIRS or SRIS, depending on the Taxonomy under which the View is built.
· Taxonomy is always the last released version available for the Authority, and it is not an editable field.
· View Name is an internal mandatory name the Administrator has to assign to the View. It is unique for each View.
· Display Name: it is the mandatory Name of the View displayed by the platform to all users
· Description: it is optional
· Library: Mandatory field. Administrators can select Local Common Library locations.
· Release Number: Mandatory. It is composed of four groups of numbers, all mandatory.
· Status: Draft, Release and Archived are not eligible on the creation page
· Use Alternative Texts toggle: To indicate that the alternative texts assigned to the Attributes and values in the Custom Taxonomy of the Authority will be used in the view
The Administrator has to fill in all the mandatory fields as needed.
Below the fields is the Roles table with all the available roles, where the Administrator has to select Create, Edit, and Read rights for the corresponding roles.
Once Administrators have selected the roles’ rights, they have to click the ‘Save’ button.
The system will save the data in the database and will add the new view to the table of views of the Views menu.
5.3.1.2. Edit a view
To edit a View, Administrators have to click on the ‘Edit View’ option of the 3-dot menu of the specific view at the table of Views. The system will display the ‘Edit View’ page:
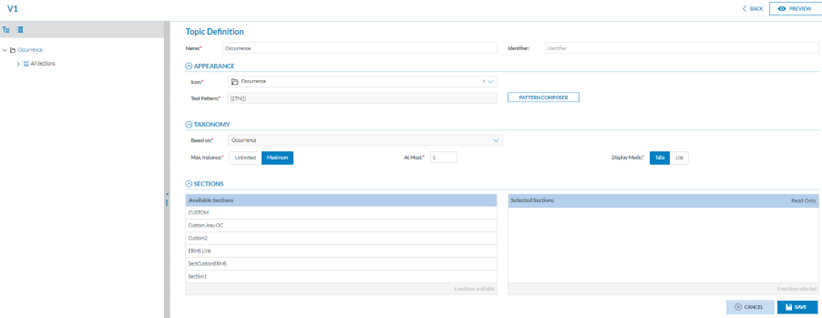
· On the left side, there is the 'Topic tree.'
· On the right side, there is the Topic definition for ‘Occurrence’ (‘Recommendation’ for SRIS-based views) or the added topic in the Topic tree (see next section for further detail)
5.3.1.3. Edit the root topic
The root topic depends on the root Entity of the Taxonomy the View is based on:
· ‘Occurrence’ for ECCAIRS Taxonomy
· ‘Recommendation’ for SRIS Taxonomy
From now on, we will refer to ‘Occurrence’, but it also applies to ‘Recommendation’ topic.
The first topic, 'Occurrence', is editable on the left pane.

Administrators must click the ‘ADD’ icon next to ‘Occurrence’, and the system will add a field below ‘All Sections’.
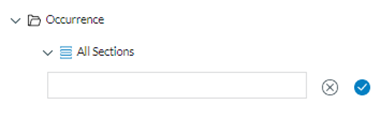
Administrators have to introduce a Name and click on the OK icon. The system will add the topic to the left pane under the ‘Occurrence’ topic:
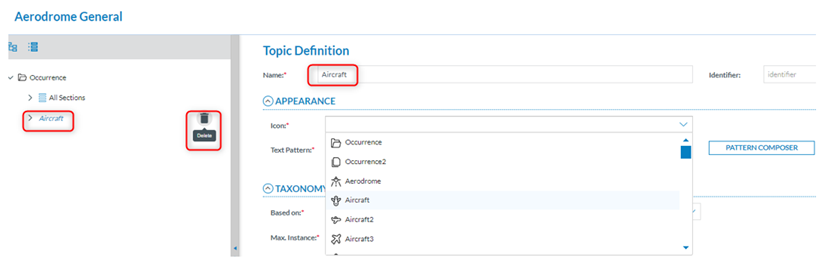
The topic will provide a Delete icon next to it. At the same time, the Topic Definition page will bring the created topic to the Name field (See image above).
On the right side of the screen, Administrators can edit the topic properties by changing the mandatory name and the identifier (optional field).
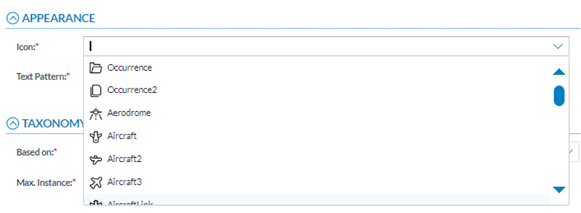
Update the icon
There are different predefined icons. You can select one through the icon selector:
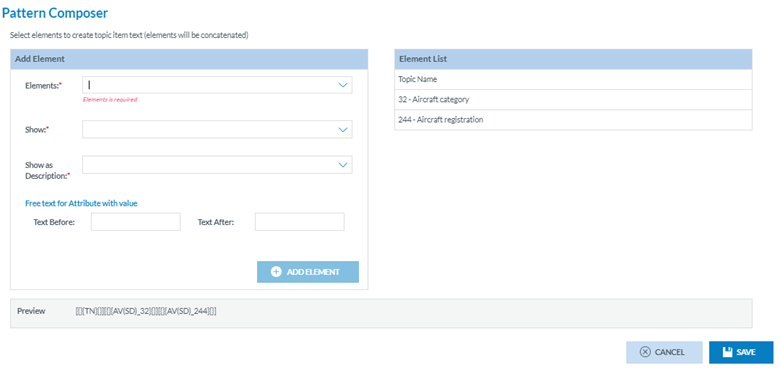
Pattern Composer
When viewing a record, the text shown in the Topic tree results from executing the formula in the text-pattern associated with the topic when creating the view.
When creating a topic within a view, the text pattern used in the Topic tree can be constructed by clicking the 'Pattern Composer' button.
A new window to select Attribute property combinations will be displayed.
Administrators can add several elements and configure the way they are displayed.

Select and configure an Element (Show and Show as Description mandatory drop-down menus). Click on the 'Add element' button to add it to the Pattern Composer:
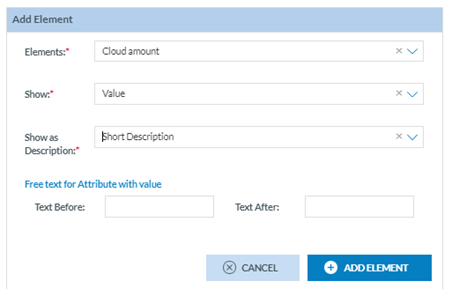
The Element will be added to the ‘Element List’ on the right side of the right panel:
Administrators can add as many elements as needed and can organise the way the elements are shown in the pattern by dragging and dropping them in the Elements list:
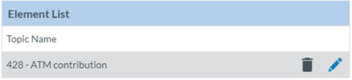
To edit or delete an existing element, click on the 'Edit' or 'Delete' button that appears while hovering:
When Administrators have added all the needed elements, they have to click on the ‘Save’ button below the list. The system will save the update in the database and will return to the Edit View page with the Taxonomy code of the selected elements on the ‘Text pattern’ field:

The composed pattern helps users fill in the information once the specific view is saved and published and the user accesses it, i.e., through a VR; when the user accesses the specific section when adding a sub-Entity, the system displays the available topics for the particular view:
After selecting it, the system will display the topic, and the chosen elements in the pattern composer will be available, so when filling them in, the topic's name will be added to the element information. i.e.:
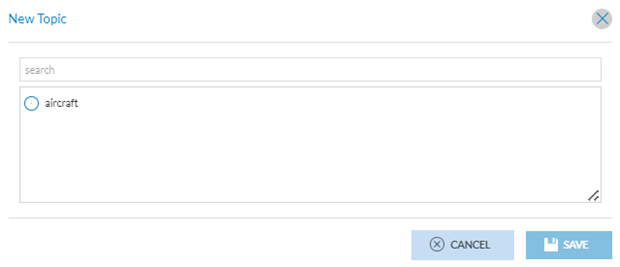
Users have to fill in the fields, and the Aircraft topic will add the Attributes to the topic:
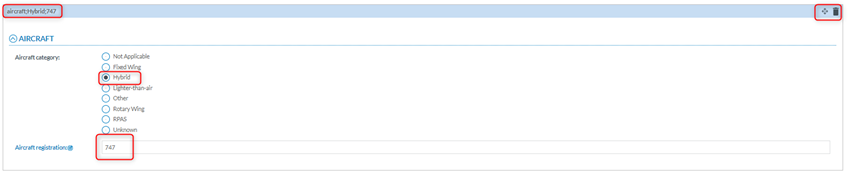
There is a delete icon to delete the information on the top right corner of the right corner.
Taxonomy
The Taxonomy area is below the Text Pattern, as shown below:

· ‘Based on’: mandatory field to set the Entity in which the topic is based. For the ‘Occurrence’ topic, it is not editable. Administrators can select other entities at this drop-down menu when topics have been added in the left panel to ‘Occurrence’:
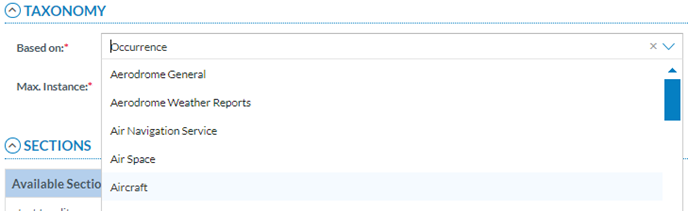
But the system will display a warning message:

· Max instance: it sets the number of instances of the same Entity that can be included in the occurrence when using this view. Depending on the Entity selected, the system will set this field as:
ü ‘Unlimited’ or ‘Maximum’: the number of instances the Entity can have based on what is defined in the Taxonomy.
ü ‘At Most’: where Administrators have to fill in the maximum instances that can be included in the Entity when using this view.
· Display mode: By default, it is ‘Tabs’, and Administrators can update it to ‘Lists’.
Add sections
The area below the Taxonomy is ‘Sections’. The available sections depend on the Entity on which the topic is based:

Administrators can add or remove Sections to a View by dragging and dropping Sections between these 2 columns. The Administrator can also organise the order:

Administrators can also set the selected sections to the ‘Read Only’ version through the ‘Read Only’ toggle displayed next to each selected section.
Once all the mandatory fields are filled out, Administrators can click the ‘Save’ button below the selected sections.
The system will save the new topic in the database.
Administrators can preview the View through the ‘Preview’ button at the top of the Edit View page.
The added sections will be available in the left panel by unfolding ‘All Sections’:
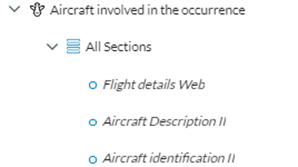
5.3.1.4. Preview a view
Administrators must click on the ‘Preview’ option of the 3-dot menu of the specific view at the table of views. The system will display the Preview page of the selected view:
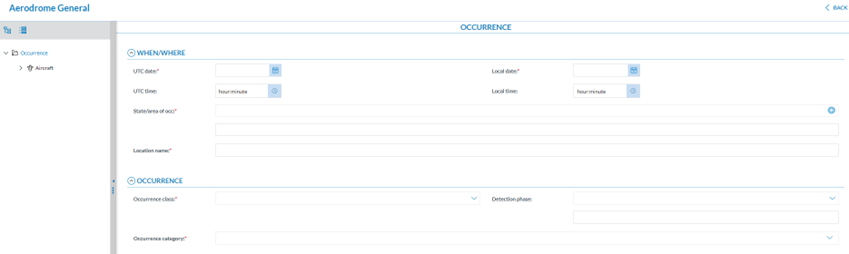
5.3.1.5. Duplicate a view
Copying or duplicating a View generates an exact copy in the same Library and folder. The only difference is the new one has a ‘-copy’ reference in the name.
Administrators must click on the ‘Copy’ option of the 3-dot menu of the specific view at the table of views.
The system will generate the exact copy in the table of views with the same name + ‘-Copy’ added to it.
5.3.1.6. Publish a view
Administrators must click on the ‘Publish’ option of the 3-dot menu of the specific view at the table of views. The system will publish the view in the views menus of the E2 Web Application, such as the VR menu.
The Publish option of the 3-dot menu will turn into Unpublish for published view. This option will unpublish the specific view.
5.3.1.7. Transfer a view to Lobby
Administrators can transfer views to the Lobby Library if they are published and do not contain Custom Attributes. To do so, Administrators must click on the ‘To Lobby’ option in the 3-dot menu of the specific view in the table of views. The system will display the ‘To Lobby’ window, where to select the Authorities of the environments with which transfer the view:
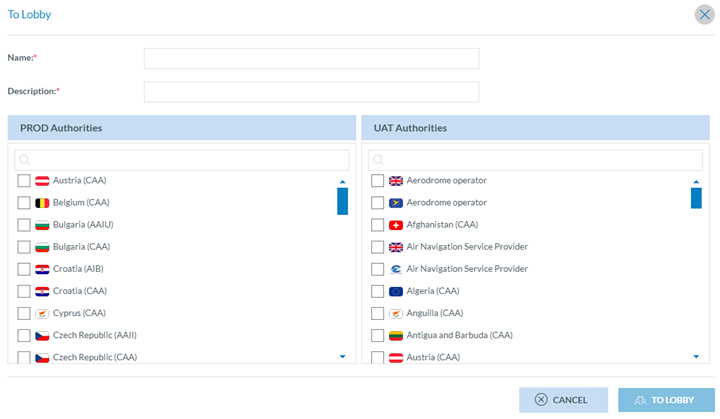
Administrators must fill in the Name and Description fields and select the Authorities of the specific environments. Then, they have to click on ‘To Lobby’.
The system will save the update in the database and transfer the view to the Lobby library of the selected Authorities.
5.3.1.8. Archive a view
Only released views not being used by any role can be archived by the Administrator. Administrators must click on the ‘Archive’ option of the 3-dot menu of the specific view at the table of views. The system will archive the view accordingly.
When a view is archived, it is a good practice to unlink all the sections involved before archiving so the sections can be edited to be used in other views.
The Archive 3-dot option will turn into a ‘Restore’ 3-dot option that will reset the view.
5.3.1.9. Edit view properties
Administrators can edit the view properties through the ‘Edit View properties’ option of the specific View. This option opens the View Properties page:
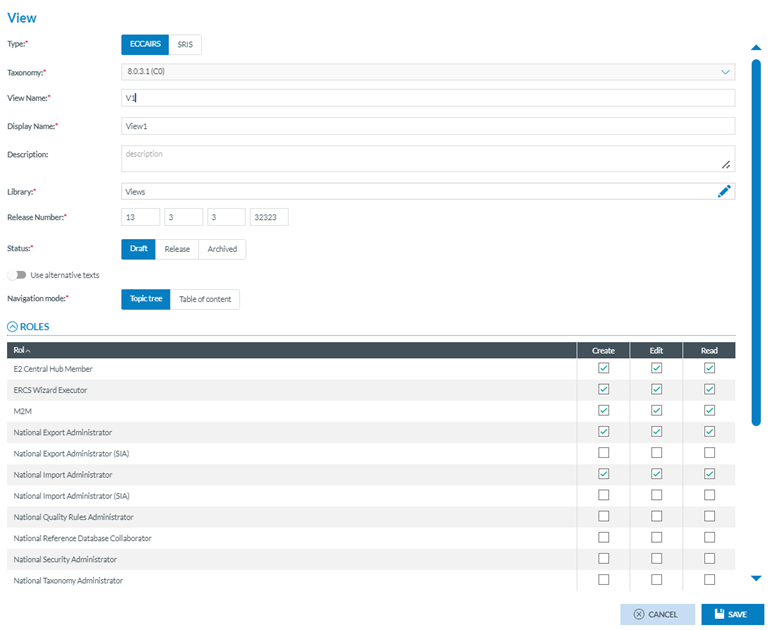
This page is like the View creation page with the addition of the Navigation mode, where the system sets ‘Topic tree’ by default. Administrators can select ‘Table of content’ instead.
When the Table of Contents is selected, a configuration icon is displayed next to this tab. Administrators have to click on it, and the system will display the Table of Content Configuration window:
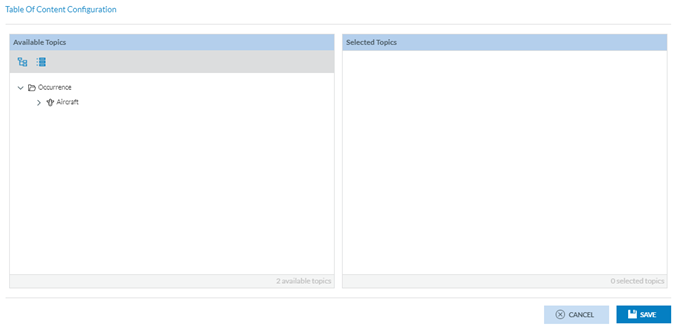
Administrators have to click the specific topics of the left column, which will appear in the right column:
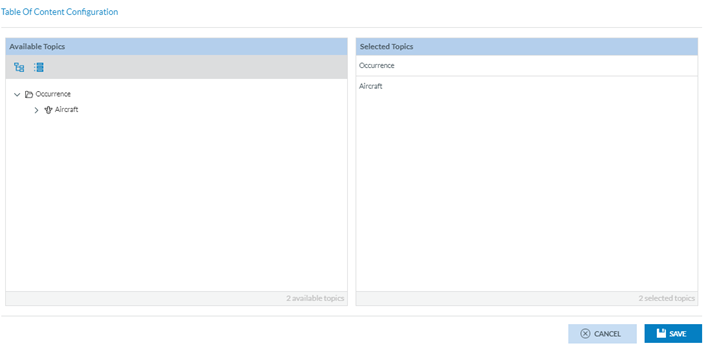
Next to each selected topic, the system will display a Delete and an Edit icon:
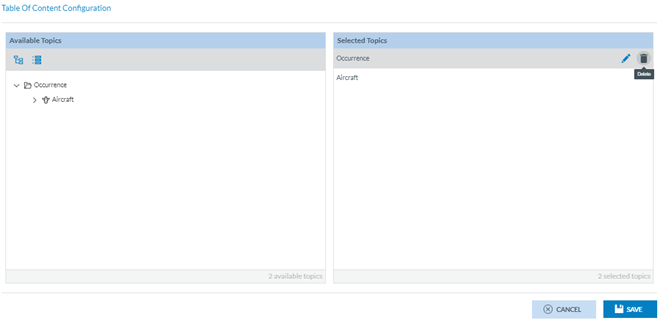
The Delete button is used to delete the selected topic, and the Edit button allows the Administrator to choose a different name for the topic.
Once finished, Administrators will click on Save, and the system will return to the Edit Properties page.
Administrators have to update the needed fields and click on ‘Save’.
The system will save the updates in the database, and the table of views will be updated accordingly.
5.3.1.10. Delete a view
Only views that are not being used by any role can be deleted. Administrators must click on the ‘Delete’ 3-dot option for the specific view in the table of views. The system will display a confirmation message. If Administrators confirm the action, the system will delete the view of the database and remove it from the table of views. If any role were using the view, the system would display a message explaining that deletion is impossible for that reason.
5.4. Webforms
Webforms are E2 platform digital forms available through which reporters of the E2 Web Application can introduce ORs. They are composed of Views.
Administrators can create, edit, view, publish and unpublish their views, and regarding ECCAIRS webforms, they can view, enable and disable them. Webforms cannot be deleted.
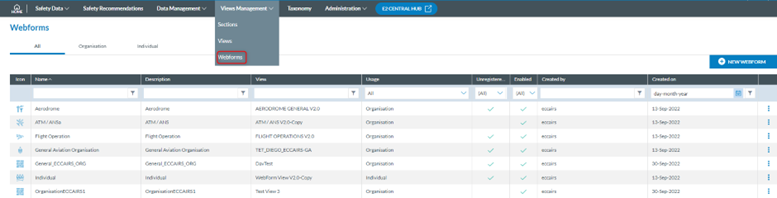
It displays the ‘All’ tab with all Webforms, including the Organisation and the Individual webforms. Next to it are the Organisation tab, with the list of Organisation webforms and the Individual tab, with the table of Individual webforms.
All the tables have the following columns, all working as filters except for the icon:
· Icon: unique for each webform.
· Name: unique for each webform
· Description: to describe the webform
· View: that is associated with the webform
· Usage: can be organisation or individual
· Unregistered reporting: available for unregistered reporters
· Enabled: green tick for enabled
· Created by: the author of the webform, that can be ECCAIRS or the Authority Administrators
· Created on: creation date
The last column has a 3-dot menu to manage each webform.
Administrators can alter the order in which the webforms appear in the Reporting Portal by dragging and dropping the rows in the Organisation and Individual tabs.
5.4.1. Webform Management
5.4.1.1. Create a new webform
Administrators have to click on the ‘New Webform’ button above the table, and the system will display the Webform creation page:
Administrators have to fill in the mandatory fields:
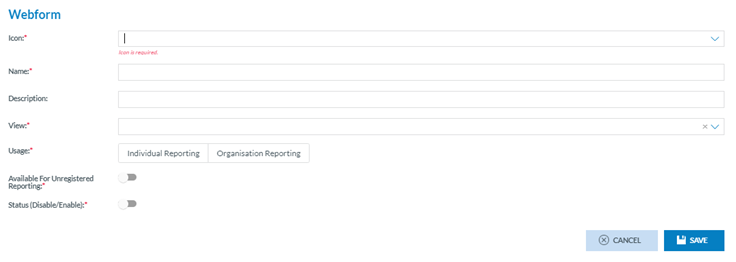
· Icon: the drop-down menu provides all the available icons
· Name: has to be different to the existing ones
· View: the drop-down menu provides all the available views. Only views not used in other webforms can be selected and saved.
· Usage: Administrators have to select Individual or Organisation Reporting if the webform is going to be addressed to individual reporters or Organisation reporters
· Available for Unregistered Reporting toggle: deactivated by default. If activated, the webform will be available for non-registered reporters of the E2 Reporting Portal.
· Status toggle: by default, it is disabled. If activated, it is enabled so when the webform is saved. The webform will be available in the E2 Reporting Portal to report ORs
The Description field is optional.
Once Administrators have filled out all mandatory fields, they have to click the ‘Save’ button. The system will save the new webform and add the webform to the ‘All’ table and the table of the selected usage, individual or organisation.
5.4.1.2. Edit a webform
Only disabled non-ECCAIRS’ webforms can be edited.
Administrators have to click on the ‘Edit webform’ option of the 3-dot menu of the specific webform of the table, and the system will display the ‘Edit webform’ page:
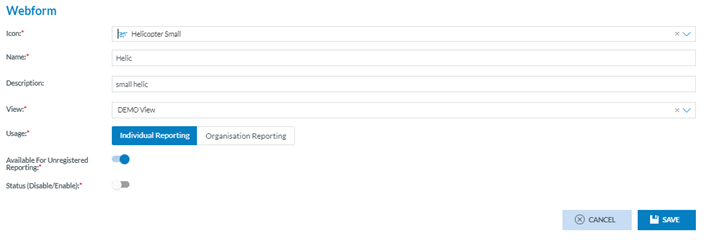
The function is the same as in the previous version. Once Administrators click the Save button, the system will save the update in the database and add the update to the webform tables.
5.4.1.3. View a webform
Administrators have to click on the View webform option of the 3-dot menu of the specific webform of the table, and the system will display the ‘View webform’ page:
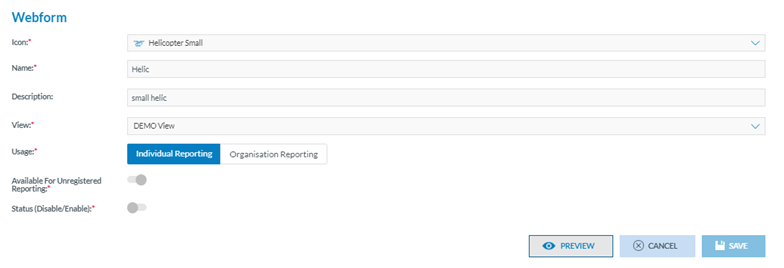
It is similar to the previously described ‘Edit webform’ option. However, the fields are not editable, and it includes a ‘Preview’ button which accesses the webform as displayed in the E2 Reporting Portal when the users are filling it:
